
Popular categories
Looking for a yarn?


Comments / Questions (31)
![]() Kasia wrote:
Kasia wrote:
Dotarlam do miejsca zamykania oczek na dekolt, oczka zamknęłam, zaczęłam przerabiać ramiona i pomiędzy tymi zamkniętymi oczkami i ramionami czyli na początku i na końcu zamkniętych oczek mam dziury. Przerabiałam to kilka razy, rozcisgniete oczka skecalam, przerabiałam z nitka z niższego rzędu i ciągle mam tam dziury- jak je wyeliminować? Dziekuje,pozdrawiam
07.05.2022 - 10:35DROPS Design answered:
Witaj Kasiu, zdarza się takie coś czasem. Musisz jak najbardziej zaciskać nitkę w skrajnych oczkach przy zamykaniu. Możesz spruć i spróbować jeszcze raz, albo po prostu po zakończeniu pracy, zszyć dziurki za pomocą kilku małych szwów po lewej stronie robótki. Pozdrawiamy!
09.05.2022 - 10:08
![]() Sameer wrote:
Sameer wrote:
Please expkain how to decrease sleeves for xxl size.
23.07.2021 - 05:18DROPS Design answered:
Hi Sameer, When the sleeve measures 5 cm (and from the right side) you decrease 1 stitch on each side by knitting 2 stitches together. Repeat this decrease every 4th row (every 2nd row from the right side) 2 more times. Happy knitting!
23.07.2021 - 08:32
![]() Sameer Sharma wrote:
Sameer Sharma wrote:
Hello, I am not understanding how to decrease in the sleeves. I am knitting xl size. Thanks.
13.05.2021 - 11:30DROPS Design answered:
Dear Sameer, It helps, if you mark the numbers relevant to the size you are knitting. So with the sleeve for size XL, when piece measures 4 cm from marker, dec 1 st in each side by working the first 2 and the last 2 sts tog. Repeat dec every other row (i.e. every row from RS) 7 times in total and every row (both from RS and WS) 11 times in total = 46 sts remain on needle. Cast off. Happy Knitting
13.05.2021 - 11:41
![]() Loulou wrote:
Loulou wrote:
Merci beaucoup, je continue donc ce beau projet
03.08.2020 - 16:49
![]() Loulou wrote:
Loulou wrote:
Merci i pour cette information. Maintenant, je me demande quoi faire pour combler les écarts entre le nombre de rangs de motifs différents. Total=12 rangs pour les sections A, 2, 6 rangs pour la section 3, et ?10 rangs pour la section 4 et ainsi de suite
02.08.2020 - 02:16DROPS Design answered:
Bonjour Loulou, il n'y a pas d'écart entre les motifs, les motifs se répètent individuellement en hauteur, autrement dit, quand vous avez terminé un des diagrammes en hauteur mais que vous devez continuer, reprenez-le au 1er rang (ou comme l'encadré) au rang suivant. Si les autres diagrammes du même rang ne sont pas terminés, tricotez simplement le rang suivant comme avant. Bon tricot!
03.08.2020 - 08:07
![]() Loulou wrote:
Loulou wrote:
Au tout début des explications, vous indiquez comment débuter le rang 1 avec les notes concernant les mailles du 1er et du 7e rang. Doit-on faire les 14 rangs de A.1 avant de continuer avec les directions de A.1, répéter avec A2A sur les xxx mailles suivantes? J'espère que ma demande est claire.
28.07.2020 - 20:59DROPS Design answered:
Bonjour Loulou, au tout début, on tricote effectivement les 14 rangs de A.1 (avec 2 m point mousse de chaque côté) puis on tricote les diagrammes A.2A (côté), A.3 (transition entre les 2 motifs), A.4 (panneau central), A.3 (transition entre les 2 motifs), A.2B (côté). Bon tricot!
29.07.2020 - 11:35
![]() Monique Kankkunen wrote:
Monique Kankkunen wrote:
Après avoir lu les explications je ne trouve pas d’indication sur le nombre de rangs à ajouter aux différents diagrammes pour obtenir un top plus long pour les plus grandes tailles. Merci d’avance. Le modèle est fort joli!
27.04.2019 - 18:15DROPS Design answered:
Bonjour Mme Kankkunen et merci. Pour que le top soit plus long dans les grandes tailles, on va former les emmanchures plus tard (= à 39-40-41-42-43-44 cm) et l'encolure également plus tard (= 50-54 cm). Le top mesure ainsi 56-58-60-62-64-66 cm de hauteur totale. Bon tricot!
29.04.2019 - 09:20Margaret wrote:
Can I work it in the round?
06.06.2018 - 18:58DROPS Design answered:
Dear Margaret, you can work the bottom of body in the round if you like to, but remember when a design has been written to be worked back and forth, there may be some reasons and it can be easier to follow the explanations as they are. Happy knitting!
07.06.2018 - 08:34
![]() I Butler wrote:
I Butler wrote:
It is a lovely pattern and not boring to knit., I will knit it (in cotton) for my daughter and use part of the designs for a baby summer top. Thanks
21.05.2018 - 21:18
![]() Doris wrote:
Doris wrote:
Ich habe den Pullover gestrickt. Ist superschön geworden. Toller Schnitt. Bin begeistert. Danke für ihre schönen Anleitungen!
22.07.2017 - 09:11
|
|||||||||||||||||||
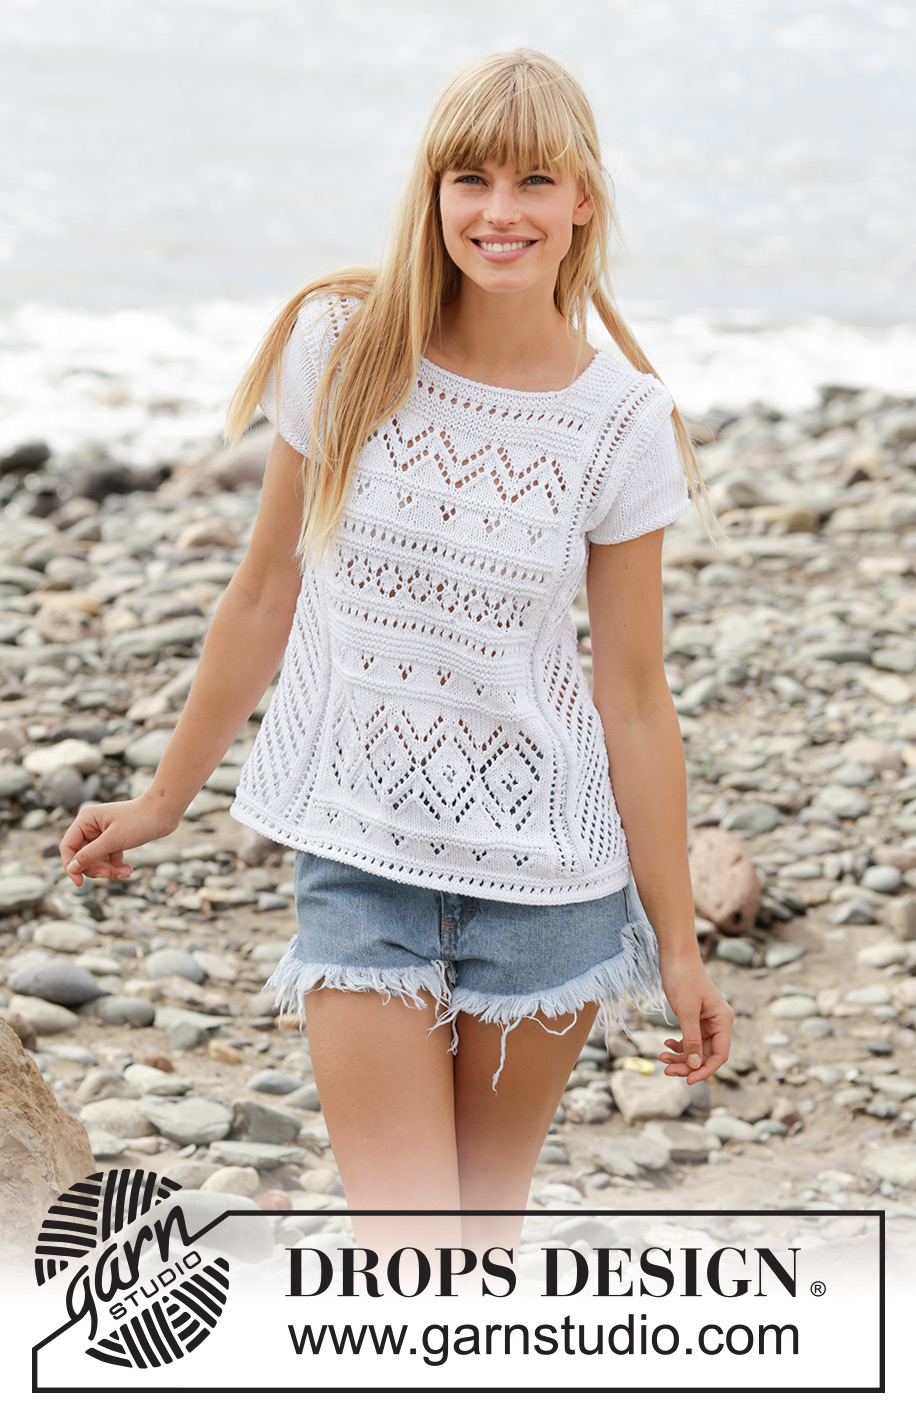
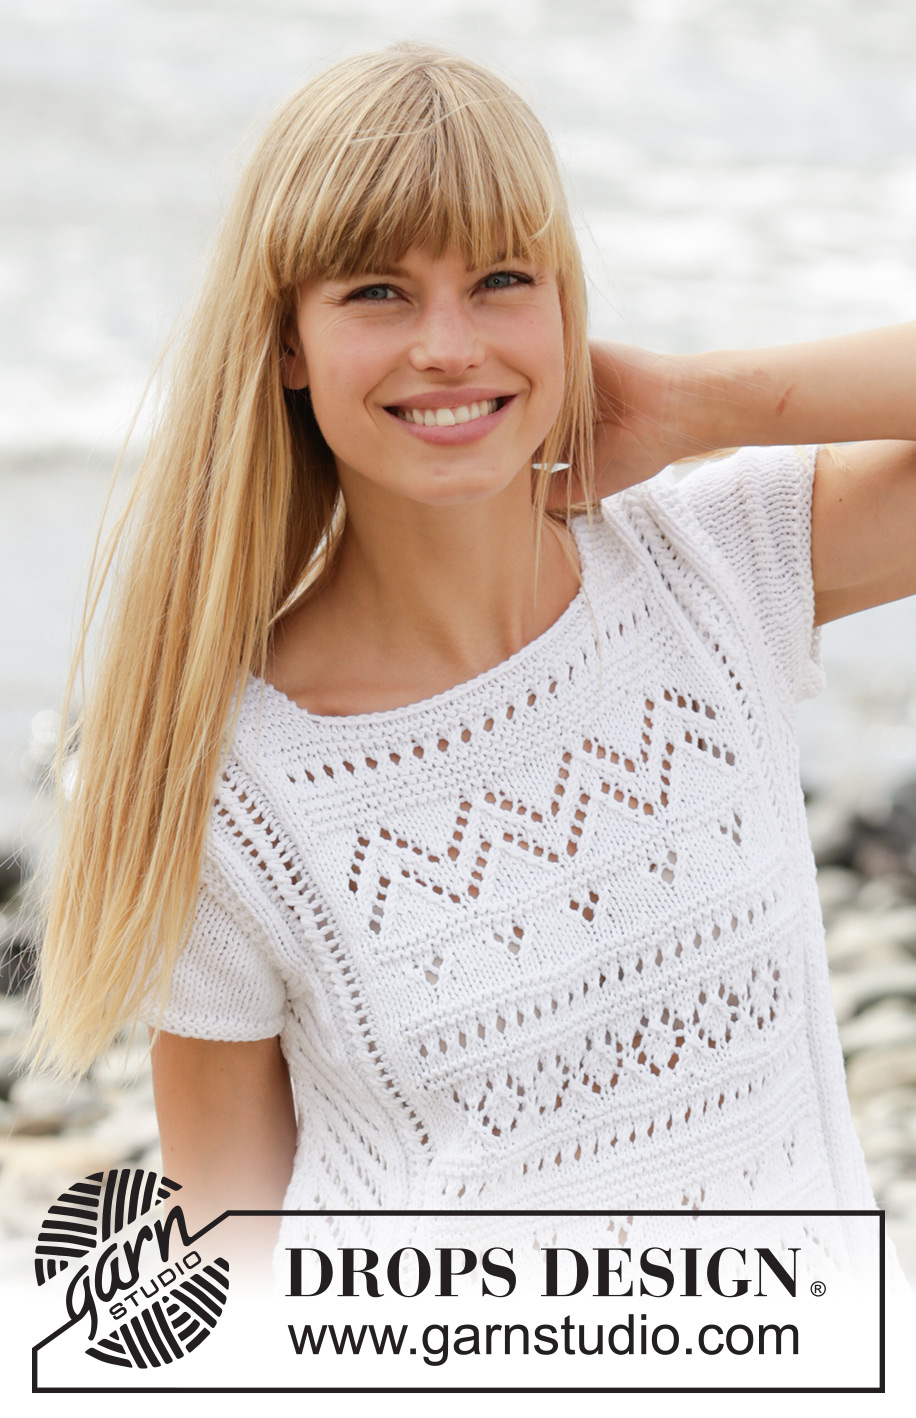
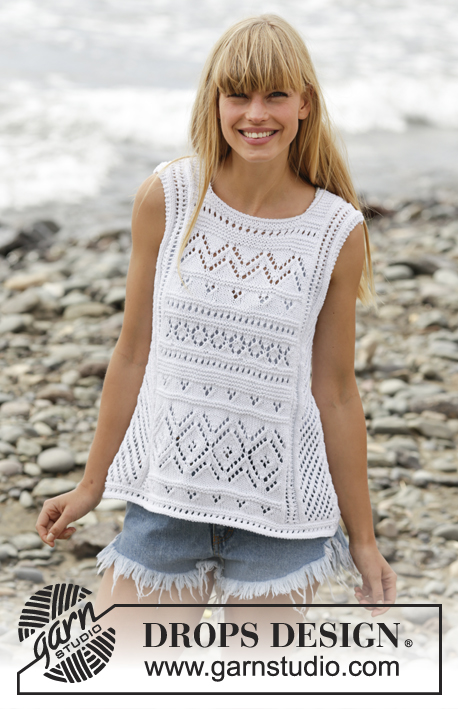
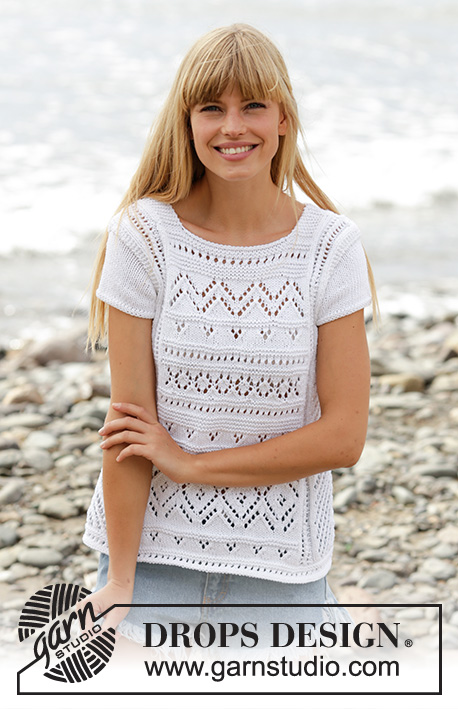
Erica Top#ericatop |
|||||||||||||||||||
 |
 |
||||||||||||||||||
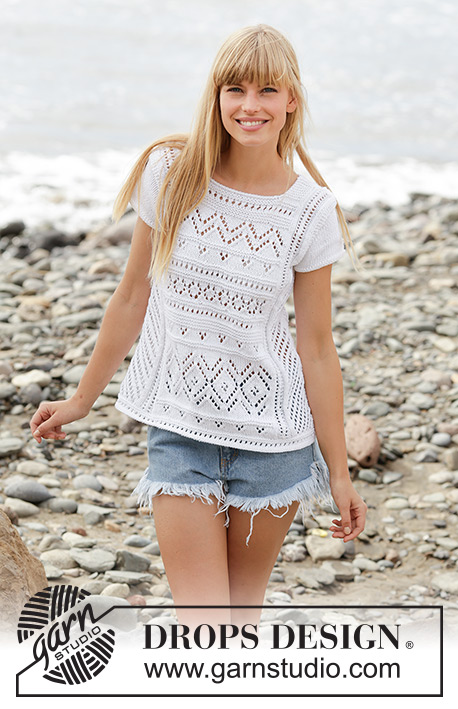
Knitted DROPS top with lace pattern, short sleeves and A-shape in ”Cotton Light”. Size: S - XXXL.
DROPS 169-19 |
|||||||||||||||||||
|
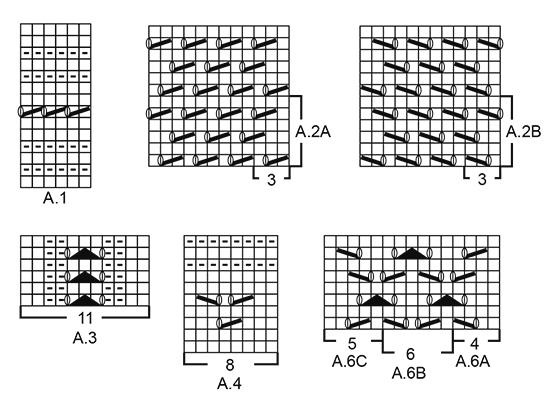
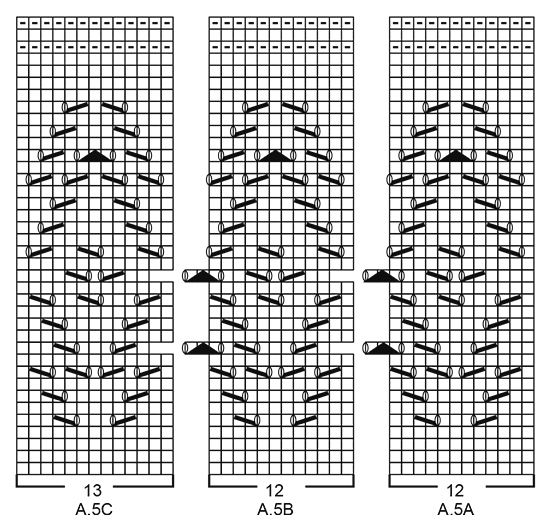
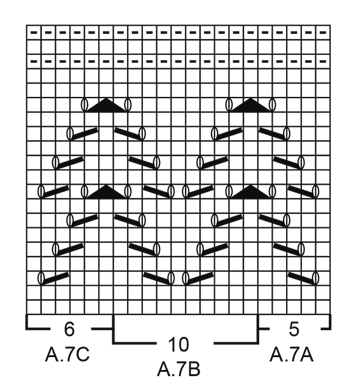
GARTER ST (back and forth): K all rows. 1 ridge = 2 rows K. PATTERN: See diagrams A.1 to A.7. The diagrams show all rows in pattern seen from RS. DECREASE TIP-1 (applies to sides of body): Dec inside 2 edge sts in garter st. All dec are done from RS! Dec as follows after 2 edge sts: K 2 tog. Dec as follows before 2 edge st: Beg 2 sts before edge st, slip 1 st as if to K, K 1, psso. DECREASE TIP-2 (applies to armholes): Dec inside 3 edge sts in garter st. All dec are done from RS! Dec as follows after 3 edge sts: Slip 1 st as if to K, K 1, psso. Dec as follows before 3 edge st: Beg 2 sts before edge sts and K 2 tog. ---------------------------------------------------------- TOP: Worked back and forth on needle in 2 parts. BACK PIECE: Cast on 111-117-129-141-147-159 sts on needle size 4 mm with Cotton Light. Work first row as follows from RS: 2 edge sts in GARTER ST - see explanation above, work pattern according to diagram A.1 until 3 sts remain on row, work 1st st in A.1 and finish with 2 edge sts in garter st - NOTE: On 7th row in A.1 K last st before edge sts. When A.1 has been worked, work next row as follows from RS: 2 edge sts in garter st, work pattern according to diagram A.2A over the next 18-21-27-33-36-42 sts (= 6-7-9-11-12-14 repetitions of 3 sts), work A.3 (=11 sts), insert 1 marker (= marker A), work pattern according to diagram A.4 over the next 48 sts (= 6 repetitions of 8 sts), work 1st st in A.4, insert 1 marker (= marker B – there are now 49 sts between markers), work A.3 (= 11 sts), work pattern according to diagram A.2B over the next 18-21-27-33-36-42 sts and finish with 2 edge sts in garter st. Continue pattern like this. NOTE: Continue A.2 and A.3 upwards outside of marker A and B up to armhole. Between marker A and B work a lace edge, no of sts between markers will vary upwards. READ ALL OF THE FOLLOWING SECTION BEFORE CONTINUING! PATTERN (applies to sts between marker A and B): When A.4 has been worked 1 time vertically, work pattern according to diagram A.5 as follows (continue sts before marker A and after marker B as before): Work A.5A (= 12 sts), repeat A.5B over the next 24 sts (= 2 repetitions of 12 sts) and finish with A.5C (= 13 sts). When A.5 has been worked 1 time vertically, work pattern according to A.4 again the same way as last time. Then work A.1 while AT THE SAME TIME on last row from RS dec 4 sts evenly in size S + M + L + XL and inc 2 sts evenly in size XXL + XXXL (between marker A and B) = 45-45-45-45-51-51 sts between markers. On next row from RS work A.6 as follows: Work A.6A (= 4 sts), repeat A.6B over the next 36-36-36-36-42-42 sts (= 6-6-6-6-7-7 repetitions of 6 sts) and finish with A.6C (= 5 sts). After A.6 work A.1 again and AT THE SAME TIME on last row from RS dec 4-4-4-4-2-2 sts evenly = 41-41-41-41-49-49 sts between markers. After A.1 work A.4 again AT THE SAME TIME on last row from RS inc 2 sts in size XXL + XXXL = 41-41-41-41-51-51 sts between markers. Then work A.7 as follows: Work A.7A (= 5 sts), repeat A.7B over the next 30-30-30-30-40-40 sts (= 3-3-3-3-4-4 repetitions of 10 sts) and finish with A.7C (= 6 sts). On last row from RS in A.7 dec 2 sts evenly in size XXL + XXXL = 41-41-41-41-49-49 sts. After A.7 repeat A.4 and A.1 alternately up to neck dec. DECREASE IN THE SIDES: When piece measures 6 cm, dec 1 st in each side - READ DECREASE TIP-1! Repeat dec every 6-6-6-4-4-4 cm a total of 6-6-6-9-9-9 times - NOTE: Work sts that do not fit the pattern out towards the side in stocking st when dec. After dec in the sides, 12-15-21-24-27-33 sts remain in A.2 in each side. ARMHOLE: When piece measures 39-40-41-42-43-44 cm, work 2 ridges over the outermost 14-17-23-26-29-35 sts in each side (i.e. over all sts on outside of A.3 in each side - work the other sts as before). Then cast off the outermost 4-6-6-8-10-14 sts at beg of the next 2 rows for armholes. Continue pattern between marker A and B as explained above, continue A.3 on outside of marker A and B as before and work in garter st over the outermost 10-11-17-18-19-21 sts in each side. AT THE SAME TIME dec for armholes in each side every other row (i.e. every row from RS) as follows - READ DECREASE TIP-2: Dec 1 st 7-8-12-13-16-18 times in total. NECK: When piece measures approx. 50-50-54-54-54-54 cm - adjust after one whole repetition of A.1 or A.4 - cast off the middle 31-31-31-31-37-37 sts for neck and finish each shoulder separately. Continue A.3 as before with 5-5-5-5-7-7 edge sts in garter st towards the neck and 3-3-5-5-3-3 edge st in garter st towards the armhole. Continue until piece measures 56-58-60-62-64-66 cm and cast off. Repeat on the other shoulder. FRONT PIECE: Cast on and work as back piece. SLEEVE: Worked back and forth on needle. Cast on 66-70-76-82-86-94 sts on needle size 4 mm and work 2 ridges. Continue in stocking st with 2 edge sts in garter st in each side. When piece measures 3-3-3-4-4-4 cm, insert 1 marker in each side - marks where to sew in sleeve in body. Then work in stocking st over all sts. When piece measures 2-3-3-4-5-7 cm from marker, dec 1 st in each side by working the first 2 and the last 2 sts tog. Repeat dec every 4th row (i.e. every other row from RS) 5-4-0-0-0-0 times in total, every other row (i.e. every row from RS) 2-4-10-7-3-0 times in total and every row (both from RS and WS) 0-0-5-11-19-26 times in total = 52-54-46-46-42-42 sts remain on needle. Cast off. Knit another sleeve. ASSEMBLY: Sew the shoulder seams. Sew underarm seams - sew edge to edge with 1 stitch in every st to get a flat seam. Sew side seams the same way. Place sleeve under sleeve edge and fasten neatly with small stitches so that edge in garter st is visible – markers mid under sleeve should match side seams on body. |
|||||||||||||||||||
Diagram explanations |
|||||||||||||||||||
|
|||||||||||||||||||
 |
|||||||||||||||||||
 |
|||||||||||||||||||
 |
|||||||||||||||||||
 |
|||||||||||||||||||
Have you finished this pattern?Tag your pictures with #dropspattern #ericatop or submit them to the #dropsfan gallery. Do you need help with this pattern?You'll find 20 tutorial videos, a Comments/Questions area and more by visiting the pattern on garnstudio.com. © 1982-2026 DROPS Design A/S. We reserve all rights. This document, including all its sub-sections, has copyrights. Read more about what you can do with our patterns at the bottom of each pattern on our site. |
|||||||||||||||||||


With over 40 years in knitting and crochet design, DROPS Design offers one of the most extensive collections of free patterns on the internet - translated to 17 languages. As of today we count 324 catalogues and 12278 patterns translated into English (UK/cm). 12278
We work hard to bring you the best knitting and crochet have to offer, inspiration and advice as well as great quality yarns at incredible prices! Would you like to use our patterns for other than personal use? You can read what you are allowed to do in the Copyright text at the bottom of all our patterns. Happy crafting!
Post a comment to pattern DROPS 169-19
We would love to hear what you have to say about this pattern!
If you want to leave a question, please make sure you select the correct category in the form below, to speed up the answering process. Required fields are marked *.