Comments / Questions (36)
![]() CINZIA IRIDE wrote:
CINZIA IRIDE wrote:
Buongiorno, sono arrivata alla fine degli aumenti dello sprone. Cosa significa saltare? Avete eventualmente uno schema da poter seguire? Le spiegazioni sono piuttosto complicate. Grazie mille Buona giornata Cinzia
15.02.2016 - 14:58DROPS Design answered:
Buongiorno Cinzia Quando trova l’indicazione di saltare A.1 + 22-24-26-28-30-32 m.a.d + A.1 (= manica), significa che non deve lavorare nelle m del diag. A.1 + le m.a.d indicate + le m del diag. A.1. Punta quindi l’uncinetto dopo tutte queste m. Le maglie saltate, verranno lavorate successivamente e sono le m della manica. Buon lavoro!
16.02.2016 - 13:09
![]() Béatrice wrote:
Béatrice wrote:
Bonjour ! quelqu'un a t'il résolu ce fameux mystère des 6 augmentations sur 2 brides ? j'ai l'impression que le pull Priscilla suscite également les mêmes questions ...n'y a t'il pas une erreur dans les explications ? je commence à désespérer, à l'aide !
18.12.2015 - 19:30DROPS Design answered:
Bonjour Béatrice, la question a été transmise à nos stylistes. Merci d'avance pour votre patience.
21.12.2015 - 10:04
![]() Nectoux wrote:
Nectoux wrote:
Bonjour comment faire les augmentations du raglan sur les manches? la manche gauche est constituee du motif A1, 2 BB et 1 motif A1 (idem pour manche droite) Pour le 1er rang d'augmentation, il faut faire 3 augmentations de chaque cote du motif. comment faire 6 augmentations sur 2 BD Merci pour votre reponse
22.11.2015 - 17:53
![]() Arild Tømmerholt wrote:
Arild Tømmerholt wrote:
I oppskrift står det at man skal øke 3 dbl-st på begge sider av A.1. en gang, men da blir det feil med maskeantall så er det 2 dbl-st. på denne omg . hvor mange skal det økes der?
20.11.2015 - 09:38DROPS Design answered:
Hej Arild, Se gerne både rettelse og video. God fornøjelse!
01.02.2017 - 08:26
![]() Mira wrote:
Mira wrote:
Hei, jeg følger oppskriften for XL. Et spørsmål til raglan økningene. I oppskriften står det at det økes til raglan på hver side av A1, men det er 6 stk A1 felt pr. omgang? Jeg går utifra at det bare er ment for de 2 feltene som er på hver side av ermen? Jeg får også probl med å øke 3 dbl-st på hver side av A1 feltene da jeg bare har 2 dbl-st mellom disse? Oppskr. sier at det da økes 6 dbl-st på disse 2? blir ikke det litt mye? Fint hvis jeg kan få en forklaring på hvordan dette skal gjøres. :-)
19.11.2015 - 13:30DROPS Design answered:
Hej Mira, se gerne både rettelse og video. God fornøjelse!
01.02.2017 - 08:25
![]() Beatrice wrote:
Beatrice wrote:
Bonjour, très joli modèle, mais je cale complètement au niveau des augmentations pour le raglan. Serait-il possible de clarifier ? Merci
17.11.2015 - 23:01DROPS Design answered:
Bonjour Béatrice et merci. Les augmentations du raglan (cf augmentations-1) se font avant et après chaque motif A.1 (cf Point fantaisie). On va crocheter de chaque côté de chaque A.1: 1x 3DB, 3-5 fois (cf taille) 2 DB, et 0-2 fois 1 DB. Les augmentations se font sur les rangs de DB du point fantaisie. Bon crochet!
18.11.2015 - 09:36
Priscilla Cardigan |
|||||||||||||
|
|
|||||||||||||
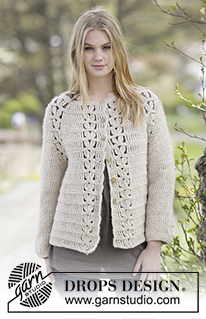
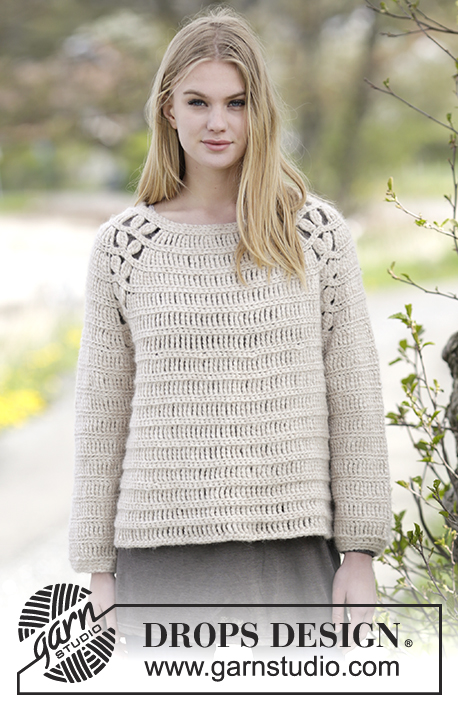
Crochet DROPS jacket with raglan and lace pattern in ”Air”. The piece is worked top down. Size: S - XXXL.
DROPS Extra 0-1182 |
|||||||||||||
|
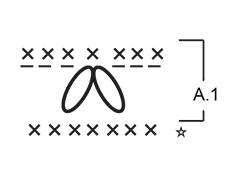
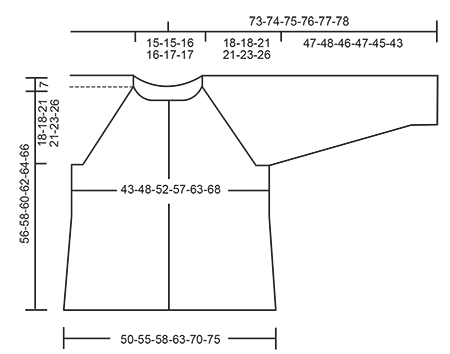
CROCHET INFO: Replace first dc at beg of every dc row with 1 ch. Replace first dtr at beg of every dtr row with 4 ch. Replace first triple tr at beg of every triple tr row with 5 ch. CROCHET TIP: If the crochet tension vertically is not high enough switch all dtr with triple tr. INCREASE TIP-2: Inc 1 dtr by working 2 dtr in same st. In size XXL and XXXL it is necessary to inc 2 dtr in same st some places. Work by making 3 dtr in same st. PATTERN-1: ROW 1 (= WS): Work 1 dc in front loop of every dtr. ROW 2 (= RS): Work 1 dtr in back loop of every dc. Repeat rows 1 to 2 until finished measurements. PATTERN-2: ROUND 1: Work 1 dtr in back loop of every dc. ROUND 2: Work 1 dc in back loop of every dtr. Repeat rounds 1 to 2 until finished measurements. INCREASE TIP-1: Inc 3 dtr before A.1 on BODY as follows: Work as before until 3 dc remain before A.1, work 2 dtr in each of the next 3 dc. Inc 3 dtr after A.1 on BODY as follows: Work 2 dtr in each of the next 3 dc after A.1. Inc 3 dtr before A.1 on SLEEVE as follows: Work 4 dtr in 1 dc before A.1. Inc 3 dtr after A.1 on SLEEVE as follows: Work 4 dtr in 1st dc after A.1 Inc 2 dtr before A.1 as follows: Work as before until 2 dc remain before A.1, work 2 dtr in each of the next 2 dc. Inc 2 dtr after A.1 as follows: Work 2 dtr in each of the next 2 dc after A.1. Inc 1 dtr before A.1 as follows: Work as before until 1 dc remain before A.1, work 2 dtr in dc. Inc 1 dtr after A.1 as follows: Work 2 dtr in first dc after A.1. DECREASE TIP: Work 1 dtr/dc but wait with last pull through (= 2 sts on hook), then work next dtr/dc but on last pull through, pull yarn through all sts on hook = 1 dc/dtr dec. PATTERN: See diagram A.1. Work A.1 as follows: ROW 1: Work 3 ch, skip 1 dc, * work 1 dtr in back loop of next dc but wait with last pull through (= 2 sts on hook), work 2 dtr in same st the same way *, skip 3 dc, repeat from *-* 1 time, pull yarn through all 7 sts on hook, 3 ch, skip 1 dc. ROW 2: Work 1 dc in each of the first 3 ch, 1 dc in next st, 1 dc in each of the next 3 ch. ---------------------------------------------------------- JACKET: Worked top down, back and forth from mid front. YOKE: Work 86-86-90-90-94-94 ch (incl 5 band sts in each side of piece) on hook size 6 mm with Air. Work next row as follows: Work 1 dc in 2nd ch from hook - READ CROCHET INFO, 1 dc in every ch = 86-86-90-90-94-94 dc. Then work as follows from RS: Work all dtr in back loop of dc, and READ CROCHET TIP. Work 1 dtr in each of the first 5 dc (= band), A.1 - see explanation above - over the next 7 dc, 1 dtr in each of the next 4-4-5-5-6-6 dc AT THE SAME TIME inc 1-3-3-5-7-9 dtr evenly - READ INCREASE TIP-2 – (= left front piece), A.1 over the next 7 dc, 1 dtr in each of the next 2 dc, A.1 over the next 7 dc (= left sleeve), 1 dtr in each of the next 22-22-24-24-26-26 dc AT THE SAME TIME inc 2-6-6-10-14-18 dtr evenly (= back piece), A.1 over the next 7 dc, 1 dtr in each of the next 2 dc, A.1 over the next 7 dc, (= right sleeve), 1 dtr in each of the next 4-4-5-5-6-6 dc AT THE SAME TIME inc 1-3-3-5-7-9 dtr evenly, A.1 over the next 7 dc, finish with 1 dtr in each of the last 5 dc (= right front piece). Work PATTERN-1 over dtr and A.1 over A.1 as before. On first row in pattern-1 there are 90-98-102-110-122-130 dc (incl A.1). Repeat pattern-1 and A.1 vertically until finished measurements. REMEMBER THE CROCHET TENSION! On next row (= dtr row) inc for raglan on every row from RS (i.e. every row with dtr) on each side of A.1 – READ INCREASE TIP-1 – as follows: Inc 3 dtr on each side of A.1 1 time in total, then inc 2 dtr on each side of A.1 3-4-4-5-5-5 times in total, then 1 dtr on each side of A.1 1-0-1-0-1-2 times in total (= 170-186-198-214-234-250 sts in total). On next row (= from WS with dc) work as follows: Work all dc in front loop of every dtr. Work 1 dc in each of the first 5 dtr (= band), A.1 as before, 1 dc in each of the next 15-18-20-23-27-30 dtr, work 8 ch, insert 1 marker in 4th ch, skip: A.1 + 22-24-26-28-30-32 dtr + A.1 (= sleeve), work 1 dc in each of the next 44-50-54-60-68-74 dtr, work 8 ch, insert 1 marker in 4th ch, skip: A.1 + 22-24-26-28-30-32 dtr + A.1 (= sleeve), 1 dc in each of the next 15-18-20-23-27-30 dtr, A.1 as before, finish with 1 dc in each of the last 5 dtr (= band) = 98-110-118-130-146-158 dc (incl A.1) and 16 ch. Move the markers upwards when working. Insert 1 marker in piece, NOW MEASURE PIECE FROM HERE. BODY: Work next row (= from RS) as follows: Pattern-1 over the first 5 dc (= band), A.1 as before, pattern-1 over the next 90-102-110-122-138-150 sts (i.e. work 1 dtr in every ch under sleeve), A.1 as before, finish with pattern-1 over the last 5 dc (= band). On next row there are 114-126-134-146-162-174 dc on row (incl A.1). Work pattern-1 and A.1 over body as before. When piece measures 6 cm, adjust so that next row is with dtr, inc 1 dtr on each side of each marker in the side (= 4 sts inc), repeat inc every 8 cm 3 more times. On next row with dc there are 130-142-150-162-178-190 dc on row (incl A.1). When piece measures 38-40-39-41-41-40 cm from marker, adjust so that last row is with dc, fasten off. SLEEVE: = A.1 + 22-24-26-28-30-32 dtr + A.1. Insert 1 marker in piece, NOW MEASURE PIECE FROM HERE. Sleeve is worked in the round, top down. Beg by working mid under sleeve as follows: Work 1 dc in the 5th ch of the 8 ch worked in armhole on body, work 1 dc in each of the next 3 ch, work last round of A.1 (= dc) over A.1, 1 dc in back loop of the next 22-24-26-28-30-32 dtr, last round of A.1 over A.1, before working 1 dc in each of the remaining 4 ch under sleeve = 44-46-48-50-52-54 dc. Insert 1 marker mid under sleeve, move the marker when working. Then work piece with PATTERN-2 - see explanation above. When sleeve measures 4 cm, dec 1 dc/tr on each side of marker - READ DECREASE TIP. Repeat dec every 5-4-4-4-4-3 cm 7-8-8-9-9-10 more times = 28-28-30-30-32-32 dc/dtr. Work until piece measures 46-47-45-46-44-42 cm – adjust so that last round is with dc. Work 2 round with 1 dc in back loop of every dc (= 3 round in total with dc at the bottom of sleeve). Fasten off. Work the other sleeve the same way. NECK EDGE: Beg mid front and work as follows from RS: 1 dc in back loop of every dc while AT THE SAME TIME dec 4-4-5-5-6-6 dc evenly = 82-82-85-85-88-88 dc. Turn piece and work from WS. 1 dc in front loop of every dc while AT THE SAME TIME dec 4-4-5-5-6-6 dc evenly = 78-78-80-80-82-82 dc. Fasten off. ASSEMBLY: Sew the buttons on to left band. Sew on first button in 2nd dc row from neck (= approx. 2 cm down from neck), then sew them approx. 7 cm apart. Button through dc rows. |
|||||||||||||
Diagram explanations |
|||||||||||||
|
|||||||||||||
 |
|||||||||||||
 |
|||||||||||||
Have you finished this pattern?Tag your pictures with #dropspattern or submit them to the #dropsfan gallery. Do you need help with this pattern?You'll find 11 tutorial videos, a Comments/Questions area and more by visiting the pattern on garnstudio.com. © 1982-2026 DROPS Design A/S. We reserve all rights. This document, including all its sub-sections, has copyrights. Read more about what you can do with our patterns at the bottom of each pattern on our site. |
|||||||||||||


Post a comment to pattern DROPS Extra 0-1182
We would love to hear what you have to say about this pattern!
If you want to leave a question, please make sure you select the correct category in the form below, to speed up the answering process. Required fields are marked *.