
Popular categories
Looking for a yarn?




























Comments / Questions (164)
 Christina wrote:
Ok thank you.
05.08.2026 - 18:27
Christina wrote:
I want to read the questions and comments below the pattern to see if they help with some of my own queries but they are all in different languages. Is there a way to automatically translate them to my language. I've already selected English UK at the top of the page.
05.08.2026 - 18:26DROPS Design answered:
Hi Christina, No we do not have this function on our site. Regards, Drops Team
06.08.2026 - 06:20
Christina wrote:
I want to read the questions and comments below the pattern to see if they help with some of my own queries but they are all in different languages. Is there a way to automatically translate them to my language. I've already selected English UK at the top of the page.
02.08.2026 - 12:16DROPS Design answered:
Hi Christina, We do not have the capacity to both answer all customer questions and also translate them into English. But you can copy the comments and answers and use AI to translate them for you maybe? Regards, Drops Team.
03.08.2026 - 07:10
 Angèle wrote:
Bonjour, Je démarre ce joli modèle, mais je bloque dès le rang 2 de M1. En effet, il s'agit de démarrer avec un maille en l'air sur la 1ère maille serrée du rang précédent. C'est impossible de continuer avec une bride dans la maille suivante, je n'ai pas l'espace de 2 mailles entre 2brides. Merci de m'éclairer. Bonne soirée. Angèle
17.07.2026 - 17:25DROPS Design answered:
Bonjour Angèle, pour que les bords de M.1 soient droits, vous pouvez remplacer la 1ère et la dernière maille par 1 bride (vous aurez ainsi 2 brides au début et 2 brides à la fin du 1er rang) - mais pensez à bien sauter 2 mailles lorsque vous crochetez les 2 mailles en l'air tout le reste du rang. Bon crochet!
03.08.2026 - 16:59
 Rosa wrote:
Buon giorno dalle spiegazioni del modulo 2 e modulo 3 minuti sembra che dalle foto manchino delle righe di punto alto potete aiutarmi a capire?
15.07.2026 - 11:23DROPS Design answered:
Buonasera Rosa, al momento non sono previste correzioni per questo modello. Buon lavoro!
08.08.2026 - 20:38
 Emi wrote:
Hej! Jestem właśnie w trakcie szydełkowania tego projektu. Skończyłam właśnie schemat M2, ale nie wiem, co mam robić dalej... W schemacie M3 robótka rozdziela się na 2 części, tworząc dekolt, ale są tam pozostawione oczka po dwóch stronach... w sensie nie są przerabiane. I nie wiem jak to zrobić. Mam się np. na końcu 5 rzędu (M2) cofać oczkami ścisłymi, żeby zacząć 6 rząd jako M3? Będę wdzięczna za odpowiedź i pomoc :
27.08.2025 - 22:04DROPS Design answered:
Witaj Emi, w schemacie M4 robótka rozdziela się na 2 części. Od tej chwili każdą połowę będziesz wykonywać osobno, w tę i z powrotem. Przy drugiej połowie będziesz musiała dołączyć nitkę przerabiając 1 psł w brzeg robótki i drugą część wykonasz tak samo, tylko odwróconą (lustrzane odbicie). Pozdrawiamy!
29.08.2025 - 19:30
Emilka wrote:
Czym są "łuki" we wzorze, bo się nie orientuję co chodzi i gdzie się to znajduje :)
23.08.2025 - 22:20DROPS Design answered:
Witaj Emilko, łuki to kilka oczek łańcuszka, rozdzielone zwykle półsłupkami. Mogą posłużyć za dziurki na guziki, jako dekoracyjny brzeg, i mają wiele innych zastosowań. W tym wzorze utworzą pętelki z tyłu bluzki, przez które zostanie przeciągnięty sznurek. Łuki wykonujesz następująco: *1 półsłupek w brzeg robótki, przerobić 3 oczka łańcuszka, ominąć 1 cm* powtarzać od *do* do dołu. Pozdrawiamy!
25.08.2025 - 09:42
Marina wrote:
Mi dispiace molto ma la risposta non è per la mia domanda riguardante alle 4 maglie, questo aumento si possono distribuire in centro alle coppe o bisogna farli obbligatoriamente ad inizio e fine riga di inizio schema M2 ? Il numero totale di maglie non cambia. Il mio campione è esattamente come da vostro campione ma rimane molto grande anche se io uso uncinetto indicato ed ho una lavorazione stretta. Grazie infinite per una risposta esatta.
13.08.2025 - 10:27
Marina wrote:
Chiedo scusa , ancora una domanda : perché bisogna aumentare 4 maglie nelle taglie S e M e non nella taglia L ? Addirittura nella L bisogna diminuire! Molto strano , non capisco. Dovrebbe essere al contrario…? Comunque anche nella taglia S è veramente troppo grande. e pensare che io ho una mano molto stretta! Grazie della spiegazione
12.08.2025 - 15:50DROPS Design answered:
Buonasera Marina, non sono riportati errori nelle spiegazioni. Il suo campione corrispondeva a quello indicato prima di iniziare? Buon lavoro!
12.08.2025 - 22:14
Marina wrote:
All’inizio della prima riga di M2 per la taglia S devo aumentare 2 maglie e altre 2 alla fine della stessa riga ? Oppure posso aumentare lo stesso numero di maglia (4) facendo gli aumenti a metà di ogni coppa , in modo da formare una ampiezza più centrale? Intendo dire nel punto di maggiore circonferenza seno? Inoltre, devo aumentare 4 maglie solo una volta, giusto?
12.08.2025 - 15:15DROPS Design answered:
Buonasera Marina, M2. si inizia dal basso verso l'alto e da sinistra verso destra, come indicato nelle spiegazioni. Buon lavoro!
12.08.2025 - 22:12
|
|||||||||||||
Sidney |
|||||||||||||
 |
 |
||||||||||||
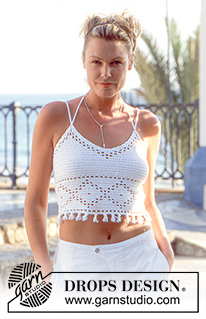
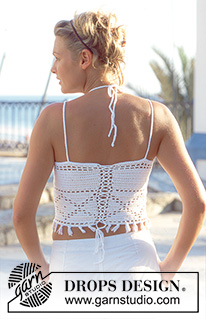
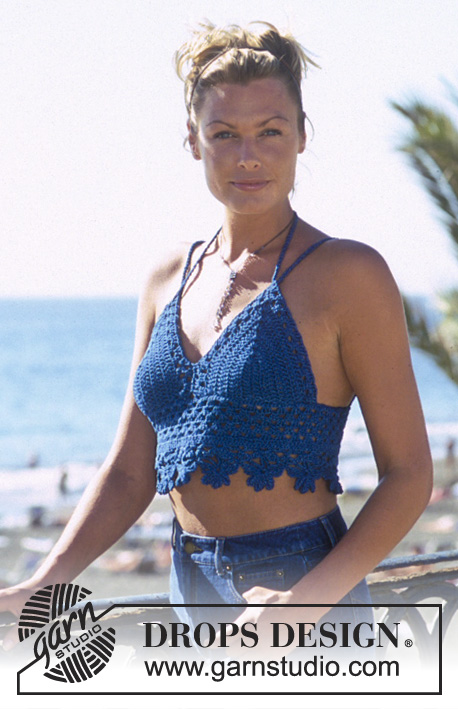
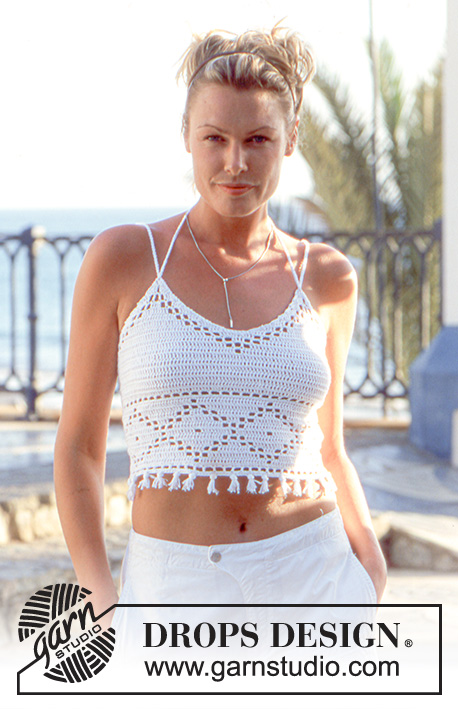
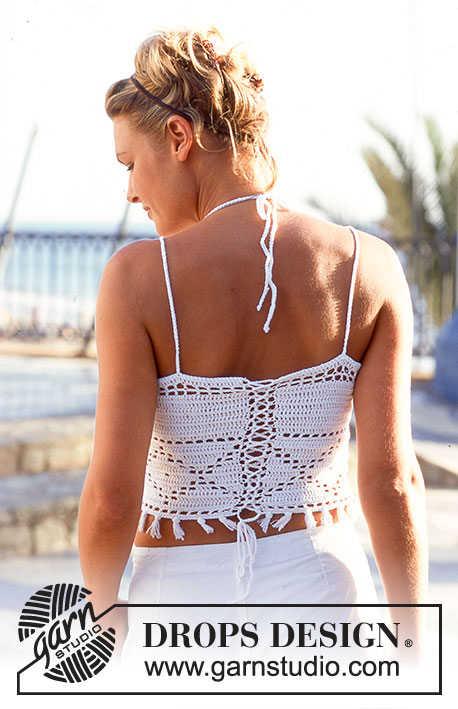
Crochet DROPS top in ”Safran”.
DROPS 69-1 |
|||||||||||||
|
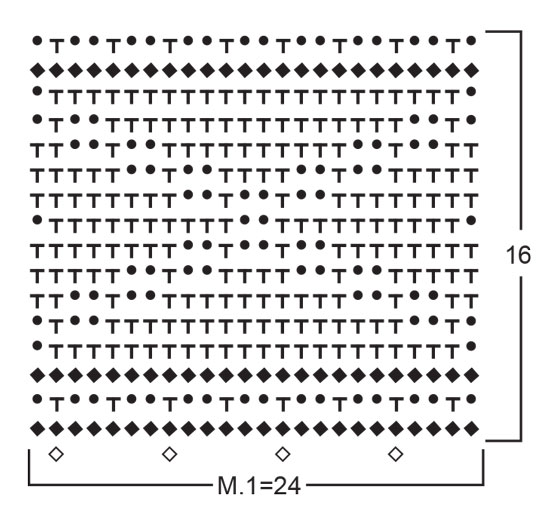
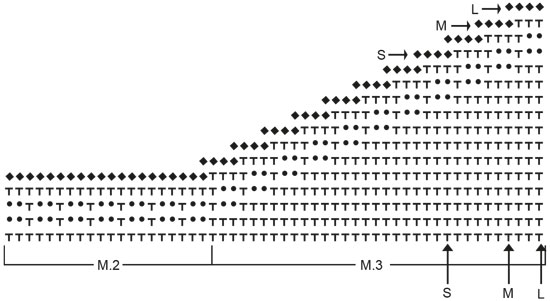
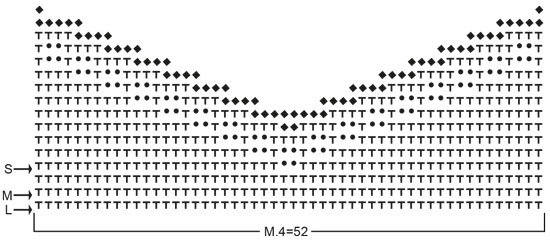
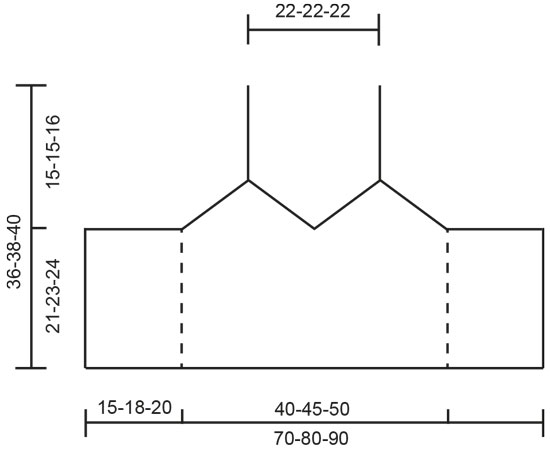
Crochet tension: 24 tr x 12 rows of pattern on hook size 3 mm = 10 x 10 cm. Remember that hook size is only a guide. Pattern: See diagram M.1, M.2, M.3 and M.4. Diagram M.1 and M.2 = 1 repetition. Work M.3 and M.4 as diagram shows in the different sizes. Crochet tip: To turn piece work as follows: 2 ch replace 1 tr and 1 ch replaces 1 dc. Top: Work a ch-row of 169-193-217 sts (incl 1 ch to turn with) on hook size 3 mm with Safran. Continue with M.1 - see crochet tip. Remember the crochet tension! After M.1 continue with tr - at the same time on: Size S and M: Inc 4 sts evenly on 1st row after M.1. Size L: Dec 2 sts evenly on 1st row after M.1 = 172-196-214 sts. When 22-24-25 row have been worked in total (incl M.1) piece measures approx. 18-20-21 cm. Continue as follows: Work M.2 - beg at the bottom in left side of diagram and work towards the right - over 36-42-48 sts, beg M.3 at the bottom in left side of diagram and work towards the right - over the next 24-30-33 sts, M.4 = 52-52-52 sts, beg M.3 at the bottom in right side of diagram at arrow for desired size and work towards the left - over 24-30-33 sts and beg M.2 at the bottom in right side of diagram and work towards the left - over the last 36-42-48 sts. Continue diagram upwards. After 5 rows M.2 is done - continue with M.3 and M.4 until diagrams are done. Assembly: Straps: Work straps as follows: Beg by working approx. 9 c in at the top on right side of piece (= back piece). Work a ch-row of approx. 90 cm with double yarn on hook size 5 mm. Thread the string at the top on the closest front piece tip. Repeat on the other side. Length of top can be adjusted by tying a knot the back of neck. Loops: Work loop along each side of piece = towards mid back. Beg at the top and work as follows: * 1 dc, 3 ch, skip 1 cm down *, repeat from *-* to the bottom. Work one ch-row of approx. 150 cm = tie. Thread tie in loop - beg at the top and thread to form a cross down the back. Fringes: 1 fringe = 4 lengths of 8 cm each. Place strands double and fasten around first ch-row at the top top of top - see placement in diagram M.1. Fasten 28-32-36 fringes. |
|||||||||||||
Diagram explanations |
|||||||||||||
|
|||||||||||||
 |
|||||||||||||
 |
|||||||||||||
 |
|||||||||||||
 |
|||||||||||||
Have you finished this pattern?Tag your pictures with #dropspattern or submit them to the #dropsfan gallery. Do you need help with this pattern?You'll find 8 tutorial videos, a Comments/Questions area and more by visiting the pattern on garnstudio.com. © 1982-2026 DROPS Design A/S. We reserve all rights. This document, including all its sub-sections, has copyrights. Read more about what you can do with our patterns at the bottom of each pattern on our site. |
|||||||||||||






With over 40 years in knitting and crochet design, DROPS Design offers one of the most extensive collections of free patterns on the internet - translated to 17 languages. As of today we count 333 catalogues and 12532 patterns translated into English (UK/cm). 12532
We work hard to bring you the best knitting and crochet have to offer, inspiration and advice as well as great quality yarns at incredible prices! Would you like to use our patterns for other than personal use? You can read what you are allowed to do in the Copyright text at the bottom of all our patterns. Happy crafting!
Post a comment to pattern DROPS 69-1
We would love to hear what you have to say about this pattern!
If you want to leave a question, please make sure you select the correct category in the form below, to speed up the answering process. Required fields are marked *.