
Popular categories
Looking for a yarn?


Comments / Questions (35)
![]() Maria wrote:
Maria wrote:
Hej! I början på mönstret står det att man ska sticka 5 maskor i rätstickning och 2 rm i varje sida mot mitt fram. Ska jag alltså sticka 7 rm mot mitt fram? Mvh Maria
25.02.2021 - 13:44DROPS Design answered:
Hej Maria, de 5 maskor i varje sida som skall rätstickas = rät från både avigsidan och rätsidan. De 2 maskor som stickas rät = rät från rätsidan och avig från avigsidan. Lycka till :)
25.02.2021 - 14:37
![]() Lina wrote:
Lina wrote:
Buona sera, ho realizzato il cardigan nella taglia XXXL, seguendo scrupolosamente le indicazioni, ma lo sprone mi è risultato 7-8 cm più lungo della misura riportata nel diagramma. Come mai è successo questo? Dovendo rifarlo nella stessa taglia, è opportuno seguire lo schema dello sprone per taglie più piccole che risulta un pò più corto rispetto a quello della taglia 3x. Grazie
30.01.2020 - 16:56DROPS Design answered:
Buonasera Lina, prima di iniziare a lavorare il modello ha controllato che il suo campione corrispondesse a quello indicato? se così non fosse le misure non combaciano. Buon lavoro!
18.02.2020 - 21:44
![]() Lina wrote:
Lina wrote:
Buonasera, nelle indicazioni per il corpo, fa riferimento ad un "ferro con i puntini". E' quello che viene lavorato con il ferro azzurro cielo chiaro? Bisogna quindi arrivare a questo punto prima di lavorare lo sprone?
26.12.2019 - 18:32DROPS Design answered:
Buongiorno Lina. Il ferro con i puntini è uno dei ferri in cui si alterna una maglia lavorata con il rosa argento a una maglia lavorata con un altro colore. Buon lavoro!
27.12.2019 - 08:26
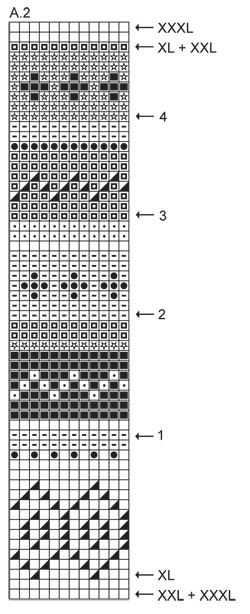
![]() Karianne Fossmo-Sørensen wrote:
Karianne Fossmo-Sørensen wrote:
Når jeg strikker A.2 skal jeg begynne vrange omganger til venstre i diagrammet? Må jeg da starte med første maske til høyre, siden jeg avslutter med den på rette omganger?
12.03.2019 - 13:19DROPS Design answered:
Hei Karianne. Ja, det stemmer: når du strikker fra vrangen leses diagrammet fra venstre mot høyre. Den første masken etter stolpen strikkes som første maske i A.2. God fornøyelse
13.03.2019 - 08:21
![]() Jacoline wrote:
Jacoline wrote:
Dan zou de mouw 6 cm. te lang worden. Ik denk dat ik hem nu maar uithaal en aan de onderkant met een andere kleur begin zodat het wel uitkomt.
12.08.2018 - 18:08
![]() Jacoline wrote:
Jacoline wrote:
Dan zou de mouw 6 cm. te lang worden. ik denk dat ik hem nu maar uithaal en aan de onderkant met een andere kleur begin zodat het wel uitkomt.
12.08.2018 - 17:35
![]() Jacoline wrote:
Jacoline wrote:
Als de mouwen bij het lijf op de rondbreinaald komen loopt de kleurenvolgorde aan de bovenpas niet gelijk. Dit doordat de mouwen langer zijn. Hoe hebben jullie dat opgelost? Op de foto lopen de kleuren wel mooi door. Ik heb als enige oplossing; de mouw uithalen en met een andere streep beginnen dan het lijf zodat het boven wel uit komt? Met vriendelijke groet, Jacoline
12.08.2018 - 15:12DROPS Design answered:
Dag Jacoline, Het staat inderdaad niet duidelijk aangegeven bij de mouw dat je uit moet komen met het patroon. Op de afbeelding is er 1 herhaling extra van patroon A.1 in de mouw te zien. Hoe kom je uit als je de mouw door breit tot het patroon overeenkomt. Ik zal het even aan de designafdeling doorgeven om dit evt. te verduidelijken.
12.08.2018 - 17:14
![]() Jacoline wrote:
Jacoline wrote:
De kleuren doorbreien in de boord/ ribbelsteek vind ik niet zo mooi worden omdat het een ribbelsteek is. Heeft u ook een mooier alternatief? Als ik de kleuren niet doorbrei krijg ik gaatjes omdat ik dan de hoofdkleur daar steeds moet aanhechten. Ik hoor graag van u. Hart. Gr, Jacoline
10.07.2018 - 08:29DROPS Design answered:
Dag Jacoline, Als je de voorbies in een kleur wilt hebben is het misschien handiger om achteraf steken op te nemen over de voorpanden en boordsteken te breien. Maar misschien ben je al een eindje op weg en haal je liever niet uit. In dat geval is het even puzzelen wat het beste voor je werkt zodat je geen gaatjes krijgt, bijv. door een klein koopje in de draden te maken of de draden om elkaar heen te leggen o.i.d.
10.07.2018 - 16:21
![]() Karianne Fossmo-Sørensem wrote:
Karianne Fossmo-Sørensem wrote:
Hvor finner jeg målene i de forskjellige størrelsene?
15.05.2016 - 16:12DROPS Design answered:
Hej. Du hittar de på måttskissen längst ner i oppskriften. Lycka till!
16.05.2016 - 14:07
![]() Jette Jonstrup wrote:
Jette Jonstrup wrote:
Kan jeg ikke strikke den rundt og klippe den op. Det synes jeg er nemmere end at strikke frem og tilbage. Hvor mange klippemasker skal jeg slå op og kan jeg ellers bare føge opskriften.
02.05.2016 - 21:53DROPS Design answered:
Hej Jette. Jo, det kan du godt. Jeg ville saette 5-6 klippemasker op. God fornöjelse.
03.05.2016 - 17:01
|
|||||||||||||||||||||||||
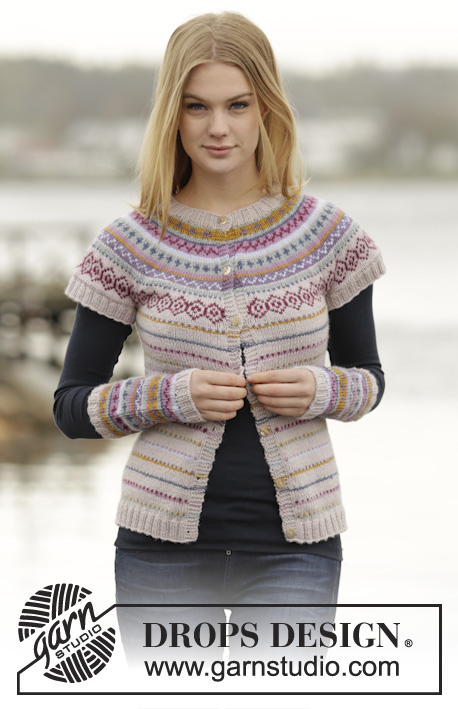
Sweet As Candy Cardigan#sweetascandycardigan |
|||||||||||||||||||||||||
 |
 |
||||||||||||||||||||||||
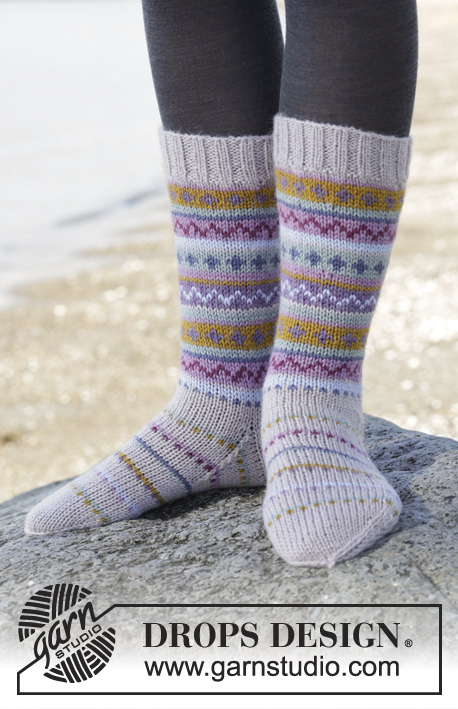
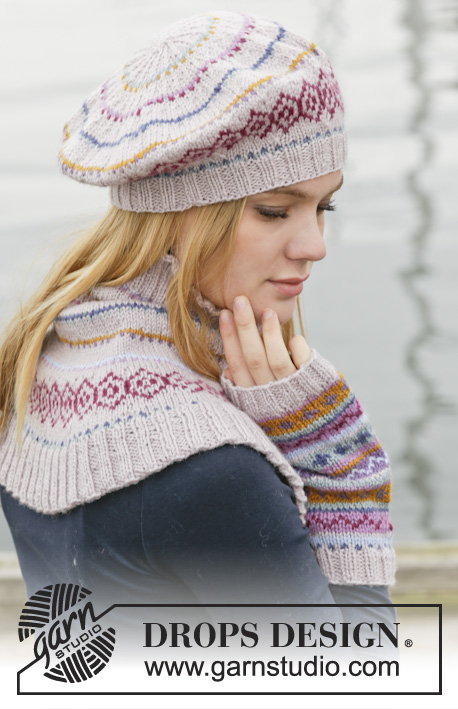
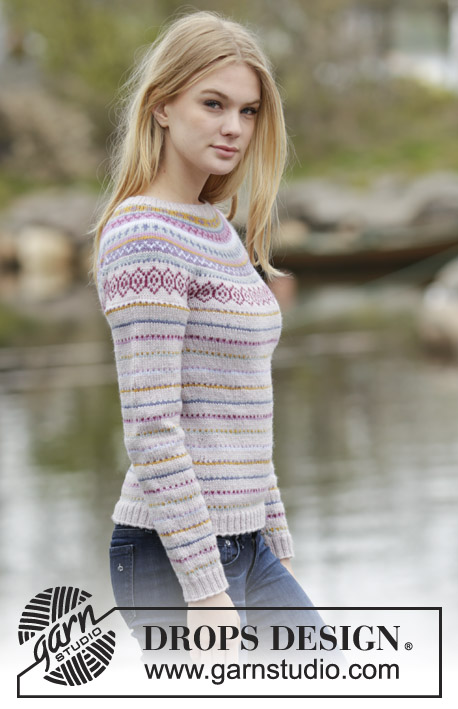
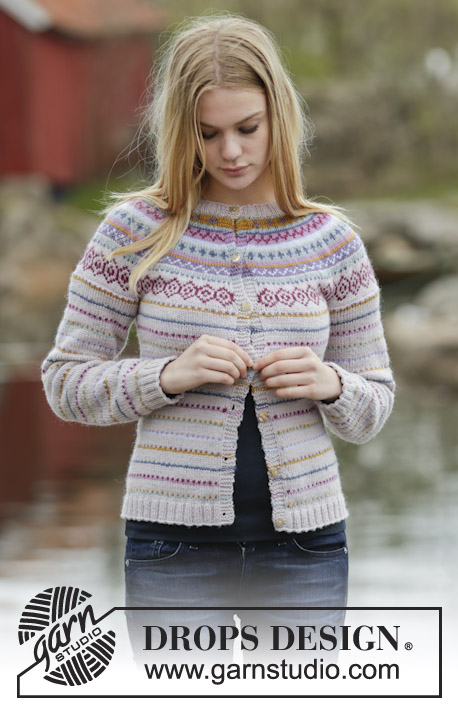
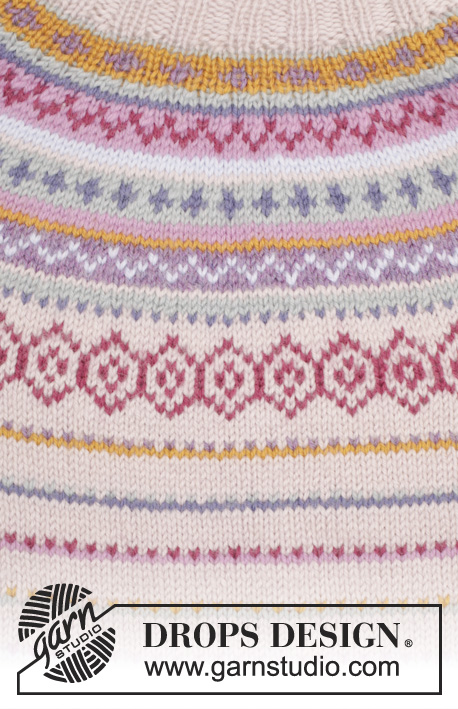
Knitted DROPS jacket with round yoke and multi-coloured pattern in borders in ”Karisma”. Size: S - XXXL.
DROPS 165-2 |
|||||||||||||||||||||||||
|
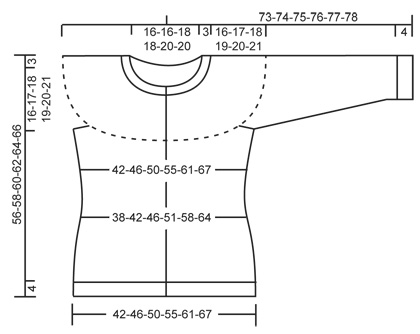
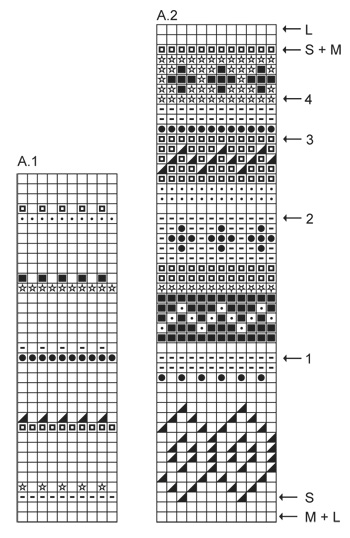
GARTER ST (back and forth): K all rows. 1 ridge = 2 rows K. PATTERN: See diagrams A.1 and A.2. Work entire pattern in stocking st. Repeat A.1 up to armhole on both body and sleeves. KNITTING TIP 1 (applies to bands): On the rows where there are either stripes or pattern border work the colour in the stripes or the base colour of pattern border also over the 5 band sts in each side. DECREASE TIP (applies to sides of body): All dec are done from RS! Beg 4 sts before marker and work as follows: K 2 tog, K 4 (marker is between these 4 sts), slip 1 st as if to K, K 1, psso (= 2 sts dec). INCREASE TIP (applies to sides of body): All inc are done from RS. Beg 2 sts before marker and work as follows: 1 YO, K 4, 1 YO (= 2 sts inc). On next row P YO twisted to avoid holes. BUTTONHOLES: Dec for buttonholes on right band. 1 buttonhole = K tog third and fourth st from edge and make 1 YO. Dec for buttonholes when piece measures: SIZE S: 2, 11, 20, 29, 38, 46 and 54 cm SIZE M: 2, 11, 20, 29, 38, 47 and 56 cm SIZE L: 2, 10, 18, 26, 34, 42, 50 and 58 cm SIZE XL: 2, 11, 20, 28, 36, 44, 52 and 60 cm SIZE XXL: 2, 9, 17, 24, 32, 39, 47, 54 and 62 cm SIZE XXXL: 2, 10, 18, 26, 34, 42, 50, 57 and 64 cm KNITTING TIP 2: To avoid the knitting tension to tighten when working pattern, it is important not to tighten the strands on back side of piece. Switch to a higher needle no when working pattern if the pattern is somewhat tight. ---------------------------------------------------------- BODY: Worked back and forth on circular needle from mid front. Cast on 232-252-272-296-332-360 sts (incl 5 band sts in each side towards mid front) on circular needle size 3 mm with silver pink. P 1 row from WS. Then work rib (= K 2/P 2) with 5 band sts in GARTER ST – see explanation above and 2 K in each side towards mid front (seen from RS). When rib measures 4 cm, K 1 row from RS while at the same time dec 45-49-53-57-65-69 sts evenly (do not dec over bands) = 187-203-219-239-267-291 sts. Switch to circular needle size 4 mm and work in stocking st and pattern according to diagram A.1 (1st row = WS), but continue the 5 band sts in each side towards mid front in garter st until finished measurements – READ KNITTING TIP 1. REMEMBER THE KNITTING TENSION and remember to dec for BUTTONHOLES on right band - see explanation above. When piece measures 8 cm in all sizes, insert 2 markers 49-53-57-62-69-75 sts in from each side = 89-97-105-115-129-141 sts between markers on back piece. On next row from RS, dec 1 st on each side of both markers - READ DECREASE TIP (= 4 sts dec). Repeat dec every 3-3-3-3-4½-4½ cm 4-4-4-4-3-3 times in total in each side = 171-187-203-223-255-279 sts - NOTE: Adjust to dec on a row with silver pink. When piece measures 22-22-23-23-23-23 cm, inc 1 st on each side of both markers – READ INCREASE TIP (= 4 sts inc). Repeat inc every 3½-3½-4-4-6-6 cm a total of 4-4-4-4-3-3 times = 187-203-219-239-267-291 sts. When piece measures approx. 37-38-39-40-41-42 cm, adjust so that 1 or 2 rows with silver pink have been worked after 1 row with dots and so that last row is worked from WS, work next row as follows from RS: Work 45-49-53-57-64-70 sts (= right front piece), cast off 8-8-8-10-10-10 sts for armhole, work 81-89-97-105-119-131 sts (= back piece), cast off 8-8-8-10-10-10 sts for armhole and work the remaining 45-49-53-57-64-70 sts (= left front piece). Put piece aside and knit the sleeves. SLEEVE: Worked in the round on double pointed needles. Cast on 60-60-64-64-68-68 sts on double pointed needles size 3 mm with silver pink. K 1 round, then work rib = K 2/P 2. When rib measures 4 cm, K 1 round while dec 12-12-14-12-14-14 sts evenly = 48-48-50-52-54-54 sts on row. Switch to double pointed needles size 4 mm and work pattern according to diagram A.1. When piece measures 8-8-7-8-8-10 cm, inc 2 sts mid under sleeve. Repeat inc every 3½-3-3-2½-2½-2 cm 11-13-13-14-14-16 times in total = 70-74-76-80-82-86 sts. Work until sleeve measures 46-46-45-45-44-44 cm - adjust to work the same no of rounds with silver pink as on body (NOTE: Shorter measurements in the larger sizes because of wider shoulders). K 1 round while casting off the middle 8-8-8-10-10-10 sts mid under sleeve = 62-66-68-70-72-76 sts remain on needle. Put piece aside and knit another sleeve. YOKE: Slip sleeves on to same circular needle size 4 mm as body where armholes were cast off (without working them first) = 295-319-339-359-391-423 sts on needle. P 1 row from WS with silver pink(continue bands in garter st) while dec 8-8-10-12-14-16 sts evenly (do not dec over bands) = 287-311-329-347-377-407 sts - remember KNITTING TIP 1 and read KNITTING TIP 2. Work next row as follows from RS: Work 5 band sts as before, work pattern according to diagram A.2 until 6 sts remain on row (choose diagram for correct size and beg on row marked with arrow in diagram for correct size), work first st in A.2 (so that pattern beg and ends the same way in each side towards mid front) and finish with 5 band sts in garter st as before. Continue pattern like this. AT THE SAME TIME on row marked with arrow 1 in diagram dec 36-40-42-48-50-56 sts evenly (do not dec over bands ) = 251-271-287-299-327-351 sts on needle. Continue pattern. On row marked with arrow 2 in diagram dec 40-40-44-48-52-56 sts evenly (do not dec over bands ) = 211-231-243-251-275-295 sts on needle. On row marked with arrow 3 in diagram dec 40-44-44-52-52-60 sts evenly (do not dec over bands ) = 171-187-199-199-223-235 sts on needle. On row marked with arrow 4 in diagram dec 48-60-60-60-64-68 sts evenly (do not dec over bands ) = 123-127-139-139-159-167 sts on needle. When A.2 has been worked, piece measures approx. 53-55-57-59-61-63 cm up to shoulder. ELEVATION IN BACK OF NECK: For better shape work an elevation in the back of neck as follows: Insert 1 marker mid back. Beg from RS with silver pink and K 12-12-14-14-15-15 sts past marker, turn, tighten yarn and P 24-24-28-28-30-30 sts back. Turn, tighten yarn and K 36-36-40-40-44-44 sts, turn, tighten yarn and P 48-48-52-52-58-58 sts back. Turn, tighten yarn and K 60-60-64-64-72-72 sts, turn, tighten yarn and P 72-72-76-76-86-86 sts back. Turn, tighten yarn and K 84-84-88-88-100-100 sts, turn, tighten yarn and P 96-96-100-100-114-114 sts back. Turn and K the rest of the row. NECK EDGE: Switch to circular needle size 3 mm and P 1 row from WS (continue bands in garter st) while dec 27-31-31-31-43-51 sts evenly (do not dec over band sts) = 96-96-108-108-116-116 sts. Work rib (= K 2/P 2) with 5 band sts in garter st and 2 K in each side towards mid front (seen from RS) - NOTE: Dec for last buttonhole on right band when neck edge measures approx. 1½-2 cm. When rib measures 3 cm, cast off with K over K and P over P in rib and K over sts in garter st on band. Jacket measures approx. 56-58-60-62-64-66 cm up to shoulder. ASSEMBLY: Sew the openings under the sleeves. Sew on buttons. |
|||||||||||||||||||||||||
Diagram explanations |
|||||||||||||||||||||||||
|
|||||||||||||||||||||||||
 |
|||||||||||||||||||||||||
 |
|||||||||||||||||||||||||
 |
|||||||||||||||||||||||||
Have you finished this pattern?Tag your pictures with #dropspattern #sweetascandycardigan or submit them to the #dropsfan gallery. Do you need help with this pattern?You'll find 31 tutorial videos, a Comments/Questions area and more by visiting the pattern on garnstudio.com. © 1982-2026 DROPS Design A/S. We reserve all rights. This document, including all its sub-sections, has copyrights. Read more about what you can do with our patterns at the bottom of each pattern on our site. |
|||||||||||||||||||||||||


With over 40 years in knitting and crochet design, DROPS Design offers one of the most extensive collections of free patterns on the internet - translated to 17 languages. As of today we count 324 catalogues and 12290 patterns translated into English (UK/cm). 12290
We work hard to bring you the best knitting and crochet have to offer, inspiration and advice as well as great quality yarns at incredible prices! Would you like to use our patterns for other than personal use? You can read what you are allowed to do in the Copyright text at the bottom of all our patterns. Happy crafting!
Post a comment to pattern DROPS 165-2
We would love to hear what you have to say about this pattern!
If you want to leave a question, please make sure you select the correct category in the form below, to speed up the answering process. Required fields are marked *.