
Popular categories
Looking for a yarn?


Comments / Questions (141)
![]() Hanne Siverts wrote:
Hanne Siverts wrote:
Jeg skal strikke Lazy Afternoon by DROPS Design i str. L. Garnet som står i oppskriften er Drops Brushed Alpaca Silk. Det står at jeg trenger 250 g garn og det blir 10 nøster. Virker litt lite. Strikket en tilsvarende genser i Drops Air og brukte da 9 nøster og de er på 50 g hver. Hva mener dere? Egentlig kunne jeg tenke meg å strikke den i en tråd Drops Brushed Alpaca Silk, og en tråd i Drops Air. Hvor mye garn trenger jeg av hver tråd?
05.06.2018 - 08:55DROPS Design answered:
Hei Hanne. Dette har med lengden på garnet å gjøre. 1 nøste (25 g) med DROPS Brushed Alpaca Silk er ca 140 m garn. 1 nøste (50 g) med DROPS Air er ca 150 m, og det er derfor du ikke trenger du ikke like mange gram med Brushed Alpaca Silk som du ville trengt i Air. Disse garnene tilhører begge garngruppe C, og kan derfor helt fint erstatte hverandre. Om du vil bruke 1 tråd av hver kvalitet så vær obs på at teksturen på plagget vil endres ettersom Air er ganske annerledes ann Brushed Alpaca Silk. Legger ved en link til hvordan å regne ut hvor mange gram Air du trenger. God fornøyelse. bruke annet garn
07.06.2018 - 14:39
![]() Bogusia wrote:
Bogusia wrote:
A jak będzie to wyglądało w przypadku włóczki Big Merino lub Air? Dziękuję za poprzednią wiadomość :)
15.05.2018 - 18:13DROPS Design answered:
Witaj ponownie Bogusiu! Ze względu podobną strukturę i wygląd ostatecznego produktu, najlepszą alternatywą dla Brushed Alpaca Silk byłaby Melody (teraz z 35% zniżki:), potrzebowałabyś 200 g i sweter byłby przerabiany 1 nitką nie 2. Pozdrawiam
15.05.2018 - 18:23
![]() Bogusia wrote:
Bogusia wrote:
Witam serdecznie. Chciałabym wykonać ten sweter z włóczki Drops Sky. Ile gram będzie potrzebne dla rozmiaru S i iloma nitkami należy go wykonać. Będę wdzięczna za szybką odpowiedź. Pozdrawiam.
15.05.2018 - 17:15DROPS Design answered:
Witaj Bogusiu! Jeżeli chcesz użyć włóczki DROPS Sky, na rozmiar S będziesz potrzebować ok. 300 g włóczki (6 motków), robótka będzie wykonywana podwójną nitką. UWAGA! Sky należy do grupy B (B+B=D), a Brushed Alpaca Silk C (C+C=E), dlatego przed rozpoczęciem pracy koniecznie wykonaj próbkę, a w razie konieczności dopasuj rozmiar drutów. Powodzenia!
15.05.2018 - 18:03
![]() Elin R A wrote:
Elin R A wrote:
Ser det ikke er bare meg som sliter med å lese oppskriften "rett". Strikket hele bolen klar før jag forstod at det var feil/dårlig forklart i oppskriften.. Hadde vært kjekt om det kunne endres/fortydeliggjøres hvordan det skal strikkes. At 1m rille på 2.OMG betyr 1vr. Hvorfor ikke bare skivet det? Det hadde gjort det så mye enklere og blitt så mye mindre frustrerende. Takk
10.05.2018 - 11:37
![]() A. Gross wrote:
A. Gross wrote:
Ich verstehe diesen Satz nicht ganz: "BITTE BEACHTEN: Die zugenommenen M am Vorder- und Rückenteil fortlaufend in das falsche Patentmuster einarbeiten, die zugenommenen M an den Ärmeln glatt re stricken." ich nehme doch nur Maschen an der Raglanlinie zu, das heißt im Bereich der Ärmel. Oder muss ich auch im Patentmuster maschen zunehmen? Wenn ja, wann & wo?
14.03.2018 - 14:39DROPS Design answered:
Liebe Frau Gross, es wird für Raglan auf beiden Seiten jeder Markierung zugenommen, dh am Vorder- und Rückenteil sowie bei den Ärmeln - siehe RAGLANZUNAHMEN am Anfang der Anleitung. Viel Spaß beim stricken!
14.03.2018 - 15:26
![]() Stine Steen wrote:
Stine Steen wrote:
Kan jeg strikke denne i drops air? isåfall enkel eller dobbel tråd
23.02.2018 - 17:01DROPS Design answered:
Hei Stine Ja, du kan strikke denne i Air istedet for Brusked Alpaca Silk, disse 2 garner er i samme garngruppe/strikkefasthet og kan brukes om hverandre på samme måte - strikkes plagget i dobbelt tråd byttes til dobbelt tråd innen for samme garngruppe ... den blir nokk meget flott i Air :) Her har du alle garn i Garngruppen C - som kan brukes på denne oppskrift: Garngruppe C . Go fornøyelse.
24.02.2018 - 09:38
![]() Rita wrote:
Rita wrote:
Habe eine Frage zur Maschenprobe: kann es sein, dass Falschespatent bei gleicher Maschenzahl eigentlich breiter ist als glatt rechts? Da die beiden Muster zumindest in der Passe wechseln, kann ich aber schlecht die Nadelstärke wechseln. Vielleicht die Erklärung warum das Stück bei einigen doch plötzlich breiter wird.
25.11.2017 - 21:26DROPS Design answered:
Liebe Rita, Sie sollen jeweils 11 M für 10 cm mit Falschespatent bzw glatt rechts, aber in der Höhe sollen Sie 22 Reihe mit Falschespatent und nur 15 Reihe glatt für 10 cm haben. Versuchen Sie vielleicht eine der Muster etwas fester/locker (je nachdem) zu stricken, oder dann mit je einer Rundnadel der entsprechenden Größe jedes Teil in der Runde stricken (dann brauchen Sie mehr als 1 Rundnadel). Viel Spaß beim stricken!
27.11.2017 - 09:58
![]() Hanna Zozgórnik wrote:
Hanna Zozgórnik wrote:
What is this marker? Co to jest marker?
04.11.2017 - 10:10DROPS Design answered:
Dear Hanna, we put markers into our knitting to help us find certain places, like to show us the place of increases /decreases, or where a buttonhole needs to be done, or where to start a particular patterng etc. You can buy simple stitch markers in knitting stores, but there are fancy ones with beads and etc too. However you can use a lot of things for a marker, from small pieces of colorful thread tied into a ring, or safety pins, or small elastic rings. Happy Knitting!
06.11.2017 - 02:37
![]() Ellen wrote:
Ellen wrote:
Ik heb ondertussen de video gevonden over het breien van de magic loop. Die had ik graag onder het patroon gezien bij de andere praktische video’s! Eerst maar es oefenen...
09.10.2017 - 12:27
![]() Ellen wrote:
Ellen wrote:
Hoi, ik wil beginnen met deze mooie trui maar begrijp niet hoe je de hals van 55 steken op een rondbreinaald van 80 cm moet breien. Die is dan toch veel te lang? Alvast bedankt.
08.10.2017 - 08:55DROPS Design answered:
Hoi Ellen, Je hebt inderdaad gelijk dat 80 cm wat te lang is voor de hals. Je zou een kleinere naald kunnen gebruiken of de zgn. magische lus techniek. Dit is uitgelegd in deze video.
08.10.2017 - 19:41
|
|
Lazy Afternoon#lazyafternoonsweater |
|
|
|
|
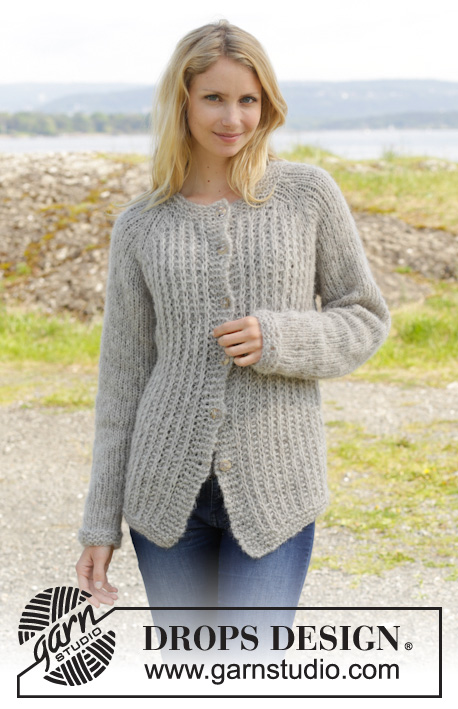
Knitted DROPS jumper with raglan and false English rib, worked top down in 2 strands ”Brushed Alpaca Silk”. Size S-XXXL
DROPS 157-20 |
|
|
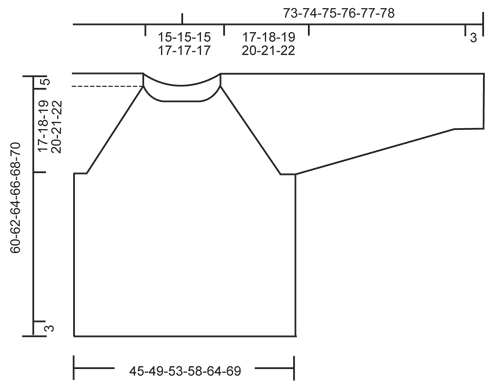
GARTER ST (in the round on circular needle): 1 ridge = 2 rounds. * K 1 round and P 1 round *, repeat from *-*. FALSE ENGLISH RIB (in the round on circular needle): ROUND 1: * K1 st, 1 YO, slip 1 st as if to P *, repeat from *-* until 1 st remains, finish with K1 st. ROUND 2: * P1 st, K tog YO and slipped st from previous round *, repeat from *-* until 1 st remains, finish with P1 st. Repeat rounds 1 to 2. RAGLAN: Inc on each side of every marker as follows: Work until 1 st remains before marker, 1 YO, work 2 sts in stocking st and 1 YO. Repeat at the remaining markers on round. On next round K YOs twisted (i.e. work in back loop of st instead of front) to avoid holes. DECREASE TIP (applies to sleeve): Dec as follows BEFORE st with marker in: Slip 1 st as if to K, K 1, psso. Dec as follows AFTER st with marker in: K 2 tog. ---------------------------------------------------------- JUMPER: Worked top down in the round on circular needle/double pointed needles. At the end, pick up sts around the neck and work an edge in garter st. YOKE: Cast on 55-55-55-59-59-59 sts with 2 strands Brushed Alpaca Silk on circular needle size 9 mm. Work 1 ridge in GARTER ST - see explanation above AT THE SAME TIME on last round in ridge inc 9 sts evenly in all sizes = 64-64-64-68-68-68 sts. On next round work as follows from right raglan at the back: 1 st in stocking st, insert 1st marker here, 9 sts in stocking st, insert 2nd marker here, 1 st in stocking st, 21-21-21-23-23-23 sts in FALSE ENGLISH RIB – see explanation above (= front piece), 1 st in stocking st, insert 3rd marker here, 9 sts in stocking st, insert 4th marker here, 1 st in stocking st, 21-21-21-23-23-23 sts in false English rib (= back piece). Continue like this AT THE SAME TIME on next round beg inc for RAGLAN – see explanation above! Repeat this inc every other round 5-7-10-13-18-22 more times, and every 4th round 5-5-4-3-1-0 times = 152-168-184-204-228-252 sts. NOTE: Work the new inc sts on front and back piece in false English rib and work the new inc sts on sleeves in stocking st. REMEMBER THE KNITTING TENSION! Piece measures 22-23-24-25-26-27 cm from shoulder. Work 1 round more with pattern as before but now stop 1 st before 1st marker (i.e. 1 st before round is done). Slip the next 33-37-41-45-51-57 sts on a stitch holder (= sleeve), cast on 7 new sts under sleeve, work the next 43-47-51-57-63-69 sts (= front piece), slip the next 33-37-41-45-51-57 sts on a stitch holder (= sleeve), cast on 7 new sts under sleeve, work the next 43-47-51-57-63-69 sts (= back piece). BODY: There are now 100-108-116-128-140-152 sts. Continue false English rib as before. P the middle of the 7 new sts under each sleeve, work the remaining new sts in false English rib. Continue like this until piece measures 35-36-37-38-39-40 cm from the new sts under sleeve. Now work 3 ridges before loosely casting off. SLEEVE: Slip the 33-37-41-45-51-57 sts back on double pointed needles. Work 1 row in stocking st over all sts. Then cast on 7 sts at the end of row = 40-44-48-52-58-64 sts. Insert a marker in the middle of the new sts under the sleeve. NOW MEASURE THE PIECE FROM HERE. Then work the sleeve in stocking st in the round. When piece measures 4 cm, beg dec for sleeve – READ DECREASE TIP. Repeat the same dec every 5½-5-4-3½-2½-2½ cm 6-7-9-10-13-15 more times = 26-28-28-30-30-32 sts. When piece measures 41-41-41-40-40-40 cm, work 3 ridges and loosely cast off. ASSEMBLY: Sew the holes under the sleeves. NECK EDGE: Pick up 1 st in every st in ridge in the neck with 2 strands Brushed Alpaca Silk = 55-55-55-59-59-59 sts. Work 2 ridges and loosely cast off. |
|
 |
|
Have you finished this pattern?Tag your pictures with #dropspattern #lazyafternoonsweater or submit them to the #dropsfan gallery. Do you need help with this pattern?You'll find 23 tutorial videos, a Comments/Questions area and more by visiting the pattern on garnstudio.com. © 1982-2026 DROPS Design A/S. We reserve all rights. This document, including all its sub-sections, has copyrights. Read more about what you can do with our patterns at the bottom of each pattern on our site. |


With over 40 years in knitting and crochet design, DROPS Design offers one of the most extensive collections of free patterns on the internet - translated to 17 languages. As of today we count 324 catalogues and 12290 patterns translated into English (UK/cm). 12290
We work hard to bring you the best knitting and crochet have to offer, inspiration and advice as well as great quality yarns at incredible prices! Would you like to use our patterns for other than personal use? You can read what you are allowed to do in the Copyright text at the bottom of all our patterns. Happy crafting!
Post a comment to pattern DROPS 157-20
We would love to hear what you have to say about this pattern!
If you want to leave a question, please make sure you select the correct category in the form below, to speed up the answering process. Required fields are marked *.