
Popular categories
Looking for a yarn?


Comments / Questions (46)
![]() Gery wrote:
Gery wrote:
Hi!Just to clarify your answer-I do 1st(dc) and 2nd(tr) rows with inc twice, 3d(dc)with inc also twice and 4th row which is dc no inc for 1 size? Thank you!
04.09.2014 - 18:18DROPS Design answered:
Dear Gery, working in A.1, you work *1 row dc, 1 row tr, 2 rows dc, 1 row tr, 1 row dc* and repeat from *-*. First inc on 1st row = on first row with dc, then 2nd inc on 3rd row (dc row), then in on 5th row (tr row), then every 3rd row: first on 8th row (tr row) then on 11th row (tr row). (no inc for 1st size). Happy crocheting!
05.09.2014 - 09:25Gery wrote:
Hi, I like very much your site. I just don't understand the inc.What does it mean: Repeat inc every other row 2-4-3-3-1-2 more times, then every 3rd row 2-1-1-1-2-3 times and every 4th row 0-0-1-1-2-1 times Thank you in advance!
03.09.2014 - 20:35DROPS Design answered:
Dear Gery, the inc are different for each size, eg in first size, you repeat the every other row 2 more times, then every 3rd row 2 times (no inc every 4th row in first size). Happy crocheting!
04.09.2014 - 08:11
![]() Pasquet Luce wrote:
Pasquet Luce wrote:
Bjr, j'ai commandé 10 pelotes de muscat pour réaliser la taille XL. Je viens de terminer la 10e pelote au cours du 9e rang du 3e et dernier motif. Il me reste encore à faire le 10e et le 11e rang plus les 3 cm du diagramme A et les tours des 2 manches. Il me manque donc 1 ou 2 pelotes. Je me vois contrainte de commander encore 2 pelotes et payer les frais de port. Avez-vous une autre solution ?
13.08.2014 - 16:54DROPS Design answered:
Bonjour Mme Pasquet, aviez-vous bien l'échantillon indiqué, et avez-vous bien conservé cette même tension pendant toute la réalisation ? Soit 17 m x 15 rangs en point fantaisie du diagramme A.1 = 10 x 10 cm. 1 motif de A.2 en hauteur mesure environ 10 cm. Bon crochet!
14.08.2014 - 12:45
![]() Benedetta wrote:
Benedetta wrote:
Buongiorno, ho finito lo schema A1 e devo proseguire con lo schema A2 ma non ho finito con gli aumenti, sto facendo la tg S.Dove sbaglio?
21.07.2014 - 17:15DROPS Design answered:
Buongiorno Benedetta, il diagramma A.1 va lavorato 1 volta, e gli aumenti continueranno nel diagramma A.2. Ci riscriva se ha altri dubbi. Buon lavoro!
23.07.2014 - 16:39
![]() Benedetta wrote:
Benedetta wrote:
Buonasera, vorrei una spiegazione per questo passaggio:"aumentare 1 m in corrispondenza di ogni segno, ripetere questi aumenti ogni 2 righe etc...quindi devo contare anche questo giro? Grazie mille
13.07.2014 - 22:02DROPS Design answered:
Buonasera Benedetta, quando viene indicato di ripetere gli aumenti ogni 2 righe, significa 1 riga si e 1 no; ogni 3 righe indica: aumento sulla 1° riga, lavoro 2 righe, aumento sulla 3° riga. Ci riscriva se qualcosa non è chiaro. Buon lavoro!!
14.07.2014 - 18:09
![]() Urszula wrote:
Urszula wrote:
Czy robiąc karczek oczka dodaję tylko w rzędach przerabianych słupkami?
09.07.2014 - 18:31DROPS Design answered:
Nie tylko. Pierwszy raz dodajemy o. w 1-szym rzędzie schematu A.1, a dalej jak w opisie: "Powt. dodawanie o. jeszcze 2-4-3-3-1-2 razy co 2 rz., dalej 2-1-1-1-2-3 razy co 3 rz. i 0-0-1-1-2-1 razy co 4 rz. = 177-207-219-237-249-291 o."
10.07.2014 - 21:06
![]() Urszula wrote:
Urszula wrote:
Brakuje mi wyjaśnienia,w którym rzędzie mam dodawać oczka-objaśnienie jest niedokładne!
06.07.2014 - 19:28DROPS Design answered:
Proszę napisać, o który fragment opisu chodzi. Postaramy się pomóc. Pozdrawiam
07.07.2014 - 12:35Fazia wrote:
J'aime bien vos modéles.les explications sont claires. merci
03.06.2014 - 11:34
![]() Dina De Man wrote:
Dina De Man wrote:
Ik heb een vraag ik ben nu a2 gehaaktnu beb ik bij de 8 lossen wat moet ik doen
05.05.2014 - 22:35DROPS Design answered:
Kunt u precies aangeven waar in het patroon u bent?
06.05.2014 - 09:48
![]() Quénaon wrote:
Quénaon wrote:
Bonjour, Mon échantillon avec muskat et crochet n° 4 fait 8,5 de large sur 10 de haut. Sa consistance est bonne. Si je prends un crochet 4,5 j'aurai peut-être 10cm de large, mais plus de 10cm en hauteur. Y a-t-il une erreur dans les 17 mailles de large indiquées ? (il en faudrait 20 pour obtenir 10 cm de large). Si la réponse est non, je suis inquiète : le gilet va être beaucoup plus étroit qu'il devrait. Que me conseillez-vous alors de faire ? Merci pour votre aide. Dominique
27.04.2014 - 11:20DROPS Design answered:
Bonjour Mme Quénaon, ce modèle a été conçu sur la base d'un échantillon de 17 m = 10 cm de large. Si vous n'avez pas l'échantillon, utilisez un crochet plus gros. Si vous souhaitez conserver votre tension de base, il vous faudra recalculer la taille à suivre en fonction de votre nombre de mailles pour 10 cm et des mesures du schéma. Bon crochet!
28.04.2014 - 10:17
|
||||||||||
Darling Please#darlingpleasecardigan |
||||||||||
 |
 |
|||||||||
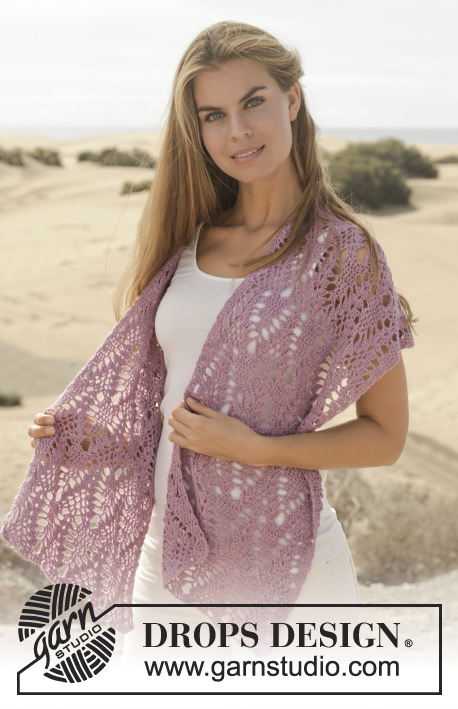
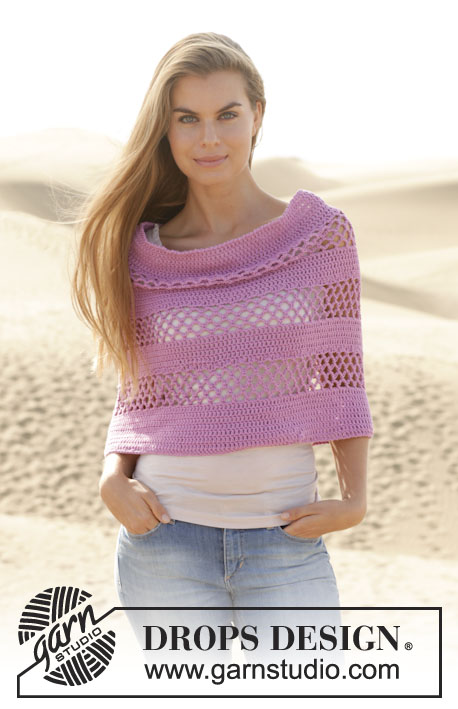
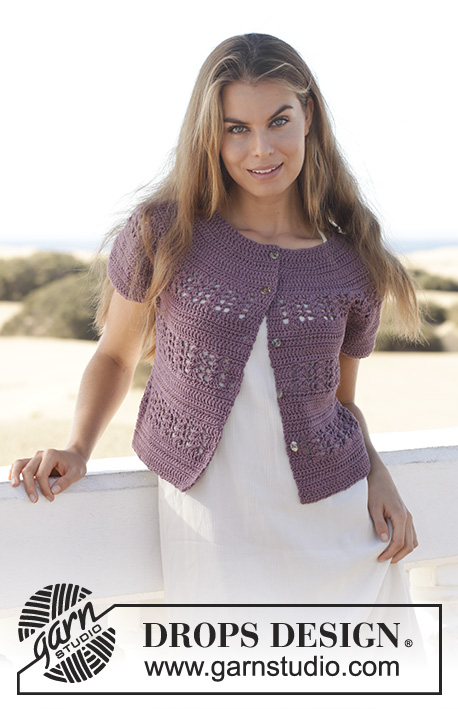
Crochet DROPS jacket with lace pattern and round yoke in ”Muskat”. Size: S - XXXL.
DROPS 154-37 |
||||||||||
|
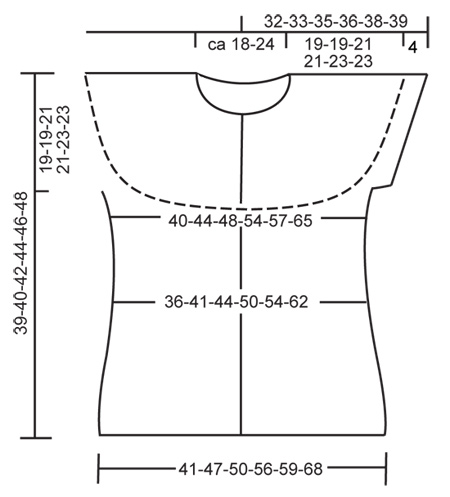
CROCHET INFO: Replace first dc on every dc row with 1 ch. Replace first tr on every tr row with 3 ch. PATTERN: See diagrams A.1 and A.2. INCREASE TIP: Inc by working 2 sts in 1 st, first on the one side of all markers on row, next time on the other side of all markers on row, continue inc like this alternately before and after markers. DECREASE TIP: Dec 1 st by working 2 sts tog. Work 2 dc tog as follows: Insert hook in first st and pull yarn through, insert hook in next st and pull yarn through, make 1 YO and pull yarn through all 3 loops on hook. Work 2 tr tog as follows: Work 1 tr in first st but wait with last pull through, work 1 tr in next st but on last pull through, pull yarn through all 3 loops on hook. ---------------------------------------------------------- BODY: The piece is worked top down. Worked back and forth from mid front. Work 101-107-115-122-130-135 ch (incl 1 ch to turn with) on hook size 4 mm with Muskat. Work next row as follows: 1 dc in 2nd ch, 1 dc in each of the next 4-5-3-5-3-3 ch, * skip 1 ch, 1 dc in each of the next 4 ch *, repeat from *-* the entire row = 82-87-93-99-105-109 dc (first dc = 1 ch) – READ CROCHET INFO! Insert 19-20-21-23-24-26 markers in the piece as follows: First marker after 5-6-7-6-7-5 sts, then insert 18-19-20-22-23-25 markers 4 sts apart, after last marker there are 5-5-6-5-6-4 sts. Work back and forth according to diagram A.1 - AT THE SAME TIME on next row inc 1 st at all markers – READ INCREASE TIP! Repeat inc every other row 2-4-3-3-1-2 more times, then every 3rd row 2-1-1-1-2-3 times and every 4th row 0-0-1-1-2-1 times = 177-207-219-237-249-291 sts. REMEMBER THE CROCHET TENSION! Continue to work A.2 as follows: 1 tr in each of the first 4 sts (= band), a over the next 7 sts, then A.2B until 10 sts remain, A.2C over the next 6 dc and 1 tr in each of the last 4 dc (= band). Work diagram A.2 1 time vertically – NOTE: On the first 4 rows work the first and the last 4 sts in each side in tr, then work the pattern as before. Inc at the markers as before on 6th and 9th row in diagram. On next to last row (= 11th row) inc 16-8-6-8-18-8 sts evenly (do not inc over the first and last 4 band sts) = 231-255-267-291-315-351 sts. Work last row in A.2 as follows: 33-38-41-45-48-56 dc (= front piece), 8 ch (= under sleeve/armhole), skip 53-56-56-59-65-68 tr (to be used for sleeve later), work 59-67-73-83-89-103 dc (= back piece), 8 ch (= under sleeve/armhole), skip 53-56-56-59-65-68 tr (to be used for sleeve later) and work 33-38-41-45-48-56 dc (= front piece). There are now 141-159-171-189-201-231 sts in total on body. Remove all the markers on yoke. Beg on 1st row in A.2 again and work a, b and c the same way as last time (every ch under sleeve = 1 dc) - the first and last 4 sts in each side = bands, only work these in tr on the first 4 rows, then in pattern as before. Continue A.2 - AT THE SAME TIME on 6th row in A.2 dec 6 sts evenly (but do not dec over bands) - SEE DECREASE TIP. Repeat dec on 9th row = 129-147-159-177-189-219 sts. The third time repetition is worked, inc 12 sts evenly on 6th row (do not inc over band sts) = 141-159-171-189-201-231 sts. After repetition is worked for the third time totally, piece measures approx. 20 cm from armhole and down. Size S is now finished. Continue with diagram A.1 for 0-1-1-3-3-5 cm, i.e. until piece measures 20-21-21-23-23-25 cm from armhole and down. Fasten off. SLEEVE: To get the same texture as on body, work back and forth. There are 61-64-64-67-73-76 sts in total on sleeve (incl the 8 ch worked under armhole on body). Beg by working diagram A.1 in the 5th ch mid under sleeve worked for armhole on body. Work 3 rows of A.1. Fasten off. Work the other sleeve the same way. ASSEMBLY: Sew sleeve seams edge to edge to avoid a chunky seam. Sew on buttons evenly down on left band – top button should be 1 cm from the top. Button through sts on right band. |
||||||||||
Diagram explanations |
||||||||||
|
||||||||||
 |
||||||||||
 |
||||||||||
Have you finished this pattern?Tag your pictures with #dropspattern #darlingpleasecardigan or submit them to the #dropsfan gallery. Do you need help with this pattern?You'll find 10 tutorial videos, a Comments/Questions area and more by visiting the pattern on garnstudio.com. © 1982-2026 DROPS Design A/S. We reserve all rights. This document, including all its sub-sections, has copyrights. Read more about what you can do with our patterns at the bottom of each pattern on our site. |
||||||||||


With over 40 years in knitting and crochet design, DROPS Design offers one of the most extensive collections of free patterns on the internet - translated to 17 languages. As of today we count 324 catalogues and 12290 patterns translated into English (UK/cm). 12290
We work hard to bring you the best knitting and crochet have to offer, inspiration and advice as well as great quality yarns at incredible prices! Would you like to use our patterns for other than personal use? You can read what you are allowed to do in the Copyright text at the bottom of all our patterns. Happy crafting!
Post a comment to pattern DROPS 154-37
We would love to hear what you have to say about this pattern!
If you want to leave a question, please make sure you select the correct category in the form below, to speed up the answering process. Required fields are marked *.