
Popular categories
Looking for a yarn?


Comments / Questions (85)
![]() Kaye wrote:
Kaye wrote:
Detta är ett horribelt mönster. Matematiken hänger inte ihop, logiken saknas i flera stycken och p.g.a. detta går mera tid åt till dechiffrering av mönstret, än till själva virkandet. Inte nog med det, dålig grammatik, urusel meningskonstruktion och en total avsaknad av vital information i vissa partier, gör det ännu svårare att följa mönstret. Gillar du att lösa gåtor? Då är "Amber" för dig, men vill du virka, lönar det kanske sig att hitta något trevligare mönster.
07.10.2015 - 15:54
![]() Marieke wrote:
Marieke wrote:
Beste Drops team. Ik ben enthousiast aan deze trui begonnen, maar ben een beginnende haakster en heb daarom nog niet zoveel ervaring met patronen lezen. Nu vroeg ik mij af of de stokjes aan het einde van een rij bij het kant/bogenpatroon (dus dat is aan het einde van de tweede en vierde toer in het kantpatroon) in de lus met lossen gehaakt wordt of dat deze in een losse gehaakt wordt. Als het stokje in een losse gehaakt moet worden, moet ik dan de eerste of de tweede losse nemen?
02.05.2015 - 21:01DROPS Design answered:
Hoi Marieke. Je haakt deze stokjes in de tweede losse van het begin van de vorige toer. Elk boogje is 5 l en je begint de toer (1, 3 enzovoort) met 1 l ter vervanging van de eerste v.
08.05.2015 - 18:30
![]() Rosalia Engelbrecht wrote:
Rosalia Engelbrecht wrote:
In der ersten Reihe wird beschrieben, dass 1Lm übersprungen werden soll. Nun meine Frage, beim häckeln ist dann bei mir immer ein Loch gekommen, das habe ich auf dem Bild nicht gesehen, ist das Loch nun richtig?
27.03.2015 - 21:53DROPS Design answered:
Ja, es ergibt sich u. U. ein kleines Loch. Man überspringt in der ersten R in regelmäßigen Abständen 1 Lm, damit der Rand nicht zu stramm und eng wird und elastisch bleibt - in der Regel häkelt man die Lm etwas fester als später die M, um das auszugleichen, schlägt man mehr Lm an. Wenn Ihnen das mit den Löchern gar nicht gefällt und Sie sehr lockere Lm anschlagen, können Sie auch nur die Anzahl der Lm anschlagen, die Sie in der 2. R für die Stb brauchen (wobei dabei zu beachten ist, dass das 1. Stb aus 3 Lm besteht).
28.03.2015 - 10:39
![]() Savethehero83 wrote:
Savethehero83 wrote:
Bonjour, je réalise ce modèle est je suis coincée. Je suis en train de faire le dos. j'en suis arrivée a l'étape des 32 cm puis point fantaisie a 49cm. Et là je ne comprends pas comment diminuer pour l'encolure et arreter chaque epaule séparément. merci par avance
01.03.2015 - 19:16DROPS Design answered:
Bonjour Savethehero83, à 49 cm (1ère taille), on forme l'encolure en crochetant les mailles de chaque épaule séparément: crochetez 1 rang sur les 21 premières B sur l'endroit, laissez les autres mailles non travaillées et continuez en diminuant comme indiqué. Quand la 1ère épaule est faite, crochetez sur les 21 B de l'autre côté de la même façon mais en vis à vis. Les mailles non travaillées au milieu forment l'encolure. Bon crochet!
02.03.2015 - 10:08Hanan wrote:
Plz i don`t understand how to do the shoulder in front piece any help ?!
28.01.2015 - 21:50DROPS Design answered:
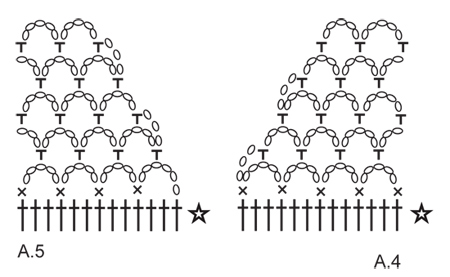
Dear Hanan, you work each shoulder with dec for neckline working over the first 27-45 sts in pattern (with 2 tr/dc between every ch-loop on 1st row with ch-spaces), working A.4 over the last 13 sts towards neckline (= left shoulder, A4 is worked at the end of row from RS). Continue working A4 towards neckline. After A.4 has been worked 1 time in height, work on next row 4 tr in first and last ch-loop, and 3 tr in every ch-space = 20-38 tr remain. Happy crocheting!
29.01.2015 - 09:16
![]() Madde wrote:
Madde wrote:
Hej! Jag förstår inte hur man ska minska enligt A4 på framstycket. Jag virkade bågar över de första 27 st och får 9 bågar. När jag ska börja med st igen har jag minskat till 7 bågar. Men om jag ska göra enligt mönstret får jag 23 st istället för 20st som det ska bli enligt anvisningarna. Vad gör jag för fel?
24.08.2014 - 22:38DROPS Design answered:
Svårt att säga var det blir fel... men försök att anpassa antal st till beskrivningen så arb inte blir för smalt.
04.09.2014 - 10:52
![]() Cornelia wrote:
Cornelia wrote:
Liebes Drops-Team, auch ich habe das gleiche Problem wie Christine und Andrea. Vielleicht sollten Sie die Häkelschrift nochmal überprüfen.
16.08.2014 - 18:49DROPS Design answered:
Liebe Cornelia, die Häkelschrift stimmt. Achten Sie darauf, dass Sie am Rand richtig arbeiten, hier übersieht man schnell mal etwas. Sie häkeln ja in der Stb-R nach den Lm-Bögen 3 Lm (= 1 Stb), dann 1 Stb in den 1. halben Lm-Bogen, dann je 3 Stb in die ganzen Bögen und am Schluss 1 Stb in den letzten halben Bogen und 1 Stb in die letzte Lm. Das sollte dann passen - Sie haben also z.B. für Größe S 22 ganze Bögen = 22 x 3 Stb = 66 Stb, dazu 2 Stb am Anfang und 2 Stb am Ende = 70 Stb.
17.08.2014 - 13:33
![]() Minna wrote:
Minna wrote:
Hvis man vil hækle fx Drops 152-17. Så er der en tegning med str på. Er målene stramme mål eller er det de mål man ønsker blusen endeligt skal blive. VH Minna
12.08.2014 - 14:30DROPS Design answered:
Hej Minna. Det er de maal blusen faar naar den er faerdig.
12.08.2014 - 16:26
![]() Marion wrote:
Marion wrote:
Ik haak deze trui in maat XL. Bij het voorpand staat dat je na de eerste toer stokjes nog 4 toeren moet haken (= totaal 7 toeren). Bij alle andere maten staat : nog 5 toeren (= totaal 6 toeren). Dat kan dus niet kloppen, moet ik nu meer of minder toeren haken?
08.08.2014 - 10:19DROPS Design answered:
Hoi Marion. Ja, ik ben met je eens dat dit niet correct lijkt. Wij kijken het patroon nu na en komen zsm terug.
11.08.2014 - 17:09
![]() Pernilla wrote:
Pernilla wrote:
Är lite besviken. Höll virkfastheten men tröjan blev mindre än väntat. Kanske är det bara jag som inte kan tolka beskrivningen, men mönstret och bilden verkar säga två olika saker när man kommer till halsen.
06.08.2014 - 18:15
|
||||||||||||||||||||||
Amber#ambersweater |
||||||||||||||||||||||
|
|
||||||||||||||||||||||
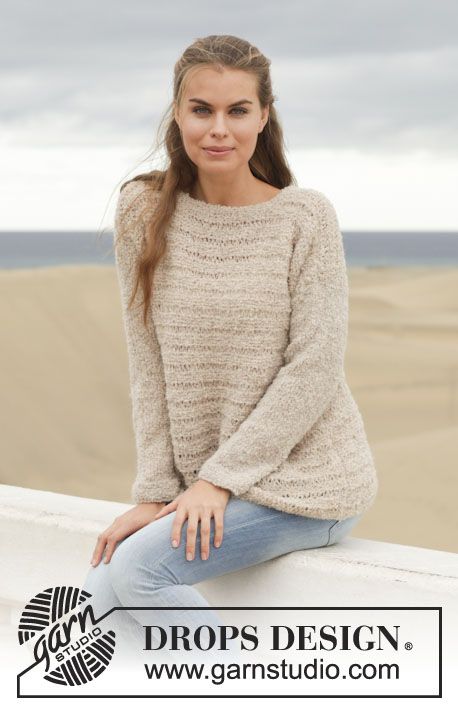
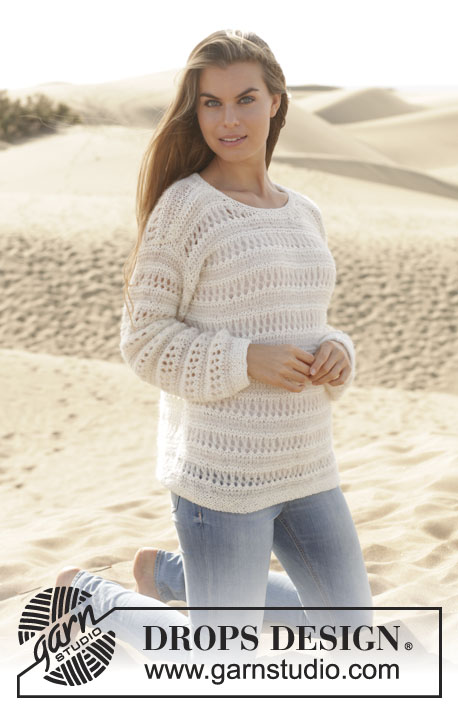
Crochet DROPS jumper with lace pattern and trebles in ”Cotton Light”. Size: S - XXXL.
DROPS 152-17 |
||||||||||||||||||||||
|
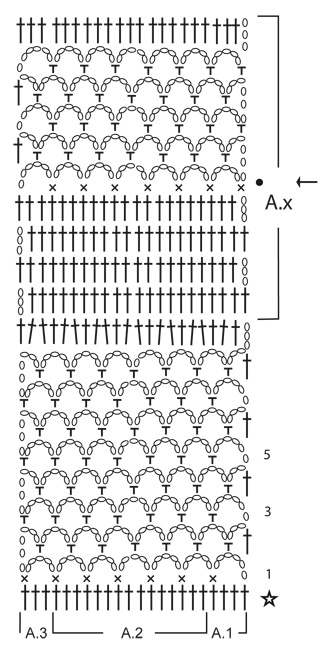
CROCHET INFO: At beg of a new row replace 1 tr with 3 ch. PATTERN: See diagrams A.1-A.5. CROCHET TIP: Beg and end at arrow in the middle of diagram A.x DECREASE TIP: Dec 1 tr by working 2 tr tog as follows: Work 1 tr but wait with last pull through (= 2 sts on hook), then work next tr but on last pull through, pull yarn through all 3 sts on hook. ---------------------------------------------------------- BACK PIECE: Worked back and forth. Work 83-90-100-107-121-132 loose ch on hook size 4.5 mm with Cotton Light. ROW 1: Work 1 tr in 4th ch from hook (= 2 tr), then work 1 tr in each of the next 2-2-5-5-5-2 ch, * skip 1 ch, work 1 tr in each of the next 6 ch *, repeat from *-* 10-11-12-13-15-17 more times = 70-76-85-91-103-112 tr. Then work 5-5-5-4-5-5 more rows with 1 tr in every tr (= 6-6-6-5-6-6 rows in total with tr) – READ CROCHET INFO. Continue with PATTERN as follows: Work A.1 over 4 tr, A.2 until 3 tr remain, A.3 over the remaining 3 tr from previous row. Continue with diagrams A.1 – A.3 back and forth for 8 rows, there are now 8 holes diagonally in height (= first stripe with lace pattern), and 1 row with tr's. REMEMBER THE CROCHET TENSION! Then continue with stripes in tr and lace pattern the same way but work according to diagram A.x, AT THE SAME TIME when piece measures 32-32-32-40-41-41 cm and when working a section with tr, insert a marker in each side for armholes. Continue with pattern as before. When piece measures 49-50-51-60-62-63 cm, beg neck dec and finish each shoulder separately as follows from RS: Work 1 row with tr over the first 21-24-27-30-36-39 tr, turn piece and dec 1 tr – READ DECREASE TIP. Work the rest of row. When piece measures 51-52-53-62-64-65 cm, back piece is finished. Fasten off. Work the other shoulder the same way but reversed. FRONT PIECE: Work as back piece. When piece measures 43-43-43-53-54-54 cm, beg neck dec and work each shoulder separately. Work left shoulder as follows from RS: Work ch-spaces as before (with 2 tr between every dc on first row with ch-spaces) over the first 27-30-33-36-42-45 tr, AT THE SAME TIME dec for neck by dec 1 ch-space in lace pattern according to pattern A.4. Continue like this back and forth until A.4 has been worked 1 time vertically. On next row work 4 tr in first ch-space, 3 tr in each of the next ch-spaces until 1 ch-space remains, and 4 tr in last ch-space on row = 20-23-26-29-35-38 tr remain for shoulder. Then continue with 1 tr in every tr. When piece measures 51-52-53-62-64-65 cm in total, front piece is finished. Fasten off. Work the other shoulder the same way but reversed and use diagram A.5 instead of A.4. Sew the shoulder seams. SLEEVE: The sleeves are worked from armhole and outwards. ROW 1: Beg at the bottom at one of the markers for armhole, and work ch-spaces over the armhole as follows: 1 dc, * 5 ch, 1 dc *, repeat from *-* until there are 20-21-23-23-25-26 ch-spaces (every ch-space is over 1½-2 cm). Continue back and forth with pattern A.x until 3 repetitions in total vertically have been worked - READ CROCHET TIP - AT THE SAME TIME dec in every section with tr as follows: 1st and 2nd time A.x is worked dec 1 tr in each side of piece on the 1st, 3rd and 5th row with tr in A.x = 6 tr dec in each side. 48-51-57-57-63-66 tr remain. 3rd time A.x is worked dec as follows: Dec 1 tr in each side of piece on the first 4-5-5-5-5-5 rows with tr = 40-41-47-47-53-56 tr remain. Continue with 4-3-2-2-1-0 rows with tr. Now sleeve measures approx. 36-35-34-34-33-32 cm. Fasten off. NECK EDGE: Work an edge around the neck as follows from mid on top of shoulder: 1 dc, * 3 ch, skip approx. 1 cm, 1 dc *, repeat from *-* around the entire neck and finish with 1 sl st in 1st dc on round. Fasten off. ASSEMBLY: Sew side seams and underarm seams in one in edge sts on rows. |
||||||||||||||||||||||
Diagram explanations |
||||||||||||||||||||||
|
||||||||||||||||||||||
 |
||||||||||||||||||||||
 |
||||||||||||||||||||||
 |
||||||||||||||||||||||
Have you finished this pattern?Tag your pictures with #dropspattern #ambersweater or submit them to the #dropsfan gallery. Do you need help with this pattern?You'll find 4 tutorial videos, a Comments/Questions area and more by visiting the pattern on garnstudio.com. © 1982-2026 DROPS Design A/S. We reserve all rights. This document, including all its sub-sections, has copyrights. Read more about what you can do with our patterns at the bottom of each pattern on our site. |
||||||||||||||||||||||


With over 40 years in knitting and crochet design, DROPS Design offers one of the most extensive collections of free patterns on the internet - translated to 17 languages. As of today we count 324 catalogues and 12290 patterns translated into English (UK/cm). 12290
We work hard to bring you the best knitting and crochet have to offer, inspiration and advice as well as great quality yarns at incredible prices! Would you like to use our patterns for other than personal use? You can read what you are allowed to do in the Copyright text at the bottom of all our patterns. Happy crafting!
Post a comment to pattern DROPS 152-17
We would love to hear what you have to say about this pattern!
If you want to leave a question, please make sure you select the correct category in the form below, to speed up the answering process. Required fields are marked *.