
Popular categories
Looking for a yarn?


Comments / Questions (34)
![]() Nadège wrote:
Nadège wrote:
Bonsoir ! Je suis perdue aux rangs raccourcis pour le col... J'ai beau regarder les tutoriels, je comprends pas. Comment faire ? Merci de votre aide !
30.11.2018 - 20:21DROPS Design answered:
Bonjour Nadège, pour que le col retombe bien, on va tricoter des rangs raccourcis en commençant par le côté extérieur (pas côté épaule): tricotez au point de riz ainsi: *2 rangs sur toutes les mailles du col, 2 rangs sur les 6 premières mailles seulement*, répétez ces 4 rangs jusqu'à la hauteur indiquée pour votre taille (= 7-8 cm depuis les mailles rabattues pour l'épaule). Pour le col du devant droit, vous commencez les rangs raccourcis sur l'endroit, pour le col du devant gauche, vous les commencez sur l'envers. Bon tricot!
03.12.2018 - 08:00
![]() Nadège wrote:
Nadège wrote:
Re-Bonjour ! J'ai encore une question: lorsque j'ai fini le devant droit plus manche, tout est sur les arrêts de mailles, je dois couper le fil et recommencer une autre pièce pour le devant gauche + manche? Merci pour votre aide!
12.11.2018 - 12:56DROPS Design answered:
Bonjour Nadège, tout à fait. Après avoir tricoté le devant gauche + manche, vous allez tricoter le dos en tricotant d'abord les mailles du devant gauche (sur l'endroit), puis vous monterez les mailles de l'encolure dos, et vous tricoterez les mailles du devant droit. Les mailles en attente pour le col des 2 devants restent en attente jusqu'à la fin du dos, vous les tricoterez ensuite séparément et vous les assemblerez. Bon tricot!
12.11.2018 - 13:52
![]() Amelia wrote:
Amelia wrote:
Estoy atascada desde aquí: "Continuar el patrón de esta manera AL MISMO TIEMPO que el patrón en el diagrama A.1 es desviado 1 pt en el lado del centro del frente por cada vez que es tejido (es decir, en cada hilera por el LD tejer 1 pt menos en pt jersey antes de tejer A.1), para obtener una línea oblicuamente pareja en dirección del hombro." ¿Hay que seguir montando nuevos puntos al final de cada hilera? ¿cómo se crea la manga? Gracias!
08.11.2018 - 11:37DROPS Design answered:
Hola Amelia. Las mangas se trabajan junto con el cuerpo. Se montan 4 puntos para las cenefas de las mangas solamente una vez a cada lado.
30.12.2018 - 17:04
![]() Nadège wrote:
Nadège wrote:
Bonsoir ! Je suis bloquée à ce niveau là: "Tricoter le rang suivant sur l'endroit ainsi: A.3 (= 12 m), jersey au-dessus des 9-10-12-13-15-17 m suiv, A.4 (= 4 m), 1 m end, 1 m lis au point mousse. Tricoter un rang sur l'envers de la même façon." Comment tricoter la même chose sur l'enver? Je dois commencer par la maille lisière et terminer par A.3?
06.11.2018 - 15:19DROPS Design answered:
Bonjour Nadège, sur l'endroit vous avez tricoté: A.3, 9-17 m jersey (cf taille), A.4, 1 m end, 1 m point mousse. Sur l'envers, tricotez: 1 m point mousse, 1 m env, le rang suivant de A.4, vos mailles jersey et terminez par le rang suivant de A.3. Bon tricot!
07.11.2018 - 08:52
![]() Andreia Guerreiro wrote:
Andreia Guerreiro wrote:
Boa tarde, estou a ter dificuldade na parte Frente Direita+Manga, onde comecamos a fazer o diagrama A.1. Nao consigo compreender ,depois de fazermos o A.1 e de aumentarmos 4 malhas para a manga, quando fazemos a volta do avesso e depois pelo direito inclinarmos uma malha antes do A.1. Obrigada
27.01.2018 - 12:43DROPS Design answered:
A inclinação de A.1 é para continuar a dar o feitio do raglan. Em todas as carreiras pelo direito tricotar 1 m/p em ponto meia a menos antes de tricotar A.1), para ter uma linha diagonal contínua que sobe em direcção ao ombro. Portanto, tricota 1 malha meia a menos nas voltas do direito antes de tricotar A.1. No avesso tricota as malhas como elas se apresentam. Bom tricô!
29.01.2018 - 11:42
![]() Trine-Lise Nordstrand wrote:
Trine-Lise Nordstrand wrote:
Skjønner ikke helt oppskriften her. Når jeg legger opp 4 nye masker for ermet, skal ermet strikkes for seg selv, eller strikkes sammen med resten av fronten?
22.12.2013 - 22:02
![]() Trine-Lise Nordstrand wrote:
Trine-Lise Nordstrand wrote:
Skjønner ikke helt oppskriften her. Når jeg legger opp 4 nye masker for ermet, skal ermet strikkes for seg selv, eller strikkes sammen med resten av fronten?
22.12.2013 - 22:01DROPS Design answered:
Hei Trine-Lise. Du strikker ermet sammen med resten af forstk
29.12.2013 - 10:37
![]() Martina Weißbach wrote:
Martina Weißbach wrote:
Hallo, Polaris Maschenprobe 7M x 8R: Für das rechte Vorderteil soll man 21 Maschen anschlagen. Das ergibt 30 cm Breite. Laut Skizze beginnt man das Vorderteil aber mit nur 13 cm und nimmt dann vor der Randmasche je eine Masche zu, bis man auf 22 cm Breite kommt. ??? Grüße Martina
21.12.2013 - 13:59DROPS Design answered:
Liebe Martina, die Form liess sich in der Schnittübersicht nicht anders darstellen. Die 21 M sind nicht nur die Blendenmaschen, folgen Sie genau der Anleitung, dann erhalten Sie die Form wie auf dem Foto.
26.12.2013 - 11:05
![]() Alessandra wrote:
Alessandra wrote:
Da fare subito,pratico leggero,da non togliere mai.
08.08.2013 - 09:16
![]() Fulconis wrote:
Fulconis wrote:
Un gilet tout en douceur pour les longues soirées d'hiver. Ne reste plus qu'à recevoir les explications. Merci
22.06.2013 - 22:30
|
||||||||||||||||
Celia#celiacardigan |
||||||||||||||||
 |
 |
|||||||||||||||
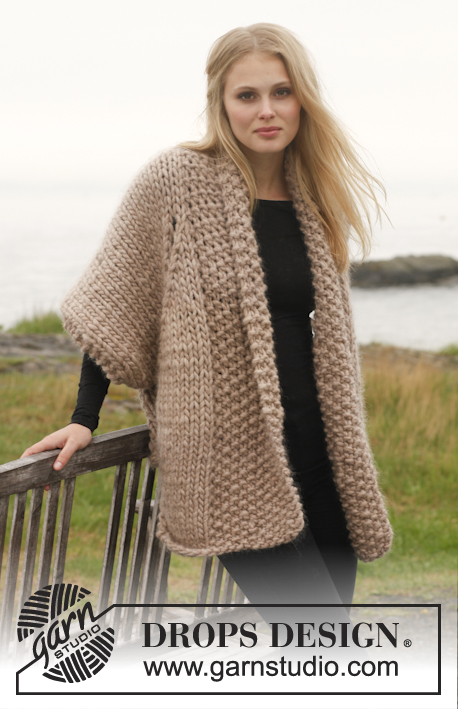
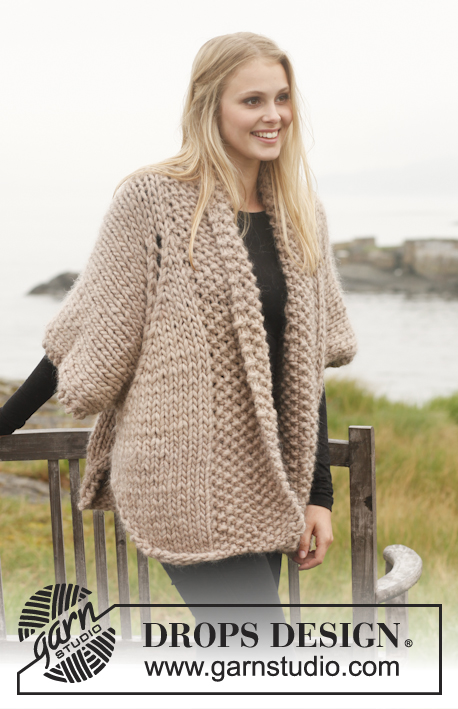
Knitted DROPS jacket with lace pattern in ”Polaris”. Size: S - XXXL.
DROPS 151-31 |
||||||||||||||||
|
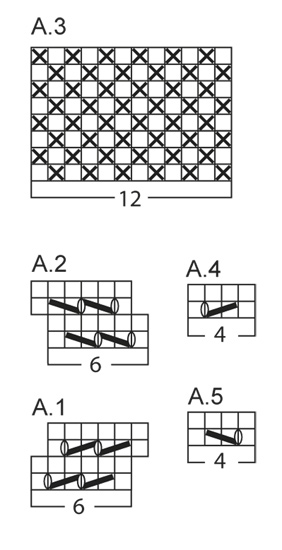
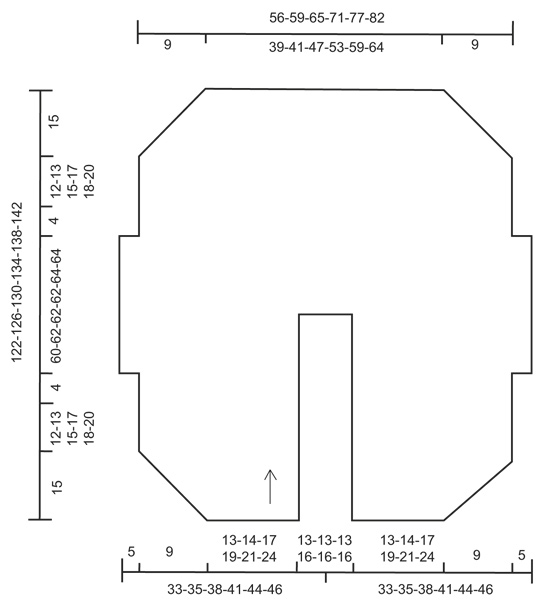
GARTER ST (back and forth on circular needle): K all rows. 1 ridge = 2 rows K. PATTERN: See diagrams A.1 to A.5. The diagrams show all rows in pattern seen from RS. TIP FOR SWITCHING YARN: When switching ball with Polaris, split the old strand in two on the last 15 cm – cut off one part, do the same on the new strand. Place the first and last 15 cm on top of each other so that the yarn is the normal thickness and continue to work – this is done to make the strand switch invisible in the yarn. INCREASE TIP: Inc 1 st from RS by making 1 YO, on next row P YO twisted (i.e. work in back loop of st instead front) to avoid holes. DECREASE TIP: Dec inside 1 edge st in garter st. All dec are done from RS! Dec before 1 edge st as follows: K 2 tog. Dec after 1 edge st as follows: Slip 1 st as if to K, K 1, psso. ---------------------------------------------------------- RIGHT FRONT PIECE + SLEEVE: To make room for all sts work piece back and forth on circular needle with 1 edge st in GARTER ST in the side – see explanation above! READ TIP FOR SWITCHING YARN! Cast on 21-22-24-25-27-29 sts on circular needle size 15 mm with Polaris. On first row from RS work as follows: PATTERN according to diagram A.3 over the first 12 sts (= band), 8-9-11-12-14-16 sts in stocking st, inc 1 st inside 1 edge st - READ INCREASE TIP, and finish with 1 edge st in garter st = 22-23-25-26-28-30 sts. Continue with stocking st and A.3 over band, AT THE SAME TIME on every other row (i.e. every row from RS) inc 1 st inside 1 edge st until 6 inc in total have been done = 27-28-30-31-33-35 sts. Continue in A.3 and stocking st until piece measures 27-28-30-32-33-35 cm. Work next row from RS as follows: A.3 (= 12 sts), stocking st over the next 9-10-12-13-15-17 sts, A.4 (= 4 sts), K 1, 1 edge st in garter st. Work a row back with the same pattern. Work next row from RS as follows: A.3 over band, stocking st over the next 8-9-11-12-14-16 sts, A.1 (= 6 sts), K 1, AT THE SAME TIME cast on 4 new sts at the end of row for sleeve = 31-32-34-35-37-39 sts on needle (piece now measures approx. 31-32-34-36-37-39 cm from cast-on edge). Work the new sts in stocking st with 2 edge sts in garter st at the edge of sleeve. Continue the pattern like this AT THE SAME TIME as pattern in diagram A.1 is displaced 1 st towards mid front every time it is worked (i.e. on every row from RS work 1 st less in stocking st before A.1 is worked), to get an even line diagonally up towards shoulder. When A.1 meets A.3 mid front work in stocking st over sts in A.1. Then when piece measures 61-63-65-67-69-71 cm, insert a marker in piece (= mid on top of shoulder), NOW MEASURE PIECE FROM HERE! On next row from WS continue as follows (from sleeve and in): 2 edge sts in garter st, stocking st over the next 17-18-20-21-23-25 sts, slip these 19-20-22-23-25-27 sts on 1 stitch holder, work A.3 as before over the last 12 sts on needle and slip these 12 sts on 1 new stitch holder for collar. LEFT FRONT PIECE + SLEEVE: Work as right front piece but reversed. Work pattern according to diagram A.2 instead of A.1 and A.5 instead of A.4. Work the 12 sts in diagram A.3 at the top by shoulder from WS before slipping them on 1 stitch holder. Work the rest of row, continue with back piece without slipping sts on 1 stitch holder. BACK PIECE: Work 1st row from RS as follows: Work 19-20-22-23-25-27 sts from left front piece, cast on 9-9-9-11-11-11 new sts (= back of neck) and work the 19-20-22-23-25-27 sts from right front piece on to circular needle = 47-49-53-57-61-65 sts. Continue back and forth in stocking st with 2 edge sts in garter st in each side. Continue until there are approx. 4-5-5-5-6-6 cm in stocking st from the marker on shoulder. Work next row from RS as follows: 2 edge sts in garter st, 14 sts in stocking st, A.1 (= 6 sts), 3-5-9-13-17-21 sts in stocking st, A.2 (= 6 sts), 14 sts in stocking st, 2 edge sts in garter st. Work 1 row back as before with P from WS and 2 edge sts in garter st in each side. On next row from RS work as follows: 2 edge sts in garter st, 13 sts in stocking st, A.1 (= 6 sts), 5-7-11-15-19-23 sts in stocking st, A.2 (= 6 sts), 13 sts in stocking st, 2 edge sts in garter st. Continue the pattern like this - NOTE: Lace pattern in diagram A.1 and A.2 will continue to displace 1 st towards the sides every time they are worked, so that pattern get an even line diagonally from shoulder down to the side (i.e. on every row from RS work 1 st in stocking st less before A.1 and after A.2 towards the sides and work 2 sts more in stocking st after A.1 and before A.2 towards the middle). Continue in stocking st and pattern according to diagram A.1 and A.2 until 2 edge sts in garter and 3 sts in stocking st remain in each side after A.1 and A.2 have been worked (sleeve measures 60-62-62-62-64-64 cm in total from the inc sts). On next row from RS work as follows: Cast off 4 sts, 1 edge st in garter st, K 2, A.4 (= 4 sts), work 25-27-31-35-49-43 sts in stocking st, A.5 (= 4 sts), K 5, 2 edge sts in garter st = 43-45-49-53-57-61 sts. Turn piece and cast off 4 sts from WS = 39-41-45-49-53-57 sts on needle incl 1 edge st in garter st in each side. Piece now measures 34-35-35-35-36-36 cm from marker on shoulder. Continue in stocking st with 1 edge st in garter st in each side until piece measures 46-48-50-52-54-56 cm. On next row from RS, dec 1 st in each side of piece from RS - SEE DECREASE TIP! Repeat dec in each side every other row (i.e. every row from RS) 5 more times (= 6 dec in total in each side). When piece measures 61-63-65-67-69-71 cm from marker on shoulder and there are 27-29-33-37-41-45 sts on needle, cast off all sts. COLLAR: Slip the 12 collar sts from stitch holder on right front piece back on needle. Then continue with moss st as before AT THE SAME TIME work short rows in moss st over collar, beg from RS = towards mid front: * 2 rows over all sts, 2 rows back and forth over the outermost 6 sts *. Repeat from *-* until collar measures approx. 7-7-7-8-8-8 cm at the most narrow. Loosely cast off. Left half of collar are worked the same way but work 1 row over all sts before continuing with short rows. Sew collar parts tog edge to edge mid back, and sew collar to neck in the back of neck. ASSEMBLY: Sew sleeve and side seam in one, sew tog edge to edge in front loop of outermost st to avoid a chunky seam. |
||||||||||||||||
Diagram explanations |
||||||||||||||||
|
||||||||||||||||
 |
||||||||||||||||
 |
||||||||||||||||
Have you finished this pattern?Tag your pictures with #dropspattern #celiacardigan or submit them to the #dropsfan gallery. Do you need help with this pattern?You'll find 24 tutorial videos, a Comments/Questions area and more by visiting the pattern on garnstudio.com. © 1982-2026 DROPS Design A/S. We reserve all rights. This document, including all its sub-sections, has copyrights. Read more about what you can do with our patterns at the bottom of each pattern on our site. |
||||||||||||||||


With over 40 years in knitting and crochet design, DROPS Design offers one of the most extensive collections of free patterns on the internet - translated to 17 languages. As of today we count 324 catalogues and 12290 patterns translated into English (UK/cm). 12290
We work hard to bring you the best knitting and crochet have to offer, inspiration and advice as well as great quality yarns at incredible prices! Would you like to use our patterns for other than personal use? You can read what you are allowed to do in the Copyright text at the bottom of all our patterns. Happy crafting!
Post a comment to pattern DROPS 151-31
We would love to hear what you have to say about this pattern!
If you want to leave a question, please make sure you select the correct category in the form below, to speed up the answering process. Required fields are marked *.