
Popular categories
Looking for a yarn?


Comments / Questions (27)
![]() Anja wrote:
Anja wrote:
Hvordan regner en ut ant. staver hvis en ønsker teppet større enn 21 omg.?
17.12.2023 - 23:09DROPS Design answered:
Hej Anja, Vi har desværre ingen opskrift på en større teppe, men prøv at øge som de sidste 3 omgange :)
19.12.2023 - 12:05
![]() Vmorin wrote:
Vmorin wrote:
Bonjour, Pour la bordure, commence t-on par 3ml ? Si oui, les brides se font-elles à la base des 3ml ou dans la première Bride du rang précédent ? Aussi, il semble que je n'arrive pas à la fin et à fermer le rang à la 5e bride après l'arceau précédent...est-ce normal N
08.02.2020 - 10:27DROPS Design answered:
Bonjour Mme Vmorin, tout à fait (= cf INFO CROCHET 2), on va donc commencer le tour par: 3 ml, 2 B dans la 1ère B, 1 ml, 3B dans la même B, 2 ml, sauter les 3 B suivantes et continuer ensuite en répétant de *à* tout le tour. Vérifiez bien que votre nombre de mailles est bien divisible par 5 pour que la bordure tombe juste. Bon crochet!
10.02.2020 - 07:59
![]() Irene Claudete wrote:
Irene Claudete wrote:
Olá,parabéns pelo ótimo trabalho. Tem qualidade ,fácil de entender. Agradeço a oportunidade de,aprender e me superar cada vez mais...!
11.12.2019 - 13:32
![]() Rose-Marie Björkan wrote:
Rose-Marie Björkan wrote:
Hej! Tänkte höra om jag vill göra mattan ännu större, hur går jag vidare med ökningarna då? Första gången jag virkar en rund matta efter beskrivning, och måste säga att den är otroligt välgjord och lätt att följa, fint blir det också😊
31.10.2019 - 10:29DROPS Design answered:
Hej Rose-Marie, vad kul att höra :) Vi har tyvärr inget mönster på en större matta. Men kanske du kan försöka med samma ökningar som sista 3 varven... Lycka till :)
01.11.2019 - 09:52
![]() Ayse wrote:
Ayse wrote:
Hi, I couldn't understand the explanation for row 6. 1 dc + 2 dc on 1 dc makes 66 sts in the end. But it should 60.
01.09.2019 - 19:14DROPS Design answered:
Dear Ayse, you will repeat a total of 15 times (1 dc in next 2 dc, 2 dc in next dc) so that you will have 15 x 4 dc = 60 dc. Happy crocheting!
02.09.2019 - 10:48
![]() Irene Claudete wrote:
Irene Claudete wrote:
Ótimo, bem explicado segui o esquema . Obrigado .
15.05.2019 - 12:15
![]() Aurélia wrote:
Aurélia wrote:
Après vérification je me suis trompée : c’est bien 6 brides dans la même maille :) oops désolé
28.01.2019 - 16:09
![]() Aurélia wrote:
Aurélia wrote:
Bonjour merci pour le modèle mais il semblerait que les corrections apportées à la fin pour la bordure éventail soit toujours erronée. A mon avis il faut faire 3 brides dans une maille - 1 maille - puis 3 brides dans la maille à côté - 2 mailles on saute 4 brides et on recommence car 6 brides dans une maille me semble trop serré mais je débute, peut être ai je tort. Merci en tout cas.
28.01.2019 - 16:02
![]() EILEEN wrote:
EILEEN wrote:
Hi from Ireland .May i say a big thank you for this wonderful pattern and in uk terms . I shall be making the rug from t-shirt yarn with a big size 15 hook. This shall be my first rug i have ever made as this is why i came across your FAB pattern ..... So Thank you ...
28.05.2018 - 03:12
![]() Irina Lech wrote:
Irina Lech wrote:
Hallo, haben Sie zu der Anleitung auch eine Fortsetzung?
24.05.2018 - 13:42DROPS Design answered:
Liebe Frau Lech, der Teppich kann bis Runde 15 (= Teppich 105 cm) oder bis Runde 21 (= Teppich 125 cm) + Muschelkante. Viel Spaß beim häkeln!
24.05.2018 - 15:15
|
|
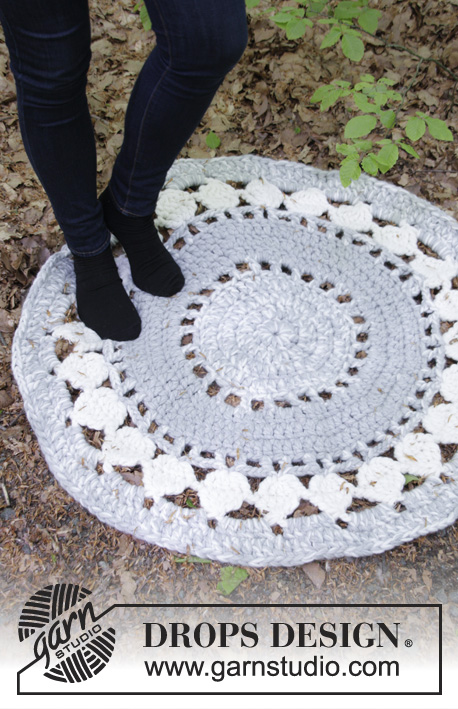
Cloud Nine#cloudninerug |
|
 |
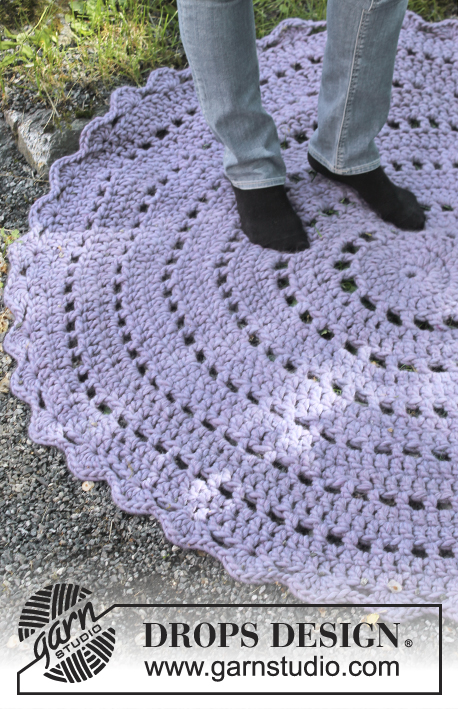 |
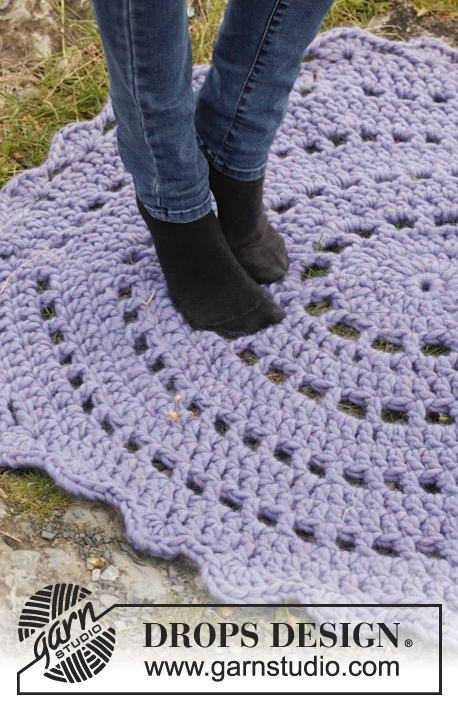
Crochet DROPS rug in "Polaris".
DROPS 151-46 |
|
|
CROCHET INFO 1: Replace first dc at beg of every dc round with 1 ch. Finish every round with 1 sl st in ch from beg of round. CROCHET INFO 2: Replace first tr at beg of every tr round with 3 ch. Finish every round with 1 sl st in 3rd ch from beg of round. CROCHET TIP: The rug can be made smaller by stopping after a round with only tr before fan edge is worked. ---------------------------------------------------------- RUG APPROX. 105 CM: Work 4 ch with Polaris on hook size 12 mm and form a ring with 1 sl st in first ch. ROUND 1: READ CROCHET INFO 1. Work 10 dc in ch-ring. ROUND 2: READ CROCHET INFO 2. Work 2 tr in every dc = 20 tr. ROUND 3: Work * 1 tr in first tr, 2 tr in next tr *, repeat from *-* the entire round = 30 tr. ROUND 4: Work 1 tr, * 3 ch, skip 1 tr and work 1 tr in next tr *, repeat from *-* the entire round and finish with 3 ch, skip 1 tr and work 1 sl st in first tr at beg of round = 15 ch-spaces on round. ROUND 5: Work 1 tr in every tr and 2 tr in every ch-space the entire round = 45 tr. ROUND 6: Work * 1 tr in each of the next 2 tr, 2 tr in next tr *, repeat from *-* the entire round = 60 tr. ROUND 7: Work 1 tr, * 2 ch, skip 1 tr and work 1 tr in next tr *, repeat from *-* the entire round and finish with 2 ch, skip 1 tr and work 1 sl st in first tr at beg of round = 30 ch-spaces on round. ROUND 8: Work 1 tr in every tr and 2 tr in every ch-space the entire round = 90 tr. ROUND 9: Work * 1 tr in each of the next 8 tr, 2 tr in next tr *, repeat from *-* the entire round = 100 tr. ROUND 10: Work 1 tr, * 2 ch, skip 1 tr and work 1 tr in next tr *, repeat from *-* the entire round and finish with 2 ch, skip 1 tr and work 1 sl st in first tr at beg of round = 50 ch-spaces on round. ROUND 11: Work * 1 tr in each of the next 9 tr, 2 tr in next tr *, repeat from *-* the entire round – NOTE: Every ch-space from previous round is counted as 1 tr when this round is worked = 110 tr. ROUND 12: Work * 1 tr in each of the next 10 tr, 2 tr in next tr *, repeat from *-* the entire round = 120 tr. ROUND 13: Work 1 tr, * 2 ch, skip 1 tr and work 1 tr in next tr *, repeat from *-* the entire round and finish with 2 ch, skip 1 tr and work 1 sl st in first tr at beg of round = 60 ch-spaces on round. ROUND 14: Work * 1 tr in each of the next 5 tr, 2 tr in next tr *, repeat from *-* the entire round – NOTE: Every ch-space from previous round is counted as 1 tr when this round is worked = 140 tr. ROUND 15: Work * 1 tr in each of the next 13 tr, 2 tr in next tr *, repeat from *-* the entire round = 150 tr. FAN EDGE: Work * 3 tr in first tr, 1 ch, 3 tr in same tr, 2 ch, skip the next 4 tr *, repeat from *-* the entire round and finish with 1 sl st in first tr at beg of round = 30 fans around the edge. Fasten off. Piece now measures approx. 105 cm in diameter. RUG APPROX. 125 CM: Work as RUG 105 CM to and with ROUND 15 and continue as follows: ROUND 16: Work 1 tr, * 2 ch, skip 1 tr and work 1 tr in next tr *, repeat from *-* the entire round and finish with 2 ch, skip 1 tr and work 1 sl st in first tr at beg of round = 75 ch-spaces on round. ROUND 17: Work * 1 tr in each of the next 9 tr, 2 tr in next tr *, repeat from *-* the entire round – NOTE: Every ch-space from previous round is counted as 1 tr when this round is worked = 165 tr. ROUND 18: Work * 1 tr in each of the next 10 tr, 2 tr in next tr *, repeat from *-* the entire round = 180 tr. ROUND 19: Work 1 tr, * 2 ch, skip 1 tr and work 1 tr in next tr *, repeat from *-* the entire round and finish with 2 ch, skip 1 tr and work 1 sl st in first tr at beg of round = 90 ch-spaces on round. ROUND 20: Work * 1 tr in each of the next 8 tr, 2 tr in next tr *, repeat from *-* the entire round – NOTE: Every ch-space from previous round is counted as 1 tr when this round is worked = 200 tr. ROUND 21: Work * 1 tr in each of the next 19 tr, 2 tr in next tr *, repeat from *-* the entire round = 210 tr. FAN EDGE: Work * 3 tr in first tr, 1 ch, 3 tr in same tr, 2 ch, skip the next 4 tr *, repeat from *-* the entire round and finish with 1 sl st in first tr at beg of round = 42 fans around the edge. Fasten off. Piece now measures approx. 125 cm in diameter. |
|
Have you finished this pattern?Tag your pictures with #dropspattern #cloudninerug or submit them to the #dropsfan gallery. Do you need help with this pattern?You'll find 8 tutorial videos, a Comments/Questions area and more by visiting the pattern on garnstudio.com. © 1982-2026 DROPS Design A/S. We reserve all rights. This document, including all its sub-sections, has copyrights. Read more about what you can do with our patterns at the bottom of each pattern on our site. |
|


With over 40 years in knitting and crochet design, DROPS Design offers one of the most extensive collections of free patterns on the internet - translated to 17 languages. As of today we count 324 catalogues and 12290 patterns translated into English (UK/cm). 12290
We work hard to bring you the best knitting and crochet have to offer, inspiration and advice as well as great quality yarns at incredible prices! Would you like to use our patterns for other than personal use? You can read what you are allowed to do in the Copyright text at the bottom of all our patterns. Happy crafting!
Post a comment to pattern DROPS 151-46
We would love to hear what you have to say about this pattern!
If you want to leave a question, please make sure you select the correct category in the form below, to speed up the answering process. Required fields are marked *.