
Popular categories
Looking for a yarn?


Comments / Questions (60)
![]() Liesbeth wrote:
Liesbeth wrote:
Goedenavond, Het is gelukt! :) Dat wilde ik toch ook even kwijt na al mijn vragen.
23.01.2014 - 19:44
![]() Liesbeth wrote:
Liesbeth wrote:
Geachte mevrouw, Na enig gepuzzel denk ik dat ik weet hoe ik de tweede regel moet lezen ((Ga verder met 1 v in 2e l vanaf haak, haak dan 1 v in elke van de volgende 2 l, *sla 1 l over, i v in elke volgende 6 l* , herhaal...)Wanneer ik dit doe kom ik op 57 v uit en niet op 58. Wat doe ik verkeerd of staat er een foutje in het patroon? Met vriendelijke groet, Liesbeth
23.01.2014 - 13:43DROPS Design answered:
Hoi Liesbeth. Je moet niet vergeten de 2. l van het begin van de toer mee te tellen (Ga verder met 1 v in 2e l vanaf haak). Deze vervangt de 1e v van de toer. Lees ook INFORMATIE VOOR HET HAKEN.
24.01.2014 - 10:01
![]() Liesbeth wrote:
Liesbeth wrote:
Geachte mevrouw, meneer, zijn er haakschema's van dit patroon beschikbaar? Ik heb moeite met het lezen van de uitgeschreven tekst. Met vriendelijke groet, Liesbeth Molenaar
23.01.2014 - 12:52DROPS Design answered:
Hoi Liesbeth. Helaas maken we niet haakschema's voor alle onze haakpatronen. Maar we proberen dan altijd de toeren zorgvuldig te beschrijven in het patroon.
24.01.2014 - 10:00
![]() Liesbeth wrote:
Liesbeth wrote:
Goedenavond, Ik heb gisteren een pagina op de site gevonden die uitlegt waar de afkortingen v, l, stk enzo voor staan. Dit kan ik niet meer terug vinden. Zouden jullie mij kunnen vertellen waar ik dat kan vinden? Dit heb ik nodig voor het lezen van het patroon. Ik doe dit voor het eerst. Met vriendelijke groet, Liesbeth Molenaar
21.01.2014 - 20:50DROPS Design answered:
Hoi Liesbeth. Je moet kijken onder Tips & Hulp, de handwerkschool en de woordenlijst. Maar standaard is l = lossen, v = vasten, hv = halve vasten, stk = stokjes en zo voort.
22.01.2014 - 10:29
![]() Marliesa Wahlberg wrote:
Marliesa Wahlberg wrote:
Beskrivning och antal maskor verkar inte stämma i stycket om ärmen.
18.10.2013 - 17:52
![]() Kathrin wrote:
Kathrin wrote:
Hallo! Ich habe eine Frage zum Ärmel in dieser Anleitung! Muß man nach den ersten Zunahmen in den Staebchenreihen nicht erst einige Zentimeter im Muster Häkeln bis die Armkugel ausgearbeitet wird?In der Anleitung arbeitet man diese schon nach den ersten Zunahmen aus. Habe ich da einen Denkfehler?MfG! Kathrin
11.07.2013 - 07:44DROPS Design answered:
Liebe Kathrin, die Ärmel werden ja von oben nach unten gehäkelt und zu Beginn ist man also ganz oben an der Armkugel. Sie beginnen gleich mit den Aufnahmen, wie Sie auch bis ganz zum Schluss Abnahmen machen, wenn Sie Ärmel von unten nach oben häkeln.
12.07.2013 - 11:24
![]() Chiara wrote:
Chiara wrote:
La spiegazione è chiarissima, grazie. Utilizzerò questo calcolo anche per altri modelli. Buonasera.
03.07.2013 - 20:51
![]() Chiara wrote:
Chiara wrote:
Vorrei realizzare questo modello taglia 3-4 anni con il filato Muscat. Quanti gomitoli devo acquistare? Grazie, saluti.
03.07.2013 - 17:30DROPS Design answered:
Buonasera. Bisogna calcolare il n° complessivo di metri con il filato indicato e dividerlo per i metri di un gomitolo del filato scelto. Per il colore grigio blu: 5 gomitoli merino extrafine x 105 metri = 525 m : 100 m (= metri in 1 gomitolo di muskat) = 5,25 , quindi 6 gomitoli. Colore verde / grigio chiaro: 4 gomitoli x 105 m = 420 m : 100 m = 4,20 quindi 5 gomitoli. La tensione con il Muskat deve però essere la stessa di quella indicata nel modello. Ci riscriva se non è chiaro. Buon lavoro!
03.07.2013 - 18:59
![]() Alike wrote:
Alike wrote:
Super trui voor mij stoere vent. leuk voor de komende winter. En Merino is heerlijk om te dragen
28.06.2013 - 13:24
![]() AnnaKarin wrote:
AnnaKarin wrote:
Färdigt mått på denna är mindre än på andra mönster ni har i samma storlek, ska de vara så?
19.06.2013 - 15:19
|
|
Little Oliver#littleoliversweater |
|
|
|
|
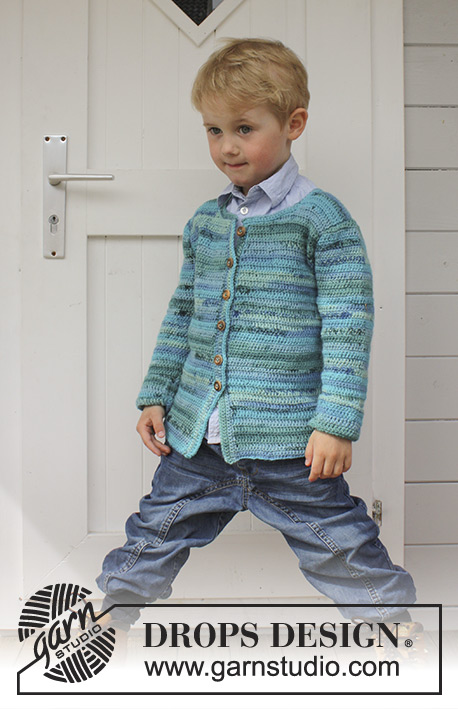
Crochet jumper with vent and buttons at the front in DROPS Merino Extra Fine. Size children 3 - 12 years.
DROPS Children 24-28 |
|
|
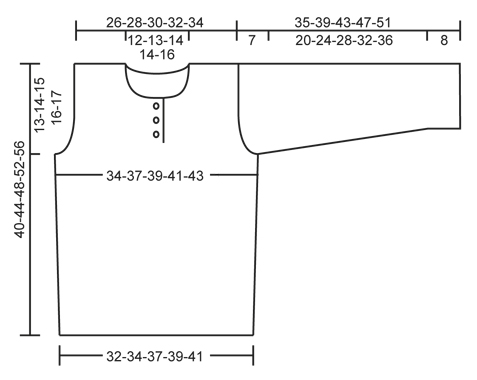
CROCHET INFO: On every dc row replace first dc with 1 ch. On every tr row replace first tr with 3 ch. PATTERN ON BODY: ROW 1: 1 tr in every dc in light greyish green. ROW 2: 1 dc in every tr in light greyish green. ROW 3: 1 tr in every dc in grey blue ROW 4: 1 dc in every tr grey blue. Repeat rows 1 to 4. PATTERN SLEEVE: ROW 1: 1 dc in every tr grey blue. ROW 2: 1 tr in every dc in grey blue ROW 3: 1 dc in every tr grey blue. ROW 4: 1 tr in every dc in grey blue ROW 5: 1 dc in every tr grey blue. ROW 6: 1 tr in every dc in grey blue ROW 7: 1 dc in every tr in light greyish green. ROW 8: 1 tr in every dc in light greyish green. Repeat rows 1 to 8. DECREASE TIP: Dec 1 st by working 2 sts tog. Work 2 dc tog as follows: Insert hook in first st and pull thread through, insert hook in next st and pull thread through, make 1 YO and pull thread through all 3 loops on hook. Work 2 tr tog as follows: Work 1 tr in first st but wait with last pull through, work 1 tr in next st but on last pull through, pull thread through all 3 loops on hook. -------------------------------------------------------- JUMPER: To make the texture the same on the piece work all parts back and forth and sew tog when finished. BACK PIECE: Work 67-71-76-81-85 ch with grey blue on hook size 4 mm. Continue with 1 dc in 2nd ch from hook, then 1 dc in each of the next 2-6-4-2-6 ch, * skip 1 ch, 1 dc in each of the next 6 ch *, repeat from *-* the entire row = 58-62-66-70-74 dc (first ch = 1 dc). READ CROCHET INFO! Turn and work 4 rows with 1 dc in every dc. Then work PATTERN BODY until finished measurements - see explanation above. REMEMBER THE CROCHET TENSION! When piece measures 10-11-12-13-14 cm, inc 1 st in each side by working 2 sts in the second and next to last st. Repeat inc when piece measures 20-21-22-23-24 cm = 62-66-70-74-78 sts. When piece measures approx. 27-30-33-36-39 cm (adjust so that next row is a row with dc), dec for armholes as follows: Work sl sts over the first 4 tr, then work dc until 4 tr remain, turn. * Work 3 ch (= 1 tr), then work the next 2 tr tog – SEE DECREASE TIP, then work tr until 3 dc remain, work the next 2 tr tog, then 1 tr in last dc. Turn and work 1 row with dc over all sts, turn *. Repeat from *-* 3 more times = 46-50-54-58-62 sts on row. Continue to work until piece measures approx. 39-43-47-51-55 cm. Now work 2 rows with pattern as before only over the 12-13-14-16-17 sts in each side (the middle 22-24-26-26-28 sts = neck). Fasten off. FRONT PIECE: Work as back piece until piece measures approx. 27-30-33-36-39 cm (adjust so that next row is a row with dc) = 62-66-70-74-78 tr. Now beg armhole dec - at the same time divide mid front for vent. 1ST SIDE: Work sl sts over the first 4 tr, then work dc over the next 29-31-33-35-37 tr. * Turn and work tr until 3 dc remain, work the next 2 tr tog – SEE DECREASE TIP, then work 1 tr in last dc. Turn and work dc over all tr *, repeat from *-* 3 more times. 8 sts have been dec in total for armhole and 25-27-29-31-33 sts remain on row. Continue as before. When piece measures approx. 35-38-42-45-49 cm (adjust so that next row beg from the side), beg neck dec. Now only work over the first 17-18-19-21-22 sts. Turn and work back - at the same time work the first 4 sts towards neck tog 2 by 2 – SEE DECREASE TIP! On next row work the 2 outermost sts towards neck tog, repeat this dec on every row 2 more times = 12-13-14-16-17 sts remain on shoulder. Continue to work until piece measures 40-44-48-52-56 cm, fasten off. 2ND SIDE: Beg mid front and work 1 dc at the back of each of the outermost 4 sts from 1st side (so that the button bands overlap at the bottom). Then work dc until 4 tr remain, turn and work back. Then work this side as 1st side. SLEEVE: Worked top down. Work 32-35-38-43-46 ch on hook size 4 mm with grey blue. Work first row as follows: Work 1 dc in 2nd ch from hook, work 1 dc in each of the next 2-1-0-1-0 ch, * skip 1 ch, 1 dc in each of the next 3 ch *, repeat from *-* the entire row = 24-26-28-32-34 dc on row (this is 1st row in PATTERN SLEEVE - see explanation above). Then continue stripes as explained in PATTERN SLEEVE. AT THE SAME TIME inc in each side on every row with tr as follows: Inc on every tr row by working 2 tr in st inside outermost st in each side (= 1 tr inc in each side – NOTE: on rows with dc work 1 dc in every tr without inc). Continue inc like this until there are 38-40-42-46-48 sts on row (adjust so that next row is a row with dc). Cut the yarn and work as follows: Work 4 loose ch, work 1 dc in each of the 38-40-42-46-48 tr on row and then work 6 loose ch, turn piece and work 1 tr in 4th ch from hook, 1 tr in each of the next 2 ch, work 1 tr in each of the 38-40-42-46-48 dc on row and finish with 1 tr in each of the 4 ch at the end of row = 46-48-50-54-56 tr on row. Insert 1 marker at the end in one side of piece. Sleeve cap is now done. Continue down the sleeve as follows: Continue with PATTERN SLEEVE in stripes as before. AT THE SAME TIME when piece measures 2 cm from marker, dec 1 tr/dc in each side by working the second and third tr/dc and the 2 next to last tr/dc tog – SEE DECREASE TIP! Repeat dec every 4th-4th-5th-5th-5th row 5-6-6-7-8 more times (= 6-7-7-8-9 dec in total) = 34-34-36-38-38 sts on row. AT THE SAME TIME when sleeve measures approx. 30-34-39-43-47 cm – adjust after 1 stripe with light greyish green, work with grey blue until finished measurements. When piece measures 35-39-43-47-51 cm, fasten off. Work another sleeve. ASSEMBLY: Sew shoulder seams, side seams and sleeve seams edge to edge to avoid a chunky seam. Sew in the sleeves in body. Sew the buttons on right side of mid front and button through sts. CROCHET EDGE: Work an edge up along the vent mid front, around the neck and down along the other vent at the front. Beg from RS and work with grey blue on hook size 4 mm as follows: Work 1 dc in 1st st, * 1 ch, 1 dc in next st *, repeat from *-* - make sure that the edge is nice and even. Fasten off. |
|
 |
|
Have you finished this pattern?Tag your pictures with #dropspattern #littleoliversweater or submit them to the #dropsfan gallery. Do you need help with this pattern?You'll find 9 tutorial videos, a Comments/Questions area and more by visiting the pattern on garnstudio.com. © 1982-2026 DROPS Design A/S. We reserve all rights. This document, including all its sub-sections, has copyrights. Read more about what you can do with our patterns at the bottom of each pattern on our site. |


With over 40 years in knitting and crochet design, DROPS Design offers one of the most extensive collections of free patterns on the internet - translated to 17 languages. As of today we count 324 catalogues and 12290 patterns translated into English (UK/cm). 12290
We work hard to bring you the best knitting and crochet have to offer, inspiration and advice as well as great quality yarns at incredible prices! Would you like to use our patterns for other than personal use? You can read what you are allowed to do in the Copyright text at the bottom of all our patterns. Happy crafting!
Post a comment to pattern DROPS Children 24-28
We would love to hear what you have to say about this pattern!
If you want to leave a question, please make sure you select the correct category in the form below, to speed up the answering process. Required fields are marked *.