
Popular categories
Looking for a yarn?


Comments / Questions (60)
![]() Geja wrote:
Geja wrote:
In welke steek moet het proeflapje/stekenproef gehaakt worden?
10.07.2017 - 09:46DROPS Design answered:
Hoi Geja, Het proeflapje moet in patroon gebreid worden. Het patroon staat verderop (na de intro) uitgelegd.
10.07.2017 - 18:15
![]() Aznar wrote:
Aznar wrote:
écouler les 2 B suiv ens – VOIR DIMINUTIONS, continuer en B jusqu'à ce qu'il reste 3 ms, écouler les 2 B suiv ens, 1 B dans la dernière ms. Tourner Il reste 3 ms comment j écoule les 2 B suiv ens + 1 B il y a que les 3 ms
08.07.2017 - 18:20DROPS Design answered:
Bonjour Mme Aznar, crochetez 1 B dans la m suivante mais ne faites pas le dernier jeté, 1 B dans la m suivante et au dernier jeté, écoulez les 3 boucles sur le crochet, terminez par 1 B dans la dernière ms. Bon crochet!
10.07.2017 - 09:29
![]() Pamela wrote:
Pamela wrote:
I am extremely confused by the instructions for the sleeves. If working top down does this mean from where the sleeve would connect to the shoulder? If so, it seems rows should decrease rather than increase. I also do not understand what is happening after reaching 38 stitches on a row. Please help clarify
06.10.2016 - 19:43DROPS Design answered:
Dear Pamela, sleeve is worked top down, ie from the top of sleeve cap (sewn to shoulder and armole on body) to wrist. You have then to inc on each side of the sleeve (as you would dec when working sleeve from bottom up) until armhole, when there are 38 sts, cut the yarn. Work now the part that will be sewn to sts dec on body for armhole: crochet 4 ch, work 1 st in each st on sleeve and crochet 6 new sts (incl. ch to turn with). You have now inc 4 sts on each side = 46 sts. Sleeve cap is done, you will then start to dec on each side of sleeve. Happy crocheting!
07.10.2016 - 08:22Polly wrote:
HI, I love this pattern, but I am struggling to make the sleeves fit. I am working to the 5/6 years pattern, but I have reached the 44cm required for the 1st side with only one decrease for the neck decrease. This doesn't seem to be enough material to connect the sleeve, which would bunch. Could you please advise how to proceed? Thank you.
20.04.2016 - 22:46DROPS Design answered:
Dear Mrs Polly, armholes should be 14 cm from bind off for armhole to shoulder. To sew sleeves, you can first add some pins around armholes arranging fabric around (top of sleeve should be at shoulder and the 4 ch worked at beg/end of sleeve should match the sts cast off on each side of body for armholes. Happy crocheting!
21.04.2016 - 08:54Sarah S wrote:
Hello, I have both sleeves made, but cannot figure out how to sew them onto the body. They came out looking strange to me as I have never crocheted a sweater with capped sleeve before. Can you please advise?
05.03.2016 - 08:18DROPS Design answered:
Dear Sarah S, you can first fix the sleeve with some pins starting from the mid top on cap of sleeve to body and towards mid under sleeve to armhole. When sleeves are placed, you can then sew them on body. Happy crocheting!
05.03.2016 - 18:11
![]() Marthe wrote:
Marthe wrote:
Hei. Jeg har det samme problemet som Andrea her oppe. Ermene passer ikke i forhold til de andre stykkene. Det blir skeivt og veldig firkantet. Litt dumt.. Skulle være en julegave dette også.. Håper dere kan finne utav denne feilen. Er tydelig at det er mange som kommenterer det samme. Takk.
02.12.2015 - 17:02
![]() FLUGEL wrote:
FLUGEL wrote:
Comment faire pour mettre ce modèle dans mes favoris, j'aimerais le tricoter plus tard ? merci d'avance cordialement, N.F.
02.11.2015 - 22:59DROPS Design answered:
Bonjour Mme Flugel, cliquez sur le petit cœur en haut à droite sur la photo, et suivez les indications. Bon crochet!
03.11.2015 - 09:41
![]() Jorunn Rong wrote:
Jorunn Rong wrote:
Hei! Har hatt mye glede av instruksjonsvideoene deres, men jeg savner tips/råd om montering av hekleplagg. På denne genseren har jeg problemer med å montere armen; når jeg syr armen sammen med bolen får jeg en "knekk" i overgangen mellom oppleggsmaskene på armen og der den begynner å skrå. Hilsener fra Bergen
19.10.2015 - 11:55DROPS Design answered:
Hej Jorun, ja der vil være et "knekk" i overgangen, men det kan du skjule ved at sy "på skrå" når du monterer. God fornøjelse!
26.11.2015 - 10:22
![]() MILOU369 wrote:
MILOU369 wrote:
Bonjour, avez-vous un correctif pour les manches? En effet, je pense qu'il doit y avoir une erreur car pour passer des 26 mailles (réduites) aux 40, il faut tout de même 14 rangs soit pour ma part 11cm environ. Bien loin des 7cm que vous indiquer sur le diagramme, et des 6cm environ pour ma part. Je ne peux donc pas assembler la manche au reste car ça ne correspond pas du tout. Merci
13.09.2015 - 22:26DROPS Design answered:
Bonjour Milou369, votre question a été transféré au Design. Merci d'avance pour votre patience.
14.09.2015 - 13:24
![]() Marion wrote:
Marion wrote:
Hall, ich habe eine Frage zu den Ärmeln. Muss ich in jeder Stäbchenreihe in der zweiten und vorletzten Masche zunehmen oder nehme ich in einer stäbchenreihe in der zweiten und in dr nächsten stäbchenreihe in der vorletzten masche zu?dazwischen dann eine reihe feste maschen. gruüße aus bayern
09.09.2015 - 11:26DROPS Design answered:
Die Zunahmen erfolgen beidseitig in JEDER Reihe, Sie nehmen also in jeder Reihe je 2 M zu.
20.09.2015 - 10:50
|
|
Little Oliver#littleoliversweater |
|
|
|
|
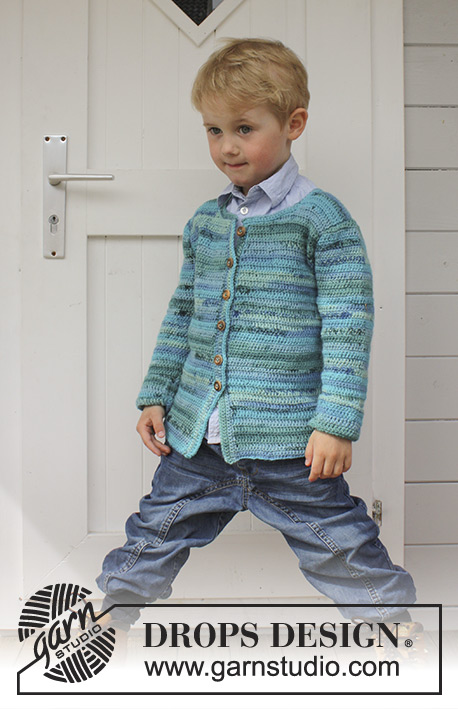
Crochet jumper with vent and buttons at the front in DROPS Merino Extra Fine. Size children 3 - 12 years.
DROPS Children 24-28 |
|
|
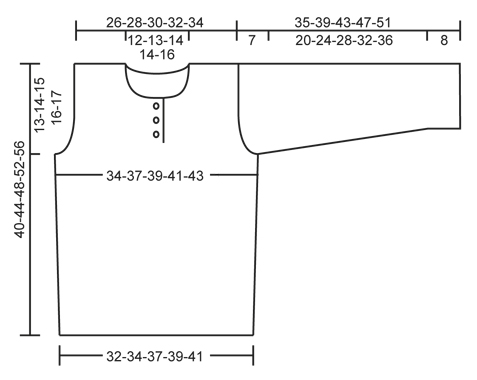
CROCHET INFO: On every dc row replace first dc with 1 ch. On every tr row replace first tr with 3 ch. PATTERN ON BODY: ROW 1: 1 tr in every dc in light greyish green. ROW 2: 1 dc in every tr in light greyish green. ROW 3: 1 tr in every dc in grey blue ROW 4: 1 dc in every tr grey blue. Repeat rows 1 to 4. PATTERN SLEEVE: ROW 1: 1 dc in every tr grey blue. ROW 2: 1 tr in every dc in grey blue ROW 3: 1 dc in every tr grey blue. ROW 4: 1 tr in every dc in grey blue ROW 5: 1 dc in every tr grey blue. ROW 6: 1 tr in every dc in grey blue ROW 7: 1 dc in every tr in light greyish green. ROW 8: 1 tr in every dc in light greyish green. Repeat rows 1 to 8. DECREASE TIP: Dec 1 st by working 2 sts tog. Work 2 dc tog as follows: Insert hook in first st and pull thread through, insert hook in next st and pull thread through, make 1 YO and pull thread through all 3 loops on hook. Work 2 tr tog as follows: Work 1 tr in first st but wait with last pull through, work 1 tr in next st but on last pull through, pull thread through all 3 loops on hook. -------------------------------------------------------- JUMPER: To make the texture the same on the piece work all parts back and forth and sew tog when finished. BACK PIECE: Work 67-71-76-81-85 ch with grey blue on hook size 4 mm. Continue with 1 dc in 2nd ch from hook, then 1 dc in each of the next 2-6-4-2-6 ch, * skip 1 ch, 1 dc in each of the next 6 ch *, repeat from *-* the entire row = 58-62-66-70-74 dc (first ch = 1 dc). READ CROCHET INFO! Turn and work 4 rows with 1 dc in every dc. Then work PATTERN BODY until finished measurements - see explanation above. REMEMBER THE CROCHET TENSION! When piece measures 10-11-12-13-14 cm, inc 1 st in each side by working 2 sts in the second and next to last st. Repeat inc when piece measures 20-21-22-23-24 cm = 62-66-70-74-78 sts. When piece measures approx. 27-30-33-36-39 cm (adjust so that next row is a row with dc), dec for armholes as follows: Work sl sts over the first 4 tr, then work dc until 4 tr remain, turn. * Work 3 ch (= 1 tr), then work the next 2 tr tog – SEE DECREASE TIP, then work tr until 3 dc remain, work the next 2 tr tog, then 1 tr in last dc. Turn and work 1 row with dc over all sts, turn *. Repeat from *-* 3 more times = 46-50-54-58-62 sts on row. Continue to work until piece measures approx. 39-43-47-51-55 cm. Now work 2 rows with pattern as before only over the 12-13-14-16-17 sts in each side (the middle 22-24-26-26-28 sts = neck). Fasten off. FRONT PIECE: Work as back piece until piece measures approx. 27-30-33-36-39 cm (adjust so that next row is a row with dc) = 62-66-70-74-78 tr. Now beg armhole dec - at the same time divide mid front for vent. 1ST SIDE: Work sl sts over the first 4 tr, then work dc over the next 29-31-33-35-37 tr. * Turn and work tr until 3 dc remain, work the next 2 tr tog – SEE DECREASE TIP, then work 1 tr in last dc. Turn and work dc over all tr *, repeat from *-* 3 more times. 8 sts have been dec in total for armhole and 25-27-29-31-33 sts remain on row. Continue as before. When piece measures approx. 35-38-42-45-49 cm (adjust so that next row beg from the side), beg neck dec. Now only work over the first 17-18-19-21-22 sts. Turn and work back - at the same time work the first 4 sts towards neck tog 2 by 2 – SEE DECREASE TIP! On next row work the 2 outermost sts towards neck tog, repeat this dec on every row 2 more times = 12-13-14-16-17 sts remain on shoulder. Continue to work until piece measures 40-44-48-52-56 cm, fasten off. 2ND SIDE: Beg mid front and work 1 dc at the back of each of the outermost 4 sts from 1st side (so that the button bands overlap at the bottom). Then work dc until 4 tr remain, turn and work back. Then work this side as 1st side. SLEEVE: Worked top down. Work 32-35-38-43-46 ch on hook size 4 mm with grey blue. Work first row as follows: Work 1 dc in 2nd ch from hook, work 1 dc in each of the next 2-1-0-1-0 ch, * skip 1 ch, 1 dc in each of the next 3 ch *, repeat from *-* the entire row = 24-26-28-32-34 dc on row (this is 1st row in PATTERN SLEEVE - see explanation above). Then continue stripes as explained in PATTERN SLEEVE. AT THE SAME TIME inc in each side on every row with tr as follows: Inc on every tr row by working 2 tr in st inside outermost st in each side (= 1 tr inc in each side – NOTE: on rows with dc work 1 dc in every tr without inc). Continue inc like this until there are 38-40-42-46-48 sts on row (adjust so that next row is a row with dc). Cut the yarn and work as follows: Work 4 loose ch, work 1 dc in each of the 38-40-42-46-48 tr on row and then work 6 loose ch, turn piece and work 1 tr in 4th ch from hook, 1 tr in each of the next 2 ch, work 1 tr in each of the 38-40-42-46-48 dc on row and finish with 1 tr in each of the 4 ch at the end of row = 46-48-50-54-56 tr on row. Insert 1 marker at the end in one side of piece. Sleeve cap is now done. Continue down the sleeve as follows: Continue with PATTERN SLEEVE in stripes as before. AT THE SAME TIME when piece measures 2 cm from marker, dec 1 tr/dc in each side by working the second and third tr/dc and the 2 next to last tr/dc tog – SEE DECREASE TIP! Repeat dec every 4th-4th-5th-5th-5th row 5-6-6-7-8 more times (= 6-7-7-8-9 dec in total) = 34-34-36-38-38 sts on row. AT THE SAME TIME when sleeve measures approx. 30-34-39-43-47 cm – adjust after 1 stripe with light greyish green, work with grey blue until finished measurements. When piece measures 35-39-43-47-51 cm, fasten off. Work another sleeve. ASSEMBLY: Sew shoulder seams, side seams and sleeve seams edge to edge to avoid a chunky seam. Sew in the sleeves in body. Sew the buttons on right side of mid front and button through sts. CROCHET EDGE: Work an edge up along the vent mid front, around the neck and down along the other vent at the front. Beg from RS and work with grey blue on hook size 4 mm as follows: Work 1 dc in 1st st, * 1 ch, 1 dc in next st *, repeat from *-* - make sure that the edge is nice and even. Fasten off. |
|
 |
|
Have you finished this pattern?Tag your pictures with #dropspattern #littleoliversweater or submit them to the #dropsfan gallery. Do you need help with this pattern?You'll find 9 tutorial videos, a Comments/Questions area and more by visiting the pattern on garnstudio.com. © 1982-2026 DROPS Design A/S. We reserve all rights. This document, including all its sub-sections, has copyrights. Read more about what you can do with our patterns at the bottom of each pattern on our site. |


With over 40 years in knitting and crochet design, DROPS Design offers one of the most extensive collections of free patterns on the internet - translated to 17 languages. As of today we count 324 catalogues and 12290 patterns translated into English (UK/cm). 12290
We work hard to bring you the best knitting and crochet have to offer, inspiration and advice as well as great quality yarns at incredible prices! Would you like to use our patterns for other than personal use? You can read what you are allowed to do in the Copyright text at the bottom of all our patterns. Happy crafting!
Post a comment to pattern DROPS Children 24-28
We would love to hear what you have to say about this pattern!
If you want to leave a question, please make sure you select the correct category in the form below, to speed up the answering process. Required fields are marked *.