
Popular categories
Looking for a yarn?


Comments / Questions (198)
![]() Sylvie wrote:
Sylvie wrote:
Bonjour Je fais le modèle en taille x/xs. J'ai fini de coudre tous les carrés et je ne comprends pas comment coudre les goussets aux manches. Dois je partir du haut de la manche jusqu'en bas ? Sur le schéma sur les devants il y a 2 petits traits. Correspondent ils a l'emmanchure ? Merci de m'aider car là je bloque complètement. Cordialement
24.09.2022 - 16:15DROPS Design answered:
Bonjour Sylvie, le gousset des manches permet de leur donner la forme "triangulaire" pour que la manche soit plus large en haut qu'en bas, on fait 2 gousset et on coud au milieu sous la manche ; ce gousset se fait de bas en haut. Les tirets sur les devants correspondent effectivement à la hauteur d'emmanchures - vous allez coudre le haut des manches + le gousset à ce niveau. Bon crochet!
26.09.2022 - 09:13
![]() Sylvie wrote:
Sylvie wrote:
Bonjour Pour les manches qu''entendez vous par gousset. C'est un terme et une technique que je connais pas du tout ? Merci pour votre aide
06.09.2022 - 11:02DROPS Design answered:
Bonjour Sylvie, c'est une petite pièce triangulaire qui va être crochetée côté milieu sous la manche pour lui donner sa forme plus serrée en bas et plus large en haut. Il en faudra 2 au total, 1 pour chaque manche. Bon crochet!
06.09.2022 - 12:02
![]() Hanne wrote:
Hanne wrote:
Kan man ikke hækle firkanterne sammen, frem for at sy dem? Det bliver så neget pænere. Kan tænke mig, at sammenhækling fyldet lidt mere, men det gør ikke noget, for mig, det skal jeg nok regulere til. Bedste hilsner, Hanne
13.05.2022 - 04:00DROPS Design answered:
Hej Hanne, jo selvfølgelig kan du det. Rigtig god fornøjelse!
13.05.2022 - 07:37
![]() Pouillon wrote:
Pouillon wrote:
Summer Patchwork Drops design Model nr. Z-643 Hoe maak ik de mouwen(sleeves), hoeveel vierkantjes(granny squares) heb ik nodig en hoe monteer ik deze Graag wat meer uitleg aub Hartelijk dank 30.04.2022 - 08:17
30.04.2022 - 10:40
![]() Pouillon wrote:
Pouillon wrote:
Summer Patchwork Drops design Model nr. Z-643 Hoe maak ik de mauwen, hoeveel vierkantjes(granny squares) heb ik nodig en hoe monteer ik deze Graag wat meer uitleg aub
30.04.2022 - 08:17DROPS Design answered:
Dag Pouillon,
Je haakt in totaal 120-142-152-208-218 vierkantjes (120 voor de kleinste maat en 218 voor de grootste maat.) De overgebleven vierkantjes zijn voor beide mouwen. Onderaan staat een schema in elke maat hoe de vierkantjes aan elkaar komen op het achterpand en de voorpanden. Onderaan de mouw, zeg maar in de oksel wordt een driehoekig stuk gehaakt (met een split erin) in stokjes om de mouw aan de bovenkant wijder te maken dan aan de onderkant. Dit wordt uitgelegd bij de paragraaf 'MOUWSPIE'.
09.05.2022 - 16:40
![]() Rossella wrote:
Rossella wrote:
Si potrebbero avere le spiegazioni in italiano? Grazie mille
13.02.2022 - 21:22DROPS Design answered:
Buonasera Rossella, aquesto link trova le spiegazioni in italiano. Buon lavoro!
14.02.2022 - 19:35
![]() VINCENZA wrote:
VINCENZA wrote:
Salve, vorrei realizzare questo modello con un filato diverso e un po' più lungo, tipo cardigan. Avevo in mente il filato Karisma, ma non trovo nel calcolatore nessun riscontro con questo filato differente. Vorrei sapere la quantità necessaria per realizzarlo nel filato che ho scelto in alternativa, in modo tale da poter ordinare quella giusta Grazie.
15.11.2021 - 23:49DROPS Design answered:
Buonasera Vincenza, probabilmente non riesce a trovare riscontro perchè Alpaca è un filato che appartiene al gruppo filati A mentre Karisma al gruppo filati B. Può sostituire Alpaca con un altro filato che appartiene al gruppo A: provi a guardare questo link se le può essere utile. Buon lavoro!
16.11.2021 - 22:08
![]() Christina wrote:
Christina wrote:
Jag förstår inte detta med kilen. Hur kan den bli 33 cm? Förstår INTE hur man ska göra. Hade varit bra med en bild på hur detta fungerar
10.06.2021 - 19:49DROPS Design answered:
Hei Christina. Vi har dessverre ikke et eget bilde av ermkilen. Du hekler et eget kile stykke. I f.eks str XS/S hekles det 7 luftmasker, snu og hekle 1 stav i 4.lm fra nåla, videre hekles det 1 st i hver av de resterende 3 luftmaskene = 5 staver. Fortsett frem og tilbake med 1 stav i hver stav til arb måler 10 cm. Nå skal det økes i hver side ved å hekle 2 staver i nest ytterste stav på hver 3. rad 9 ganger. Når økningen er ferdig, hekles det 1 stav i hver stav til arbeidet måler 33 cm. mvh DROPS design
14.06.2021 - 10:38
![]() RAFAEL DIAZ wrote:
RAFAEL DIAZ wrote:
Buenas tardes.Como se trabaja la nesga, de la que hablaís?
31.03.2021 - 17:03DROPS Design answered:
Hola Rafael, la explicación completa se encuentra bajo el apartado nesga de la manga.
07.04.2021 - 23:46
![]() Charlotte wrote:
Charlotte wrote:
Hej, I beskrivningen av kilen står det att för de 4 större storlekarna avmaskas för ärmhål, men var görs den avmaskningen? Kilen delas bara och varje del virkas resten för sig utan avmaskning för armhål. Mvh Charlotte
28.03.2021 - 20:11DROPS Design answered:
Hej Charlotte, du deler bare kilen på midten og fortsætter frem og tilbage på hver del til arb måler som på din størrelse. God fornøjelse!
28.04.2021 - 13:58
|
|
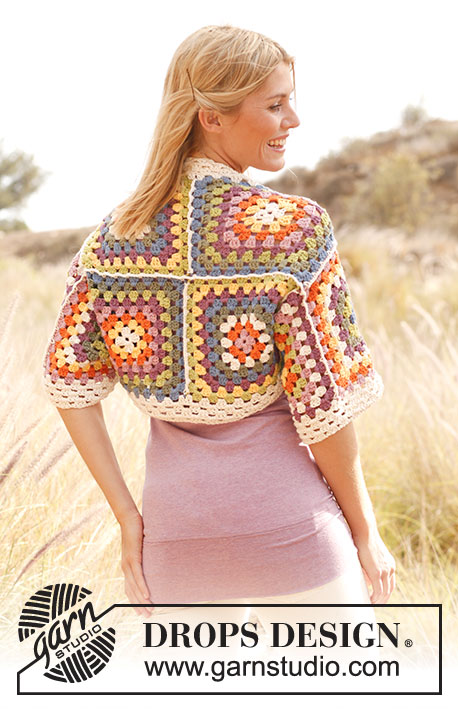
Summer Patchwork#summerpatchworkcardigan |
|
 |
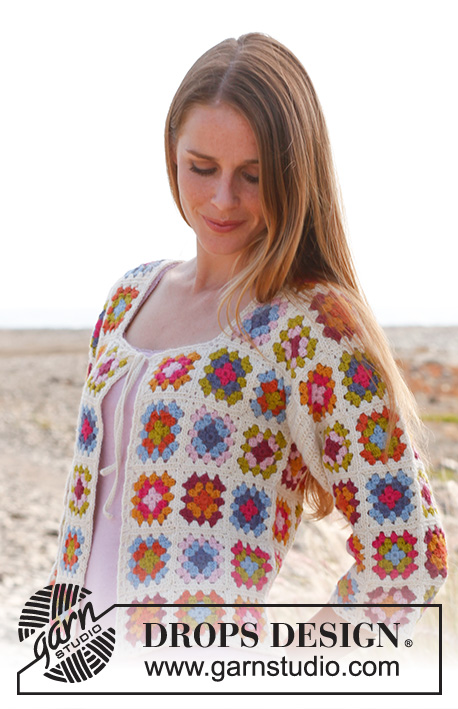 |
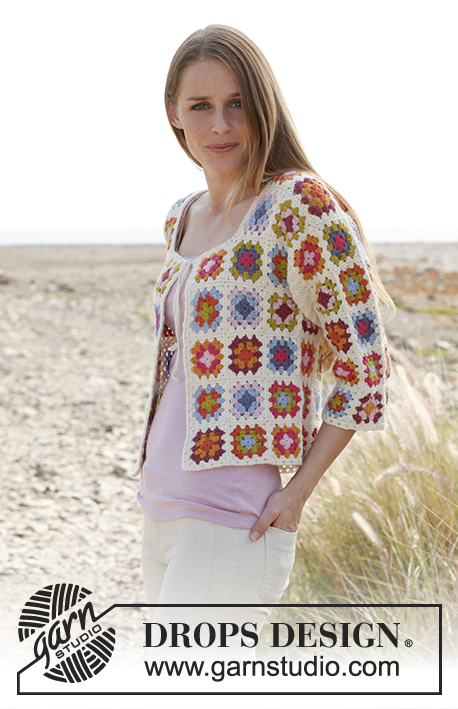
Crochet DROPS jacket with ¾ sleeves and granny squares in ”Alpaca”. Size: S - XXXL
DROPS 147-9 |
|
|
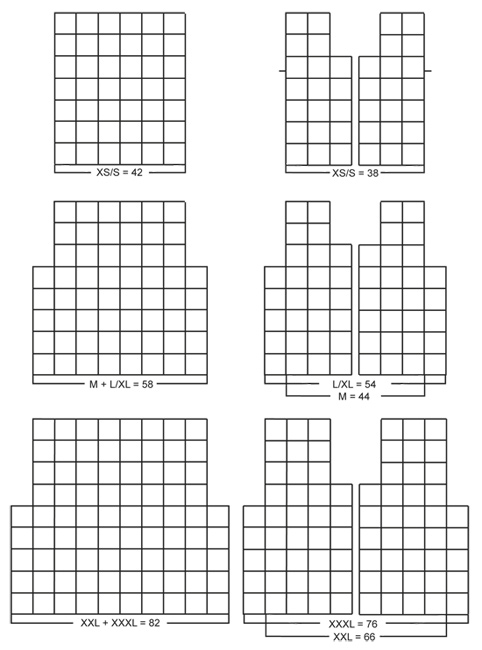
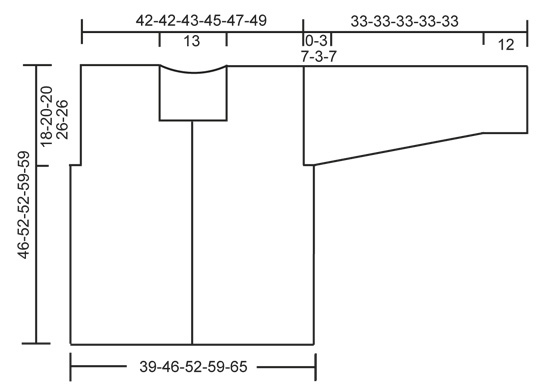
COLOURS ON SQUARES: Last round (= colour 4) on all squares is off white. SQUARE A: Colour 1 = lime, colour 2 = orange, colour 3 = light blue. SQUARE B: Colour 1 = goldenrod, colour 2 = light pink, colour 3 = dark pink. SQUARE C: Colour 1 = light blue, colour 2 = lime, colour 3 = orange. SQUARE D: Colour 1 = dark pink, colour 2 = light pink, colour 3 = lime. SQUARE E: Colour 1 = light pink, colour 2 = pink, colour 3 = goldenrod. SQUARE F: Colour 1 = pink, colour 2 = grey purple, colour 3 = light blue. SQUARE G: Colour 1 = grey purple, colour 2 = light blue, colour 3 = light pink. SQUARE H: Colour 1 = pink, colour 2 = grey purple, colour 3 = lime. SQUARE I: Colour 1 = orange, colour 2 = goldenrod, colour 3 = dark pink. SQUARE J: Colour 1 = light blue, colour 2 = lime, colour 3 = pink. GRANNY SQUARE: Crochet 6 ch on hook size 3 mm with colour 1 and form a ring with 1 sl st in first ch. ROUND 1 (colour 1): 3 ch, 2 tr in ch-ring, * 3 ch, 3 tr in ch-ring *, repeat from *-* a total of 3 times and finish with 3 ch and 1 sl st in 3rd ch from beg of round. Turn piece. ROUND 2 (colour 2): 3 ch, 2 tr in first ch-loop, 3 ch, 3 tr in same ch-loop, * 1 ch, 3 tr in next ch-loop, 3 ch, 3 tr in same ch-loop *, repeat from *-* a total of 3 times and finish with 1 ch and 1 sl st in 3rd ch from beg of round. Turn piece. ROUND 3 (colour 3): 3 ch, 2 tr in first ch-loop, 1 ch, * 3 tr in next ch-loop, 3 ch, 3 tr in same ch-loop, 1 ch, 3 tr in next ch-loop, 1 ch *, repeat from *-* a total of 3 times, 3 tr in next ch-loop, 3 ch, 3 tr in same ch-loop, 1 ch and finish with 1 sl st in 3rd ch from beg of round. Turn piece. ROUND 4 (colour 4): 3 ch, 2 tr in first ch-loop, 1 ch, * 3 tr in next ch-loop, 3 ch, 3 tr in same ch-loop, 1 ch, 3 tr in next ch-loop, 1 ch, 3 tr in next ch-loop, 1 ch *, repeat from *-* a total of 3 times, 3 tr in next ch-loop, 3 ch, 3 tr in same ch-loop, 1 ch, 3 tr in next ch-loop, 1 ch and finish with 1 sl st in 3rd ch from beg of round. Cut the thread. 1 square measures approx. 6.5 x 6.5 cm. Work 12-14-15-20-21 squares of every colour combination, work in addition 0-2-2-8-8 extra squares (choose your own colour combination on these squares) = 120-142-152-208-218 squares in total. SLEEVE GUSSET: Work a piece with tr shaped as a gusset to be sewn under sleeve so it is wider at the top than the at bottom. Replace first tr on every row with 3 ch. Work 7-8-8-8-8 ch on hook size 3 mm with off white. Turn and work 1 tr in 4th ch from hook, then work 1 tr in the remaining 3-4-4-4-4 ch = 5-6-6-6-6 tr. Continue back and forth with 1 tr in every tr until piece measures 10 cm. READ ALL OF THE FOLLOWING SECTION BEFORE FINISHING! On next row inc 1 tr in each side by working 2 tr in next to last tr in each side. Repeat inc every 3-2-2-2-2 rows a total of 9-12-12-12-12 times. NOTE: In size XS/S continue with 1 tr in every tr until piece measures 33 cm. In sizes M and XXL divide the piece in the middle when it measures 30 cm, then work each side separately with 1 tr in every tr until piece measures 33 cm. In sizes L/XL and XXXL divide the piece in the middle when it measures 26 cm, then work each side separately, when inc is done, with 1 tr in every tr until piece measures 33 cm. The piece is divided in the 4 largest sizes because of dec for armholes. This is not done in the smallest size. Work another sleeve gusset. Place the squares tog for back and front piece as shown on diagram – you can choose in which order you want to put the squares. Distribute the remaining 40-40-40-60-60 squares for 2 sleeves, with 20-20-20-30-30 squares on each sleeve. In the 3 smallest sizes there should be 4 x 5 squares and in the 2 largest sizes there should be 6 x 5 squares - there are 5 squares vertically in all sizes. Sew the squares tog edge to edge with off white. Sew sleeve gusset to each side of squares on sleeves and sew sleeves in body – with the widest part of gusset in the bottom of armhole. Then sew the side seams and shoulder seams the same way – NOTE: In sizes M and XXL there is 1 row with squares in the middle of each side under armhole, in sizes L/XL and XXXL there are 2 rows with squares in each side under armhole. Work around the entire jacket with off white as follows (beg mid back of neck): 1 dc in 1 ch at the edge of 1 square, 3 ch and 2 tr in same ch, * 1 ch, 3 tr in next ch *, repeat from *-*. NOTE: In the corners faced inwards work as follows: 1 tr in last ch before corner, 1 tr in the corner and 1 tr in first ch after corner. In the corners faced outwards work as follows: 3 tr in ch-loop in the corner on square, 3 ch and 3 more tr in the same ch-loop. In every corner at the top by neck also work a tie as follows: 3 tr in ch-loop in the corner on square, then work loose ch for approx. 28 cm, turn and work 1 dc in every ch on the way back, then 3 tr in the same ch-loop in the corner. Work the same way at bottom around the sleeves – over the section between the squares work as follows: * 1 tr in each of the first 3 tr, 1 ch, skip 1 tr *, repeat from *-*. |
|
 |
|
 |
|
Have you finished this pattern?Tag your pictures with #dropspattern #summerpatchworkcardigan or submit them to the #dropsfan gallery. Do you need help with this pattern?You'll find 9 tutorial videos, a Comments/Questions area and more by visiting the pattern on garnstudio.com. © 1982-2026 DROPS Design A/S. We reserve all rights. This document, including all its sub-sections, has copyrights. Read more about what you can do with our patterns at the bottom of each pattern on our site. |
|


With over 40 years in knitting and crochet design, DROPS Design offers one of the most extensive collections of free patterns on the internet - translated to 17 languages. As of today we count 324 catalogues and 12290 patterns translated into English (UK/cm). 12290
We work hard to bring you the best knitting and crochet have to offer, inspiration and advice as well as great quality yarns at incredible prices! Would you like to use our patterns for other than personal use? You can read what you are allowed to do in the Copyright text at the bottom of all our patterns. Happy crafting!
Post a comment to pattern DROPS 147-9
We would love to hear what you have to say about this pattern!
If you want to leave a question, please make sure you select the correct category in the form below, to speed up the answering process. Required fields are marked *.