
Popular categories
Looking for a yarn?


Comments / Questions (198)
![]() Lena T wrote:
Lena T wrote:
Jag vill virka endast en färg. Hur mycket garn behövs då?
15.04.2026 - 07:46DROPS Design answered:
Hej Lena, det har vi desværre ingen information om, men vi kan gætte på ca 2/3 af garnforbruget i din størrelse :)
15.04.2026 - 13:55
![]() Kerstin Stenholm wrote:
Kerstin Stenholm wrote:
Varför visas inte kilen under armen tydligt. Så man kan virka sig en egen utan attfölja mönstret som är extremt krångligt tycker jag Så en bild på kilen och var den ska sitta
13.04.2026 - 18:56DROPS Design answered:
Hei Kerstin. På bildene vises bare kilen delevis. Vi har dessverre ingen bedre bilde, men takk for ditt innspill, det er formidlet videre til riktig person. mvh DROPS Design
20.04.2026 - 10:15
![]() Susanne Schneider wrote:
Susanne Schneider wrote:
Hallo, ich habe nun 152 Quadrate gehäkelt. Wie werden diese nun zusammengenäht? Das wird nicht erklärt...
12.03.2026 - 10:45DROPS Design answered:
Liebe Frau Schneider, das lesen Sie unter Absatz Die Quadrate gemäß der Skizze zu Vorder- und Rückenteil zusammenlegen ... - die werden dann zusammengenäht (siehe Video). Viel Spaß beim Fertigstellen!
12.03.2026 - 15:31
![]() Wenche Waage wrote:
Wenche Waage wrote:
Hvor finner jeg rettingen til oppskrift 147-9? Jeg trykker på linken men det kommer ikke opp noe nytt.
12.08.2025 - 13:39DROPS Design answered:
Hej Wenche. Rettningen är gjord i beskrivningen allerede, så följ bara det som står i oppskriften så blir det riktigt. Mvh DROPS Design
13.08.2025 - 14:09
![]() Earline Bowman wrote:
Earline Bowman wrote:
I am trying to put together pattern 147-9 and I am at a total loss as to how to do the sleeves. Are there any pictures of the sleeve that shows exactly how the gusset is supposed to to be worked ? Thank you.
24.06.2025 - 00:39DROPS Design answered:
Dear Mrs Bowman, the gusset should be sewn together to the square mid-under the sleeve - if you have a split in your size (from size L/XL) sew the split to the armhole on each side. Happy assembly!
24.06.2025 - 18:22
![]() Annita wrote:
Annita wrote:
Is er een video hoe ik de mouwspie in deze patroon moet naaien
06.04.2025 - 11:58
![]() Dominique Richer wrote:
Dominique Richer wrote:
Bonjour, est on obligé de faire les goussets? Si je rajoute des grannies cela fera plus large. J'aurais aimé voir une photo de dessous les bras pour voir les goussets. Je le fais déjà avec des manches plus longues. Merci de votre réponse j'ai lu tous les commentaires en français avant de vous poser la question.
22.03.2025 - 12:08DROPS Design answered:
Bonjour Mme Richer, les goussets vont permettre de donner à la manche la forme voulue: plus serrée en bas et plus large côté emmanchure, vous pouvez ne pas en faire, les manches seront alors droites - veillez alors à ce que les manches aient les bonnes dimensions pour bien s'insérer dans les emmanchures. Bon crochet!
24.03.2025 - 08:25
![]() Teri Black wrote:
Teri Black wrote:
It would be very helpful to have a diagram that shows how the gussets fit with the other sweater pieces; or at the least, include a picture that gives a full view of a gusset so I can see what to do. I noticed many of the questions are about the gussets so this is information many are finding lacking. Please fill in the blanks.
29.01.2025 - 00:18
![]() Françoise wrote:
Françoise wrote:
Bonjour, Je suis au montage et j'aimerais savoir si le gousset est de la même taille que la hauteur de manche ? soit 5 carrés Merci pour votre retour.
04.12.2024 - 19:36DROPS Design answered:
Bonjour Françoise, le gousset mesure 33 cm dans toutes les tailles = toute la longueur de la manche, la seule différence est qu'en fonction de la taille vous aurez une "fente" au milieu sous la manche pour l'emmanchure - cf schéma des mesures de 3 à 7 cm selon la taille. Bon crochet!
05.12.2024 - 08:13
![]() FRANCOISE wrote:
FRANCOISE wrote:
Bonjour Faut il bloquer les carrés granny avant l'assemblage ou une fois cousus. Qu'en pensez vous ? Merci Françoise
26.11.2024 - 15:29DROPS Design answered:
Bonjour Françoise, tout est question d'habitude, certaines bloquent tout, d'autres jamais, à vous de voir ce que vous préférez. N'hésitez pas à demander conseil à votre magasin si besoin, même par mail ou téléphone. Mais si vous choisissez de bloquer, notez de toujours bien respecter les consignes d'entretien de la laine utilisée. Bon assemblage!
26.11.2024 - 17:12
|
|
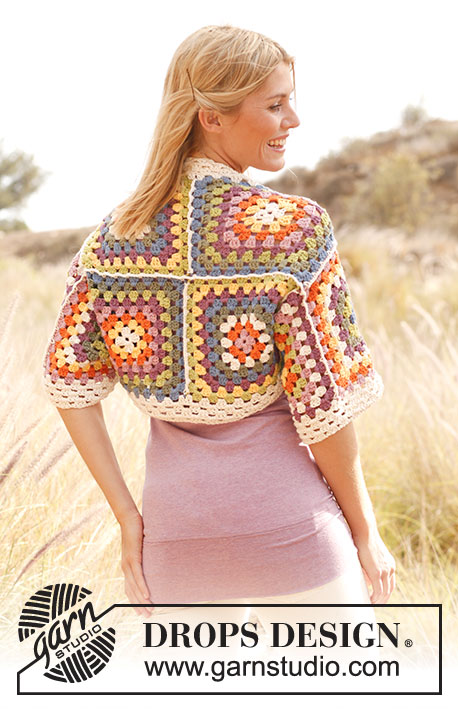
Summer Patchwork#summerpatchworkcardigan |
|
 |
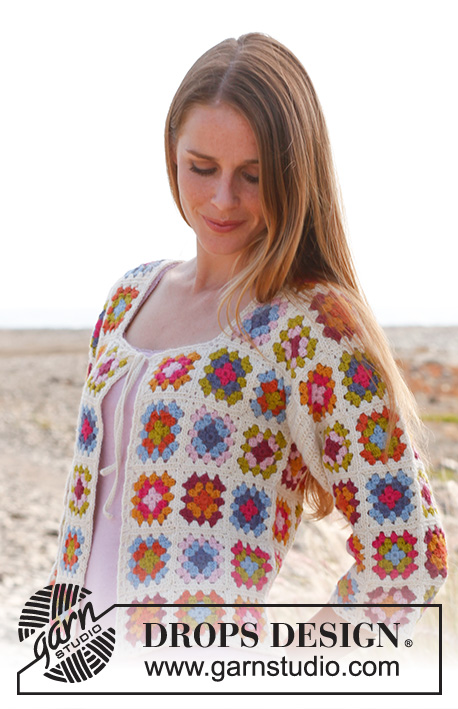 |
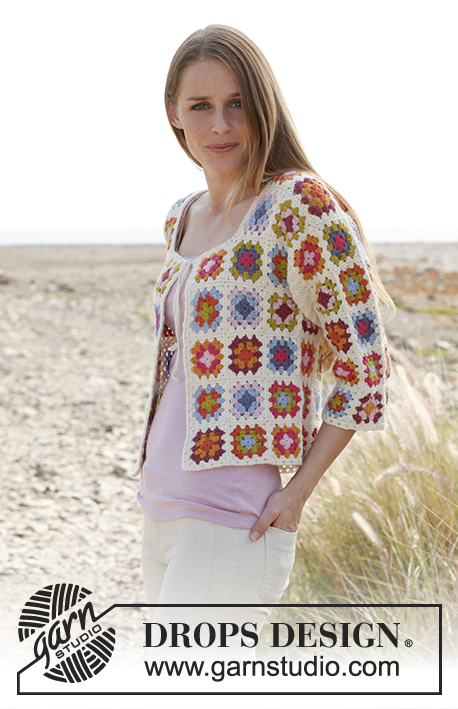
Crochet DROPS jacket with ¾ sleeves and granny squares in ”Alpaca”. Size: S - XXXL
DROPS 147-9 |
|
|
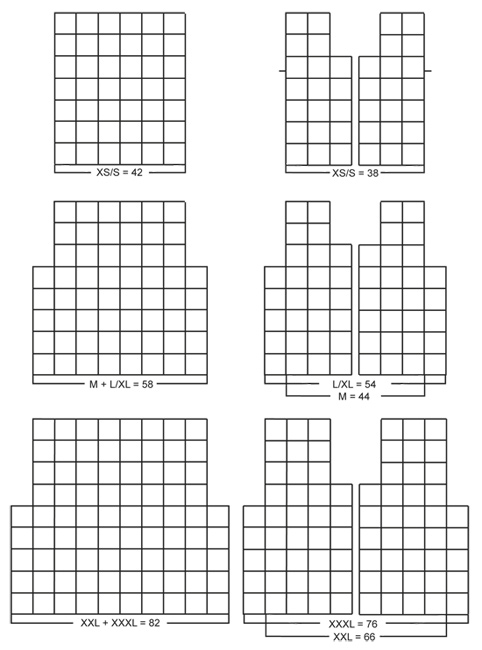
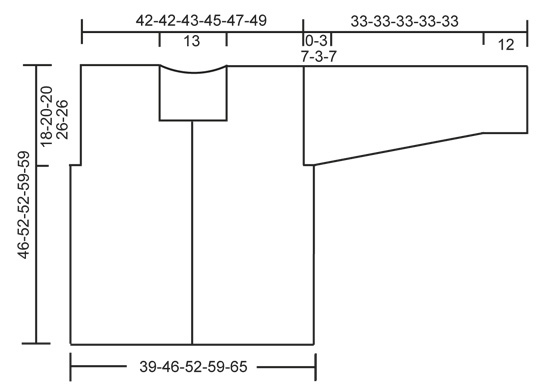
COLOURS ON SQUARES: Last round (= colour 4) on all squares is off white. SQUARE A: Colour 1 = lime, colour 2 = orange, colour 3 = light blue. SQUARE B: Colour 1 = goldenrod, colour 2 = light pink, colour 3 = dark pink. SQUARE C: Colour 1 = light blue, colour 2 = lime, colour 3 = orange. SQUARE D: Colour 1 = dark pink, colour 2 = light pink, colour 3 = lime. SQUARE E: Colour 1 = light pink, colour 2 = pink, colour 3 = goldenrod. SQUARE F: Colour 1 = pink, colour 2 = grey purple, colour 3 = light blue. SQUARE G: Colour 1 = grey purple, colour 2 = light blue, colour 3 = light pink. SQUARE H: Colour 1 = pink, colour 2 = grey purple, colour 3 = lime. SQUARE I: Colour 1 = orange, colour 2 = goldenrod, colour 3 = dark pink. SQUARE J: Colour 1 = light blue, colour 2 = lime, colour 3 = pink. GRANNY SQUARE: Crochet 6 ch on hook size 3 mm with colour 1 and form a ring with 1 sl st in first ch. ROUND 1 (colour 1): 3 ch, 2 tr in ch-ring, * 3 ch, 3 tr in ch-ring *, repeat from *-* a total of 3 times and finish with 3 ch and 1 sl st in 3rd ch from beg of round. Turn piece. ROUND 2 (colour 2): 3 ch, 2 tr in first ch-loop, 3 ch, 3 tr in same ch-loop, * 1 ch, 3 tr in next ch-loop, 3 ch, 3 tr in same ch-loop *, repeat from *-* a total of 3 times and finish with 1 ch and 1 sl st in 3rd ch from beg of round. Turn piece. ROUND 3 (colour 3): 3 ch, 2 tr in first ch-loop, 1 ch, * 3 tr in next ch-loop, 3 ch, 3 tr in same ch-loop, 1 ch, 3 tr in next ch-loop, 1 ch *, repeat from *-* a total of 3 times, 3 tr in next ch-loop, 3 ch, 3 tr in same ch-loop, 1 ch and finish with 1 sl st in 3rd ch from beg of round. Turn piece. ROUND 4 (colour 4): 3 ch, 2 tr in first ch-loop, 1 ch, * 3 tr in next ch-loop, 3 ch, 3 tr in same ch-loop, 1 ch, 3 tr in next ch-loop, 1 ch, 3 tr in next ch-loop, 1 ch *, repeat from *-* a total of 3 times, 3 tr in next ch-loop, 3 ch, 3 tr in same ch-loop, 1 ch, 3 tr in next ch-loop, 1 ch and finish with 1 sl st in 3rd ch from beg of round. Cut the thread. 1 square measures approx. 6.5 x 6.5 cm. Work 12-14-15-20-21 squares of every colour combination, work in addition 0-2-2-8-8 extra squares (choose your own colour combination on these squares) = 120-142-152-208-218 squares in total. SLEEVE GUSSET: Work a piece with tr shaped as a gusset to be sewn under sleeve so it is wider at the top than the at bottom. Replace first tr on every row with 3 ch. Work 7-8-8-8-8 ch on hook size 3 mm with off white. Turn and work 1 tr in 4th ch from hook, then work 1 tr in the remaining 3-4-4-4-4 ch = 5-6-6-6-6 tr. Continue back and forth with 1 tr in every tr until piece measures 10 cm. READ ALL OF THE FOLLOWING SECTION BEFORE FINISHING! On next row inc 1 tr in each side by working 2 tr in next to last tr in each side. Repeat inc every 3-2-2-2-2 rows a total of 9-12-12-12-12 times. NOTE: In size XS/S continue with 1 tr in every tr until piece measures 33 cm. In sizes M and XXL divide the piece in the middle when it measures 30 cm, then work each side separately with 1 tr in every tr until piece measures 33 cm. In sizes L/XL and XXXL divide the piece in the middle when it measures 26 cm, then work each side separately, when inc is done, with 1 tr in every tr until piece measures 33 cm. The piece is divided in the 4 largest sizes because of dec for armholes. This is not done in the smallest size. Work another sleeve gusset. Place the squares tog for back and front piece as shown on diagram – you can choose in which order you want to put the squares. Distribute the remaining 40-40-40-60-60 squares for 2 sleeves, with 20-20-20-30-30 squares on each sleeve. In the 3 smallest sizes there should be 4 x 5 squares and in the 2 largest sizes there should be 6 x 5 squares - there are 5 squares vertically in all sizes. Sew the squares tog edge to edge with off white. Sew sleeve gusset to each side of squares on sleeves and sew sleeves in body – with the widest part of gusset in the bottom of armhole. Then sew the side seams and shoulder seams the same way – NOTE: In sizes M and XXL there is 1 row with squares in the middle of each side under armhole, in sizes L/XL and XXXL there are 2 rows with squares in each side under armhole. Work around the entire jacket with off white as follows (beg mid back of neck): 1 dc in 1 ch at the edge of 1 square, 3 ch and 2 tr in same ch, * 1 ch, 3 tr in next ch *, repeat from *-*. NOTE: In the corners faced inwards work as follows: 1 tr in last ch before corner, 1 tr in the corner and 1 tr in first ch after corner. In the corners faced outwards work as follows: 3 tr in ch-loop in the corner on square, 3 ch and 3 more tr in the same ch-loop. In every corner at the top by neck also work a tie as follows: 3 tr in ch-loop in the corner on square, then work loose ch for approx. 28 cm, turn and work 1 dc in every ch on the way back, then 3 tr in the same ch-loop in the corner. Work the same way at bottom around the sleeves – over the section between the squares work as follows: * 1 tr in each of the first 3 tr, 1 ch, skip 1 tr *, repeat from *-*. |
|
 |
|
 |
|
Have you finished this pattern?Tag your pictures with #dropspattern #summerpatchworkcardigan or submit them to the #dropsfan gallery. Do you need help with this pattern?You'll find 9 tutorial videos, a Comments/Questions area and more by visiting the pattern on garnstudio.com. © 1982-2026 DROPS Design A/S. We reserve all rights. This document, including all its sub-sections, has copyrights. Read more about what you can do with our patterns at the bottom of each pattern on our site. |
|


With over 40 years in knitting and crochet design, DROPS Design offers one of the most extensive collections of free patterns on the internet - translated to 17 languages. As of today we count 324 catalogues and 12290 patterns translated into English (UK/cm). 12290
We work hard to bring you the best knitting and crochet have to offer, inspiration and advice as well as great quality yarns at incredible prices! Would you like to use our patterns for other than personal use? You can read what you are allowed to do in the Copyright text at the bottom of all our patterns. Happy crafting!
Post a comment to pattern DROPS 147-9
We would love to hear what you have to say about this pattern!
If you want to leave a question, please make sure you select the correct category in the form below, to speed up the answering process. Required fields are marked *.