
Popular categories
Looking for a yarn?


Comments / Questions (32)
![]() Susanne Müters wrote:
Susanne Müters wrote:
Hallo, ich habe den Pullunder in der kleinsten Größe begonnen, aber ich verstehe die Markierungen nicht. Wo genau sind zu Beginn die Markierungen zu machen. "Am Anfang", nach 60 Maschen und dann wieder nach 30?
30.05.2015 - 18:51DROPS Design answered:
"Am Anfang" bedeutet direkt am Rd-Beginn, also vor der 1. M (d.h. zwischen der letzten und 1. M). Den zweiten Markierer setzen Sie nach 60 M ab Rd-Beginn, also nach genau der Hälfte der M. Diese beiden Markierer zeigen die Seiten des Pullunders an (= Seitenmarkierer), also die Grenzen zwischen Vorder- und Rückenteil. Den letzten Markierer setzen Sie genau in die Mitte des Vorderteils, denn er soll genau das anzeigen - die Mitte des Vorderteils, um ab hier die M für die Tasche abzuzählen. Der 3. Markierer befindet sich also nach 30 M ab Rd-Beginn.
30.05.2015 - 23:45
![]() Susanne Müters wrote:
Susanne Müters wrote:
Hallo, ich verstehe das mit den Markierungen nicht so ganz. "Am Anfang eine Markierung setzen", also nach der wievielten Masche? Ich setze dann nach 60 eine weitere und sodann nach 30? Nach der 60sten Masche wäre auch gar nicht die Mitte. LG Susanne
30.05.2015 - 18:34DROPS Design answered:
Nach der 60. M bedeutet nach der Hälfte der M (Sie haben ja 120 M angeschlagen), also eine der beiden Seiten des Pullunders. Die andere Seite befindet sich am Rd-Beginn und wird dort durch den Rd-Anfangs-Markierer angezeigt. Weiteres siehe oben! :-)
30.05.2015 - 23:48Hina wrote:
DROPS,, could you please tell which stitch is the last/edge st. where should I start and where should I end?? Thanks
19.12.2013 - 11:19DROPS Design answered:
Dear Hina, you can start on one of the shoulder seam, and pick sts around to the beg of round. Happy knitting!
19.12.2013 - 13:48Hina wrote:
I really don't understand it could you please talk me through it again. i picked up the sts of neckline from back isn't it right?? or should i pick them up from the centre 2 sts on the stitch holder???? Thanks and really sorry for bothering you again and again... Please I m waiting for your reply so I can continue...
19.12.2013 - 08:32DROPS Design answered:
Dear Hina, for neck edge, you pick up sts all around neck (on front pieces + neckline on back piece)+ the 2 sts on mid front and work rib in the round with dec as stated. Happy knitting!
19.12.2013 - 09:03Hina wrote:
I really don't understand it could you please talk me through it again. i picked up the sts of neckline from back isn't it right?? or should i pick them up from the centre 2 sts on the stitch holder???? Thanks and really sorry for bothering you again and again...
17.12.2013 - 18:52Hina wrote:
Hey i m stuck again, how would I decrease stitches on each sides of neck edge?? It is stated that I should work until 1 st remains before 2 knit sts.?? what would I do before 2 knit sts? should I K2tog those 2 sts??? Please explain all decreases.. Thanx
17.12.2013 - 11:51DROPS Design answered:
Dear Hina, at the end of row you work K2 tog just before last st (edge st) - for neck edge. Start when 3 sts remain at the end of row, work next 2 sts tog and work last edge st. happy knitting!
17.12.2013 - 13:31Hina wrote:
Hi i have a question again?? where its mentioned (Repeat dec every other row (i.e. every row from RS) 5 more times and then every 4th row (i.e. every other row from RS) 5-5-5-7-7 times. ) when it says and then every 4th row what is meant by i.e every other row from RS shouldn't it be every 4th row or alternative row from RS?? Please ellaborate and explain? Thanks Hina.
11.12.2013 - 09:00DROPS Design answered:
Dear Hina, "every 4th row" means that you will work *1 row with dec, then work 3 rows without dec* and repeat from *-*, dec are done from RS, so that every 4th row will be every other row from RS (1 row from RS with dec, 1 row from RS without dec). Happy knitting!
11.12.2013 - 09:35Hina wrote:
Hi, another question!please tell me after decreasing 6sts from both sides of armholes should i rejoine the yarn to back piece and continue?
03.12.2013 - 08:37DROPS Design answered:
Dear Hina, after binding off 6 sts each side for armhole, continue front and back piece separately. Put sts for front piece onto st holder and join the yarn to back piece to continue as stated with armhole dec. Happy knitting!
03.12.2013 - 09:26Hina wrote:
Sorry to bother again, i still have a question after working 98 sts should i work 28 sts to v neck then knitting on needles??is this the pattern asking to do???
30.11.2013 - 19:35DROPS Design answered:
Dear Hina, in first size, you will work the round as follows: work first 32 sts, then work the next 2 sts and put these sts on a st holder, work the remaining 98 sts, turn and work all sts back from WS until the 2 sts on st holder, ie 130 sts. On next row from RS, you will start dec for V-neck dec 1 st at the beg + 1 st at the end of row. Happy knitting!
01.12.2013 - 20:38Hina wrote:
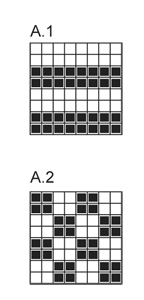
Hi, im knitting this vest for size one when i reached to the diagram i didn't get it, where should i start and how would i connect these two charts A1 and A2. I have tried again and again but I am stuck. please guide me how would I complete the round. when i have completed round 1 according to the diagram there were 4 sts left . what should I do with these 4.
26.11.2013 - 16:58DROPS Design answered:
Dear Hina, you first work diag. A.1 around on all sts 1 time in height, then work following diag. A2 on all sts around until final measurements. Happy knitting!
26.11.2013 - 18:11
|
|||||||
Paul#paulvest |
|||||||
 |
 |
||||||
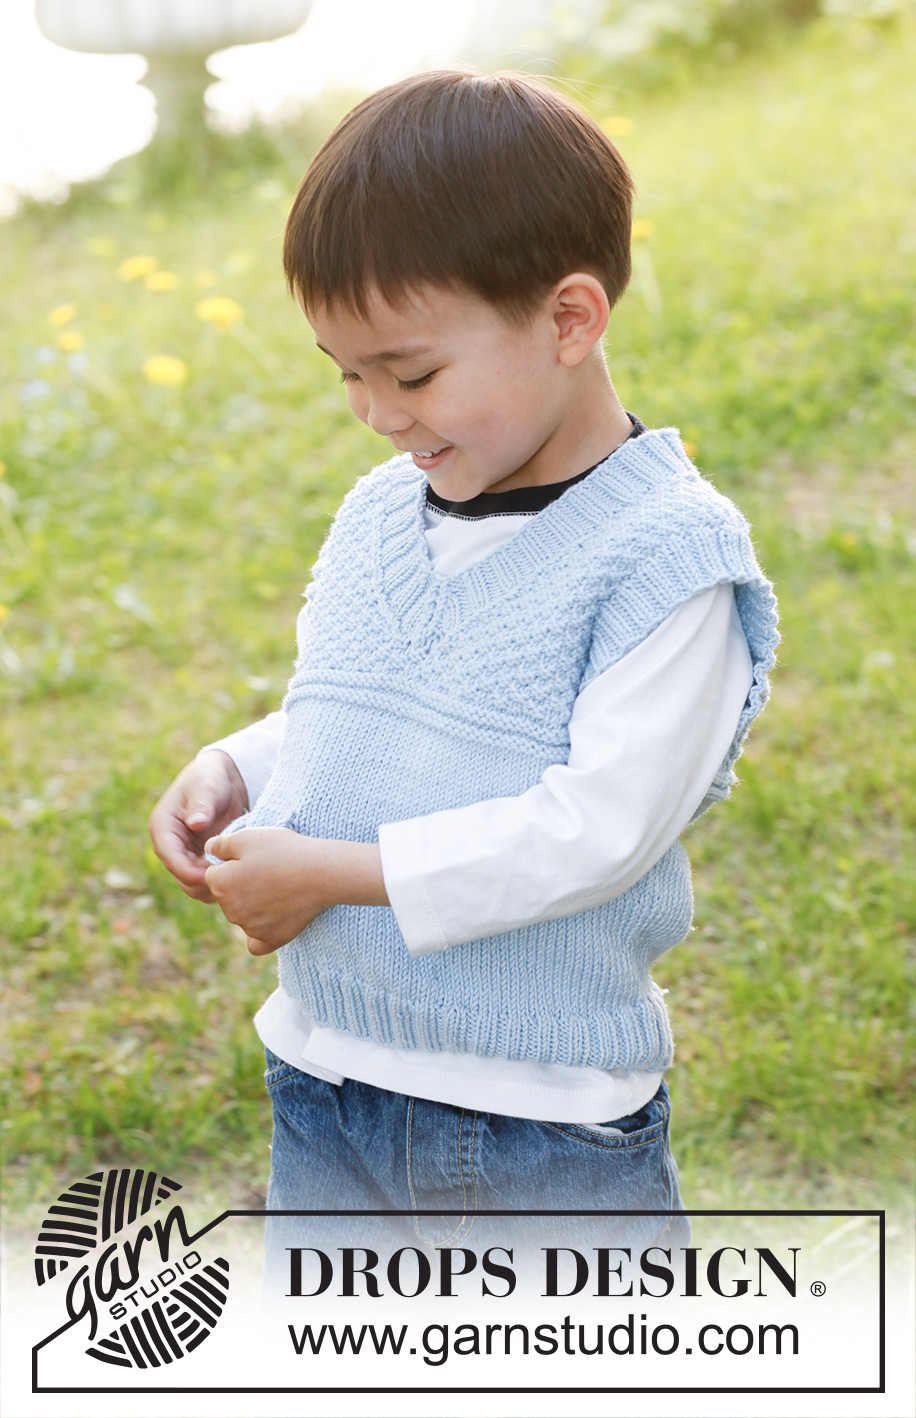
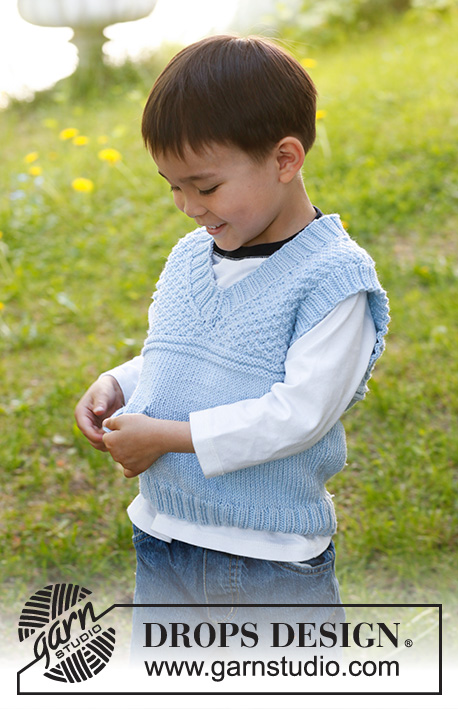
Knitted vest / slipover with V-neck and double moss st in DROPS Lima. Size children 3 to 12 years.
DROPS Children 23-8 |
|||||||
|
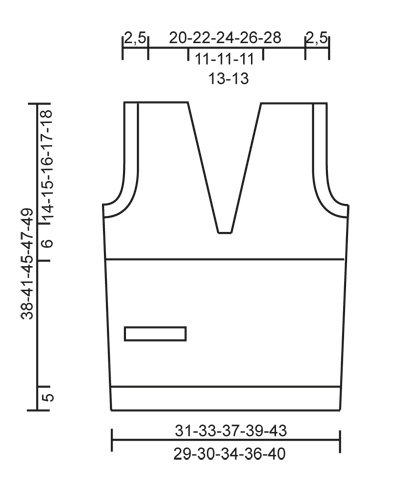
GARTER ST (back and forth on needle): K all rows. PATTERN: See diagrams A.1 and A.2. Diagrams show pattern from RS. DECREASE TIP 1 (applies to V-neck): Dec inside 1 edge st which is worked K on all rows. All dec are done from RS! DEC AFTER 1 EDGE ST AS FOLLOWS: Slip 1 st as if to K, K 1, psso. DEC BEFORE 1 EDGE ST AS FOLLOWS: K 2 tog. DECREASE TIP 2 (applies to neck edge): Dec on each side of the 2 K sts mid front of neck as follows: Work until 1 st remains before the 2 K sts, K 2 tog, slip 1 st as if to K, K 1, psso. ---------------------------------------------------------- BODY: Worked in the round on circular needle. Cast on 148-156-176-184-204 sts on circular needle size 3 mm with Lima. K 1 round, then work rib = K 2/P 2. When rib measures 5 cm, K 1 round while AT THE SAME TIME dec 28-28-32-32-36 sts evenly = 120-128-144-152-168 sts. Switch to circular needle size 4 mm and work in stocking st. AT THE SAME TIME insert a marker at beg of round and a marker after 60-64-72-76-84 sts (these marks the sides). Insert in addition a marker mid front (i.e. after 30-32-36-38-42 sts). When piece measures 6-7-8-9-8 cm, inc 1 st on each side of both markers in the sides (= 4 sts inc). Repeat inc in the sides every 5½-6-7-7-8 cm 2 more times = 132-140-156-164-180 sts. AT THE SAME TIME when piece measures 9-10-11-12-12 cm, work 6-7-8-8-8 sts past marker mid front. Slip the next 16-20-20-24-24 sts on a stitch holder for pocket slit, cast on 16-20-20-24-24 new sts on needle and then continue in the round over all sts as before (remove the marker mid front). When piece measures 18-20-23-24-25 cm, work diagram A.1. When A.1 has been worked 1 time vertically, continue with diagram A.2 until finished measurements. AT THE SAME TIME when piece measures 22-24-27-28-29 cm, work next round as follows: Work 34-36-40-42-46 sts, slip the last 2 sts worked on a stitch holder and work the remaining 98-104-116-122-134 sts. Then work back and forth on needle from mid front. AT THE SAME TIME on next row from RS, dec 1 st at the beg and end of row for V-neck - read DECREASE TIP 1. Repeat dec every other row (i.e. every row from RS) 5 more times and then every 4th row (i.e. every other row from RS) 5-5-5-7-7 times. AT THE SAME TIME when piece measures 24-26-29-30-31 cm, cast off 6 sts in each side for armholes (i.e. 3 sts on each side of both markers) and finish front and back piece separately. BACK PIECE: = 60-64-72-76-84 sts. Continue pattern as before. AT THE SAME TIME cast off for armholes at beg of every row in each side as follows: 3 sts 1 time, 2 sts 2 times and 1 st 1-1-3-3-5 times = 44-48-52-56-60 sts. Continue pattern with 1 edge st in GARTER ST - see explanation above - in each side. When piece measures 36-39-43-45-47 cm, cast off the middle 20-20-20-24-24 sts for neck and finish each shoulder separately. Then cast off 2 sts on next row from neck = 10-12-14-14-16 sts remain on shoulder. When piece measures 38-41-45-47-49 cm, cast off with K over K and P over P. RIGHT FRONT PIECE: Continue pattern and dec for V-neck as before. AT THE SAME TIME cast off for armhole at beg of every row from the side as on back piece. After all dec and cast offs, 10-12-14-14-16 sts remain on shoulder. When piece measures 38-41-45-47-49 cm, cast off with K over K and P over P - adjust so that front and back piece are the same length. LEFT FRONT PIECE: Work as right front piece but reversed. ASSEMBLY: Sew the shoulder seams. POCKET SLIT: Slip the 16-20-20-24-24 sts from stitch holder on circular needle size 3 mm and work rib (= K 2/P 2) back and forth on needle with 1 edge st in garter st and 2 K sts in each side seen from RS. When pocket slit measures approx. 2.5 cm, loosely cast off with K over K and P over P. Sew pocket slit neatly to front piece with duplicate sts in each side. Sew pocket opening to bottom of pocket slit (where sts were put on a stitch holder) on the back of piece. If a pocket is desired, work pocket slit as explained above and fasten in each side but do not fasten at the bottom. Then knit up on circular needle size 4 mm: 1 new st in each of the 16-20-20-24-24 sts cast on over pocket opening. Work in stocking st back and forth on needle (work top down) until pocket measures approx. 4-5-6-7-7 cm, loosely cast off. Sew pocket to the back of front piece with neat little loose stitches. ARMHOLE EDGE: Knit up from RS approx. 65 to 80 sts around one armhole on a short circular needle size 3 mm. K 1 round while AT THE SAME TIME inc evenly to 80-84-88-96-100 sts. Work rib = K 2/P 2 until armhole edge measures approx. 2.5 cm. Loosely cast off sts with K over K and P over P. Repeat around the other armhole. NECK EDGE: Knit up from RS approx. 90 to 112 sts (incl the 2 sts from stitch holder mid front) on a short circular needle size 3 mm. K 1 round while AT THE SAME TIME inc evenly to 112-120-124-136-140 sts (do not inc over the middle 2 sts at the front). Work rib = K 2/P 2 – adjust so that 2 K sts are mid front. AT THE SAME TIME on 2nd round, dec 1 st on each side of the 2 K sts mid front – SEE DECREASE TIP 2. Repeat dec every other round 3 more times. When neck edge measures approx. 2.5 cm, loosely cast off with K over K and P over P. |
|||||||
Diagram explanations |
|||||||
|
|||||||
 |
|||||||
 |
|||||||
Have you finished this pattern?Tag your pictures with #dropspattern #paulvest or submit them to the #dropsfan gallery. Do you need help with this pattern?You'll find 16 tutorial videos, a Comments/Questions area and more by visiting the pattern on garnstudio.com. © 1982-2026 DROPS Design A/S. We reserve all rights. This document, including all its sub-sections, has copyrights. Read more about what you can do with our patterns at the bottom of each pattern on our site. |
|||||||


With over 40 years in knitting and crochet design, DROPS Design offers one of the most extensive collections of free patterns on the internet - translated to 17 languages. As of today we count 324 catalogues and 12290 patterns translated into English (UK/cm). 12290
We work hard to bring you the best knitting and crochet have to offer, inspiration and advice as well as great quality yarns at incredible prices! Would you like to use our patterns for other than personal use? You can read what you are allowed to do in the Copyright text at the bottom of all our patterns. Happy crafting!
Post a comment to pattern DROPS Children 23-8
We would love to hear what you have to say about this pattern!
If you want to leave a question, please make sure you select the correct category in the form below, to speed up the answering process. Required fields are marked *.