
Popular categories
Looking for a yarn?


Comments / Questions (89)
![]() REINE MARIE wrote:
REINE MARIE wrote:
Bonsoir ,je voudrai refaire ce joli pull ,ma plus grande de mes petite fille a grandi et j'aimerai lui refaire mais en taille adulte ,auriez vous les explications ?Merci beaucoup
24.03.2025 - 22:45DROPS Design answered:
Bonjour Reine Marie, nous avons deux versions semblables de ce modèle mais pour homme: Harbor Horizon et Celtic Ballad. Bon tricot!
25.03.2025 - 12:55
![]() Jane wrote:
Jane wrote:
Hello, if I do that, Starting A1 at mid back, I work 15 stitches. That puts my first marker between 2 purls, 14 stitches puts my second between 2 knits, 30 stitches puts my third between 2 purls, 14 stitches puts my fourth between 2 knits. Then 15 back to mid back marker. If I start the other way (with 2 purls at mid back) I still have 2 markers that work and 2 that don’t, it’s just the opposite markers. I know I’m missing something but I just don’t see how it can work.
05.11.2024 - 00:03DROPS Design answered:
Dear Jane, pattern and raglan stitches might not fit after rib, just work the stitches between the 2 raglan stitches following diagram, and adjust if needed the beg of 2nd part of back piece so that pattern fits at the beg of the round. Happy knitting!
05.11.2024 - 09:57
![]() Jane wrote:
Jane wrote:
Hello, I’m working the smallest size. I’m at the part where you are removing the mid-back marker. Should I be knitting on the row where I place the markers or starting A1 on this round? I’m having trouble making the numbers work. I can’t get all my markers in between what will be two knit stitches so I can follow the Increase Tip. I think that I might be starting A1 either on the wrong round or at the wrong marker. Help!
03.11.2024 - 23:20DROPS Design answered:
Dear Jane, after you have worked the elevation, keep the marker on mid back for the beg of the round, then insert new markers for raglan as follows: 15 sts (mid back), 14 sts (sleeve), 30 sts (front piece), 14 sts (sleeve) and 15 sts (mid back to the end of the round) = 15+14+30+14+15=88 sts and you have 30 sts for both front and back piece. To get A.1 working on mid back, start A.1 with the first 2 sts just as shown in diagram but start the 2nd half of back piece with Purl 2 instead of K2 after the raglan stitches (ie 3rd and 4th sts in diagram). Happy knitting!
04.11.2024 - 10:22
![]() Jane wrote:
Jane wrote:
Hello, I’m working the smallest size. I’m at the part where you are removing the mid-back marker. Should I be knitting on the row where I place the markers or starting A1 on this round? I’m having trouble making the numbers work. I can’t get all my markers in between what will be two knit stitches so I can follow the Increase Tip. I think that I might be starting A1 either on the wrong round or at the wrong marker. Help!!!
03.11.2024 - 23:10
![]() Jane wrote:
Jane wrote:
Thank you so much. I really appreciate how quickly you got back to me. Your company has wonderful customer service.
28.10.2024 - 01:13
![]() Jane wrote:
Jane wrote:
Hello, I am knitting the beautiful Paulina sweater. The Increase Tip says to do a Make 1 YO to create a one stitch increase. Should you do a Make 1 or a YO? Wouldn’t doing both create 2 stitches? I would appreciate any help you could give. I’m looking forward to making this gorgeous sweater for my great niece.
27.10.2024 - 14:19DROPS Design answered:
Dear Jane, Make 1 YO = work 1 yarn over. It's not "Make 1" (like M1) and 1 yarn over, otherwise there should be a comma in the sentence to separate each term. Happy knitting!
27.10.2024 - 15:24
![]() Susi wrote:
Susi wrote:
Ich finde es toll daß Ihre Designer offenbar beginnen, die Vintage Anleitungen wie hier zu überarbeiten! Die alten Schnitte sind einfach zu groß und wuchtig, außerdem von der Stricktechnik her teilweise überholt. Bitte macht weiter so und bringt die traditionellen Zopfmuster und Reliefmuster auf einen modernen Stand. Das ist gerade so angesagt. Vielleicht gibt es ja sogar einmal die ein oder andere Top Down Version... ;-)
27.10.2024 - 10:22
![]() Pascale wrote:
Pascale wrote:
Bonjour, Les côtes 2X2 s'effectuent sur un nombre de mailles multiple de 4+2. Sur 84 m ce n'est pas possible, il faut 86 m ou 82 m. Bonne fin de journée et merci pour ce joli modèle.
15.10.2024 - 17:23DROPS Design answered:
Bonjour Pascale, pour ce modèle, on tricote le col en rond, donc il nous faut un nombre de mailles divisible par 4, dans les 3 premières tailles, on va répéter 21 fois (2 m end, 2 m env) soit 21 x 4 = 84. Bon tricot!
16.10.2024 - 09:19
![]() Sabine wrote:
Sabine wrote:
Dankeschön für die Erklärung. Habe deswegen nur 7 mal gemacht, da müsste man schon genau durchlesen. Stimmt, dann sind es insgesamt 8 mal.
27.09.2024 - 16:17
![]() Sabine wrote:
Sabine wrote:
Jetzt brauche ich keine Hilfe mehr. Habe einfach eine Runde mehr gestrickt bis zum richtigen Maschenzahl. Das passt.
27.09.2024 - 16:03
|
|||||||
Paulina#paulinasweater |
|||||||
|
|
|||||||
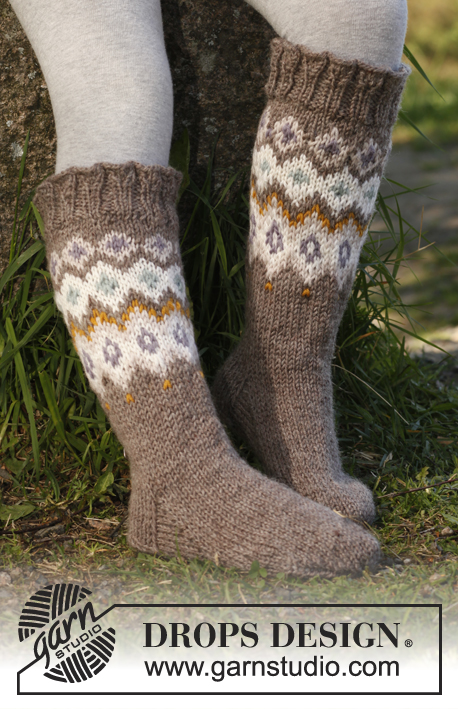
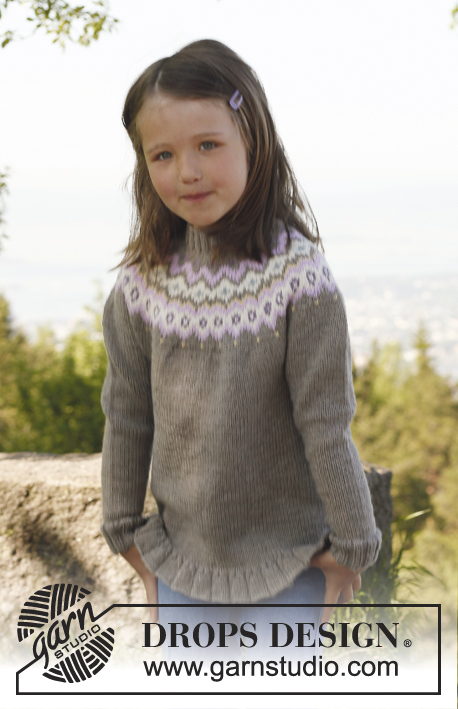
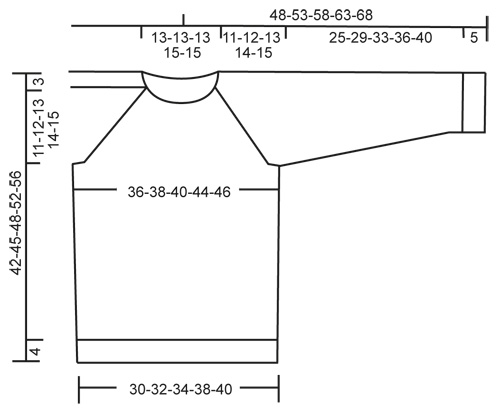
Knitted jumper with raglan, worked top down in DROPS Merino Extra Fine. Size children 3 to 12 years.
DROPS Children 23-7 |
|||||||
|
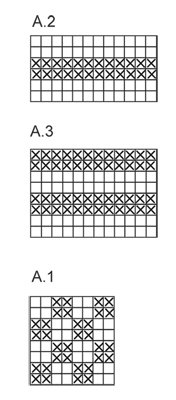
INCREASE TIP (applies to raglan): Work until 1 st remain before marker: Make 1 YO, K 2 sts (marker is in the middle of these sts), make 1 YO. On next round K YOs twisted (i.e. work in back loop of st instead of front) to avoid holes. Work the inc sts in the pattern. PATTERN: See diagrams A.1, A.2 and A.3. Diagrams show pattern from RS. DECREASE TIP (applies to body and sleeves): Work until 2 sts remain before marker, K 2 tog, marker, and K 2 twisted tog (i.e. work in back loop of st instead of front). -------------------------------------------------------- JUMPER: Worked in the round, top down. YOKE: Cast on 84-84-84-92-92 sts on a short circular needle size 3 mm with Merino Extra Fine. Insert a marker at beg of round (= mid back). K 1 round. Then work rib = K 2/P 2 for 3 cm. Then work an elevation in back of neck as follows (continue in rib): Work 8 sts past marker, turn, tighten thread and work 16 sts back, turn, tighten thread and work 24 sts, turn, continue by working 8 sts more on every turn until a total of 64 sts have been worked, turn and work 1 round until marker mid back again. READ ALL OF THE FOLLOWING SECTION BEFORE CONTINUING! Switch to circular needle size 4 mm and work 1 round in stocking st while at the same time inc 4 sts evenly = 88-88-88-96-96 sts. Now insert 4 new markers (for raglan) as follows: Work 15-15-15-17-17 sts from marker mid back, insert 1st marker here (at the same time remove marker mid back), work 14 sts more (= sleeve), insert 2nd marker, work 30-30-30-34-34 sts (= front piece) and insert 3rd marker, work 14 sts (= sleeve), insert 4th marker and work until 1st marker again (there are 30-30-30-34-34 sts between markers on back piece). Work A-1, AT THE SAME TIME on 1st round, inc 1 st on each side of the 4 markers for raglan (= 8 inc) - SEE INCREASE TIP! Repeat inc every round 7-7-9-10-11 more times and then every other round 11-13-13-14-15 times = 240-256-272-296-312 sts on needle. AT THE SAME TIME when piece measures 8-8-8-9-9 cm from mid front, work A.2 1 time vertically, then work A.1 again. After all inc, work next round as follows: Work until 1st marker. Slip the 52-56-60-64-68 sts between 1st and 2nd marker on a stitch holder, cast on 8 new sts over stitch holder, work until 3rd marker, slip the 52-56-60-64-68 sts between 3rd and 4th marker on a stitch holder, cast on 8 new sts over stitch holder, work until 1st marker again = 152-160-168-184-192 sts on needle. BODY: Continue in A.1 – AT THE SAME TIME insert a marker in the middle of the 8 new sts in each side. When piece measures 3 cm from where sleeve sts were put on a stitch holder, work A-3 1 time vertically, then continue in stocking st. AT THE SAME TIME when 4 cm have been worked from where sleeve sts were slipped on a stitch holder, dec 1 st on each side of the markers in the sides – SEE DECREASE TIP! Repeat dec every 3-4-4-5-5 cm 4 more times = 132-140-148-164-172 sts. Continue to work until piece measures 38-41-44-48-52 cm from shoulder. Work 1 round while AT THE SAME TIME inc 4 sts evenly = 136-144-152-168-176 sts. Switch to circular needle size 3 mm and work rib = K 2/P 2 for 4 cm. LOOSELY cast off with K over K and P over P. Piece measures approx. 42-45-48-52-56 cm from shoulder. SLEEVE: Slip sts from one stitch holder on double pointed needles size 4 mm and in addition cast on 8 new sts under sleeve = 60-64-68-72-76 sts. Insert a marker mid under sleeve (i.e. in the middle of the 8 new sts). NOW MEASURE PIECE FROM HERE! Continue with A.1 until piece measures 3 cm from marker, now work A.3 1 time vertically, then work in stocking st. AT THE SAME TIME when 1 cm of A.3 has been worked, dec 1 st on each side of marker – SEE DECREASE TIP! Repeat dec every 4-3-4-4-3½ cm 5-7-7-7-9 more times = 48-48-52-56-56 sts. Continue to work until sleeve measures 25-29-33-36-40 cm. Switch to double pointed needles size 3 mm and work rib = K 2/P 2 for 5 cm. Then LOOSELY cast off with K over K and P over P. Work the other sleeve the same way. ASSEMBLY: Sew the openings under the sleeves. |
|||||||
Diagram explanations |
|||||||
|
|||||||
 |
|||||||
 |
|||||||
Have you finished this pattern?Tag your pictures with #dropspattern #paulinasweater or submit them to the #dropsfan gallery. Do you need help with this pattern?You'll find 11 tutorial videos, a Comments/Questions area and more by visiting the pattern on garnstudio.com. © 1982-2026 DROPS Design A/S. We reserve all rights. This document, including all its sub-sections, has copyrights. Read more about what you can do with our patterns at the bottom of each pattern on our site. |
|||||||


With over 40 years in knitting and crochet design, DROPS Design offers one of the most extensive collections of free patterns on the internet - translated to 17 languages. As of today we count 324 catalogues and 12245 patterns translated into English (UK/cm). 12245
We work hard to bring you the best knitting and crochet have to offer, inspiration and advice as well as great quality yarns at incredible prices! Would you like to use our patterns for other than personal use? You can read what you are allowed to do in the Copyright text at the bottom of all our patterns. Happy crafting!
Post a comment to pattern DROPS Children 23-7
We would love to hear what you have to say about this pattern!
If you want to leave a question, please make sure you select the correct category in the form below, to speed up the answering process. Required fields are marked *.