
Popular categories
Looking for a yarn?


Comments / Questions (53)
![]() Isa wrote:
Isa wrote:
Pouvez-vous me donner les définitions de vos abréviations dans ce patron svp? Ex.: ms = maille simple? ml = maille lisière? 1 nope? mc = maille chaînette? Les B sont des brides je crois et DB double bride. Je pense avoir fait le tour des abréviations. Merci pour le suivi.
15.10.2024 - 23:31DROPS Design answered:
Bonjour Isa, 1 ml = 1 maille en l'air, 1 ms = 1 maille serrée, 1 B = 1 double bride (et 1 dB = 1 demi-bride mais pas utilisée dans ce modèle, sauf erreur de ma part). La nope est expliquée dans la légende des diagrammes. Bon crochet!
16.10.2024 - 07:41
![]() Denise Clemens wrote:
Denise Clemens wrote:
I am not a bobble fan. Will the pattern work by replacing the bobbles with the type stitches where the bobbles are made? What is the meaning for "work over" and "do not work over" stitches? Thank you very much.I
22.01.2024 - 09:58DROPS Design answered:
Dear Denise, yes, you can skip the bobbles and work 1 stitch in each stitch; it will be flat and there won't be the holes in the lower part. So the whole piece will look the same (the upper and lower parts). On another note, work over means that you will work in or around these stitches (work normally). Do not work over means that you are going to skip these stitches (so you won't be working them). Happy crochetting!
22.01.2024 - 23:33
![]() Denise Clemens wrote:
Denise Clemens wrote:
I am not a bobble fan. Will the pattern work by replacing the bobbles with the type stitches where the bobbles are made? What is the meaning for "work over" and "do not work over" stitches? Thank you very much.I
22.01.2024 - 09:57DROPS Design answered:
Dear Denise, yes, you can skip the bobbles and work 1 stitch in each stitch; it will be flat and there won't be the holes in the lower part. So the whole piece will look the same (the upper and lower parts). On another note, work over means that you will work in or around these stitches (work normally). Do not work over means that you are going to skip these stitches (so you won't be working them). Happy crochetting!
22.01.2024 - 23:33
![]() Pauline Brotherhood wrote:
Pauline Brotherhood wrote:
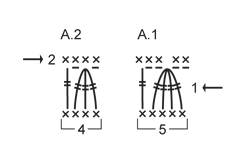
When the pattern (Drops 140-7) changes from A1 to A2 the stitches aren't in line but on the pattern picture they are. Am I doing something wrong??
31.08.2022 - 14:21DROPS Design answered:
Dear Mrs Brotherhood, make sure you worked the last row in A.1 from WS as explained, there should be now 4 sts worked over the 5 sts each A.1 so that you can continue working A.2 (= 4 sts) over each A.1 (= 5 sts). Happy crocheting!
31.08.2022 - 15:06
![]() Zofia wrote:
Zofia wrote:
Why don't you actually do entire tutorials for these designs on YouTube? Some of these pattern instructions get confusing & this would really help with learning to understand the instructions. There are quite few crocheters on there with massive followers & I understand they are making an absolute fortune doing this but they mainly for blankets & very complicated granny squares but not any for some of these 'start from the top down' cardigans. Is that ever going to happen in the near future?
21.06.2021 - 20:29DROPS Design answered:
Dear Zofia, a pattern might use a number of elements, and elements may be used in a number of patterns. If you learn a certain technique, you can use it for other patterns as well. Our website is available for free to support our yarns (DROPS yarns), and not for other purpouses. Though we might do longer tutorials from time to time, we think that these bits help to understand some details. happy Stitching!
22.06.2021 - 01:59
![]() Susanne wrote:
Susanne wrote:
Ok danke dachte weil das oberteil bis zu den Arm auschnit aus sieht als were es in Runde oben gehäkelt.weil es oben schmaler und zu den arm aus Schnitten breiter wird. Gruß Susanne
16.12.2020 - 18:09
![]() Susanne wrote:
Susanne wrote:
Hallo eine Frage wird die jacke von oben runter gehäkelt.? Gruß Susanne
12.12.2020 - 09:01DROPS Design answered:
Liebe Susanne, diese Jacke wird von unten nach oben gehäkelt. Viel Spaß beim häkeln!
14.12.2020 - 10:28
![]() Cornelia Zeller wrote:
Cornelia Zeller wrote:
Ich wollte die Anleitung zum Model Christel ausdrucken. Leider fehlen beim Ausdruck die Bilder (Diagramme). Muss ich bei Drucken etwas Spezielles berücksichtigen? Freundliche Grüsse C. Zeller
13.02.2020 - 16:36DROPS Design answered:
LIebe Frau Zeller, Diagramme sind wieder da - jetzt können Sie die Diagramme ausdrücken. Viel Spaß beim stricken!
14.02.2020 - 08:07
![]() SHIRLEY PACK wrote:
SHIRLEY PACK wrote:
I am totally confused with the yoke instructions........at the end of the body I have 156 stitches but at the end of the yoke there are supposed to be 212 without any increases. Where do t he extra 56 stitches come from??
28.08.2019 - 22:28DROPS Design answered:
Dear Mrs Pack, after you have worked body (= 156 sts), you now work both sleeve edges, then work yoke over the 156 sts + 40 sts for each sleeve skipping 12 sts on each side (for sleeves/armholes) 156-12-12 sts (body) = 132+40-40 sts for the sleeves = 212 sts. Happy crocheting!
29.08.2019 - 09:26Liliane Lohsmann wrote:
Hallo, ich habe das Problem nach meinem Dafürhalten gelöst und es hat auch geklappt. Die Weste ist sehr schön geworden. Tschüss bis zum nächsten Mal.
26.10.2017 - 10:49
|
||||||||||||||||||||||
Christel#christelcardigan |
||||||||||||||||||||||
|
|
||||||||||||||||||||||
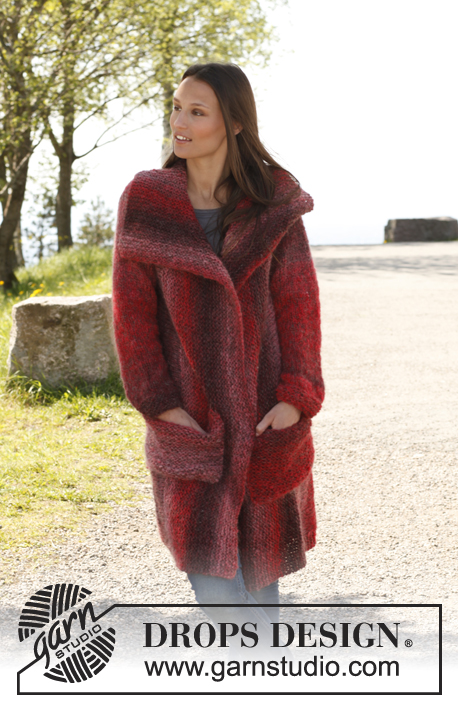
Crochet DROPS vest with round yoke in ”Lima”. Size: S - XXXL.
DROPS 140-7 |
||||||||||||||||||||||
|
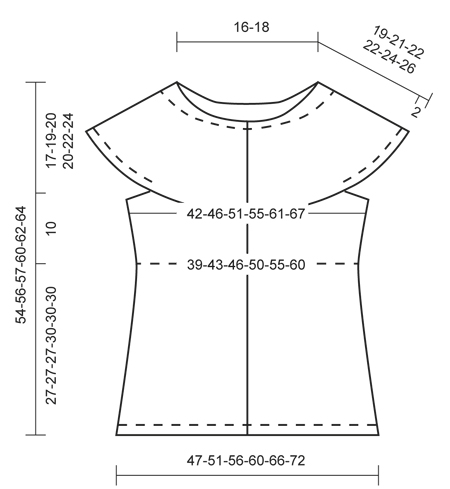
DC ROW: Beg every dc row with 1 ch (not counted as 1st dc), work 1 dc in every st the entire row, turn. PATTERN A.1 (divisible by 5 + 1): ROW 1 (= RS): Work 4 ch (= 1 dtr) in 1st dc, continue as follows – also see 1st row in diagram A-1: * 2 ch, work 1 bobble with 4 dtr, 2 ch, 1 dtr in next dc *, repeat from *-* the entire row, turn piece. ROW 2 (= WS): 1 ch, 3 dc in 1st ch-loop, skip 1st bobble, 2 dc in next ch-loop, continue as follows – also see 2nd row in diagram A-1: * 1 dc in next dtr, 2 dc in next ch-loop, skip next bobble, 2 dc in next ch-loop *, repeat from *-* the entire row, finish with 1 dc more in last ch-loop on row (= same no of dc as before). PATTERN A.2 (divisible by 4 + 1): ROW 1 (= RS): Work 4 ch (= 1 dtr) in 1st dc, continue as follows – also see 1st row in diagram A-2: * 1 ch, work 1 bobble with 3 dtr, 1 ch, 1 dtr in next dc *, repeat from *-* the entire row, turn piece. ROW 2 (= WS): 1 ch, 2 dc in 1st ch-loop, 1 dc in next bobble, 1 dc in next ch-loop, continue as follows – also see 2nd row in diagram A-2: * 1 dc in next dtr, 1 dc in next ch-loop, 1 dc in next bobble, 1 dc in next ch-loop *, repeat from *-* the entire row, finish with 1 dc more in last ch-loop on row (= same no of dc as before). INCREASE TIP: Inc 1 st by working 2 sts in the same st. TR ROW: Work all tr rows from RS. Beg every tr row with 3 ch (= 1st tr), skip 1st dc from previous row, work 1 tr in every dc the entire row, turn. PATTERN A.3: ROW 1 (= RS): Work 1 tr row. ROW 2 (= WS): Work 1 dc row. ROUNDS WITH DC: Beg every dc round with 1 ch (not counted as 1st dc), work 1 dc in every st the entire round, finish with 1 sl st in 1st dc. DECREASE TIP - DC: Work 1 dc but wait with last pull through (= 2 sts on hook), then work next dc but on last pull through, pull thread through all sts on hook = 1 dc dec over 2 sts -------------------------------------------------------- BODY: Worked back and forth from mid front. Work 157-172-187-202-222-242 LOOSE ch with Lima on hook size 4.5 mm, turn and work 1 dc in 2nd ch from hook, then 1 dc in every ch the entire row = 156-171-186-201-221-241 dc, turn (1st row = RS). Work DC ROWS - read explanation above - until piece measures 2 cm. Then work PATTERN A.1 - read explanation above = 31-34-37-40-44-48 repetitions + 1 dtr. When 2ND ROW has been worked, there are 156-171-186-201-221-241 dc on row. REMEMBER THE CROCHET TENSION! Work A.1 a total of 5-5-5-6-6-6 times vertically - but work last dc row from WS as follows: 1 ch, 2 dc in 1st ch-loop, 1 dc in next bobble, 1 dc in next ch-loop, * 1 dc in next dtr, 1 dc in next ch-loop, 1 dc in next bobble, 1 dc in next ch-loop *, repeat from *-* the entire row, finish with 2 dc in last ch-loop = 125-137-149-161-177-193 dc, turn piece. Then work PATTERN A.2 - read explanation above. When 2ND ROW has been worked, there are 125-137-149-161-177-193 dc on row. Work A.2 a total of 5 times vertically - but on last dc row from WS inc 10-10-12-14-16-18 dc evenly - READ INCREASE TIP = 135-147-161-175-193-211 dc. Piece now measures approx. 27-27-27-30-30-30 cm. Continue to work PATTERN A.3 - read explanation above - AT THE SAME TIME on 1st dc row from WS inc 9-9-11-13-15-17 sts evenly = 144-156-172-188-208-228 dc. Work A.3 a total of 6 times (last row = dc row from WS), piece now measures approx. 37-37-37-40-40-40 cm, cut and fasten the thread. Insert 1 marker 36-39-43-47-52-57 dc in from each side on last dc row (= 72-78-86-94-104-114 dc between markers on back piece). SLEEVE EDGE: Worked in the round. Crochet 50-52-56-60-64-66 LOOSE ch on hook size 4.5 mm with Lima and form a ring with 1 sl st in first ch. Work 1st round as follows: 1 ch, then work 1 dc in every ch, finish with 1 sl st in 1st dc at beg of round (= mid under sleeve) = 50-52-56-60-64-66 dc. Continue in the round with ROUNDS WITH DC - read explanation above - until piece measures 2 cm. Now insert 1 marker on each side of the middle 12-12-12-14-16-16 sts under sleeve = 38-40-44-46-48-50 dc between markers on top of sleeve. Put piece aside and crochet another sleeve edge the same way. YOKE: Insert 1 new marker mid front on body, now measure piece from here. Work 1st row from RS as follows: Work 1 tr in each of the first 30-33-37-40-44-49 sts on right front piece, work 1 tr in each of the 38-40-44-46-48-50 sts from one sleeve edge (i.e. do not work over the 12-12-12-14-16-16 sts between markers mid under sleeve), skip 12-12-12-14-16-16 sts in the middle of the side on body (i.e. 6-6-6-7-8-8 sts on each side of marker), work 1 tr in each of the next 60-66-74-80-88-98 sts (= back piece), work 1 tr in each of the 38-40-44-46-48-50 sts from the other sleeve edge, skip 12-12-12-14-16-16 sts in the side of body (i.e. 6-6-6-7-8-8 sts on each side of marker), and work 1 tr in each of the last 30-33-37-40-44-49 sts on left front piece = 196-212-236-252-272-296 tr. Continue back and forth with A.3 as before - AT THE SAME TIME on 3rd-4th-4th-4th-5th-5th dc row from WS, dec 32-36-40-44-48-54 dc evenly - READ DECREASE TIP - DC. Repeat dec on 6th-7th-7th-7th-8th-8th dc row, then on 8th-9th-9th-9th-10th-11th dc row and finally on 9th-10th-11th-11th-12th-13th dc row = 68-68-76-76-80-80 dc remain (last row = WS), yoke now measures approx. 15-17-18-18-20-22 cm from marker. Do not cut the thread. NECK EDGE: Then work an elevation at the back of neck as follows: ROW 1 (= RS): Beg at the top of right front piece, work 1 ch, 1 dc in 1st dc, * 1 ch, skip 1 dc, 1 dc in next dc *, repeat from *-* around the neck, turn piece. ROW 2 (= WS): Work 1 dc in every ch and 1 ch over every dc around the neck until 12 sts remain (= 6 dc + 6 ch) on right front piece. ROW 3: Work 1 dc in every ch and 1 ch over every dc until 12 sts remain on left front piece, turn piece. ROW 4: Work 1 dc in every ch and 1 ch in every dc around the neck until 18 sts remain before edge on right front piece (= 9 dc and 9 ch), turn piece. ROW 5: Work 1 dc in every ch and 1 ch over every dc around the neck until 18 sts remain before edge on left front piece, turn piece. ROW 6: Work 1 dc in every ch and 1 ch in every dc around the neck until 24 sts remain before edge on right front piece (= 12 dc and 12 ch), turn piece. ROW 7: Work 1 dc in every ch and 1 ch over every dc until 24 sts remain before edge on left front piece. Do not cut the thread. Then work 1 row with dc in every dc and in every ch, then work dc rows until edge in dc measures 2 cm mid front, cut and fasten the thread. ASSEMBLY: Sew the openings under the sleeves. BAND: Work from RS approx. 90 - 110 dc along the entire edge mid front on right front piece (incl neck edge). Then work 1 dc row from WS while AT THE SAME TIME adjusting no of sts to 92-94-98-102-104-108 dc. Insert 1 marker in the transition between A.2 and A.3. On next row from RS work dc - AT THE SAME TIME work 4 buttonholes evenly between marker and at the top edge in the neck (1 buttonhole = work 2 ch, skip the next 2 dc) - the last buttonhole should be approx. 1 cm from the top edge. On next row work 2 dc in every ch-loop for buttonhole. Work dc rows until band measures approx. 2 cm, cut and fasten the thread. Work 1 band along left front piece the same way but without buttonhole. Sew 4 buttons on to left band. |
||||||||||||||||||||||
Diagram explanations |
||||||||||||||||||||||
|
||||||||||||||||||||||
 |
||||||||||||||||||||||
 |
||||||||||||||||||||||
Have you finished this pattern?Tag your pictures with #dropspattern #christelcardigan or submit them to the #dropsfan gallery. Do you need help with this pattern?You'll find 6 tutorial videos, a Comments/Questions area and more by visiting the pattern on garnstudio.com. © 1982-2026 DROPS Design A/S. We reserve all rights. This document, including all its sub-sections, has copyrights. Read more about what you can do with our patterns at the bottom of each pattern on our site. |
||||||||||||||||||||||


With over 40 years in knitting and crochet design, DROPS Design offers one of the most extensive collections of free patterns on the internet - translated to 17 languages. As of today we count 324 catalogues and 12290 patterns translated into English (UK/cm). 12290
We work hard to bring you the best knitting and crochet have to offer, inspiration and advice as well as great quality yarns at incredible prices! Would you like to use our patterns for other than personal use? You can read what you are allowed to do in the Copyright text at the bottom of all our patterns. Happy crafting!
Post a comment to pattern DROPS 140-7
We would love to hear what you have to say about this pattern!
If you want to leave a question, please make sure you select the correct category in the form below, to speed up the answering process. Required fields are marked *.