
Popular categories
Looking for a yarn?


Comments / Questions (23)
![]() Vale wrote:
Vale wrote:
Excuse me, I have a question. The patterns in Garnstudio.com , have a reference regarding the scale of difficulty, for example, how can I understand if a pattern is Easy, Medium or Hard difficulty level? Also, it says its for needle 4.5 mm (80 cm), but if the yarn is 'extra fine', how is it possible to use large needles, for fine yarn? Thank you for the info...
30.12.2020 - 11:59DROPS Design answered:
Dear Vale, unfortunately, DROPS pattern don't have a grade of difficulty but if you have trouble during the project you can watch the suggested video tutorials or lessons which can help you to go on. Moreover, regarding this pattern, you've to choose the needle size that let you reach the correct gauge. Happy knitting!
30.12.2020 - 12:11
![]() Vale wrote:
Vale wrote:
Excuse me, I have a question. The patterns in Garnstudio.com , have a reference regarding the scale of difficulty, for example, how can I understand if a pattern is Easy, Medium or Hard difficulty level? Also, it says its for needle 4.5 mm (80 cm), but if the yarn is 'extra fine', how is it possible to use large needles, for fine yarn? Thank you for the info...
30.12.2020 - 11:58DROPS Design answered:
Dear Vale, unfortunately, DROPS pattern don't have a grade of difficulty but if you have trouble during the project you can watch the suggested video tutorials or lessons which can help you to go on. Moreover, regarding this pattern, you've to choose the needle size that let you reach the correct gauge. Happy knitting!
30.12.2020 - 12:10
![]() JoAnne wrote:
JoAnne wrote:
Thanks so very much for your time and all of your help! I'll be able to finish my sweater today. Have a joyful day!
03.03.2016 - 12:54
![]() JoAnne wrote:
JoAnne wrote:
Easy Breeze sleeve cap Part 3: Where the patterns states: "Now bind off for sleeve cap in each side on every other row as follows: 2 sts 3 times, 3 sts 2 times." Does this mean I (bind off 2 sts at beginning of next 2 rows followed by 1 row with no decreases) 3 times; and then (bind off 3 sts at beginning of next 2 rows followed by 1 row with no decreases) 2 times? Thanks so much for your help!
29.02.2016 - 14:53DROPS Design answered:
Dear JoAnne, you have to bind off these sts at the beg of each row both from RS and from WS as previously done, ie bind off 2 sts at the beg of the next 12 rows (= 6 sts bound off on each side), then bind off 3 sts at the beg of next 4 rows (6 sts bound off on each side). Happy knitting!
29.02.2016 - 17:35
![]() JoAnne wrote:
JoAnne wrote:
Easy Breeze sleeve cap Part 2: Where the pattern states: "[bind off] 1 st until piece measures approx. 55 cm" How many times do I bind off 1 st? How many stitches should be left once this is complete?
29.02.2016 - 14:52DROPS Design answered:
Dear JoAnne, Bind off 1 st at the beg of each row both from RS and from WS until sleeve measures 55 cm in size M, the number of sts bound off will depend on how many row you need to this measurements. Then bind off at the beg of each row on both sides: 2 sts 3 times and 3 sts 2 times. Sleeve should measure 59 cm. Happy knitting!
29.02.2016 - 17:34
![]() JoAnne wrote:
JoAnne wrote:
Good morning! I am having a little trouble with the sleeve cap shaping for Easy Breeze (I'm making the small size). My question is too long so it is in 3 parts. Part One: Where the pattern states: "Now bind off for sleeve cap in each side on every other row as follows: bind off 3 sts 1 times, 2 sts a total of 3 times" Does this mean I bind off 3 stitches at beginning of next 2 rows; and (2 stitches at beginning of next 2 rows) 3 times?
29.02.2016 - 14:51DROPS Design answered:
Dear JoAnne, that's correct, you bind off for sleeve cap at the beg of every row (both from RS and from WS) 3 sts 1 time, 2 sts a total of 3 times etc. Happy knitting!
29.02.2016 - 17:32
![]() Davesne wrote:
Davesne wrote:
Bonjour ,j'adore ce petit modèle mais j'ai horreur de tricoter avec 4aiguilles (sans bout) !!y a t'il possibilité de tricoter à plat et de plier en deux et coudre après ?
20.09.2015 - 12:53DROPS Design answered:
Bonjour Mme Davesne, hormis le col, chaque pièce se tricote ici en allers et retours sur aiguille circulaire pour avoir suffisamment de place pour y loger toutes les mailles. Vous pouvez ainsi les tricoter sur aiguilles droites, mais pensez à bien conserver la bonne tension car vos mailles seront plus serrées. Voir aussi ici. Bon tricot!
21.09.2015 - 09:11
![]() Lydia Lapidus wrote:
Lydia Lapidus wrote:
Hei, Jeg finner det litt rart at knappehullet skal ligge på kanten av stolpen og ikke i midten. Skal det være sånn? Altså, det er 3. og 4. Masken som skal strikkes sammen?
06.05.2013 - 20:54DROPS Design answered:
Nej, det er til at knappe kragen i Puddel fast paa jakken. Derfor skal du lukke af som KNAPPHULL 2. Paa det andet billede af modellen (naerbillede af kragen) kan du ogsaa se hvad der menes. God fornöjelse.
10.05.2013 - 16:35
![]() Martine wrote:
Martine wrote:
J'aime beaucoup
04.08.2011 - 21:57
![]() Katrien wrote:
Katrien wrote:
Elegant,verfijnd, mooie Claudinekraag en eenvoudig van lijn, kan ook sportief gedragen worden; topper
30.06.2011 - 20:12
|
|||||||
Easy Breeze#easybreezecardigan |
|||||||
 |
 |
||||||
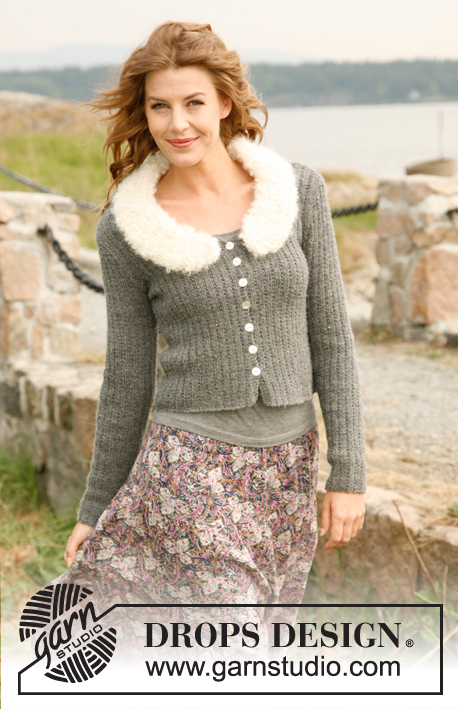
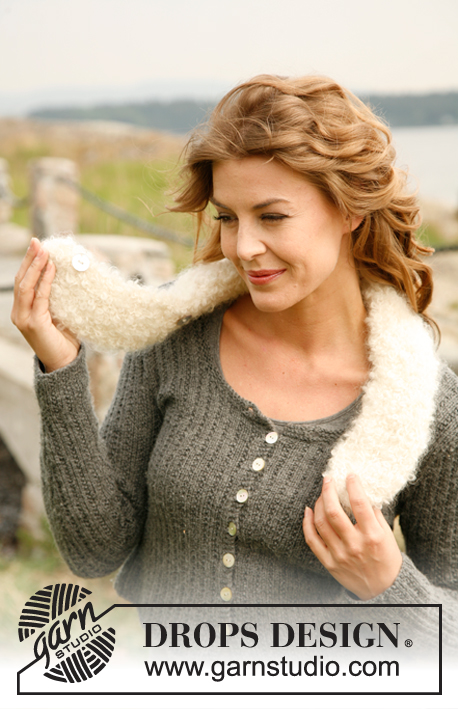
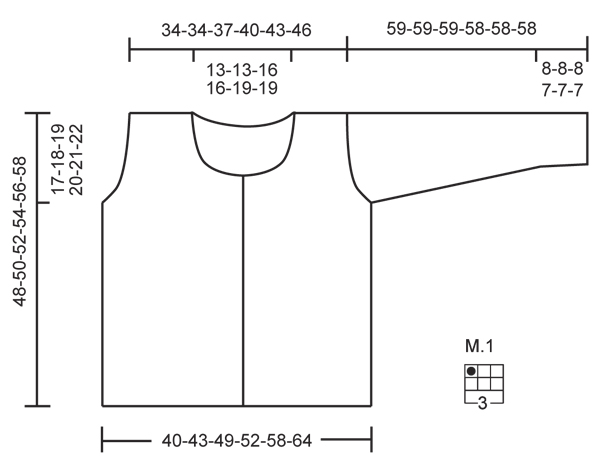
Knitted DROPS jacket in “Merino Extra Fine” with removable collar in “Puddel”. Size: S - XXXL.
DROPS 132-17 |
|||||||
|
GARTER ST (back and forth on needle): K all rows. DECREASE TIP (applies to armholes): Dec 1 st from RS inside 1 edge st and 2 K sts along armhole. After 1 edge st and 2 K sts: Slip 1 st as if to K, K 1, psso. Before 2 K sts and 1 edge st: K 2 tog. INCREASE TIP: Inc 1 st by making 1 YO. On next row K YO twisted, i.e. work in back loop of st instead of front, to avoid holes. PATTERN: See diagram M.1 (the diagram shows the pattern from RS) BUTTON HOLE 1: Cast off for 7 button holes on right front band. 1 BUTTON HOLE = K tog third and fourth st from edge tog and make 1 YO. K YO on next row. Cast off for button holes when piece measures approx.: SIZE S: 6, 11, 16, 21, 26, 31, 35 cm. SIZE M: 6, 12, 17, 22, 27, 32, 37 cm. SIZE L: 6, 12, 18, 23, 28, 33, 38 cm. SIZE XL: 7, 13, 19, 25, 30, 35, 40 cm. SIZE XXL: 7, 13, 19, 25, 31, 36, 41 cm. SIZE XXXL: 7, 13, 19, 25, 31, 37, 43 cm. Approx. 1 cm remains up to neck edge after last button hole. BUTTON HOLE 2: Cast off for 6 button holes evenly on neck edge. Cast off for the outermost button holes approx. 2 cm from edge in each side. 1 BUTTON HOLE = K 2 sts tog and make 1 YO. K YO on next row. -------------------------------------------------------- BACK PIECE: Worked back and forth on needle. Cast on 82-88-100-106-118-130 sts (incl 1 edge st in garter st in each side) on circular needle size 4.5 mm with Merino Extra Fine. On 1st row (= RS) work as follows: 1 edge st in garter st - see explanation above -, work diagram M.1 until 3 sts remain, finish with the first 2 sts in diagram M.1 and 1 edge st in garter st. Continue to work like this until piece measures 31-32-33-34-35-36 cm. REMEMBER THE KNITTING TENSION! Then cast off from RS 3-3-6-6-6-9 sts for armholes at beg of the next 2 rows = 76-82-88-94-106-112 sts. Work next row (= RS) as follows: 1 edge st in garter st, K 2, dec 1 st - Read DECREASE TIP above, continue with pattern until 5 sts remain, dec 1 st - Read DECREASE TIP above, K 2 and 1 edge st in garter st = 2 sts dec. Repeat dec of 1 st inside 1 edge st and 2 K sts in each side on every row from RS like this a total of 3-6-6-6-9-9 times = 70-70-76-82-88-94 sts. Continue with pattern until piece measures 46-48-50-52-54-56 cm. Now cast off the middle 22-22-28-28-34-34 sts for neck and finish each shoulder separately. Cast off 2 sts on next row from neck = 22-22-22-25-25-28 sts remain on the shoulder. When piece measures 48-50-52-54-56-58 cm, loosely cast off all sts with K over K and P over P. RIGHT FRONT PIECE: Worked back and forth on needle. Cast on 46-49-55-58-64-70 sts (incl 4 band sts towards mid front and 1 edge st in garter st in the side) on circular needle size 4.5 mm with Merino Extra Fine. On 1st row (= RS) work as follows: 4 sts in garter st (= band sts), work diagram M.1 until 3 sts remain, finish with the first 2 sts in diagram M.1 and 1 edge st in garter st. Cast off for button holes when piece measures 6-6-6-7-7-7 cm - Read BUTTON HOLE 1 above. Do not forget to continue to cast off for button holes! When piece measures 31-32-33-34-35-36 cm, cast off 3-3-6-6-6-9 sts for armhole at beg of next row from WS =43-46-49-52-58-61 sts. Then dec 1 st inside 1 edge st and 2 K sts in the side as on back piece. At the same time when piece measures 36-38-39-41-42-44 cm, cast off 6-6-8-8-10-10 sts at beg of next row from RS for neck. Then cast off at beg of every row from RS as follows: Cast off 3 sts 1 time, 2 sts 1-1-2-2-2-2 times, then 1 st 7-7-6-6-7-7 times = 22-22-22-25-25-28 sts remain on shoulder. When piece measures 48-50-52-54-56-58 cm, loosely cast off all sts with K over K and P over P. LEFT FRONT PIECE: Work the same way as on right front piece but reversed and without button holes. SLEEVE: Worked back and forth on needle. Cast on 40-46-52-52-58-58 sts (incl 1 edge st in garter st in each side) on circular needle size 4.5 mm with Merino Extra Fine. On 1st row (= RS) work as follows: 1 edge st in garter st, work diagram M.1 until 3 sts remain, finish with the first 2 sts in diagram M.1 and 1 edge st in garter st. When piece measures 8-8-8-7-7-7 cm, inc 1 st inside 1 edge st in each side of piece - Read INCREASE TIP above. Work the new sts in the pattern. Repeat inc every 4½-5-5½-4-4½-3½ cm a total of 9-8-7-9-8-10 times = 58-62-66-70-74-78 sts. Continue until piece measures 48-47-47-45-45-44 cm (shorter measurements in the larger sizes because of broader shoulder width). Now cast off for sleeve cap in each side on every other row as follows: Cast off 3 sts 1-2-2-2-3-3 times, 2 sts a total of 3-2-3-3-2-3 times and 1 st until piece measures approx. 55-55-55-54-54-54 cm. Now cast off for sleeve cap in each side on every other row as follows: 2 sts 3 times, 3 sts 2 times. Then loosely cast off all sts with K over K and P over P. Piece now measures approx. 59-59-59-58-58-58 cm Knit another sleeve. ASSEMBLY: Sew the shoulder seams tog. Sew in sleeves. Sew sleeve and side seams in one inside 1 edge st. NECK EDGE: Worked back and forth in garter st with Merino Extra Fine on circular needle size 4.5 mm as follows: Beg on right front band, knit up from RS approx. 110-140 sts inside 1 edge st along neck edge. Work 1 row in garter st from WS. On next row from RS, cast off for 6 button holes evenly on row - Read BUTTON HOLE 2 above. Continue in garter st until piece measures approx. 2 cm. Loosely cast off all sts. COLLAR: Worked in the round in stocking st. Cast on 12-12-12-16-16-16 sts on double pointed needles size 6 mm with Puddel. On the first 2 rounds inc 4 sts evenly on each round = 20-20-20-24-24-24 sts. Continue in stocking st until length is the same as neck edge minus approx. 1 cm. On the next 2 rounds dec 4 sts evenly on each round = 12-12-12-16-16-16 sts, cast off all sts on next round. Sew tog opening at the ends, evenly sew on buttons on collar to match button holes on neck edge. |
|||||||
Diagram explanations |
|||||||
|
|||||||
 |
|||||||
Have you finished this pattern?Tag your pictures with #dropspattern #easybreezecardigan or submit them to the #dropsfan gallery. Do you need help with this pattern?You'll find 14 tutorial videos, a Comments/Questions area and more by visiting the pattern on garnstudio.com. © 1982-2026 DROPS Design A/S. We reserve all rights. This document, including all its sub-sections, has copyrights. Read more about what you can do with our patterns at the bottom of each pattern on our site. |
|||||||


With over 40 years in knitting and crochet design, DROPS Design offers one of the most extensive collections of free patterns on the internet - translated to 17 languages. As of today we count 324 catalogues and 12290 patterns translated into English (UK/cm). 12290
We work hard to bring you the best knitting and crochet have to offer, inspiration and advice as well as great quality yarns at incredible prices! Would you like to use our patterns for other than personal use? You can read what you are allowed to do in the Copyright text at the bottom of all our patterns. Happy crafting!
Post a comment to pattern DROPS 132-17
We would love to hear what you have to say about this pattern!
If you want to leave a question, please make sure you select the correct category in the form below, to speed up the answering process. Required fields are marked *.