
Popular categories
Looking for a yarn?


Comments / Questions (90)
![]() Nicole wrote:
Nicole wrote:
Hallo, ich möchte gerne wissen, ob ich bei meinem schmalem Oberkörper und etwas größerer Oberweite bei dem vorliegenden Modell statt der angegebenen 4 zu- und abzunehmenden Rapporte auch insgesamt 8 Rapporte zu- und abnehmen kann? Z.B. Vier Rapp. und dann einige Reihen später nochmal vier? Würde mich freuen, wenn ihr mir einen Tip geben könntet! Danke schon mal!
22.07.2012 - 08:22DROPS Design answered:
Liebe Nicole, ich fürchte, ich habe Ihre Frage nicht genau verstanden. Könnten Sie mir noch genauer beschreiben, was Sie meinen?
02.08.2012 - 17:26
![]() Jeanne wrote:
Jeanne wrote:
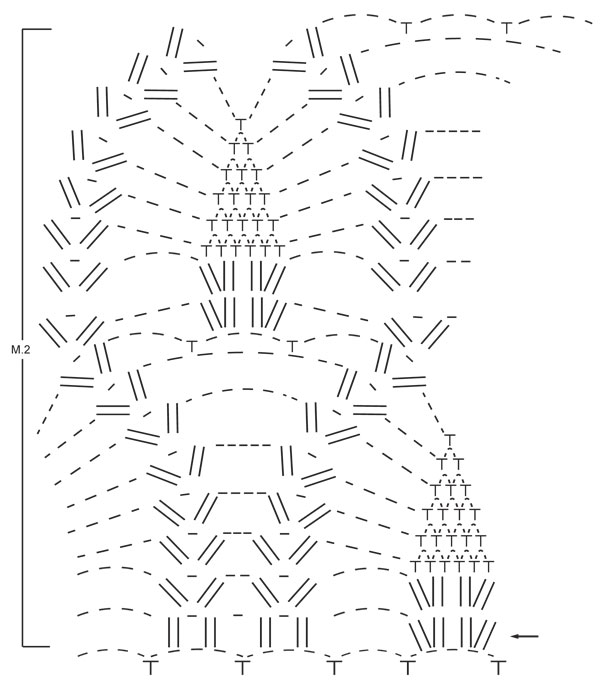
Hej Drops. Jeg er igang med diagram M.2 Jeg skal til at starte 9. omg. men jeg synes der mangler 4 lm i starten og i slutningen + evt. en fm imellem. Kan det passe? Mvh. Jeanne
14.06.2012 - 20:11DROPS Design answered:
Du hækler M.2 rundt, derfor er der ikke en start/slut på mønstret med lm/fm.
22.02.2013 - 10:34
![]() DuezJacqueline wrote:
DuezJacqueline wrote:
Zou graag de achterkant van dit kleed willen zien.DANK U
12.05.2012 - 12:00DROPS Design answered:
De achterkant is eigenlijk helemaal gelijk aan de voorkant.
14.05.2012 - 14:23
![]() Lutz wrote:
Lutz wrote:
Ok merci beaucoup de cette réponse rapide. Vous devriez préciser dans les explications :FAIRE EN MEME TEMPS DE CHAQUE COTE.
17.04.2012 - 11:15DROPS Design answered:
Bonjour Lutz, vous ne diminuez pas en même temps de chaque côté, vous diminuez en fin de rang, donc une fois d'un côté et la fois suivante, de l'autre côté. Bon crochet !
17.04.2012 - 13:30
![]() Lutz wrote:
Lutz wrote:
Au moment des explications pour les diminutions de l'emmanchure,il n'y a aucune informations pour l'encolure.Pourriez-vous me renseigner SVP?
17.04.2012 - 02:14DROPS Design answered:
Bonjour Lutz, les diminutions sont indiqués pour les 2 côtés, crochetez le nombre de mailles indiquées au 1er rang du côté gauche, tournez, puis diminuez 2 ms en fin de rang (2ème rang indiqué), tournez, et continuez à diminuer 2 ms en fin de rang pendant encore 3 rangs supplémentaires : vous allez diminuer de chaque côté. Bon crochet !
17.04.2012 - 08:59Isabela wrote:
Thank you, I did not understand this from the pattern explanation :-).
10.01.2012 - 18:05
![]() DROPS Design wrote:
DROPS Design wrote:
You decrease on each side not only on the armhole side.
10.01.2012 - 09:43Isabela wrote:
I tried to work it, but I am stuck: for the upper part, I worked the decrease and it is on the armhole side. My question is: how do I make the cleveage round, mine comes out straight? What am I not doing right? Thank you
09.01.2012 - 09:20
![]() Samira wrote:
Samira wrote:
Merci pour la réponse, peut être que je donne pas importance au échantillon c'est une faute je sais,bref, jais mesurer louvrage sur moi je trouve que cest une idez logique,une bonne resultat, jais terminer lenpiecemnt et je comence le bas. merci encore.
05.04.2011 - 11:52
![]() Drops Design France wrote:
Drops Design France wrote:
Bonjour Samira, avez-vous l'échantillon de 28 m = 10 cm en M.1 ? La conformité de l'échantillon est très importante pour vous assurer la réussite de votre ouvrage. Pensez également à comparer vos mesures avec celles du croquis des mesures ci- dessous pour trouver la taille qu'il vous faut.
30.03.2011 - 17:54
|
|||||||||||||
Talk Pineapple#talkpineappletop |
|||||||||||||
 |
 |
||||||||||||
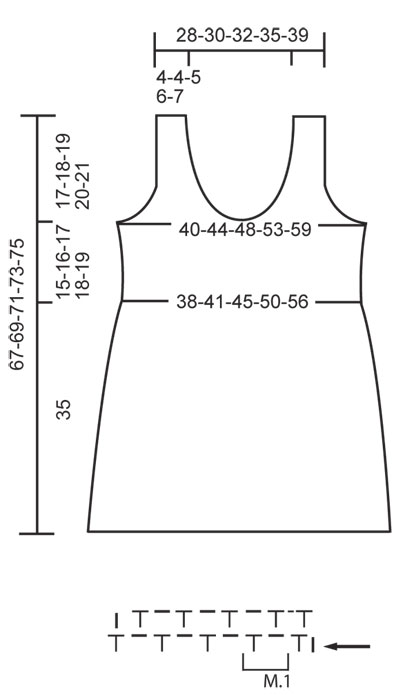
Crochet DROPS top in ”Safran”. Size: XS - XL.
DROPS 128-25 |
|||||||||||||
|
CROCHET INFO: PATTERN: M.1: Work the pattern back and forth. Start every row with 1 ch, 1 dc in 1st ch on row, * 1 ch, 1 dc in next ch * = 1 repetition of M.1. Repeat from *-*, finish with 1 ch and 1 dc in last dc on row, turn piece. See diagram M.1. M.2: Work the pattern in the round. See diagram M.2. DECREASE TIP: Decrease 2 dc as follows: Work M.1 until 2 dc remain (= no of dc to be dec) on row, finish row with 1 ch and 1 dc in next ch, turn piece = 2 dc dec at the end of row. Decrease 1 dc as follows: Work M.1 until 1 dc remains (= no of dc to be dec) on row, finish row with 1 ch and 1 dc in last ch, turn piece = 1 dc dec at the end of row. INCREASE TIP: Inc 1 repetition of M.1 in each side of piece as follows: Work 2 repetitions of M.1 in first and last ch on row = 2 new dc. Inc 1 repetition of M.1 on each side of marker as follows: Work 2 repetitions of M.1 in ch on both sides of marker = 2 new dc. -------------------------------------------------------- FRONT AND BACK PIECE: Work front and back piece back and forth in one, with opening in the left side. Start below the chest and work the top upwards. Work 210-232-254-282-316 ch (= 209-231-253-281-315 ch + 1 ch to turn with) on hook size 3 mm with Safran. Work first row (= RS) as follows: 1 dc in 2nd ch from hook, * 1 ch, skip 1 ch, 1 dc in next ch *. Repeat from *-* the entire row, finish with 1 ch and 1 dc in last ch = 105-116-127-141-158 dc. Insert a marker from RS in ch after the 53rd-58th-64th-71st-79th dc (front piece is to the right of the marker = 53-58-64-71-79 dc), turn piece. NOTE: Move the marker upwards when working. On next row, work M.1 - See explanation above, turn piece. REMEMBER THE CROCHET TENSION! Work like this until piece measures 5-5-5-6-7 cm. On next row from RS, inc 4 repetitions of M.1 as follows: Inc 1 repetition of M.1 in each side of piece and inc 1 repetition of M.1 on both sides of marker (= 4 new dc on row) - Read INCREASE TIP. Repeat inc when piece measures 10-10-10-12-14 cm = 113-124-135-149-166 dc (front piece = 57-62-68-75-83 dc). Continue until piece measures 15-16-17-18-19 cm. On next row from WS, continue as follows: Work M.1 until 2 dc remain on row, finish with 1 ch and 1 dc in next ch, turn piece (= 1st dec of 2 dc on front piece - Read Decrease tip). There are now 55-60-66-73-81 dc to the right of the marker. Then start the armhole, and finish left and right side of front piece separately. LEFT SIDE OF FRONT PIECE: Work the first row (= RS) as follows: 1 ch, 1 dc in next ch on row, work 23-25-28-32-35 repetitions of M.1, turn piece = 24-26-29-33-36 dc on row. Work next row (= WS) as follows: 1 ch, 1 dc in 1st ch on row, work M.1 until 2 dc remain on row, finish with 1 ch and 1 dc in next ch (= 2 dc dec), turn piece = 22-24-27-31-34 dc on row. Dec 2 dc at the end of row like this on 3-3-3-3-3 more rows = 16-18-21-25-28 dc. Then dec 1 dc at the end of row - Read Decrease tip - until 6-6-7-9-10 dc remain on row. Continue to work M.1 until piece measures 34-36-38-40-42 cm from armhole (= shoulder strap). Cut and fasten the thread. RIGHT SIDE OF FRONT PIECE: Pick up the thread in the 26th-28th-31st-35th-38th dc to the right of the marker. Work the right part the same way as left part of front piece. Cut and fasten the thread. ASSEMBLY: Sew the shoulder straps edge to edge on each side of back piece. SKIRT: Worked in the round top down from cast on edge on front and back piece. Work on hook size 3 mm with Safran at the bottom of left back piece as follows: Pick up the thread in 1st ch and work 1 ch. Then work 1 dc in every ch along the edge of back and front piece, finish with 1 sl st in 1st dc = 209-231-253-281-315 dc on the round, then work in the round. Work next round as follows: 3 ch, work tr in every dc - while AT THE SAME TIME adjusting no of sts to 220-240-260-280-320 tr, finish with 1 sl st in 3rd ch from beg of round. Work next round as follows: 1 ch, 1 dc in 1st tr, * 3 ch, skip 3 tr, 1 dc in next tr *, repeat from *-* the entire round. Finish round with 3 ch and 1 sl st in 1st dc. Then work M.2 in the round - See diagram, beg of round is marked with an arrow. Continue until M.2 has been worked 2 times vertically. Then work 1st round in M.2 (round marked with arrow) one more time, cut and fasten the thread. BAND IN THE LEFT SIDE WITH BUTTON HOLES: Work from RS back and forth up along the side on left front piece. Start at the bottom of left front piece (above the skirt) as follows: Pick up the thread in 1st row, work 1 ch, then work 40-42-44-46-50 dc (dc in every row) along the edge up to armhole, turn piece. Work 2 more dc rows (1 dc in every dc, beg every row with 1 ch). On next row (4th row) work button holes as follows: Work 4 dc, * skip 2 dc, work 2 ch, work 13-14-15-16-18 dc *. Repeat from *-* one more time, work 2 ch, skip 2 dc, finish with 4 dc. Then work dc rows, work 1 dc in every ch from 4th row. Continue until 7 dc rows have been worked. Cut and fasten the thread. Place the band over left back piece and sew it to the bottom edge with neat little stitches. Sew the buttons on to the left back piece. CROCHET BORDER: Work M.1 around the neck and armhole if a more even edge is desired. |
|||||||||||||
Diagram explanations |
|||||||||||||
|
|||||||||||||
 |
|||||||||||||
 |
|||||||||||||
Have you finished this pattern?Tag your pictures with #dropspattern #talkpineappletop or submit them to the #dropsfan gallery. Do you need help with this pattern?You'll find 4 tutorial videos, a Comments/Questions area and more by visiting the pattern on garnstudio.com. © 1982-2026 DROPS Design A/S. We reserve all rights. This document, including all its sub-sections, has copyrights. Read more about what you can do with our patterns at the bottom of each pattern on our site. |
|||||||||||||


With over 40 years in knitting and crochet design, DROPS Design offers one of the most extensive collections of free patterns on the internet - translated to 17 languages. As of today we count 324 catalogues and 12290 patterns translated into English (UK/cm). 12290
We work hard to bring you the best knitting and crochet have to offer, inspiration and advice as well as great quality yarns at incredible prices! Would you like to use our patterns for other than personal use? You can read what you are allowed to do in the Copyright text at the bottom of all our patterns. Happy crafting!
Post a comment to pattern DROPS 128-25
We would love to hear what you have to say about this pattern!
If you want to leave a question, please make sure you select the correct category in the form below, to speed up the answering process. Required fields are marked *.