
Popular categories
Looking for a yarn?


Comments / Questions (90)
![]() Maria wrote:
Maria wrote:
Jag förstår inte ökningen vid markören riktigt. Ska båda ökningarna göras i samma lm där markören är, eller ska det göras en ökning i lm innan markören och en ökning i lm efter markören...? Var lite vagt i beskrivningen tycker jag :)
18.05.2015 - 13:50DROPS Design answered:
Hej. Det ökas på varje sida av markören. Lycka till!
20.05.2015 - 10:56
![]() Lynn Peckham wrote:
Lynn Peckham wrote:
Hi There is another question related to mine but I still don't understand. I am working the armhole decreases,so I need to decrease 2 dc (English) on 3 rows after the initial 2dc decrease. When I have 16 dc I then decrease 1 dc at the armhole edge. What about the neckline? I'm assuming I have to decrease there too because otherwise it's straight as opposed to curved. The pattern is not too clear on this. Can you help me, please. Thank you
07.05.2015 - 23:00DROPS Design answered:
Dear Mrs Peckham, dec 2 dc at the end of next 3 rows, then 1 dc at the end of every row until 6 dc remain, you have dec sts on both sides for neckline and for armhole. Happy crocheting!
08.05.2015 - 10:12
![]() Bev H wrote:
Bev H wrote:
Why does the M.2 diagram shows sc, ch 5, and sc ch 4 sc ch 5, etc. on the row before starting M.2, when the written directions says sc ch 3, skip 3 sc ch 3. Which is correct?
20.08.2014 - 20:58DROPS Design answered:
Dear Bev H, the row before M.2 has to be worked as in written pattern (ch 3), start then M.2 at the arrow. Happy crocheting!
21.08.2014 - 11:37
![]() Wilma wrote:
Wilma wrote:
De top kan mogelijk "Fris fruitig annanas top" heten.
22.04.2014 - 18:14
![]() Wilma wrote:
Wilma wrote:
Ik vind het model heel mooi en ben gelijk begonnen. Maar moet ik nu op 10 cm alleen met voorpand verder?
13.04.2014 - 20:41DROPS Design answered:
Hoi Wilma. Nee, er wordt alleen aangegeven hoeveel st van het voorpand zijn.
14.04.2014 - 14:21
![]() Elena wrote:
Elena wrote:
Non capisco bene per lo scollo e lo scalfo manica...grazie
17.03.2014 - 16:01DROPS Design answered:
Buonasera. Per il davanti sinistro e p.es per la taglia XS: alla 1a riga lavora 1 cat e 1 m.b finchè ha lavorato in tutto 24 m.b. Gira. Alla 2a riga lavora 22 m.b (non lavora le ultime 2 m.b della riga); alla 3a riga lavora 20 m.b (non lavora le ultime 2 m.b alla fine della riga. Diminuisce così una volta per lo scalfo e una volta per lo scollo); alla quarta 18 m.b e alla quinta 16 m.b. Lavora ora 1 sola m.b in meno alla fine di ogni riga finché rimangono 6 m.b. Buon lavoro!
17.03.2014 - 22:29
![]() Elena wrote:
Elena wrote:
Non capisco bene per lo scollo e lo scalfo manica...grazie
17.03.2014 - 15:59DROPS Design answered:
Buonasera. Per il davanti sinistro e p.es per la taglia XS: alla 1a riga lavora 1 cat e 1 m.b finchè ha lavorato in tutto 24 m.b. Gira. Alla 2a riga lavora 22 m.b (non lavora le ultime 2 m.b della riga); alla 3a riga lavora 20 m.b (non lavora le ultime 2 m.b alla fine della riga. Diminuisce così una volta per lo scalfo e una volta per lo scollo); alla quarta 18 m.b e alla quinta 16 m.b. Lavora ora 1 sola m.b in meno alla fine di ogni riga finché rimangono 6 m.b. Buon lavoro!
17.03.2014 - 22:28
![]() Christina wrote:
Christina wrote:
Wat ik niet begrijp van dit patroon is, wat betekent herhaaling m1. En heb gemeerderd tot 135 v. En dan lees ik 68 v. Dat begrijp ik niet. Ik hoop dat uw dat mijn uit kan leggen. Gr. Christina.
09.06.2013 - 18:40DROPS Design answered:
1 herhaling van M.1 is een herhaling van het teltpatroon M.1 (1 l + 1 v) - zie onderaan het patroon en TIP VOOR HET MEERDEREN. Je hebt 135 v op de hele toer = hiervan is het voorpand 68 v.
10.06.2013 - 12:40
![]() Nicole wrote:
Nicole wrote:
Ich bin fertig und muß sagen, es ist wirklich ganz toll geworden. Erst hatte ich ein wenig Bammel vor dem Muster, aber es hat alles super geklappt! Es hat zwar ne ganze Weile gedauert, aber ich überlege schon, ob ich es mit einer anderen Farbe nicht nochmal angehe. Die Mühe lohnt sich! Ein großes Lob an den Modelldesigner.
15.09.2012 - 10:37
![]() Yara wrote:
Yara wrote:
Hallo, ich verstehe das Diagramm nicht ganz. Gleich zu Beginn sollen vier Stäbchen gehäkelt werden. Ich kann an der Zeichnung nicht erkennen, ob diese alle in das erste Stäbchen sollen. Und weshalb sind in der Reihe unterhalb 5 LM zw. den fM abgebildet und nicht 3? Ist jeder kleine Strich eine LM? Bitte um Klärung, ich kann sonst nicht weitermachen. Danke!
31.07.2012 - 16:04DROPS Design answered:
Sie haben recht wegen den 5 Strichen (jeder Strich = 1 Lm) statt 3, aber da die Stb in den Luftmaschenbogen gehäkelt werden, entsteht kein Fehler beim Ausführen.
09.08.2012 - 13:29
|
|||||||||||||
Talk Pineapple#talkpineappletop |
|||||||||||||
 |
 |
||||||||||||
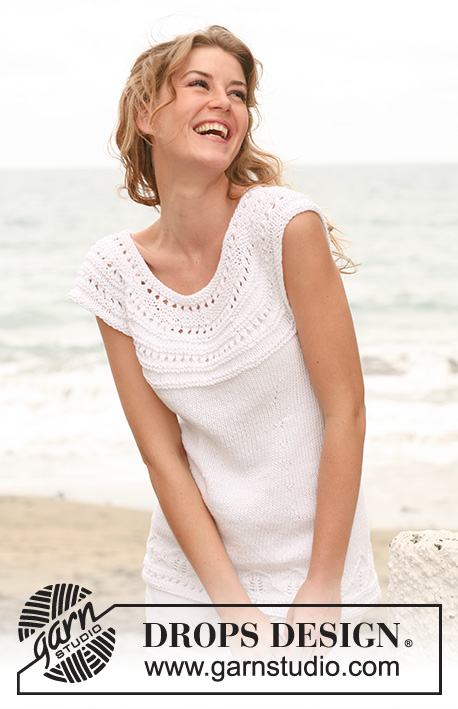
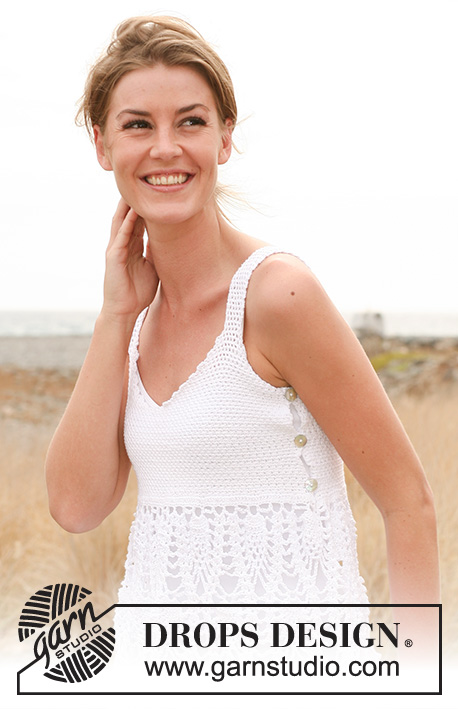
Crochet DROPS top in ”Safran”. Size: XS - XL.
DROPS 128-25 |
|||||||||||||
|
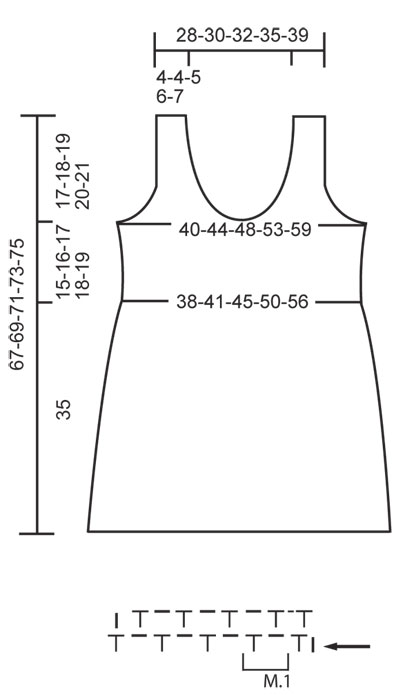
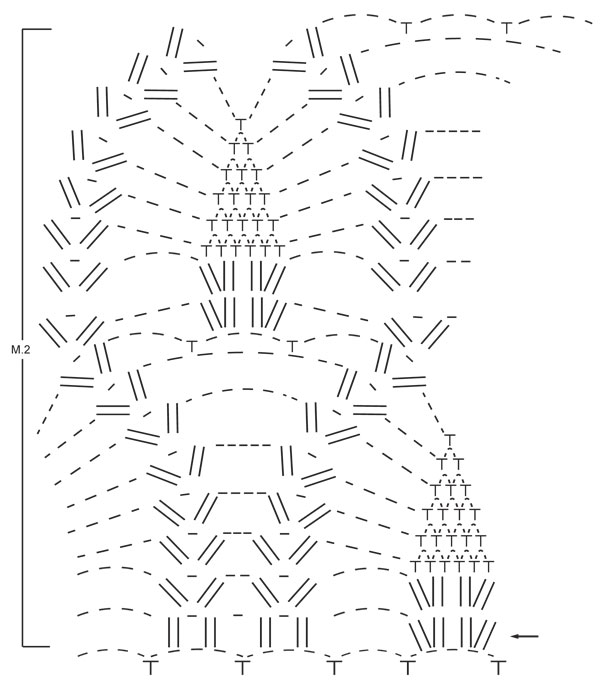
CROCHET INFO: PATTERN: M.1: Work the pattern back and forth. Start every row with 1 ch, 1 dc in 1st ch on row, * 1 ch, 1 dc in next ch * = 1 repetition of M.1. Repeat from *-*, finish with 1 ch and 1 dc in last dc on row, turn piece. See diagram M.1. M.2: Work the pattern in the round. See diagram M.2. DECREASE TIP: Decrease 2 dc as follows: Work M.1 until 2 dc remain (= no of dc to be dec) on row, finish row with 1 ch and 1 dc in next ch, turn piece = 2 dc dec at the end of row. Decrease 1 dc as follows: Work M.1 until 1 dc remains (= no of dc to be dec) on row, finish row with 1 ch and 1 dc in last ch, turn piece = 1 dc dec at the end of row. INCREASE TIP: Inc 1 repetition of M.1 in each side of piece as follows: Work 2 repetitions of M.1 in first and last ch on row = 2 new dc. Inc 1 repetition of M.1 on each side of marker as follows: Work 2 repetitions of M.1 in ch on both sides of marker = 2 new dc. -------------------------------------------------------- FRONT AND BACK PIECE: Work front and back piece back and forth in one, with opening in the left side. Start below the chest and work the top upwards. Work 210-232-254-282-316 ch (= 209-231-253-281-315 ch + 1 ch to turn with) on hook size 3 mm with Safran. Work first row (= RS) as follows: 1 dc in 2nd ch from hook, * 1 ch, skip 1 ch, 1 dc in next ch *. Repeat from *-* the entire row, finish with 1 ch and 1 dc in last ch = 105-116-127-141-158 dc. Insert a marker from RS in ch after the 53rd-58th-64th-71st-79th dc (front piece is to the right of the marker = 53-58-64-71-79 dc), turn piece. NOTE: Move the marker upwards when working. On next row, work M.1 - See explanation above, turn piece. REMEMBER THE CROCHET TENSION! Work like this until piece measures 5-5-5-6-7 cm. On next row from RS, inc 4 repetitions of M.1 as follows: Inc 1 repetition of M.1 in each side of piece and inc 1 repetition of M.1 on both sides of marker (= 4 new dc on row) - Read INCREASE TIP. Repeat inc when piece measures 10-10-10-12-14 cm = 113-124-135-149-166 dc (front piece = 57-62-68-75-83 dc). Continue until piece measures 15-16-17-18-19 cm. On next row from WS, continue as follows: Work M.1 until 2 dc remain on row, finish with 1 ch and 1 dc in next ch, turn piece (= 1st dec of 2 dc on front piece - Read Decrease tip). There are now 55-60-66-73-81 dc to the right of the marker. Then start the armhole, and finish left and right side of front piece separately. LEFT SIDE OF FRONT PIECE: Work the first row (= RS) as follows: 1 ch, 1 dc in next ch on row, work 23-25-28-32-35 repetitions of M.1, turn piece = 24-26-29-33-36 dc on row. Work next row (= WS) as follows: 1 ch, 1 dc in 1st ch on row, work M.1 until 2 dc remain on row, finish with 1 ch and 1 dc in next ch (= 2 dc dec), turn piece = 22-24-27-31-34 dc on row. Dec 2 dc at the end of row like this on 3-3-3-3-3 more rows = 16-18-21-25-28 dc. Then dec 1 dc at the end of row - Read Decrease tip - until 6-6-7-9-10 dc remain on row. Continue to work M.1 until piece measures 34-36-38-40-42 cm from armhole (= shoulder strap). Cut and fasten the thread. RIGHT SIDE OF FRONT PIECE: Pick up the thread in the 26th-28th-31st-35th-38th dc to the right of the marker. Work the right part the same way as left part of front piece. Cut and fasten the thread. ASSEMBLY: Sew the shoulder straps edge to edge on each side of back piece. SKIRT: Worked in the round top down from cast on edge on front and back piece. Work on hook size 3 mm with Safran at the bottom of left back piece as follows: Pick up the thread in 1st ch and work 1 ch. Then work 1 dc in every ch along the edge of back and front piece, finish with 1 sl st in 1st dc = 209-231-253-281-315 dc on the round, then work in the round. Work next round as follows: 3 ch, work tr in every dc - while AT THE SAME TIME adjusting no of sts to 220-240-260-280-320 tr, finish with 1 sl st in 3rd ch from beg of round. Work next round as follows: 1 ch, 1 dc in 1st tr, * 3 ch, skip 3 tr, 1 dc in next tr *, repeat from *-* the entire round. Finish round with 3 ch and 1 sl st in 1st dc. Then work M.2 in the round - See diagram, beg of round is marked with an arrow. Continue until M.2 has been worked 2 times vertically. Then work 1st round in M.2 (round marked with arrow) one more time, cut and fasten the thread. BAND IN THE LEFT SIDE WITH BUTTON HOLES: Work from RS back and forth up along the side on left front piece. Start at the bottom of left front piece (above the skirt) as follows: Pick up the thread in 1st row, work 1 ch, then work 40-42-44-46-50 dc (dc in every row) along the edge up to armhole, turn piece. Work 2 more dc rows (1 dc in every dc, beg every row with 1 ch). On next row (4th row) work button holes as follows: Work 4 dc, * skip 2 dc, work 2 ch, work 13-14-15-16-18 dc *. Repeat from *-* one more time, work 2 ch, skip 2 dc, finish with 4 dc. Then work dc rows, work 1 dc in every ch from 4th row. Continue until 7 dc rows have been worked. Cut and fasten the thread. Place the band over left back piece and sew it to the bottom edge with neat little stitches. Sew the buttons on to the left back piece. CROCHET BORDER: Work M.1 around the neck and armhole if a more even edge is desired. |
|||||||||||||
Diagram explanations |
|||||||||||||
|
|||||||||||||
 |
|||||||||||||
 |
|||||||||||||
Have you finished this pattern?Tag your pictures with #dropspattern #talkpineappletop or submit them to the #dropsfan gallery. Do you need help with this pattern?You'll find 4 tutorial videos, a Comments/Questions area and more by visiting the pattern on garnstudio.com. © 1982-2026 DROPS Design A/S. We reserve all rights. This document, including all its sub-sections, has copyrights. Read more about what you can do with our patterns at the bottom of each pattern on our site. |
|||||||||||||


With over 40 years in knitting and crochet design, DROPS Design offers one of the most extensive collections of free patterns on the internet - translated to 17 languages. As of today we count 324 catalogues and 12290 patterns translated into English (UK/cm). 12290
We work hard to bring you the best knitting and crochet have to offer, inspiration and advice as well as great quality yarns at incredible prices! Would you like to use our patterns for other than personal use? You can read what you are allowed to do in the Copyright text at the bottom of all our patterns. Happy crafting!
Post a comment to pattern DROPS 128-25
We would love to hear what you have to say about this pattern!
If you want to leave a question, please make sure you select the correct category in the form below, to speed up the answering process. Required fields are marked *.