
Popular categories
Looking for a yarn?


Comments / Questions (16)
![]() BROCHET wrote:
BROCHET wrote:
Bonjour, je suis en train de réaliser le modèle 125-12 et plus particulièrement les moufles. Mais je bloque au niveau du pouce. Je ne comprends pas comment faire. L’un ou l’une d’entre vous aurait-il la gentillesse de me dépanner svp ? Je vous remercie
17.03.2024 - 17:27DROPS Design answered:
Bonjour Mme Brochet, dans cette vidéo, nous montrons comment augmenter pour le pouce; dans ce modèle, vous allez procéder de la même façon en faisant 1 jeté avant + 1 jeté après la maille avec le marqueur, et tricotez ces jetés torse à l'envers (en jersey envers) au tour suivant. Bon tricot!
18.03.2024 - 09:28
![]() Anett Beate Thorvaldsen wrote:
Anett Beate Thorvaldsen wrote:
Hei. Dette er mine første votter. Jeg er usikker på hvordan jeg skal tolke de 2 ulike fellingene på over og undersiden, og når jeg skal starte med fellingen. Jeg har strikket ferdig M2. skal jeg starte å felle nå på oversiden, eller strikke 4 omganger og så felle en gang. Det står heller ikke hvor mange masker som skal felles. Men leser felletips 2 m vridd vr sm. , før og etter merketråd på underside og overside. Jeg strikker S/M .
08.12.2023 - 21:34
![]() Anett Beate Thorvaldsen wrote:
Anett Beate Thorvaldsen wrote:
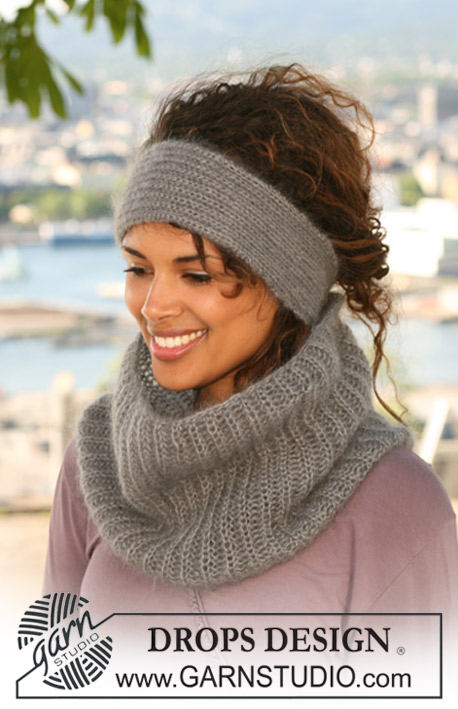
Hei på oppskriften til Hals: på bilde ser det ut som selve halsen er smalere, altså felt masker. Men i oppskriften står det at jeg skal øke med 9 masker opp mot halsen. Er det bare synsbedrag på bilde, eller mangler det ett avsnitt i oppskriften. Mvh Anett
02.08.2023 - 16:38DROPS Design answered:
Hei Anett Beate, Vi anbefaler å øke masker før man begynner på selve halsen, slik at den er løs. Da blir den som vist i bildet. God fornøyelse!
04.08.2023 - 06:45
![]() Anett Beate Thorvaldsen wrote:
Anett Beate Thorvaldsen wrote:
Har jeg forstått det riktig? I mønsterdiagram 1 så skal alle hvite firkanter strikkes rett, og etter de 9 maskene i diagrammet strikkes det deretter 4 vrangmasker, før man starter på ny omgang? Mvh Anett
10.07.2023 - 19:26DROPS Design answered:
Hei Anett Beate, I M.1 de 2 første omgangene er strikket rett. I omgang 3 strikker du fletter, deretter strikker rett i 3 omganger til, og begynner igjen på bunnen med 2 omganger med rett. På hver omgang strikker du 4 vrangmasker mellom hver rapport av M.1 i bredden (M.1, 7 vrangmasker, M.1, 7 vrangmasker osv til slutten av omgangen). God fornøyelse!
11.07.2023 - 07:15
![]() Sonja wrote:
Sonja wrote:
Hals: M1 er det 9m vrang selv om det viser firkant ret når der står i vejledningen vrang i højde ?.?
06.01.2021 - 09:21DROPS Design answered:
Hej Sonja, M.1 strikkes ret (glat) over de 9 masker og imellem hver M.1 strikker du 4 vrang ifølge opskriften. God fornøjelse!
11.01.2021 - 15:10
![]() Roberta Ferrari wrote:
Roberta Ferrari wrote:
I don't understand the tension, it seems too tight 17 sts. x 22 rows=10cm. I want to use LIMA instead of MERINO extra fine, do you have any hint for the right needle size to use ? I am going to use stainless steel needles. thank you
12.02.2018 - 14:12DROPS Design answered:
Dear Mrs Ferrari, wash first your swatch and check measurements. Set is worked here with a quite tighter tension than expected for a yarn group B + a yarn group A worked together to get the desired fabric. Should you like to get it looser, you would then need to recalculate entirely the pattern to your own wishes or find another pattern matching the tension you like. Happy knitting!
12.02.2018 - 14:30
![]() Hanneke wrote:
Hanneke wrote:
Ik snap het patroon van de want niet helemaal. Je moet markeerders zetten op de zijkant van de want. Maar dan staat er dat je op de bovenkant en op de palm moet minderen. Maar daar zitten niet de markeerders. Ik snap het niet. Wie kan me helpen? Groetjes.
07.11.2015 - 19:59DROPS Design answered:
Hoi Hanneke. De markeerders zitten in het werk als volgt: Plaats 2 markeerders in het werk, 1 na 15-19 st en 1 na de laatste st op de nld (= 15-19 st voor de bovenkant hand en 15-17 st voor de palm van de hand). Je breit nu verder volgens M2 boven M1 (bovenkant van de want) en mindert zoals beschreven.
09.11.2015 - 12:45
![]() Anja wrote:
Anja wrote:
Beim Handschuh steht für den Handrücken: "bei jeder 4. R. total 4-4 Mal, und dann bei jeder 1.-2. R. total 1-2 Mal". Ich nehme an, damit ist das Abketten der Maschen gemeint. Aber alle 4 Runden 4 Mal? Dann wäre die Handfläche des Handschuhs länger als der Handrücken. Soll es alle 2 Runden heißen? Logisch wäre für mich, wenn man das Abketten auf der Handfläche jeweils in derselben Runde macht, wo im Muster M2 die Maschen zusammengestrickt werden. LG Anja
16.10.2014 - 07:44DROPS Design answered:
Ich kann Ihren Einwand verstehen, denke aber, dass es trotzdem funktioniert, wenn Sie am Ende nur noch auf der Unterseite abnehmen und oben einfach li weiterstricken. Für Gr. S/M: Die 1. Abn. auf der Unterseite machen Sie in derselben Rd wie die 1. Abn. in M.2. Dann noch 3 Abn. in jeder 4. Rd, dann in der nächsten Rd die letzte Abn. Nach der letzten Abn. in M.2 haben Sie also noch 7 Rd, in denen Sie li stricken, auf dem Foto sind ja auch noch einige Linksrd. nach dem Muster zu sehen.
17.10.2014 - 10:59
![]() Anja wrote:
Anja wrote:
In der Anleitung für den linken Fäustling steht in der 8. Zeile: "Nach 16-18 cm (nach einem ganzen Rapport)." Fehlt hier etwas? Ich verstehe sonst nicht, was Ihr meint! LG Anja
22.06.2014 - 18:54DROPS Design answered:
Liebe Anja, ja, hier ist leider beim Übersetzen etwas ein wenig durchgeschüttelt worden. Die Stelle wurde nun behoben, nun müsste es verständlich sein!
23.06.2014 - 17:56
![]() Fraçois wrote:
Fraçois wrote:
Aux expliquation du motif m.1 vous avez mis une case endroit alors que ce sont des mailles envers donc case avec croix
23.12.2013 - 14:26DROPS Design answered:
Bonjour Mme Fraçois, dans M.1, on tricote bien toutes les m à l'end, chaque motif de M.1 est ensuite séparé de 4-5 m env. Bon tricot!
27.12.2013 - 14:30
|
|||||||||||||||||||
DROPS 125-12 |
|||||||||||||||||||
|
|
|||||||||||||||||||
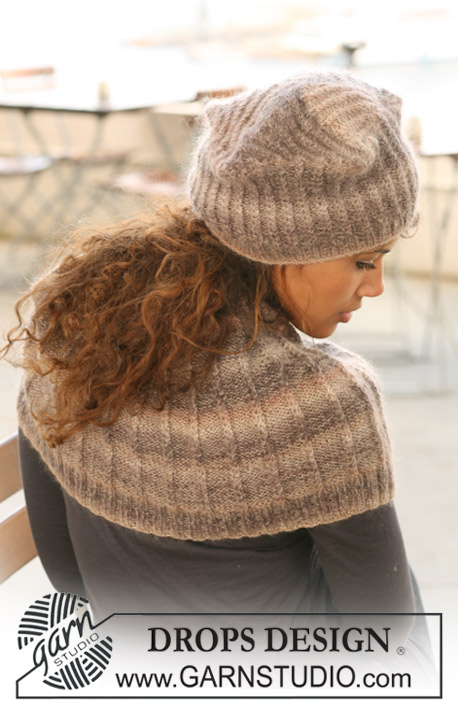
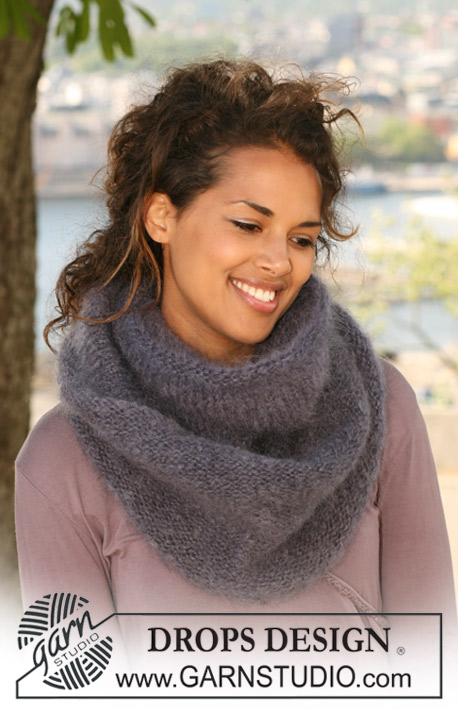
Set comprises: Knitted DROPS hat, neck warmer and mittens with cables in ”Merino Extra Fine” and ”Kid-Silk”.
DROPS 125-12 |
|||||||||||||||||||
|
HAT: DECREASING TIP: Dec by P2 tog on the right and left side alternately of the P-sections PATTERN: See diagram M.1 (= 9 sts) and M.2 (= 9 sts). -------------------------------------------------------- HAT: Worked in the round. Cast on 96-104 sts on circular needle size 4 mm with 1 strand Merino Extra Fine and 1 strand Kid-Silk (= 2 strands). Work rib K2/P2 until piece measures 3 cm. Change to circular needle size 4.5 mm. K 1 round, AT THE SAME TIME dec 5-6 sts evenly = 91-98 sts. On next round work PATTERN - see above - as follows: * M.1, P 4-5 *, repeat from *-* a total of 7 times. Continue like this. REMEMBER THE KNITTING TENSION! AT THE SAME TIME when piece measures 12-14 cm dec 1 st in each P-section – See DECREASING TIP = 84-91 sts. Repeat the dec when piece measures 14-16 cm and 15-17 cm = 70-77 sts. Change to double pointed needles when sts no longer fit circular needle. After 5-6 vertical repeats of M.1 (piece now measures approx 16-19 cm) work next round as follows: * M.2, P 1-2 *, repeat from *-* a total of 7 times. After 1 repeat of M.2 there are 14-21 sts left on needle. K 1 round AT THE SAME TIME dec 0-5 sts evenly = 14-16 sts. Piece now measures approx 22-25 cm. Cut the thread, pull thread through remaining sts, tighten tog and fasten. POMPOM: Make a pompom of Merino Extra Fine and Kid-Silk (= 2 strands) with a diameter of approx 5 cm. Attach to top of hat. -------------------------------------------------------- NECK WARMER: INCREASING TIP: Inc by making 1 YO. On next round K YO into back of loop to avoid a hole. DECREASING TIP: Dec by P2 tog on the right and left side alternately of the P-sections PATTERN: See diagram M.1 (= 9 sts). -------------------------------------------------------- NECK WARMER: Worked in the round. Cast on 240-276 sts with 1 strand Merino Extra Fine and 1 strand Kid-Silk (= 2 strands) on circular needle size 4 mm. K 1 round and continue in rib K2/P4 on all sts. When piece measures 3 cm dec 1 st in each P-section – See DECREASING TIP = 200-230 sts. Continue in rib K2/P3. Repeat the dec when piece measures 6 cm = 160-184 sts. Continue in rib K2/P2. When piece measures 7 cm change to circular needle size 4.5 mm. K 1 round, AT THE SAME TIME dec 17-15 sts evenly = 143-169 sts. On next round work PATTERN - see above - as follows: * M.1, P4 *, repeat from *-* a total of 11-13 times. Continue like this. REMEMBER THE KNITTING TENSION! After 8-9 vertical repeats of M.1 (piece now measures approx 28-31 cm) K next round, AT THE SAME TIME inc 9-11 sts evenly – See INCREASING TIP = 152-180 sts. Change back to circular needle size 4 mm and continue in rib K2/P2. Cast off with K over K and P over P when rib measures 3 cm. Piece measures approx 31-34 cm. -------------------------------------------------------- MITTENS: PATTERN: See diagram M.1 (= 9 sts) and M.2 (= 9 sts). DECREASING TIP: P tog into back of loop the 2 sts after marker and P tog the 2 sts before marker. -------------------------------------------------------- LEFT MITTEN: Worked in the round. Cast on 32-40 sts on double pointed needles size 4 mm with 1 strand Merino Extra Fine and 1 strand Kid-Silk (= 2 strands). Work rib K2/P2 until piece measures 5-7 cm. Change to double pointed needles size 4.5 mm. P next round, AT THE SAME TIME dec 2-4 sts evenly = 30-36 sts. Work next round in PATTERN – see above - as follows: P3-5, M.1, P remaining 18-22 sts. Continue like this. REMEMBER THE KNITTING TENSION! When piece measures 9-10 cm insert a marker in the last but one st on round (st no 29-35 from beg of round) = thumb st. On next round inc 1 st each side of this st by making 1 YO. On next round P YO into back of loop to avoid a hole. Repeat the inc on every other round a total of 3-4 times = 7-9 thumb sts. When piece measures 12-13 cm slip the 7-9 thumb sts + 1 st each side of these on a stitch holder and cast on 3 new sts behind the thumb = 30-36 sts. Continue in pattern as before until piece measures 16-18 cm (finish after 1 full repeat of M.1). Insert 2 markers in piece, 1 after 15-19 sts and 1 after last st on round (= 15-19 sts on upper hand and 15-17 sts in palm of hand). READ ALL OF THE FOLLOWING SECTION BEFORE CONTINUING: (NOTE! Dec differently in palm of hand and upper hand). Dec on upper hand as follows: Work M.2 over M.1. After M.2 continue to dec by markers on every 4th round a total of 1-2 times, then on every other round a total of 0-1 time – See DECREASING TIP! AT THE SAME TIME dec in palm of hand as follows (by markers): Work 2 rounds without dec and then dec on every 4th round a total of 4-4 times, then on every other round a total of 1-2 times = 10-10 sts left on needle. Cut the thread, pull it through remaining sts and fasten. THUMB: Slip the 9-11 sts from stitch holder back on double pointed needles size 4.5 mm and pick up 3 sts in the edge behind thumb = 12-14 sts. P sts in the round. When thumb measures 5-5.5 cm P2 tog across the round. Cut the thread, pull it through remaining 6-7 sts, tighten tog and fasten. RIGHT MITTEN: Cast on and work like left mitten, but work first round of pattern as follows: P18-22, M.1, P the remaining 3-5 sts. Continue like this. When piece measures 9-10 cm insert a marker in the 2nd st from beg of round (= thumb st). Continue as described for left mitten. |
|||||||||||||||||||
Diagram explanations |
|||||||||||||||||||
|
|||||||||||||||||||
 |
|||||||||||||||||||
Have you finished this pattern?Tag your pictures with #dropspattern or submit them to the #dropsfan gallery. Do you need help with this pattern?You'll find 22 tutorial videos, a Comments/Questions area and more by visiting the pattern on garnstudio.com. © 1982-2026 DROPS Design A/S. We reserve all rights. This document, including all its sub-sections, has copyrights. Read more about what you can do with our patterns at the bottom of each pattern on our site. |
|||||||||||||||||||


With over 40 years in knitting and crochet design, DROPS Design offers one of the most extensive collections of free patterns on the internet - translated to 17 languages. As of today we count 324 catalogues and 12290 patterns translated into English (UK/cm). 12290
We work hard to bring you the best knitting and crochet have to offer, inspiration and advice as well as great quality yarns at incredible prices! Would you like to use our patterns for other than personal use? You can read what you are allowed to do in the Copyright text at the bottom of all our patterns. Happy crafting!
Post a comment to pattern DROPS 125-12
We would love to hear what you have to say about this pattern!
If you want to leave a question, please make sure you select the correct category in the form below, to speed up the answering process. Required fields are marked *.