
Popular categories
Looking for a yarn?


Comments / Questions (98)
![]() Jane wrote:
Jane wrote:
Supposed to chain 53 for armhole but then work dc in chains only (47). What happens to the other 6 chains.
14.11.2024 - 01:45DROPS Design answered:
Dear Jane, as the chain stitches worked at the beginning of a piece are often too tight, you will crochet here more chain stitches (53) than you need double crochets (47), this means on the first row, skip 6 chain stitches evenly to get only 47 double crochets over the 53 chains. Happy crocheting!
14.11.2024 - 10:08
![]() Sandra Meyer wrote:
Sandra Meyer wrote:
How do I find out the bust size of patterns? S/M, L, XL/XXL, XXXL is not help.
23.06.2022 - 00:01DROPS Design answered:
Dear Mrs Meyer, measure a similar garment you have and like the shape and compare the back measurements (on top/bottom), this should help you to find the best matching size. Read more here. Happy knitting!
23.06.2022 - 08:40
![]() Tanja wrote:
Tanja wrote:
Når man har hæklet rygstykket som jo vendes ved hver række, og man går over til kantstykket, skal det så vendes hver omgang? eller hækler man kun med retsiden mod sig selv?
16.01.2019 - 19:22DROPS Design answered:
Hei Tanja. Ja, kanten hekler du rundt, så du hekler hele tiden fra rettsiden. God fornøyelse
23.01.2019 - 09:21Carla wrote:
Hello! How are the squares supposed to be joined? Crochet or needle? Any joining technique recommended? Thanks
28.12.2017 - 01:26DROPS Design answered:
Dear Carla, according to the pattern, the squares are sewn together (with a needle). Happy crocheting!
29.12.2017 - 10:00
![]() Laura wrote:
Laura wrote:
Buona sera. Sto per unire la striscia di quadrati al confronto del.bolero. Non capisco per l unione cucito con ago come ho fatto per unire i quadrati insieme? Prendendo l anello esterno del collo con quello esterni del quadrato? Grazie e a presto laura
25.04.2017 - 15:37DROPS Design answered:
Buonasera Laura. Sì esatto, cuce lavorando nei fili più esterni delle maglie. Buon lavoro!
25.04.2017 - 16:05
![]() Laura wrote:
Laura wrote:
Buona sera. Ho iniziai il.gilet taglia s..solo.che arrivata al.bordo del dietro ho misurato e viene tropo grande...in effetti 22 maglie misurano 11 cm anziché 10. Quindi posso chiedere secondo voi con quante maglie devo iniziare al posto di 88..e quante saltate nella prima riga? Graziee e buona serata
16.04.2017 - 23:12DROPS Design answered:
Buongiorno Laura, se il suo campione non corrisponde a quello indicato, deve rifarlo cambiando il numero di ferri: provi con mezza misura in meno. Buon lavoro!
17.04.2017 - 09:03
![]() Herdis Hundahl wrote:
Herdis Hundahl wrote:
Rygstykke: der står man skal hækle stangmasker i hver række. Men iflg. Billedet ser det ikke sådan ud. Det ser ud som om at der måske på hver tredie række skal springe over nogle eller hækle luftmasker. Der må være en fejl i opskriften.
16.03.2016 - 14:40DROPS Design answered:
Hej Herdis, Ja på "KANTSTK" skal der hækles luftmasker, det er dem du kan se på billedet. Således står det i opskriften: 1.OMG: 1 st i første st (erstattes af 3 lm), * 1 lm, spring over 1 st, 1 st i næste st *, gentag fra *-* og slut af med 1 lm, spring over 1 st og 1 km i 3.lm i beg af omg. 2.OMG: 1 st i hver st og 1 st om hver lm. God fornøjelse!
16.03.2016 - 15:29
![]() Monique Van Den Bosch wrote:
Monique Van Den Bosch wrote:
Ik mis het telpatroon, klopt dat ?
12.04.2015 - 14:45DROPS Design answered:
Hoi Monique. Er is geen telpatroon voor dit model. De werkwijze is geschreven in het patroon
13.04.2015 - 12:56
![]() Kathrin wrote:
Kathrin wrote:
Hallo,ich möchte sehr gern den Bolero nacharbeiten, allerdings soll er etwas länger werden - eher eine Weste. Funktioniert es, wenn ich entsprechend mehr Maschen für den Armausschnitt nehme?
24.01.2015 - 11:34DROPS Design answered:
Es ist schwierig, das Modell umzuarbeiten. Grundsätzlich bestimmt das Rückenteil die Länge und die Armausschnitte, wenn Sie es länger arbeiten (und dabei die Zunahmen anpassen müssten!), werden auch die Armausschnitte tiefer, und Sie müssten beim Randstück mehr Lm über den Ausschnitten arbeiten, auch müssten Sie beim Zunehmen am Randstück mehr M zunehmen. Alles in allem sind leider zu viele Änderungen nötig, daraus ergäbe sich ein neues Modell, ich kann es ja mal als Vorschlag weiterleiten. :-)
31.01.2015 - 10:32
![]() TeBi wrote:
TeBi wrote:
Dobry den. Existuje videonavod na hackovani ctvercu k modelu DROPS 126-8 (navod c. DE-026)? Dekuji.
25.11.2014 - 10:04DROPS Design answered:
Dobrý den, tento konkrétní čtverec zatím na videu nemáme - ve videotéce však najdete čtverce podobné a také ukázky jejich sháčkování. Hodně zdaru!
28.11.2014 - 10:02
|
|
Rose Parade#roseparadebolero |
|
 |
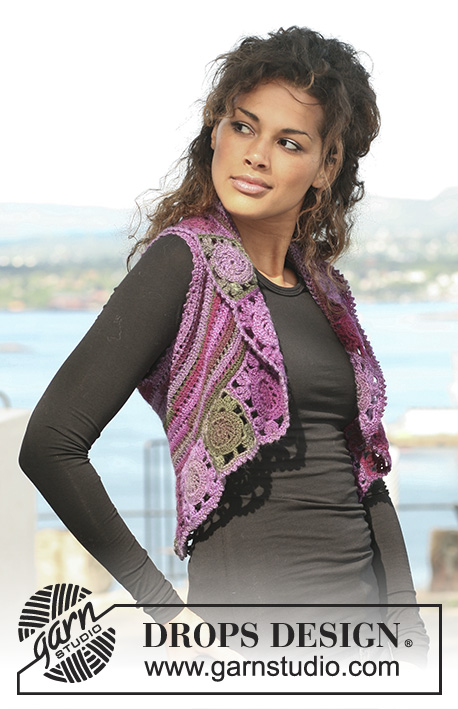 |
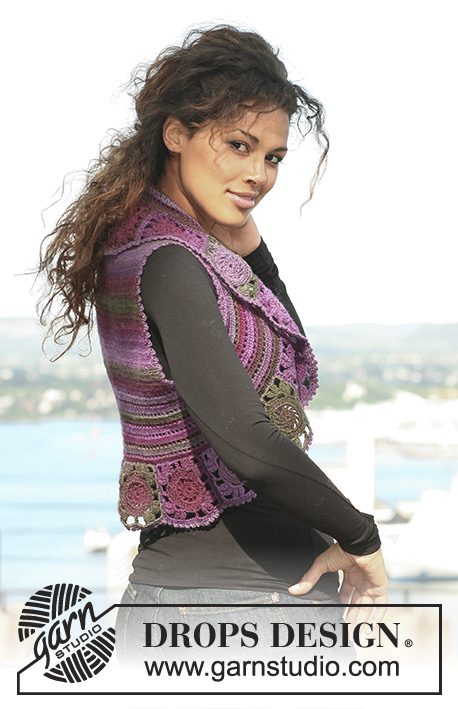
Crochet DROPS bolero in ”Delight” with crochet squares round the edge. Size S to XXXL
DROPS 126-8 |
|
|
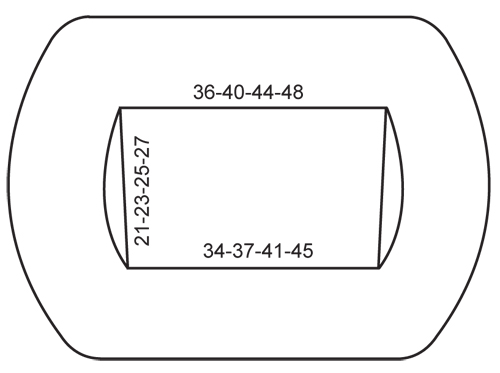
NEW BALL OF YARN TIP: To make the colour transitions in Delight neat when starting a new ball of yarn it is important to use a ball beg with the same shade as finished the previous ball CROCHET INFO: Replace first tr on each row/round with 3 ch. Finish each round with 1 sl st in 3rd ch from beg of round. INCREASING TIP: Inc 1 tr by working 2 tr in 1 tr. BOBBLE (applies to crochet square): 1 bobble = 3 dtr crochet tog, i.e. wait with last pull-through on each dtr until all 3 dtr have been crochet, make 1 YO and pull thread through all 4 loops on hook. -------------------------------------------------------- BACK PIECE: Worked back and forth – See NEW BALL OF YARN TIP and CROCHET INFO! Crochet 88-97-106-118 loose ch with crochet hook size 3.5 mm and Delight. Work 1 tr in 4th ch from hook, 1 tr in each of the next 0-2-4-2 ch, * skip 1 ch, 1 tr in each of the next 6 ch *, repeat from *-* to end = 74-82-90-100 tr. Continue with 1 tr in each tr. When piece measures 5-6-7-8 cm inc 1 tr each side in the last but one tr – See INCREASING TIP, repeat the inc when piece measures 11-12-13-14 cm and again when piece measures 17-18-19-20 cm = 80-88-96-106 tr. Continue until piece measures 21-23-25-27 cm. EDGE PIECE: Work 1 tr in each of the 80-88-96-106 tr at the top along back piece, then crochet 53-57-61-65 ch (= armhole), 1 tr in each of the 74-82-90-100 tr at the bottom along back piece, then 53-57-61-65 ch (= armhole), finish with 1 sl st in first tr on round. On next round work 1 tr in each tr at the top and at the bottom of back piece and in each ch-loop work 47-51-55-59 tr = 248-272-296-324 tr. Continue in the round as follows: ROUND 1: 1 tr in first tr (replace by 3 ch), * 1 ch, skip 1 tr, 1 tr in next tr *, repeat from *-* and finish with 1 ch, skip 1 tr and work 1 sl st in 3rd ch from beg of round. ROUND 2: 1 tr in each tr and 1 tr in each ch. Repeat these 2 rounds - AT THE SAME TIME when edge piece measures approx 4 cm (adjust so that next round is a round with only tr) inc 32-34-36-38 tr evenly – See INCREASING TIP - repeat the inc when piece measures approx 7 and 10 cm = 344-374-404-438 tr. Crochet until edge piece measures approx 12-13-14-15 cm – adjust to after a round with only tr. CROCHET SQUARE: Crochet 6 ch with Delight and crochet hook size 3.5 mm and form a ring with 1 sl st in first ch. ROUND 1: 12 tr in ring – See CROCHET INFO! ROUND 2: 5 ch (= 1 tr + 2 ch), 1 tr in next tr, * 2 ch, 1 tr in next tr *, repeat from *-* to end and finish with 1 sl st in 3rd ch from beg of round (= 12 ch-loops). ROUND 3: 1 tr in each tr and 2 tr in each ch-loop (= 36 tr). ROUND 4: 5 ch, skip 2 tr, * 1 dc in next tr, 4 ch, skip 2 tr *, repeat from *-*, finish with 1 sl st in first ch (= 12 ch-loops). ROUND 5: 5 ch, skip first ch-loop, in next ch-loop crochet *-* as follows: * 1 BOBBLE – see above, 2 ch, 1 bobble, 5 ch, 1 bobble, 2 ch, 1 bobble *, 4 ch, 1 tr in dc between the next 2 ch-loops, 4 ch, skip 1 ch-loop, in next ch-loop crochet *-*, 6 ch, 1 tr in dc between the next 2 ch-loops, 6 ch, skip 1 ch-loop, in next ch-loop crochet *-*, 4 ch, 1 tr in dc between the next 2 ch-loops, 4 ch, skip 1 ch-loop, in next ch-loop crochet *-*, finish with 2 ch and 1 sl st in third ch from beg of round. ROUND 6: Crochet dc in all ch-loops as follows: 2 dc in first ch-loop, 2 dc in next, 7 dc in next (= corner), then 2 dc, 4 dc, 4 dc, 2 dc, 7 dc (= corner), 2 dc, 6 dc, 6 dc, 2 dc, 7 dc (= corner), 2 dc, 4 dc, 4 dc, 2 dc, 7 dc (= corner), 2 dc and 2 dc in last ch-loop, finish with 1 sl st in first dc from beg of round. Cut the thread. Two of the sides are the same width - approx 9.5 cm, 1 side is only approx 8.5 cm and 1 side is wider at approx 10.5 cm. Crochet approx 18-20-22-24 squares. Sew the squares tog to one long piece – sew edge to edge – and make sure to place all the shorter side towards the same side and all the longer sides towards the opposite side to make the piece curved. Beg by sewing the 2 middle squares on the long piece to mid back at the top of edge piece – sew edge to edge. Continue down one side to mid back at the bottom of edge piece, then sew on the other side of the long piece from the top mid back – make sure seam is not too tight. If you need more/fewer squares adjust this before sewing on the last 2 squares mid back. PICOT BORDER: Crochet with crochet hook size 3.5 mm and Delight round the whole bolero. Beg in the first square sewn to mid back and crochet as follows: 1 dc in second st on square, * 1 picot (= 3 ch, 1 dc in first ch), skip 1 dc, 1 dc in next dc *, repeat from *-* (= approx 11 picots along each square + 1 in transition between 2 squares), finish with 1 sl st in first dc from beg of round. Crochet a similar picot border round the armholes. |
|
 |
|
Have you finished this pattern?Tag your pictures with #dropspattern #roseparadebolero or submit them to the #dropsfan gallery. Do you need help with this pattern?You'll find 13 tutorial videos, a Comments/Questions area and more by visiting the pattern on garnstudio.com. © 1982-2026 DROPS Design A/S. We reserve all rights. This document, including all its sub-sections, has copyrights. Read more about what you can do with our patterns at the bottom of each pattern on our site. |
|


With over 40 years in knitting and crochet design, DROPS Design offers one of the most extensive collections of free patterns on the internet - translated to 17 languages. As of today we count 324 catalogues and 12290 patterns translated into English (UK/cm). 12290
We work hard to bring you the best knitting and crochet have to offer, inspiration and advice as well as great quality yarns at incredible prices! Would you like to use our patterns for other than personal use? You can read what you are allowed to do in the Copyright text at the bottom of all our patterns. Happy crafting!
Post a comment to pattern DROPS 126-8
We would love to hear what you have to say about this pattern!
If you want to leave a question, please make sure you select the correct category in the form below, to speed up the answering process. Required fields are marked *.