
Popular categories
Looking for a yarn?


Comments / Questions (49)
![]() Nettl wrote:
Nettl wrote:
Hi, ich hab ein kleines Verständnisproblem mit dem folgen Text aus der Anleitung: GLEICHZEITIG nach 30-31-32-33-34-35 cm 2 R. nur über die 5 Blendenm gegen die Mitte hin und zurück stricken (damit die Blende schön liegt). Frage: was ist mit dem Rest der Reihe? VG und danke im Voraus.
07.09.2019 - 16:22DROPS Design answered:
Liebe Nettl, hier stricken Sie verkürzten Reihen, dh Sie stricken zuerst nur 2 Reihen über die 5 BlendeMaschen, dh die anderen Maschen werden hier nicht gestrickt, dann stricken Sie über alle Maschen wie zuvor. Viel Spaß beim stricken!
09.09.2019 - 08:21
![]() Etmmy wrote:
Etmmy wrote:
¿Me puede explicar ese diagrama?
14.07.2019 - 19:56DROPS Design answered:
Hola Etmmy. Aquí tienes la lección de DROPS de cómo leer un diagrama: https://www.garnstudio.com/lesson.php?id=68&cid=23
17.10.2019 - 19:14
![]() Herta Emilie wrote:
Herta Emilie wrote:
FERTIG, habe 2 Tage dafür gebraucht. Danke für diese supertolle Anleitung
06.02.2019 - 00:12
![]() Annett wrote:
Annett wrote:
Die Beschreibung für den Ärmelausschnitt ist etwas zu kompliziert. Habt ihr eine bildhafte Beschreibung oder ein Video dazu?
01.04.2018 - 13:34
![]() Annett wrote:
Annett wrote:
Die Beschreibung für den Ärmelausschnitt ist etwas zu kompliziert. Habt ihr eine bildhafte Beschreibung oder ein Video dazu?
01.04.2018 - 13:34
![]() Mirja wrote:
Mirja wrote:
Super Weste und schön warm. Ich habe die Weste in "Marine" gestrickt. Sitzt toll und passt praktisch überall zu. Bin begeistert und werde sie auch noch in anderen Farbe stricken. Liebe Grüße Mirja
21.02.2017 - 14:17Anjum Javaid wrote:
Easy to knit till first completion of pattern rows m1 m2 m3 but unable to understand further please try make it clear
28.11.2015 - 14:51DROPS Design answered:
Dear Mrs Javaid, when piece measures 37-42 cm (see size), you will prepare armholes working 4 rows garter st over the 7-12 sts on each side, then bind off 4-9 sts on each side and dec on each side to shape armholes - while continue working in pattern as stated. Happy knitting!
30.11.2015 - 11:20
![]() Claus wrote:
Claus wrote:
In der Anleitung bricht der Text zur Fertigstellung ab: Die Seitennaht zusammennähen. Die Schultern ......? Wie geht es mit dem Halsausschnitt weiter?
12.12.2014 - 16:00DROPS Design answered:
Die Anleitung wurde gerade ergänzt. Der Halsausschnitt ist fertig, so, wie er ist, es fehlte eigentlich nur noch, dass die Schultern zusammengenäht und die Knöpfe angenäht werden müssen. Viel Spaß beim Tragen!
14.12.2014 - 10:23VIRGINIA MALDONADO wrote:
EL DIAGRAMA M.2 LA EXPLICACION DEL SIMBOLO TINE UN ERROR. YO LO SOLUCIONE. PERO PIENSO QUE ES MEJOR QUE LO REVISEN GRACIAS POR LA ATENCION
20.07.2014 - 22:21DROPS Design answered:
Hola Virginia. ¿Podrías concretar, por favor, dónde ves tu el fallo en el diagrama? Gracias.
25.07.2014 - 22:26
![]() Ilaisa wrote:
Ilaisa wrote:
Sehr schöne Weste! Hab sie für meine Oma gemacht. War in einer Woche fertig. Die Wolle lässt sich wirklich toll verarbeiten!
07.01.2014 - 15:02
|
|||||||||||||||||||||||||
Lady Love Vest |
|||||||||||||||||||||||||
|
|
|||||||||||||||||||||||||
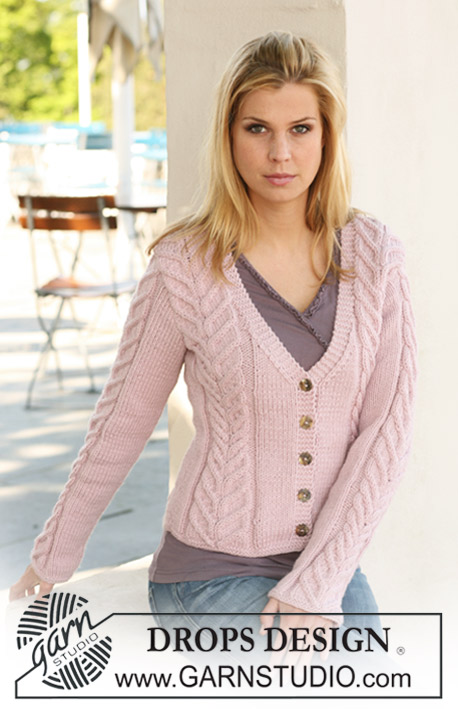
Knitted DROPS waistcoat in ”Nepal” with cables. Size S to XXXL.
DROPS 123-10 |
|||||||||||||||||||||||||
|
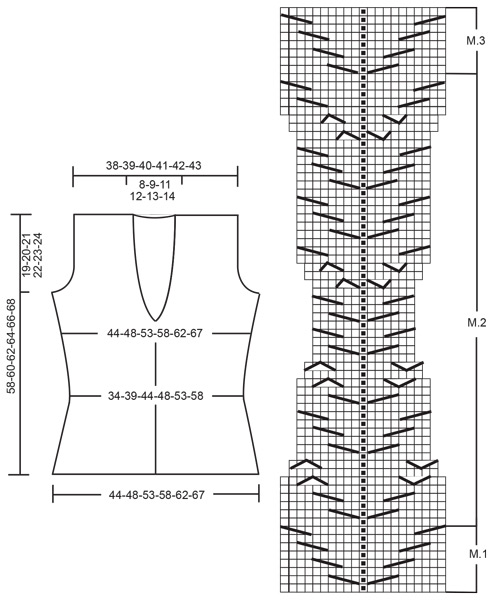
GARTER ST (back and forth on needle): K all rows. PATTERN: See diagrams M.1, M.2 and M.3 - pattern in diagram is shown from RS (Row 1 = WS). DECREASING TIP (applies to armhole and neck): Dec from RS inside 3 garter sts towards armhole and 5 sts garter st towards neck. Dec as follows AFTER 3/5 sts: slip 1 st as if to K, K1, psso. Dec as follows BEFORE 3/5 sts: K2 tog. BUTTONHOLES: Make buttonholes on right front band. 1 buttonhole = K tog 3rd and 4th st from mid front and make 1 YO. Make buttonholes when piece measures: SIZE S: 3, 10, 16, 22 and 28 cm. SIZE M: 3, 10, 16, 23 and 29 cm. SIZE L: 3, 10, 17, 23 and 30 cm. SIZE XL: 4, 11, 18, 24 and 31 cm. SIZE XXL: 4, 11, 18, 25 and 32 cm. SIZE XXXL: 4, 11, 19, 26 and 33 cm. -------------------------------------------------------- BACK PIECE: Worked back and forth on needle. Cast on 76-84-92-100-108-116 sts (includes 1 edge st each side) on needle size 4 mm with Nepal. K 3 rows. Work next row as follows (from RS): 1 edge st in garter st, K 14-17-20-23-26-29 sts, * K2 in each of the next 2 sts, K1, K2 in each of the next 2 sts *, K 36-38-40-42-44-46 sts, repeat from *-*, K 14-17-20-23-26-29 sts and 1 edge st in garter st = 84-92-100-108-116-124 sts. Change to needle size 5 mm, and work next row as follows from WS: 1 edge st in garter st, P 5-8-11-14-17-20 sts, K3, M.1 (= 21 sts), K3, P 18-20-22-24-26-28 sts, K3, M.1 (= 21 sts), K3, P 5-8-11-14-17-20 sts and 1 edge st in garter st. Work 2 vertical repeats of M.1, remaining sts with K over K and P over P. After M.1 work M.2 with dec and inc as shown in diagram (work remaining sts as before). REMEMBER THE KNITTING TENSION! After M.2 there are 84-92-100-108-116-124 sts on needle. Continue in M.3 over M.2 until finished measurements (work remaining sts as before). When piece measures 37-38-39-40-41-42 cm work 4 rows garter st on 7-8-9-10-11-12 sts each side (includes edge st), then cast off the first 4-5-6-7-8-9 sts each side for armhole. Cast off to shape the armhole – SEE DECREASING TIP – 1 st 2-4-6-8-10-12 times = 72-74-76-78-80-82 sts on needle. Continue in pattern as before with 3 garter sts each side towards armhole. When piece measures 55-57-59-61-63-65 cm work 4 rows garter st on the middle 24-26-28-30-32-34 sts, then cast off the middle 14-16-18-20-22-24 sts for neck and complete each shoulder (= 29 sts) separately. Continue with 5 garter sts towards neck. When piece measures approx 58-60-62-64-66-68 cm dec 4 sts evenly over M.3 = 25 sts left on needle. On next row cast off with K over K and P over P. LEFT FRONT PIECE: Cast on 43-47-51-55-59-63 sts (includes 1 edge st at the side and 5 front band sts towards front edge) on needle size 4 mm with Nepal. K 3 rows. Work next row as follows (from RS with start from the side): 1 edge st in garter st, K 14-17-20-23-26-29 sts, K2 in each of the next 2 sts, K1, K2 in each of the next 2 sts, K 18-19-20-21-22-23 sts and 5 front band sts in garter st = 47-51-55-59-63-67 sts. Change to needle size 5 mm, work next row as follows from WS: 5 front band sts in garter st, P 9-10-11-12-13-14 sts, K3, M.1 (= 21 sts), K3, P 5-8-11-14-17-20 sts and 1 edge st in garter st. Work 2 vertical repeats of M.1, remaining sts with K over K and P over P. Then work M.2 over M.1 (with remaining sts as before). After M.2 there are 47-51-55-59-63-67 sts on needle, Continue with M.3 over M.2 until finished measurements (with remaining sts as before). AT THE SAME TIME when piece measures 30-31-32-33-34-35 cm work 2 rows back and forth on the 5 front band sts only. Continue on all sts as before – AT THE SAME TIME on next row from RS dec 1 st towards neck – SEE DECREASING TIP, and repeat the dec on every other row a total of 7-8-9-10-11-12 times and then on every 4th row 5 times for all sizes. AT THE SAME TIME when piece measures 37-38-39-40-41-42 cm work 4 rows garter st on the 7-8-9-10-11-12 sts towards the side, work remaining sts as before. On next row cast off 4-5-6-7-8-9 sts at the side for armhole and cast off to shape the armhole as described or back piece. When all dec for armhole and neck are complete there are 29 sts on needle. Continue in pattern with 3 garter sts towards armhole and 5 garter sts towards neck When piece measures approx 58-60-62-64-66-68 cm dec 4 sts evenly over M.3 = 25 sts left on needle. On next row cast off with K over K and P over P. RIGHT FRONT PIECE: Like left front piece but mirrored. Remember BUTTONHOLES on front band – see above. ASSEMBLY: Sew side seams inside 1 edge st and sew shoulder seams. Sew on buttons. |
|||||||||||||||||||||||||
Diagram explanations |
|||||||||||||||||||||||||
|
|||||||||||||||||||||||||
 |
|||||||||||||||||||||||||
Have you finished this pattern?Tag your pictures with #dropspattern or submit them to the #dropsfan gallery. Do you need help with this pattern?You'll find 16 tutorial videos, a Comments/Questions area and more by visiting the pattern on garnstudio.com. © 1982-2026 DROPS Design A/S. We reserve all rights. This document, including all its sub-sections, has copyrights. Read more about what you can do with our patterns at the bottom of each pattern on our site. |
|||||||||||||||||||||||||


With over 40 years in knitting and crochet design, DROPS Design offers one of the most extensive collections of free patterns on the internet - translated to 17 languages. As of today we count 324 catalogues and 12245 patterns translated into English (UK/cm). 12245
We work hard to bring you the best knitting and crochet have to offer, inspiration and advice as well as great quality yarns at incredible prices! Would you like to use our patterns for other than personal use? You can read what you are allowed to do in the Copyright text at the bottom of all our patterns. Happy crafting!
Post a comment to pattern DROPS 123-10
We would love to hear what you have to say about this pattern!
If you want to leave a question, please make sure you select the correct category in the form below, to speed up the answering process. Required fields are marked *.