
Popular categories
Looking for a yarn?


Comments / Questions (68)
![]() Margret Moldenhauer wrote:
Margret Moldenhauer wrote:
Hallo, nun würde mich mal interessieren, wie lange man braucht, wie schnell kann man das Ding fertig bekommen? Ich würde gerne eins entwerfen, aber komme nur abends dazu.
23.10.2013 - 21:58DROPS Design answered:
Liebe Margret, diese Frage ist fast nicht zu beantworten, weil das Stricktempo sehr variieren kann. Aber wenn Sie bereits jetzt anfangen, sollten Sie den Anzug in jedem Fall in der Weihnachtszeit fertig haben.
24.10.2013 - 08:39
![]() Atilla wrote:
Atilla wrote:
Vielen Dank für die Info und für die hübsche Anleitung
09.10.2013 - 20:30
![]() Atilla wrote:
Atilla wrote:
Werden dIe 14 cm bei denen im Bein das erste Mal zugenommen wird vom Maschenanschlag oder vom Farbwechsel gemessen?
05.10.2013 - 20:47DROPS Design answered:
Liebe Atilla, die 14 cm werden ab Anschlag gemessen, sind also die Gesamthöhe.
07.10.2013 - 09:21
![]() Erika S wrote:
Erika S wrote:
Blev klar med denna det var på håret att det vita räckte. men det behövs 50g mer i röda färgen för 12-18 månader då man stickar med dubbelt garn
04.09.2013 - 22:07
![]() Erica wrote:
Erica wrote:
"BAKST: = 44-48-54 (58-64) m. Fortsätt med slätst – SAMTIDIGT läggs det upp nya m i slutet på varje v i varje sida till ärmar: 3 m 2-1-3 (1-2) ggr, 5 m 1-2-1 (2-2) ggr, 7 m 1-1-1 (2-2) ggr och sedan 9-10-12 (14-16) m 1 gång = 98-108-120 (140-156) m på st." Så står det i texten men när jag ska börja på baklstycket har jag 54m som det står sen lägger jag upp dom 3x3+5+7+12=78m så det är ju inte riktigt rätt där.. hur ska jag göra?
17.07.2013 - 00:06Erik answered:
54+33+33= 120 (det ska bli 2 ärmar!)
17.07.2013 - 07:48
![]() Linda wrote:
Linda wrote:
When you say "2 threads Alpaca"...does this imply I should knit with 2 strands of the same alpaca yarn? thanks
13.02.2013 - 01:34DROPS Design answered:
Dear Linda, you are correct, it means working with 2 strands of Alpaca hold together. Happy knitting !
13.02.2013 - 11:39
![]() Monica wrote:
Monica wrote:
Toll zu stricken! Ich habe den Anzug aus Fabel Wolle in Cerise/Natur gestrickt (als Wollanzug fürs Tragetuch) und beim ersten Waschen hat das Cerise ausgeblutet. Also lieber auf Hell-Rot-Kombinationen verzichten :-(
03.01.2013 - 14:06
![]() Miia wrote:
Miia wrote:
Eli ne pitää luoda langankierrolla? Ihmettelen vain miksi tätä ei voi lukea ohjeessa jos kerran hiha ei muilla luontitavoilla onnistu.
28.12.2012 - 22:37
![]() Ulpu wrote:
Ulpu wrote:
Mia. Itse pähkäilin samaa ja neuloin hihat moneen kertaan. Mutta lopuksi sain onnistumaan. Kun loin silmukoita lisää joka kerroksen päähän. Ei siis neulota esim. yhdestä silmukasta kahta vaan tehdään kerroksen loppuun ohjeen mukainen määrä uusia silmukoita. Punomosta löytyi ohje silmukoiden silmuilemiseen...
27.12.2012 - 16:31
![]() Miia wrote:
Miia wrote:
Toistan kysymyksen edellisestä viestistä, Pitääkö silmukat luoda jollain tietyllä tavalla jotta pituutta tulee lisää?
22.12.2012 - 00:30DROPS Design answered:
Hei! Löydät luontitekniikan ohjevideoistamme, eli katso video nimeltä "Silmukoiden luominen työn sivuun".
04.01.2013 - 14:43
|
|
My First Christmas#myfirstchristmasonesie |
|
|
|
|
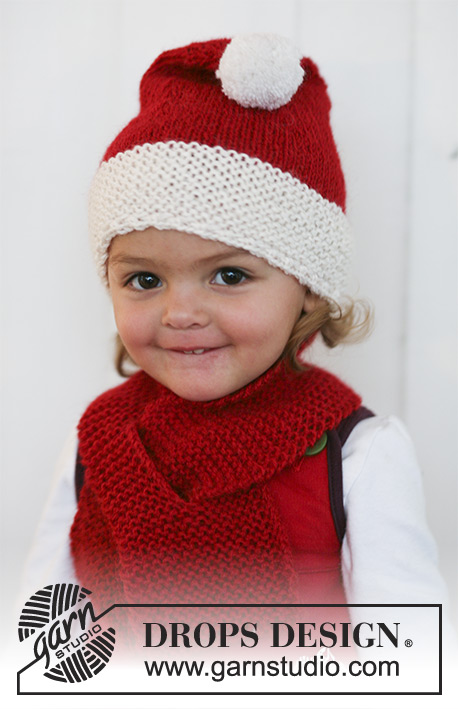
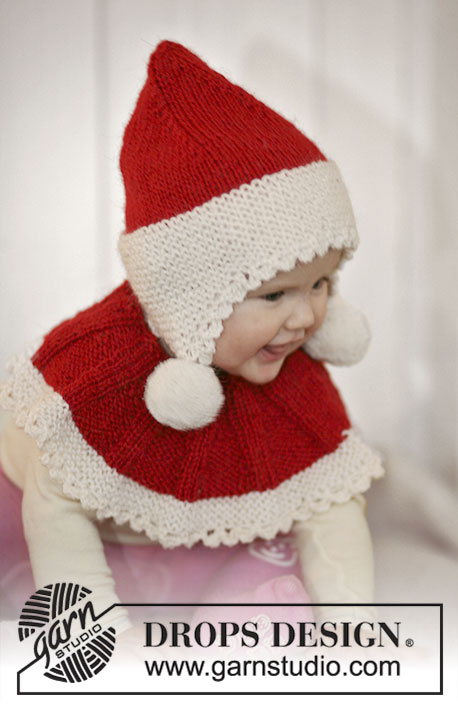
Santa onesie with hood for baby and children in 2 threads DROPS Alpaca
DROPS Baby 19-16 |
|
|
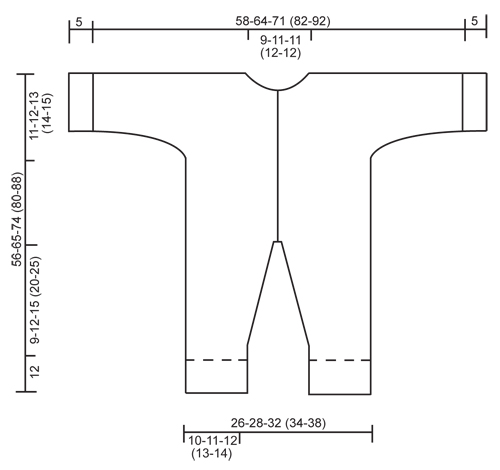
MOSS ST: Row 1: * K1, P1 *, repeat from *-*. Row 2: K over P and P over K. Repeat row 2. GARTER ST (back and forth on needle): K all rows. BUTTONHOLES: Make buttonholes on right front band. 1 BUTTONHOLE = K tog 3rd and 4th st from mid front and make 1 YO. Make buttonholes when piece measures a total of: SIZE 1/3 MONTHS: 23, 30, 37, 44, 51 cm SIZE 6/9 MONTHS: 28, 36, 44, 52, 60 cm SIZE 12/18 MONTHS: 31, 38, 46, 53, 61, 68 cm SIZE 2 YEARS: 34, 42, 50, 58, 66, 74 cm SIZE 3/4 YEARS: 39, 48, 56, 65, 73, 82 cm ---------------------------------------------------------- LEG: Worked in the round on double pointed needles. LOOSELY cast on 34-36-40 (44-48) sts on double pointed needles size 4.5 mm with 2 threads white. K 1 round and continue in MOSS ST – see above. When piece measures 12 cm change to double pointed needles size 5 mm and 2 threads red and continue in stocking st. Insert a marker at beg of round = inside of leg. REMEMBER THE KNITTING TENSION! When piece measures 14 cm inc 1 st each side of marker, and repeat the inc on every 2-2-3 (4-5) round a total of 7-8-9 (9-10) times = 48-52-58 (62-68) sts. When piece measures 21-24-27 (32-37) cm cast off 4 sts at the inside of leg (= 2 sts each side of marker) = 44-48-54 (58-64) sts. Put piece aside and knit the other leg in the same way. BODY: Slip both legs on the same circular needle size 5 mm with the inside of legs towards each other = 88-96-108 (116-128) sts. Now continue back and forth on circular needle from mid front as follows (first row = RS): Cast on 3 new sts on needle, K all sts on row and cast on 3 new sts at the end of row = 94-102-114 (122-134) sts. Insert a marker 25-27-30 (32-35) sts in from each side (= 44-48-54 (58-64) sts between markers on back piece). Continue in stocking st with 5 sts each side towards mid front in garter st (= front bands). AT THE SAME TIME when piece measures 23-28-31 (34-39) cm make buttonholes on right front band – SEE ABOVE! When piece measures 45-53-61 (66-73) cm divide the piece by the 2 markers and complete front and back pieces separately. BACK PIECE: = 44-48-54 (58-64) sts. Continue in stocking st, AT THE SAME TIME cast on new sts at the end of every row each side for sleeves: 3 sts 2-1-3 (1-2) times, 5 sts 1-2-1 (2-2) times, 7 sts 1-1-1 (2-2) times and then 9-10-12 (14-16) sts 1 time = 98-108-120 (140-156) sts on needle. When piece measures 55-64-73 (79-87) cm cast off the middle 16-18-18 (20-20) sts for neck and complete each shoulder/sleeve separately. Work 2 rows stocking st on the remaining 41-45-51 (60-68) sts and cast off LOOSELY. LEFT FRONT PIECE: = 25-27-30 (32-35) sts. Continue in stocking st with the 5 front band sts in garter st as before, AT THE SAME TIME cast on new sts at the end of every row towards the side for sleeve as described for back piece = 52-57-63 (73-81) sts. When piece measures 52-61-69 (75-83) cm cast off 5-6-6 (7-7) sts towards mid front for neck and cast off to shape the neckline at the beg of every row from mid front: 2 sts 2 times and 1 st 2 times = 41-45-51 (60-68) sts left on needle for shoulder/sleeve. Continue until piece measures 56-65-74 (80-88) cm and cast off LOOSELY. RIGHT FRONT PIECE: Like left front piece, but mirrored – remember buttonholes on front band. ASSEMBLY: Sew upper arm seams, edge to edge in outer loops of sts. Place right front band over left front band and sew tog at the bottom of body piece. Sew under arm seams, edge to edge in outer loops of sts. Sew on buttons. CUFF: Pick up 32-36-36 (40-40) sts on double pointed needles size 4.5 mm with 2 threads white round sleeve edge. Work moss st in the round until cuff measures 5 cm and cast off LOOSELY with K over P and P over K. Repeat round the other sleeve edge. Fold sleeve and leg edges towards RS. HOOD: Pick up approx 40 to 50 sts from RS round neck on circular needle size 5 mm with 2 threads red – beg after the 5 front band sts on right front piece and finish before the 5 front band sts on left front piece. Work stocking st back and forth on needle, AT THE SAME TIME on second row (= from RS) inc evenly to 66-70-74 (78-82) sts. Continue until hood measures 21-23-25 (27-28) cm and cast off. Sew hood tog at the top in outer loops of sts. Now work border round the opening of hood as follows: Pick up approx 81-89-97 (105-109) sts from RS along the opening of hood on needle size 4.5 mm with 2 threads white. Work moss st back and forth on needle until border measures 6 cm and cast off LOOSELY with K over P and P over K. Fold border double towards RS and sew border to the 5 garter sts each side. Make a white pompom with a diameter of approx 4-5 cm and attach to the top of hood. |
|
 |
|
Have you finished this pattern?Tag your pictures with #dropspattern #myfirstchristmasonesie or submit them to the #dropsfan gallery. Do you need help with this pattern?You'll find 22 tutorial videos, a Comments/Questions area and more by visiting the pattern on garnstudio.com. © 1982-2026 DROPS Design A/S. We reserve all rights. This document, including all its sub-sections, has copyrights. Read more about what you can do with our patterns at the bottom of each pattern on our site. |


With over 40 years in knitting and crochet design, DROPS Design offers one of the most extensive collections of free patterns on the internet - translated to 17 languages. As of today we count 324 catalogues and 12291 patterns translated into English (UK/cm). 12291
We work hard to bring you the best knitting and crochet have to offer, inspiration and advice as well as great quality yarns at incredible prices! Would you like to use our patterns for other than personal use? You can read what you are allowed to do in the Copyright text at the bottom of all our patterns. Happy crafting!
Post a comment to pattern DROPS Baby 19-16
We would love to hear what you have to say about this pattern!
If you want to leave a question, please make sure you select the correct category in the form below, to speed up the answering process. Required fields are marked *.