
Popular categories
Looking for a yarn?


Comments / Questions (68)
![]() Ann wrote:
Ann wrote:
Hat es einen Vorteil, den Strampler mit 2 Fäden der Garngruppe A zu stricken anstatt mit 1 der Garngruppe C? Wird er dann weicher/flexibler/...? Is there any benefit to choose two threads of yarn A instead of one thread of yarn C? Is the first option more flexible/softer/...? thanks!
26.08.2015 - 15:51DROPS Design answered:
Nein, das lässt sich so generell nicht sagen. Die Robustheit ist z.B. von der Verzwirnung und dem Material des einzelnen Garns abhängig. Sie können 2 Fäden der Gruppe A einfach durch 1 Faden C ersetzen,wenn Ihnen ein Garn der Gruppe C besser gefällt, Sie müssen nur beachten, dass Sie die benötigte Menge neu berechnen müssen, und es ist wichtig, die Maschenprobe einzuhalten.
01.09.2015 - 15:43
![]() Maria Saggese wrote:
Maria Saggese wrote:
Volevo sapere come fare la tutina rossa senza usare i ferri circolari grazie della vostra disponibilita
23.04.2015 - 18:41DROPS Design answered:
Buongiorno Maria. Deve modificare un po' le istruzioni per le gambe. Avvia le m senza chiudere in tondo; può aggiungere 1 m vivagno ai lati per la cucitura. A 14 cm inizia ad aumentare 1 m ai lati. A 21-24-27 (32-37) cm dovrà intrecciare, le prime 2 e le ultime 2 m. Le restanti istruzioni prevedono già una lavorazione in ferri di andata e ritorno. Anche per i polsini, può riprendere le m e lavorare a grana di riso prima di completare la cucitura delle maniche. Buon lavoro!
23.04.2015 - 19:19
![]() Auni wrote:
Auni wrote:
Hei, kuinka neulominen jatkuu lahkeiden teon jälkeen.Molemmat lahkeet ovat nyt pyöröpuikoilla mutta keskietu kohta on puikkojen johto-osalla. En saa keskietukohtaa puikkojen alkuun,koska silmukoita ei saa venytettyä niin.Pitäisikö olla toiset puikot joilla aloitan neulomisen? Kiitos avusta!
29.01.2015 - 12:37DROPS Design answered:
Hei! Kun olet ottanut molemmat lahkeet samalle puikolle, päätösreunojen tulee olla vastakkain, eli "aukko" tulee puikkojen kohdalle. Tämä on jatkossa keskietu ja neulominen voidaan aloittaa tästä. On vaikea selittää kirjoittaen, mutta voit aina käydä lähimmässä DROPS-jälleenmyyjäliikkeessäsi ja kysyä heiltä neuvoa.
06.02.2015 - 17:25
![]() Anette Solberg Jensen wrote:
Anette Solberg Jensen wrote:
Kan man bruke 15 mm tre knapper istedet for perleknappene?
14.01.2015 - 11:47DROPS Design answered:
Hei Anette. Ja, det burde gaa fint. God fornöjelse med den.
14.01.2015 - 14:27
![]() Dayana wrote:
Dayana wrote:
Salve io volevo domandare dal momento che mia sorella deve ancora partorire se potevo fargli questo regalo prima Dell evento !!!! Grazie cordiali saluti
06.12.2014 - 14:52DROPS Design answered:
Buongiorno Dayana. Sarà sicuramente un regalo gradito. I ferri indicati sono il n° 5 e quindi il lavoro cresce abbastanza in fretta. Il tempo necessario per la realizzazione dipende dalla sua esperienza e da quanto tempo riesce a dedicare al lavoro a maglia. Valuti anche in base a quanto tempo manca alla nascita. Buon lavoro e auguri!
07.12.2014 - 16:03
![]() Bossard wrote:
Bossard wrote:
Bonjour ;la hauteur total du debut jambe on mesure d ou car j ai 12cm en blanc ensuite si je fait 15cm en rouge ok 27cm mais je n ai pas mes 58m sur chaque jambe
09.11.2014 - 11:31DROPS Design answered:
Bonjour Mme Bossard, c'est bien ainsi que l'on procède, on tricote 12 cm en blanc puis 15 cm en rouge (soit 27 cm bordure comprise), dans ces 15 cm en rouge, vous devez augmenter 9 fois 2 m tous les 3 tours - pensez à bien vérifier votre échantillon (17m x 22 rangs = 10 x 10 cm en jersey), vous devez avoir 33 rangs rouge au total pour 15 cm. Bon tricot!
10.11.2014 - 09:42
![]() Nancy Brodrick-Ward wrote:
Nancy Brodrick-Ward wrote:
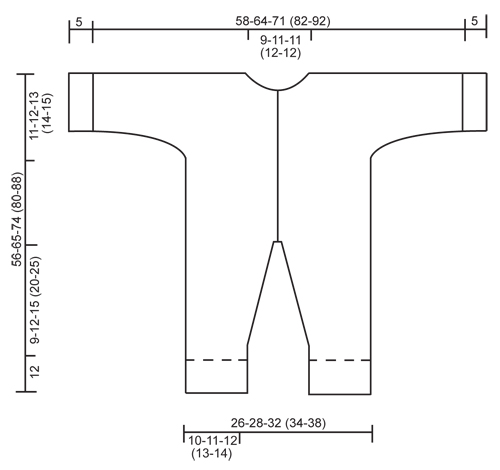
On the Left Front Piece section of this pattern my grannie who is knitting this for me has said that the measurements are too big by a lot? She is doing the 12-18month the last section says it comes out at 74cm or 291/8 " which is much too big for this age. Could you let me know if she has misunderstood this section, she has already knitted the trousers and they are perfect but she is stuck here. Many thanks Nancy
16.10.2014 - 16:49DROPS Design answered:
Dear Mrs Brodrick-Ward, you can check measurement in the chart at the end of the pattern: 27 cm for the each leg + 34 cm fo body to armhole + 13 cm from beg of casting on for sleeves to shoulder = 74 cm. The bottom cuff will be folded towards RS (double). Happy knitting!
17.10.2014 - 09:11
![]() Suzanne Wärme Meigård wrote:
Suzanne Wärme Meigård wrote:
Hej jag undrar hur mycket garn som går åt till en ettåring, hittar det inte någonstans. Mvh Suzanne
15.07.2014 - 18:25DROPS Design answered:
Hej Suzanne. Du skal så nok bruge str 12/18 måneder (3e størrelse). Du skal så bruge 3e tal for materialer: dvs, 300 gr Alpaca rød og 100 gr Alpaca hvid. Du finder det altsammen øverst på mønstret.
16.07.2014 - 17:29
![]() Sarah wrote:
Sarah wrote:
Is there any way to this on flat needles as I don't like working with circular needles
02.12.2013 - 00:24DROPS Design answered:
Dear Sarah, you can work both legs back and forth, just add edge sts for seam, but then rest of body is worked back and forth on circular needle. Happy knitting!
02.12.2013 - 13:55
![]() Sandra Völler wrote:
Sandra Völler wrote:
Hallo, ich stricke gerade den Strampler und habe Probleme mit der Anleitung beim Übergang von den Beinen zum Strampler. Ich gehe davon aus, dass die 3 Maschenaufnahmen im Schritt erfolgen sollen. Der Satz "Jetzt von der Mitte her hin und zurück stricken", ist mir nicht ganz klar. Wo fange ich an und wo höre ich auf. Für Hilfe wäre ich sehr dankbar.
18.11.2013 - 09:42DROPS Design answered:
Liebe Sandra, es ist die vordere Mitte gemeint, wir werden das gleich ergänzen.
18.11.2013 - 14:54
|
|
My First Christmas#myfirstchristmasonesie |
|
|
|
|
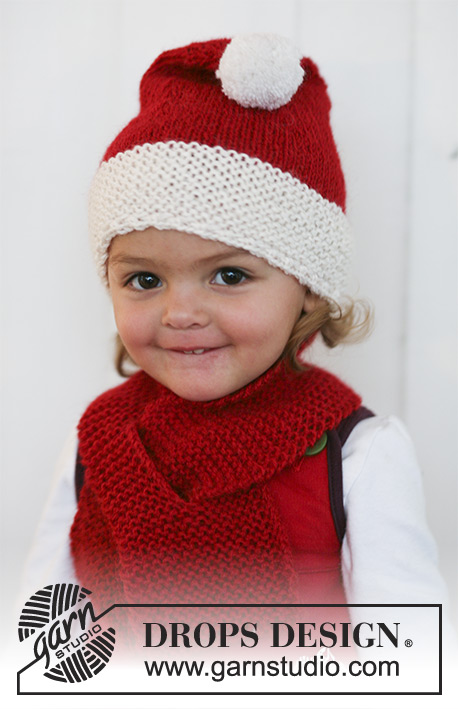
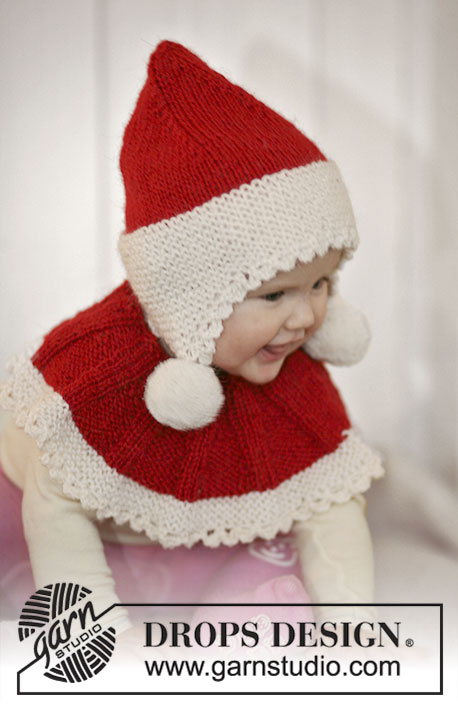
Santa onesie with hood for baby and children in 2 threads DROPS Alpaca
DROPS Baby 19-16 |
|
|
MOSS ST: Row 1: * K1, P1 *, repeat from *-*. Row 2: K over P and P over K. Repeat row 2. GARTER ST (back and forth on needle): K all rows. BUTTONHOLES: Make buttonholes on right front band. 1 BUTTONHOLE = K tog 3rd and 4th st from mid front and make 1 YO. Make buttonholes when piece measures a total of: SIZE 1/3 MONTHS: 23, 30, 37, 44, 51 cm SIZE 6/9 MONTHS: 28, 36, 44, 52, 60 cm SIZE 12/18 MONTHS: 31, 38, 46, 53, 61, 68 cm SIZE 2 YEARS: 34, 42, 50, 58, 66, 74 cm SIZE 3/4 YEARS: 39, 48, 56, 65, 73, 82 cm ---------------------------------------------------------- LEG: Worked in the round on double pointed needles. LOOSELY cast on 34-36-40 (44-48) sts on double pointed needles size 4.5 mm with 2 threads white. K 1 round and continue in MOSS ST – see above. When piece measures 12 cm change to double pointed needles size 5 mm and 2 threads red and continue in stocking st. Insert a marker at beg of round = inside of leg. REMEMBER THE KNITTING TENSION! When piece measures 14 cm inc 1 st each side of marker, and repeat the inc on every 2-2-3 (4-5) round a total of 7-8-9 (9-10) times = 48-52-58 (62-68) sts. When piece measures 21-24-27 (32-37) cm cast off 4 sts at the inside of leg (= 2 sts each side of marker) = 44-48-54 (58-64) sts. Put piece aside and knit the other leg in the same way. BODY: Slip both legs on the same circular needle size 5 mm with the inside of legs towards each other = 88-96-108 (116-128) sts. Now continue back and forth on circular needle from mid front as follows (first row = RS): Cast on 3 new sts on needle, K all sts on row and cast on 3 new sts at the end of row = 94-102-114 (122-134) sts. Insert a marker 25-27-30 (32-35) sts in from each side (= 44-48-54 (58-64) sts between markers on back piece). Continue in stocking st with 5 sts each side towards mid front in garter st (= front bands). AT THE SAME TIME when piece measures 23-28-31 (34-39) cm make buttonholes on right front band – SEE ABOVE! When piece measures 45-53-61 (66-73) cm divide the piece by the 2 markers and complete front and back pieces separately. BACK PIECE: = 44-48-54 (58-64) sts. Continue in stocking st, AT THE SAME TIME cast on new sts at the end of every row each side for sleeves: 3 sts 2-1-3 (1-2) times, 5 sts 1-2-1 (2-2) times, 7 sts 1-1-1 (2-2) times and then 9-10-12 (14-16) sts 1 time = 98-108-120 (140-156) sts on needle. When piece measures 55-64-73 (79-87) cm cast off the middle 16-18-18 (20-20) sts for neck and complete each shoulder/sleeve separately. Work 2 rows stocking st on the remaining 41-45-51 (60-68) sts and cast off LOOSELY. LEFT FRONT PIECE: = 25-27-30 (32-35) sts. Continue in stocking st with the 5 front band sts in garter st as before, AT THE SAME TIME cast on new sts at the end of every row towards the side for sleeve as described for back piece = 52-57-63 (73-81) sts. When piece measures 52-61-69 (75-83) cm cast off 5-6-6 (7-7) sts towards mid front for neck and cast off to shape the neckline at the beg of every row from mid front: 2 sts 2 times and 1 st 2 times = 41-45-51 (60-68) sts left on needle for shoulder/sleeve. Continue until piece measures 56-65-74 (80-88) cm and cast off LOOSELY. RIGHT FRONT PIECE: Like left front piece, but mirrored – remember buttonholes on front band. ASSEMBLY: Sew upper arm seams, edge to edge in outer loops of sts. Place right front band over left front band and sew tog at the bottom of body piece. Sew under arm seams, edge to edge in outer loops of sts. Sew on buttons. CUFF: Pick up 32-36-36 (40-40) sts on double pointed needles size 4.5 mm with 2 threads white round sleeve edge. Work moss st in the round until cuff measures 5 cm and cast off LOOSELY with K over P and P over K. Repeat round the other sleeve edge. Fold sleeve and leg edges towards RS. HOOD: Pick up approx 40 to 50 sts from RS round neck on circular needle size 5 mm with 2 threads red – beg after the 5 front band sts on right front piece and finish before the 5 front band sts on left front piece. Work stocking st back and forth on needle, AT THE SAME TIME on second row (= from RS) inc evenly to 66-70-74 (78-82) sts. Continue until hood measures 21-23-25 (27-28) cm and cast off. Sew hood tog at the top in outer loops of sts. Now work border round the opening of hood as follows: Pick up approx 81-89-97 (105-109) sts from RS along the opening of hood on needle size 4.5 mm with 2 threads white. Work moss st back and forth on needle until border measures 6 cm and cast off LOOSELY with K over P and P over K. Fold border double towards RS and sew border to the 5 garter sts each side. Make a white pompom with a diameter of approx 4-5 cm and attach to the top of hood. |
|
 |
|
Have you finished this pattern?Tag your pictures with #dropspattern #myfirstchristmasonesie or submit them to the #dropsfan gallery. Do you need help with this pattern?You'll find 22 tutorial videos, a Comments/Questions area and more by visiting the pattern on garnstudio.com. © 1982-2026 DROPS Design A/S. We reserve all rights. This document, including all its sub-sections, has copyrights. Read more about what you can do with our patterns at the bottom of each pattern on our site. |


With over 40 years in knitting and crochet design, DROPS Design offers one of the most extensive collections of free patterns on the internet - translated to 17 languages. As of today we count 324 catalogues and 12291 patterns translated into English (UK/cm). 12291
We work hard to bring you the best knitting and crochet have to offer, inspiration and advice as well as great quality yarns at incredible prices! Would you like to use our patterns for other than personal use? You can read what you are allowed to do in the Copyright text at the bottom of all our patterns. Happy crafting!
Post a comment to pattern DROPS Baby 19-16
We would love to hear what you have to say about this pattern!
If you want to leave a question, please make sure you select the correct category in the form below, to speed up the answering process. Required fields are marked *.