
Popular categories
Looking for a yarn?


Comments / Questions (112)
![]() Sigrid Baatz wrote:
Sigrid Baatz wrote:
Glem mit sidste spørgsmål.. Jeg har 186 masker og skal ta 6 masker ud hver 2 gang i alt 9 gange, ja, det gir 240 Men forstår så ikke sætningen efter OBS: Tag ud hver 2. gang før og efter mærkerne = 170-188-206-222-240-256 m. Hvad gør jeg..så bliver det jo 12 masker på hver 2 pind eller hvad?? Forstår det ikke rigtigt..
10.12.2013 - 19:18DROPS Design answered:
Hej Sigrid. Du skal tage 6 m ud i hver anden runde. Det der menes er at du skal skiftes til at tage ud för og efter maerkerne - altsaa hver anden gang för og hver anden gang efter.
11.12.2013 - 14:58
![]() Sigrid Baatz wrote:
Sigrid Baatz wrote:
Forstår ikke udtagningen...der er i mit arb 217 masker og der skal tages i m ud før hver markering..i alt 6 masker v hver udtagningspind.. I alt 9 gange.. Så står der OBS der skal tages ud FØR og efter markeringen i alt til 240 masker.. 6 masker gange 9 = 54 masker og så Gange 2 Det forstår jeg ikke rigtig???
10.12.2013 - 19:12
![]() Deborah wrote:
Deborah wrote:
How many dc(US) should there be at the end of Row 2? I have 169 if I count the chain 3 as a dc. How many sc(US) should there be at the end of row 3?
08.11.2013 - 05:37
![]() Deborah wrote:
Deborah wrote:
How many dc(US)should there be at the end of Row 2? I have 169 if I count the chain 3 as a dc, 168 if I don't. How many sc(US) will there be at the end of row 3?
08.11.2013 - 05:35DROPS Design answered:
Dear Deborah, in 4th size, you should have 168 sc (US) at the end of first row, and 168 sc/dc at the end of each row until you start dec (after 5 rows). Happy crocheting!
08.11.2013 - 09:20
![]() Tamara wrote:
Tamara wrote:
After the pattern says to work the increase 9 times, it says to continue until the piece measures the appropriate length. Does this mean continue with the increases or continue with the regular pattern rows? Otherwise looks like a great pattern - can't to get started!
26.05.2013 - 15:37DROPS Design answered:
Dear Tamara, you have to inc 9 times, and when they are done, continue with the regular pattern rows until stated measurements. Happy crocheting!
27.05.2013 - 09:15
![]() Claudia Sardellitti wrote:
Claudia Sardellitti wrote:
La gonna, dopo le prime 5 righe a maglia bassa deve essere lavorata a maglie alte? o tutta la gonna è lavorata a maglie alte? grazie
08.05.2013 - 10:51DROPS Design answered:
Buongiorno, deve iniziare la gonna avviando il n° di cat. richieste, e poi seguendo le istruzioni per la prima riga. Poi deve lavorare 4 righe con il motivo (1 riga a m.a. e 1 riga a m.b. alternate) e poi procedere con i segnapunti come indicato nelle istruzioni. Se ha altri dubbi non esiti a contattarci! Buon lavoro!
08.05.2013 - 12:41
![]() Christa wrote:
Christa wrote:
I have been working on this skirt and ordered the prescribed no. of balls for size medium and have run out of the light grey! This is going to cost me another 11.00 for one ball of yarn to be ordered and mailed to me. As well, I THINK that the diagram to sew the squares together does not go far enough on the left side as the medium is supposed to use up 24 squares and not 22 as it would seem on the diagram. thanks
02.04.2013 - 01:19
![]() Aceuss wrote:
Aceuss wrote:
Hello everyone, I’m starting this lovely skirt but I have a problem on the very first row! I don’t quite understand the instructions... does this mean that I have to skip one chain every six? What’s the purpose of this? Why not making less chains from the beginning… I’m a beginner myself, so if any of you found this troublesome and could explain, I would be really glad! thanks
15.02.2013 - 22:41DROPS Design answered:
Dear Aceuss, skipping every 7th ch will give you a looser edge. Happy crocheting !
21.02.2013 - 11:58
![]() Kikima wrote:
Kikima wrote:
J'aimerais faire cette jupe, mais combien faut-il de pelote? merci
26.09.2012 - 11:30DROPS Design answered:
Bonjour Kikima, la quantité est indiquée au poids pour chaque couleur et chaque taille. Divisez par 50 g (= 1 pelote de Karisma) le poids indiqué dans chaque couleur pour connaître la quantité nécessaire pour cette couleur. Bon crochet !
26.09.2012 - 14:38
![]() Sherin Hamza wrote:
Sherin Hamza wrote:
Love the pattern, really easy to make. Looks very elegant.
15.09.2012 - 17:17
|
|
Licorice Squares |
|
|
|
|
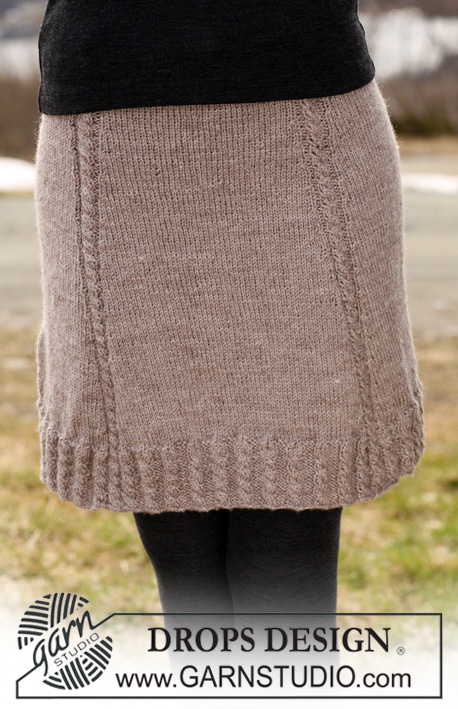
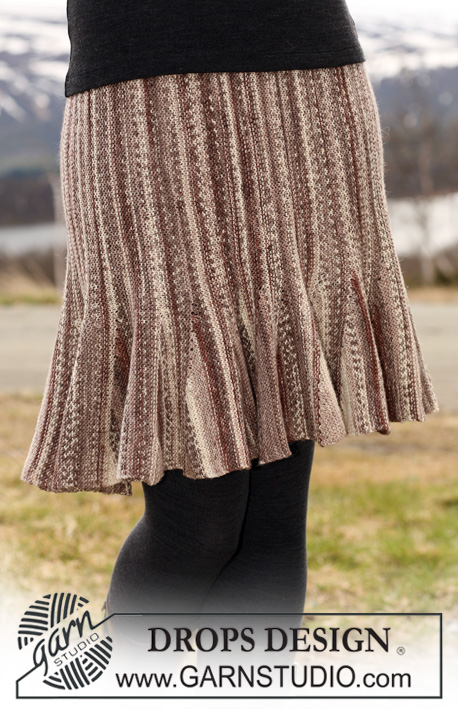
DROPS Crochet Skirt in ”Karisma” with patterned squares along bottom edge. Size XS-XXL.
DROPS 115-43 |
|
|
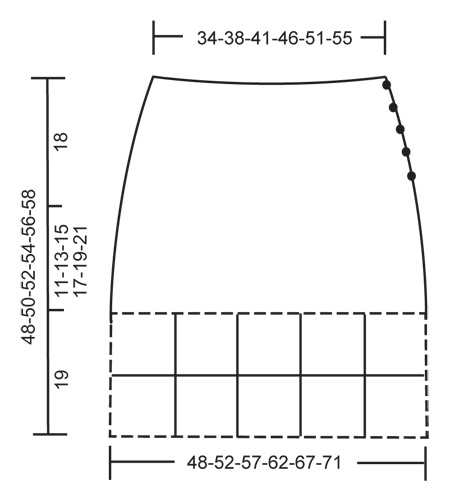
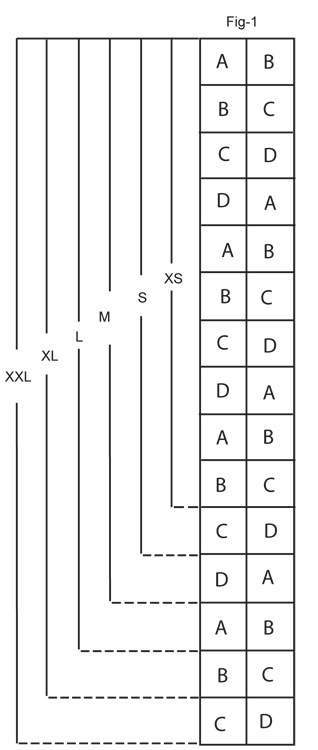
PATTERN: ROW 1: 1 tr in each dc, finish row with 1 ch to turn with. ROW 2: 1 dc in each tr, finish row with 3 ch to turn with. INCREASING TIP: Inc by working 2 tr in 1 dc. SKIRT: Worked back and forth from top down, and sewn tog at the side afterwards. Crochet 136-157-178-196-217-236 loose ch with charcoal grey with crochet hook size 4 mm. Crochet first row as follows: 1 dc in 2nd ch from hook, 1 dc in each of the next 1-1-1-5-5-3 ch, * skip 1 ch, 1 dc in each of the next 6 ch *, repeat from *-* = 116-134-152-168-186-202 dc. Continue in PATTERN – see above – until finished measurements. REMEMBER CROCHET TENSION! After 5 rows (last row is a row with dc) insert 6 markers in piece as follows: First marker after 11-12-14-14-16-19 sts, then 19-22-25-28-31-33 sts between each marker = 10-12-13-14-15-18 sts after the last marker. On next row inc 1 tr before all markers – SEE INCREASING TIP and repeat the inc on every other row (inc after and before marker alternately) a total of 9 times = 170-188-206-222-240-256 sts. Continue until piece measures 29-31-33-35-37-39 cm (or desired length), cut the thread. COLOURS OF SQUARES: SQUARE A: Beg + round 1 = charcoal grey, round 2 = light grey, round 3 = white, round 4 = black, round 5 = charcoal grey. SQUARE B: Beg + round 1 = black, round 2 = charcoal grey, round 3 = white, round 4 = light grey, round 5 = charcoal grey. SQUARE C: Beg + round 1 = white, round 2 = charcoal grey, round 3 = black, round 4 = light grey, round 5 = charcoal grey. SQUARE D: Beg + round 1 = white, round 2 = charcoal grey, round 3 = light grey, round 4 = black, round 5 = charcoal grey. CROCHET SQUARES: Crochet 6 ch with crochet hook size 4 mm and form a ring with 1 sl st in first ch. ROUND 1: 3 ch, 2 tr in ring, * 3 ch, 3 tr *, repeat from *-* a total of 3 times and finish with 3 ch and 1 sl st in 3rd ch from beg of round. Turn piece. ROUND 2: 3 ch, 2 tr in first ch-loop, 3 ch, 3 tr in the same ch-loop, * 1 ch, 3 tr in the next ch-loop, 3 ch, 3 tr in the same ch-loop *, repeat from *-* a total of 3 times, finish with 1 ch and 1 sl st in 3rd ch from beg of round. Turn piece. ROUND 3: 3 ch, 2 tr in the first ch-loop, 1 ch, * 3 tr in the next ch-loop, 3 ch, 3 tr in the same ch-loop, 1 ch, 3 tr in the next ch-loop, 1 ch *, repeat from *-* a total of 3 times, 3 tr in the next ch-loop, 3 ch, 3 tr in the same ch-loop, 1 ch, finish with 1 sl st in 3rd ch from beg of round. Turn piece. ROUND 4: 3 ch, 2 tr in the first ch-loop, 1 ch, * 3 tr in the next ch-loop, 3 ch, 3 tr in the same ch-loop, 1 ch, 3 tr in the next ch-loop, 1 ch, 3 tr in the next ch-loop, 1 ch *, repeat from *-* a total of 3 times, 3 tr in the next ch-loop, 3 ch, 3 tr in the same ch-loop, 1 ch, 3 tr in the next ch-loop, 1 ch, finish with 1 sl st in 3rd ch from beg of round. Turn piece. ROUND 5: Crochet 1 dc in each tr and 1 dc in each ch, finish with 1 sl st in first dc. 1 square = approx 9.5 x 9.5 cm. NUMBER OF SQUARES: Crochet 5-5-6-7-7-7 squares of A, 6-6-6-7-8-8 squares of B, 5-6-6-6-7-8 squares of C and 4-5-6-6-6-7 squares of D = a total of 20-22-24-26-28-30 squares. ASSEMBLY: Sew skirt tog at the side, edge to edge, but leave a 15 cm opening at the top. Sew squares tog, edge to edge, to a string as shown in fig-1, and then sew tog to form a ring. Now sew squares to bottom of skirt, edge to edge. BUTTONHOLE LOOPS: Crochet buttonhole loops on the side of opening towards front piece as follows (beg at bottom of opening): 1 dc in each of the first 2 sts, 3 ch, skip 1 cm, * crochet 1 dc in each st for 2 cm, 3 ch, skip 1 cm *, repeat from *-* a total of 4 times, and finish with 2 dc at the top. Turn and work return row as follows: 1 dc in each dc and 3 dc in each ch-loop, cut the thread. BUTTONHOLE BAND: Crochet 5 rows with dc along the side of opening towards back piece, cut the thread. Sew on buttons. |
|
 |
|
 |
|
Have you finished this pattern?Tag your pictures with #dropspattern or submit them to the #dropsfan gallery. Do you need help with this pattern?You'll find 8 tutorial videos, a Comments/Questions area and more by visiting the pattern on garnstudio.com. © 1982-2026 DROPS Design A/S. We reserve all rights. This document, including all its sub-sections, has copyrights. Read more about what you can do with our patterns at the bottom of each pattern on our site. |


With over 40 years in knitting and crochet design, DROPS Design offers one of the most extensive collections of free patterns on the internet - translated to 17 languages. As of today we count 324 catalogues and 12290 patterns translated into English (UK/cm). 12290
We work hard to bring you the best knitting and crochet have to offer, inspiration and advice as well as great quality yarns at incredible prices! Would you like to use our patterns for other than personal use? You can read what you are allowed to do in the Copyright text at the bottom of all our patterns. Happy crafting!
Post a comment to pattern DROPS 115-43
We would love to hear what you have to say about this pattern!
If you want to leave a question, please make sure you select the correct category in the form below, to speed up the answering process. Required fields are marked *.