
Popular categories
Looking for a yarn?


Comments / Questions (32)
![]() Pillen wrote:
Pillen wrote:
Wie geht es, beim Vorderteil vorne in der Mitte die ersten 10 Maschen auf einen Hilfsfaden legen und bei jeder 2. Reihe gegen den Hals abketten: 2M . 3 Mal und 1 M 3 Mal ?
27.03.2024 - 19:04
![]() Marianne Kenny wrote:
Marianne Kenny wrote:
Hi for the buttonholes do you really cast on only 1 new stitch even though you have cast off 2 stitches? Would this not leave you short 3 stitches after 3 buttonholes have been made? Regards Marianne
12.06.2021 - 02:22DROPS Design answered:
Hi Marianne, You are right, you cast on 2 new stitches over the 2 cast-off stitches on the buttonholes. Happy knitting!
14.06.2021 - 07:40
![]() Chantal wrote:
Chantal wrote:
Bonjour, pour cette instruction : (DEVANT DROIT : À 58cm de hauteur totale, placer en attente sur un arrêt de mailles pour l'encolure les 10 premières m côté milieu devant) ces 10 mailles est-ce celle du début du rang qui sont celles au point de riz ou bien celles en milieu du devant ? Merci
06.01.2018 - 04:44DROPS Design answered:
Bonjour Chantal, ce sont les 10 premières m en début de rang sur l'endroit (pour le devant droit) que l'on met en attente, tricotez ces mailles d'abord pour éviter d'avoir à couper le fil. Vous reprendrez ensuite ces mailles pour le col. Bon tricot!
08.01.2018 - 08:55
![]() Corry wrote:
Corry wrote:
Wie kan mij vertellen hoe je dit patroon op gewone recht breinaalden kunt breien?
03.07.2012 - 19:59DROPS Design answered:
Dit vest wordt heen en weer gebreid op de rondbreinld. U zou daarom ook rechte naalden kunnen gebruiken. Ik denk dat er ruimte genoeg zal zijn op lange rechte naalden.
04.07.2012 - 09:09
![]() DROPS Design NL wrote:
DROPS Design NL wrote:
Beste Evaluna. Dit is een foutje. U moet uiteraard 2 nieuwe st opzetten. Het knoopsgat wordt dan niet te klein. Ik heb het gewijzigd. Bedankt voor de reactie.
15.09.2011 - 12:21
![]() Evaluna wrote:
Evaluna wrote:
Hoi! heel leuk vest, ook heel afwisselend om te breien. Alleen snap ik niet waarom je voor de knoopsgaten twee steken moet afkanten en slechts 1 opnieuw opzetten. Dan klopt het gerstekorrelpatroon toch niet meer? Trouwens, het gat lijkt me dan ook wat klein, niet?
15.09.2011 - 12:17
![]() Drops Design wrote:
Drops Design wrote:
Pam, first you work the whole jacket up to where you divide for armholes, after that you continue fronts and back separately.
18.12.2009 - 17:22Pam wrote:
Hi I am looking a pattern Drops no - 111-15 a green coat. I am confused you give instructions under jacket but you have instructions for back front and sleeves so what is the jacket design for
18.12.2009 - 06:25
![]() Lian wrote:
Lian wrote:
Kunt u mij helpen dit patroon met 2 naalden te breien, ik vind rondbreinaald te moeilijk
13.04.2009 - 10:05
![]() Lian wrote:
Lian wrote:
Kunt u mij uitleg geven hoe ik dit patroon met 2 naalden kan breien. alvast bedankt
10.04.2009 - 19:08
|
||||||||||
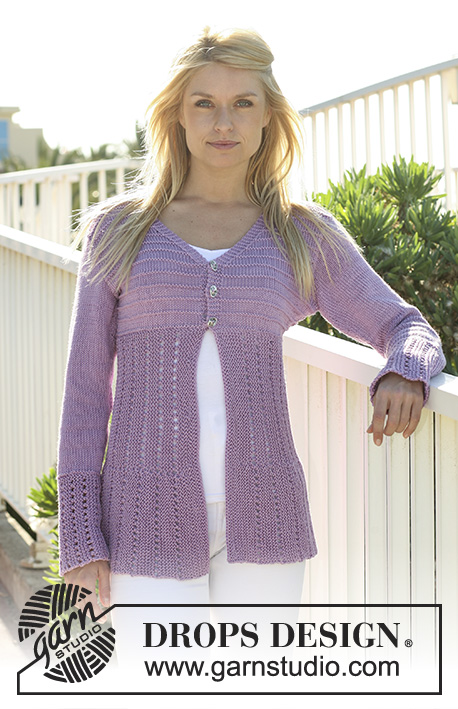
Arundel#arundeljacket |
||||||||||
|
|
||||||||||
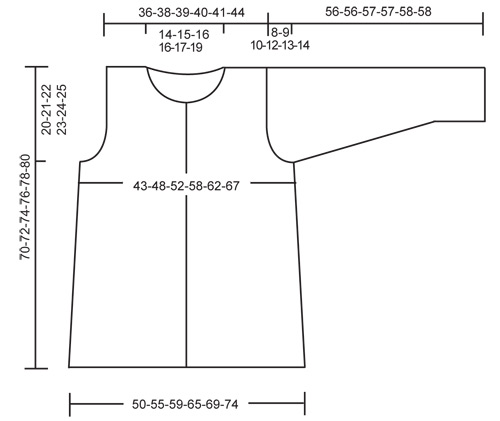
Knitted DROPS jacket with pattern in ”Paris”. Size S - XXXL.
DROPS 111-15 |
||||||||||
|
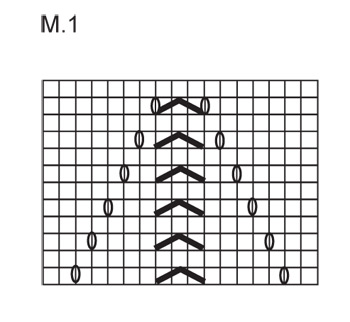
GARTER ST (back and forth on needle): K all rows. MOSS ST: Row 1: * K1, P1 *, repeat from *-*. Row 2: K over P and P over K. Repeat row 2. PATTERN: See diagram M.1. The diagram shows the pattern from the RS. BUTTONHOLES: Make buttonholes on right front band. 1 buttonhole = cast off 4th and 5th st from mid front and cast on 1 new st on return row. Make buttonholes when piece measures: SIZE S: 28, 35 and 42 cm. SIZE M: 28, 35 and 42 cm. SIZE L: 29, 36 and 43 cm. SIZE XL: 29, 36 and 43 cm. SIZE XXL: 33, 40 and 47 cm. SIZE XXXL: 33, 40 and 47 cm. -------------------------------------------------------- -------------------------------------------------------- JACKET: Worked back and forth on circular needle from mid front. Cast on 185-202-215-232-245-262 sts on circular needle size 5 mm with Paris. P 1 row from WS and continue in moss st on all sts - see above. When piece measures 8-8-9-9-9-9 cm, work next row as follows from RS: 10 moss sts (= front band), 5-6-7-8-9-10 garter sts, M.1 (= 17 sts), 5-6-7-8-9-10 garter sts, 11-12-13-14-15-16 stocking sts, 4-6-6-8-8-10 garter sts, 11-12-13-14-15-16 stocking sts, 5-6-7-8-9-10 garter sts, M.1, 5-6-7-8-9-10 garter sts, 5-6-7-8-9-10 stocking sts, 5-6-7-8-9-10 garter sts, M.1, 5-6-7-8-9-10 garter sts, 11-12-13-14-15-16 stocking sts, 4-6-6-8-8-10 garter sts, 11-12-13-14-15-16 stocking sts, 5-6-7-8-9-10 garter sts, M.1, 5-6-7-8-9-10 garter sts, 10 moss sts (= front band). GARTER ST – see above. REMEMBER THE KNITTING TENSION! When piece measures 10 cm dec 1 st in all stocking st sections with 11-12-13-14-15-16 sts (i.e. do not dec in stocking st section mid back = 4 dec per row) on every 4.5-4.5-4.5-4.5-5-5 cm a total of 6 times (dec at the left and right side alternately by K2 tog) = 161-178-191-208-221-238 sts. AT THE SAME TIME make buttonholes on right front piece – see above. When dec are complete continue as follows: 10 moss sts (= front band), 5-6-7-8-9-10 garter sts, M.1 (= 17 sts), 5-6-7-8-9-10 garter sts, 5-6-7-8-9-10 stocking sts, 4-6-6-8-8-10 garter sts, * 5-6-7-8-9-10 stocking sts, 5-6-7-8-9-10 garter sts, M.1, 5-6-7-8-9-10 garter sts *, repeat from *-* a total of 2 times, 5-6-7-8-9-10 stocking sts, 4-6-6-8-8-10 garter sts, 5-6-7-8-9-10 stocking sts, 5-6-7-8-9-10 garter sts, M.1, 5-6-7-8-9-10 garter sts, 10 moss sts (= front band). When piece measures approx 35-35-36-36-40-40 cm – adjust to a full repeat of M.1 - change to circular needle size 4.5 mm and continue in garter st on all sts with front band in moss st. After 6 cm change back to needle size 5 mm and continue in pattern as before. Insert 2 markers in piece, 44-48-51-55-58-62 sts in from each side, back piece = 73-82-89-98-105-114 sts. When piece measures 50-51-52-53-54-55 cm cast off 3 sts for armhole on each side of marker both sides and complete each piece separately. BACK PIECE: = 67-76-83-92-99-108 sts. Continue in pattern, AT THE SAME TIME cast off for armhole each side at beg of every row: 2 sts 1-2-3-4-5-6 times and 1 st 1-2-2-4-5-5 times = 61-64-67-68-69-74 sts. When piece measures 68-70-72-74-76-78 cm cast off the middle 21-24-25-26-27-30 sts for neck and cast off 1 st on neckline on next row = 19-19-20-20-20-21 sts left on each shoulder. Cast off when piece measures 70-72-74-76-78-80 cm. RIGHT FRONT PIECE: = 41-45-48-52-55-59 sts. Continue in pattern, AT THE SAME TIME cast off for armhole at the side as described for back piece. When piece measures 58-60-62-64-66-68 cm slip 10-11-11-11-11-12 sts towards mid front on a stitch holder for neck and cast off to shape the neckline at the beg of every row from mid front: 2 sts 3 times and 1 st 3 times. When all dec are complete there are 19-19-20-20-20-21 sts left on shoulder. Continue in pattern and cast off when piece measures 70-72-74-76-78-80 cm. LEFT FRONT PIECE: Like right front piece, but mirrored. SLEEVE: Worked back and forth on needle. Cast on 42-44-46-48-50-52 sts (includes 1 edge st each side) on needle size 4.5 mm and work 10 rows garter st. Change to needle size 5 mm and now complete piece in stocking st. When piece measures 8 cm inc 1 st each side on every 4-3.5-3-2.5-2-2 cm a total of 10-11-12-13-15-16 times = 62-66-70-74-80-84 sts. When piece measures 48-47-47-45-45-44 cm – less for the larger sizes because of longer sleeve cap and wider shoulder – cast off for sleeve cap each side at the beg of every row: 3 sts 1 time, 2 sts 3 times, 1 st 1-2-3-4-5-6 times, then cast off 2 sts each side until piece measures 55-55-56-56-57-57 cm, now cast off 3 sts each side 1 time and cast off remaining sts on next row. Piece measures approx 56-56-57-57-58-58 cm. ASSEMBLY: Set in sleeves and sew under arm seams. Sew on buttons. COLLAR: Pick up 88-109 sts round neckline (incl sts on stitch holder) on circular needle size 5 mm. P 1 row from WS and continue in moss rs. Cast off when collar measures 8 cm. |
||||||||||
Diagram explanations |
||||||||||
|
||||||||||
 |
||||||||||
 |
||||||||||
Have you finished this pattern?Tag your pictures with #dropspattern #arundeljacket or submit them to the #dropsfan gallery. Do you need help with this pattern?You'll find 21 tutorial videos, a Comments/Questions area and more by visiting the pattern on garnstudio.com. © 1982-2026 DROPS Design A/S. We reserve all rights. This document, including all its sub-sections, has copyrights. Read more about what you can do with our patterns at the bottom of each pattern on our site. |
||||||||||


With over 40 years in knitting and crochet design, DROPS Design offers one of the most extensive collections of free patterns on the internet - translated to 17 languages. As of today we count 324 catalogues and 12290 patterns translated into English (UK/cm). 12290
We work hard to bring you the best knitting and crochet have to offer, inspiration and advice as well as great quality yarns at incredible prices! Would you like to use our patterns for other than personal use? You can read what you are allowed to do in the Copyright text at the bottom of all our patterns. Happy crafting!
Post a comment to pattern DROPS 111-15
We would love to hear what you have to say about this pattern!
If you want to leave a question, please make sure you select the correct category in the form below, to speed up the answering process. Required fields are marked *.