
Popular categories
Looking for a yarn?


Comments / Questions (27)
![]() Jani wrote:
Jani wrote:
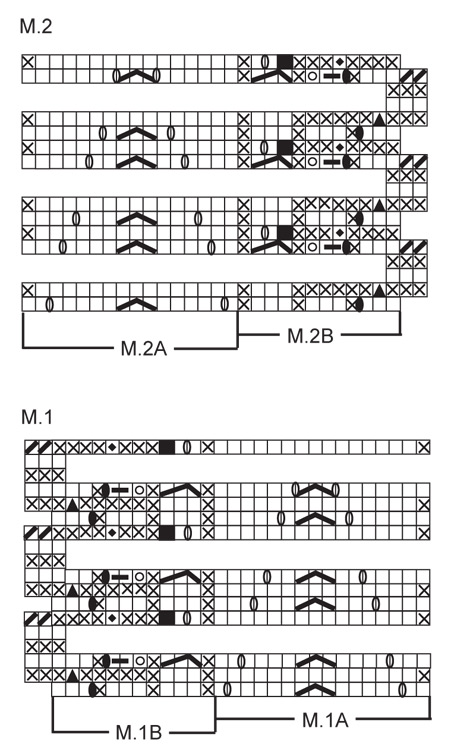
I am looking at the charts for M1 and M2 - can you please explain the short 3 stitch rows - for example for M2 do I cast on 2 stitches at the end of row 2 and I'm not sure what the backwards slash means at the beginning of row 5, ? do I cast off two stitches?
27.02.2022 - 02:24DROPS Design answered:
Dear Jani, no need to cast on new sts when working M.1B you will increase 2 sts (= double yarn over = 3rd symbol), but at the beg of 6th row you will have to cast off the first 2 sts (the symbol: / in diagram is the one explained with \ under diagram text, this will be edited, thanks for your feedback). Happy knitting!
28.02.2022 - 10:07
![]() Rita Ånes wrote:
Rita Ånes wrote:
Jakken ble flott den men oppgitt mengde garn ble helt feil. Strikket med oppgitt garn og pinner. Trengte likevel 150 gram mer garn enn det som stod i oppskriften
15.08.2016 - 12:04
![]() Kirsten wrote:
Kirsten wrote:
Habe eine Frage zum Diagramm. Was bedeutet eine Masche abnehmen? Und welche restliche Masche ist gemeint, die für das nächste Viereck gerechnet wird? Weiter steht dort 1 M re abheben, 2 re, die abgehobene über die gestrickten ziehen. Über welche von den zwei gestrickten soll man die abgehobene ziehen?
12.01.2016 - 13:37DROPS Design answered:
1 M abn. soll 1 M abketten bedeutet. Die abgehobene M ziehen Sie über BEIDE gestrickte M. Der Hinweis mit dem nächsten Viereck bezieht sich nur auf die graphische Darstellung, stricken Sie einfach wie im Diagramm gezeigt weiter.
23.01.2016 - 18:22
![]() Kirsten wrote:
Kirsten wrote:
Habe eine Frage zum Diagramm. Was bedeutet eine Masche abnehmen? Und welche restliche Masche ist gemeint, die für das nächste Viereck gerechnet wird? Weiter steht dort 1 M re abheben, 2 re, die abgehobene über die gestrickten ziehen. Über welche von den zwei gestrickten soll man die abgehobene ziehen?
12.01.2016 - 11:44DROPS Design answered:
Antwort siehe oben!
23.01.2016 - 18:23
![]() Charlotte wrote:
Charlotte wrote:
Denna blev jättefin, jag gjorde den i mörkblått. Den var jättekul att göra också
15.06.2009 - 19:06Walem wrote:
Un modèle très féminin. J'aime beaucoup.
28.01.2009 - 20:24
![]() Jenný H Wiium wrote:
Jenný H Wiium wrote:
Den er veldig fin, den ma jeg bare strikke til sommeren helt nydelig og sikkert veldig god at ha pa!!!
22.01.2009 - 21:55Yulik wrote:
Woooooow
22.01.2009 - 20:04
![]() S. Geurts wrote:
S. Geurts wrote:
Nog een fijn vest om te maken, zoals verschillende modellen in deze collectie. Hopelijk volgen de patronen vlug.
19.01.2009 - 16:16
![]() Ghita NP wrote:
Ghita NP wrote:
Det er lige den jeg går og mangler
16.01.2009 - 16:44
|
|||||||||||||||||||||||||||||||||||||
Water Lotus#waterlotuscardigan |
|||||||||||||||||||||||||||||||||||||
|
|
|||||||||||||||||||||||||||||||||||||
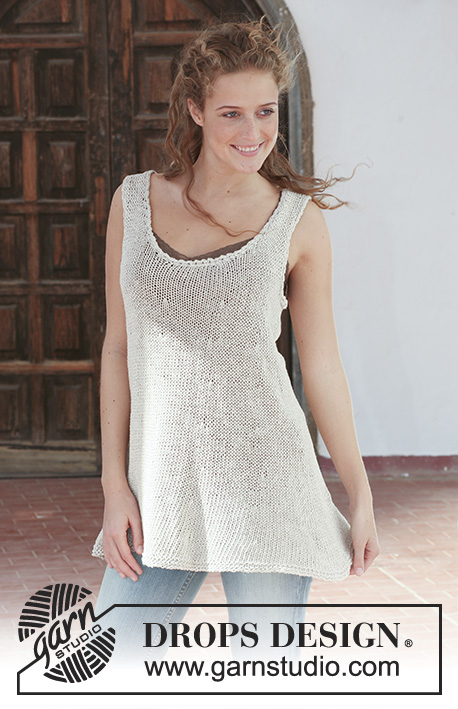
Knitted DROPS jacket with lace pattern in ”Muskat”. Size S - XXXL.
DROPS 112-14 |
|||||||||||||||||||||||||||||||||||||
|
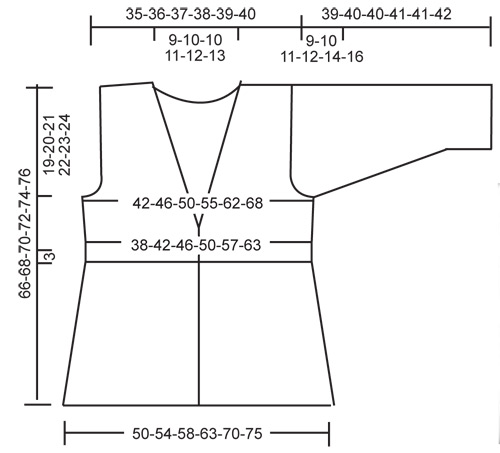
GARTER ST (back and forth on needle): K all rows. PATTERN: See diagram M.1 and M.2. The diagrams show the pattern from the RS. Rows in pattern over 3 sts only, are short rows that are knitted back and forward over these 3 sts only so the edge doesn't get tight. DECREASING TIP (applies to neckline): Dec 1 st inside 28 sts (= M.1 or M.2). Make all dec from the RS. After 28 sts: slip 1 st as if to K, K1, psso. Before 28 sts: K2 tog. -------------------------------------------------------- BACK PIECE: Worked back and forth on needle. Cast on 108-116-124-134-148-160 sts (includes 1 edge st each side) on needle size 3.5 mm with Muskat. Work 4 rows garter st - see above. Change to needle size 4 mm and continue in stocking st with 1 edge st each side. REMEMBER THE KNITTING TENSION! When piece measures 2 cm dec 1 st each side on every 2.5 cm a total of 13 times = 82-90-98-108-122-134 sts. Continue until piece measures 33 cm. Insert a marker in piece and now measure piece from here. Change back to needle size 3.5 mm and continue in garter st on all sts. When piece measures 4 cm from marker inc 1 st each side on every 2.5-2.5-2.5-2.5-2.5-3 cm a total of 4-4-5-5-5-5 times = 90-98-108-118-132-144 sts. When piece measures 14-15-16-17-18-19 cm from marker cast off 3 sts each side for armhole and cast off to shape the armhole each side at the beg every row: 2 sts 2-4-6-8-11-13 times and 1 st 1-0-0-0-0-1 time = 74-76-78-80-82-84 sts. Continue until piece measures 31-33-35-37-39-41 cm from marker. Now cast off the middle 16-18-20-22-24-26 sts for neck and complete each shoulder separately. Cast off 1 st on neckline on next row = 28 sts left on shoulder. Continue until piece measures 33-35-37-39-41-43 cm from marker – piece now measures a total of approx 66-68-70-72-74-76 cm. Cast off. LEFT FRONT PIECE: Cast on 66-70-74-79-86-92 sts (includes 1 edge st at the side and 12 front band sts towards mid front) on needle size 3.5 mm with Muskat. Work first row as follows from RS: 1 edge st, garter st on the next 53-57-61-66-73-79 sts, M.1B on the 12 front band sts. Work 4 rows like this. Change to needle size 4 mm and continue in stocking st with 1 edge st at the side and 12 front band sts towards mid front in pattern as before. When piece measures 2 cm dec at the side as described for back piece = 53-57-61-66-73-79 sts. When piece measures 33 cm insert a marker in piece, and now measure piece from here. Change back to needle size 3.5 mm. READ ALL OF THE FOLLOWING SECTION BEFORE CONTINUING! Continue as follows from the RS: 1 edge st, 40-44-48-53-60-66 garter sts, 12 front band sts in pattern as before. Continue like this for 3 cm and now continue as follows from the RS: 1 edge st, 24-28-32-37-44-50 garter sts, M.1A (= 16 sts) and M.1B on front bands as before. AT THE SAME TIME when piece measures 4 cm from marker inc at the side as described for back piece (work inc sts in garter st). AT THE SAME TIME when piece measures 10-11-12-13-14-15 cm from marker dec 1 st for neckline towards mid front – SEE DECREASING TIP! - on every 8 row a total of 9-10-11-12-13-14 times. AT THE SAME TIME when piece measures 14-15-16-17-18-19 cm from marker cast off for armhole at the side as described for back piece. When all dec are complete there are 40 sts left on needle. Continue as before until piece measures 33-35-37-39-41-43 cm from marker. Piece now measures a total of approx 66-68-70-72-74-76 cm. Cast off 28 sts from the side towards neckline for shoulder = 12 front band sts left on needle. Continue as before with M.1B on the 12 front band sts for approx 5-6-6-7-7-8 cm (measured from shoulder) Cast off. RIGHT FRONT PIECE: Like left front piece, but mirrored, and work M.2 instead of M.1. SLEEVE: Worked back and forth on needle. Cast on 60-60-62-66-68-68 sts (includes 1 edge st each side) on needle size 3.5 mm with Muskat. Work 8 rows garter st. Change to needle size 4 mm and continue in stocking st with 1 edge st each side. When piece measures 6 cm inc 1 st each side on every 5-3-2.5-2-1.5-1 cm a total of 5-8-9-10-12-15 times = 70-76-80-86-92-98 sts. When piece measures 30-30-29-29-27-26 cm (less for the larger sizes because of longer sleeve cap and wider shoulder) cast off 3 sts each side and cast off for sleeve cap each side at the beg of every row: 2 sts 4 times and 1 st 3-5-5-5-9-13 times, then 2 sts each side until piece measures 38-39-39-40-40-41 cm, now cast off 3 sts each side 1 time and cast off remaining sts. Piece measures approx 39-40-40-41-41-42 cm. ASSEMBLY: Sew shoulder seams. Set in sleeves. Sew sleeve and side seams inside 1 edge st. Sew neckline tog mid back (front bands) and sew to neckline. Sew buttons on left front piece (buttoned in the holes on right front piece). Sew on buttons as follows, measured from bottom edge: SIZE S: 26, 34 and 42 cm. SIZE M: 25, 34 and 43 cm SIZE L: 24, 34 and 44 cm. SIZE XL: 24, 31, 38 and 45 cm SIZE XXL: 22, 30, 38 and 46 cm. SIZE XXXL: 23, 31, 39 and 47 cm. |
|||||||||||||||||||||||||||||||||||||
Diagram explanations |
|||||||||||||||||||||||||||||||||||||
|
|||||||||||||||||||||||||||||||||||||
 |
|||||||||||||||||||||||||||||||||||||
 |
|||||||||||||||||||||||||||||||||||||
Have you finished this pattern?Tag your pictures with #dropspattern #waterlotuscardigan or submit them to the #dropsfan gallery. Do you need help with this pattern?You'll find 22 tutorial videos, a Comments/Questions area and more by visiting the pattern on garnstudio.com. © 1982-2026 DROPS Design A/S. We reserve all rights. This document, including all its sub-sections, has copyrights. Read more about what you can do with our patterns at the bottom of each pattern on our site. |
|||||||||||||||||||||||||||||||||||||


With over 40 years in knitting and crochet design, DROPS Design offers one of the most extensive collections of free patterns on the internet - translated to 17 languages. As of today we count 324 catalogues and 12290 patterns translated into English (UK/cm). 12290
We work hard to bring you the best knitting and crochet have to offer, inspiration and advice as well as great quality yarns at incredible prices! Would you like to use our patterns for other than personal use? You can read what you are allowed to do in the Copyright text at the bottom of all our patterns. Happy crafting!
Post a comment to pattern DROPS 112-14
We would love to hear what you have to say about this pattern!
If you want to leave a question, please make sure you select the correct category in the form below, to speed up the answering process. Required fields are marked *.