
Popular categories
Looking for a yarn?


Comments / Questions (44)
![]() Carina wrote:
Carina wrote:
Hallo Liebes Team. ich bin emrwas verzweifelt. Ich habe alles gmacht wie angegeben und es sieht auch aus wie ein Schuh aber für Bigfoot! Auch nach dem Waschen ist er weiter riesig! Was mach ich falsch? Und wie bekomm ich den so schön geformt? Danke schon mal
02.01.2023 - 07:27DROPS Design answered:
Liebe Carina, am besten zeigen Sie ihr DROPS Händler Ihr Strickstück, so kann man dort am besten mit Ihnen mal schauen, warum die Hausschuhen nicht filzen. Danke im voraus!
02.01.2023 - 16:38
![]() Angela wrote:
Angela wrote:
Hallo, kann ich Ihnen ein Foto senden? Ich habe beide Schuhe fertig gestrickt und kann nicht erkennen wie ich den Schuh zusammennähen muss. Herzliche Grüße Angela
05.12.2021 - 21:01DROPS Design answered:
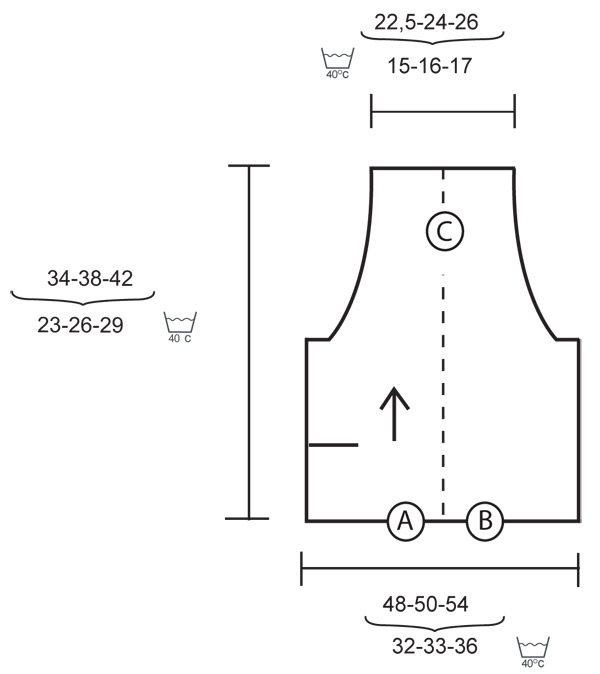
Liebe Angela, legen Sie die Schuhen wie in der Skizze - folden Sie dann die Arbeit in der Mitte (gestrichte Linie = mitten unter dem Fuss = C ) und nähen Sie A + B zusammen (= hinten Fersen). Dann nähen Sie die Zähne flach zusammen und die letzte Naht: von der Zähne bis zur Öffnung zusammennähen. Hoffentlich kann es Ihnen helfen!
06.12.2021 - 08:55
![]() Harriet Sigrid Martinussen wrote:
Harriet Sigrid Martinussen wrote:
Hei. Jeg skjønner ikke dette med de 16 maskene. Når jeg feller av de 16 og legger opp 16 nye masker, da blir det en flik hengende under de opplakte 16 m. Er dette riktig?
02.10.2021 - 23:30DROPS Design answered:
Hei Harriet, Dette blir klaffen hvor knappen skal kneppes. God fornøyelse!
04.10.2021 - 09:39
![]() Mette wrote:
Mette wrote:
Strikkes denne i rillestrikk? Eller skal det strikkes rett på retten og vrangt på vrangen?
17.01.2021 - 19:03DROPS Design answered:
Hej Mette, tøflerne strikkes i glatstrik. God fornøjelse!
18.01.2021 - 15:58
![]() Anke wrote:
Anke wrote:
Ik ben voor het eerst sloffen aan het breien het deel . Waar het knoopsgat komt is dit pas na 8 cm? Omdat de flap maar 6 cm is en hoe bevestig je een plastic zakje, is daar ook een filmpje van?
08.01.2021 - 18:49DROPS Design answered:
Dag Anke,
Ja, het klopt dat het knoopsgat pas bij 8 cm is, omdat het werk nadien gevilt wordt en dus ook dat stuk korter wordt. De plastic zak stop je gewoon in de slof (net als de papieren proppen die je in nieuwe schoenen aantreft).
09.01.2021 - 09:18
![]() Minika wrote:
Minika wrote:
Heej.. jeg har strikket over de 16 m i v side og lukket dem af.. men kan simpelthen ikke finde ud af hvor de 16 nye masker skal slåes op henne.. Ser nu ud som her hvis der giver mening ........ ........ ............................... ...............................
07.01.2021 - 16:07DROPS Design answered:
Hej Minika, hvis du kigger på måleskitsen nederst i opskriften, så er stregen i venstre side der hvor du lukker de 16 masker af og når du starter på alle de "hvilende" masker igen, så starter du med at slå 16 nye masker op igen (ved stregen). God fornøjelse!
08.01.2021 - 12:09
![]() Úna wrote:
Úna wrote:
Thank you for getting back to me. I worked it out. The slippers worked out lovely. I am on a second pair but I will make the buttonhole a bit smaller. Lovely pattern. I knit them in Drops Nepal with one strand of yarn.
22.11.2020 - 18:07
![]() Una wrote:
Una wrote:
I do not understand where I cast on the extra stitches (which side of the work) after putting the stitches on the holder back on needles. Is the first row picked up knit on the right side or the wrong side? Which end of it are the extra stitches added? It is not clear from the diagram as I cannot see them in it!
19.11.2020 - 02:39DROPS Design answered:
Dear Una, you can cast off the 16 sts from RS (just make sure to have the same number of rows on the 2nd slipper), and cut the yarn - Slip then all stitches back on needle and work these stitches then cast on 16 sts at the end of the row from RS (= over the 16 sts worked alone for 7 cm and cast off). Hope this helps. Happy knitting!
19.11.2020 - 10:26
![]() Anne-Karin Hyvärinen wrote:
Anne-Karin Hyvärinen wrote:
Hei igjen! Vil fortelle at jeg fulgte oppskrifta til punkt og prikke. At knappestolpen og knapphullet var på samme side under strikkingen og at de ble helt perfekt. Tusen takk for at dere tok dere tid til å overbevise meg. Tips til de som blir å strikke disse: Når du skal sy sammen forran ved tærne så er den sømmen vannrett.
24.09.2020 - 00:53
![]() Anne-Karin Hyvärinen wrote:
Anne-Karin Hyvärinen wrote:
Tusen takk for svar! Jeg ønsker virkelig å strikke disse vakre tøflene. Mener at det er en feil i oppskrifta for etter oppskrifta så blir knapphull og stolpe på samme siden om man følger oppskrifta. Jeg forstår derfor ikke den fasongen på knappestolpen Jeg venter i spenning på foklaringen så at jeg å begynne å strikke disse i julegaver . Vennlig hilsen fra Anne-Karin som liker å strikke med dropsgarn :)
08.09.2020 - 22:58DROPS Design answered:
Hej Anne-Karin, nej det skal ikke være fejl i opskriften. I og med at du slår 9 nye masker op, strikker knaphul helt i starten af de nye masker, så vil stykket med knaphul vende "bagud" på ydersiden af foden og knappen skal sys i det lille tillæg på klaffen, som ligger under de 9 nye masker som blev slået op. Bare følg opskriften, så kan du se i skissen nederst hvordan du skal sy dem sammen. God fornøjelse!
09.09.2020 - 14:39
|
|||||||||||||
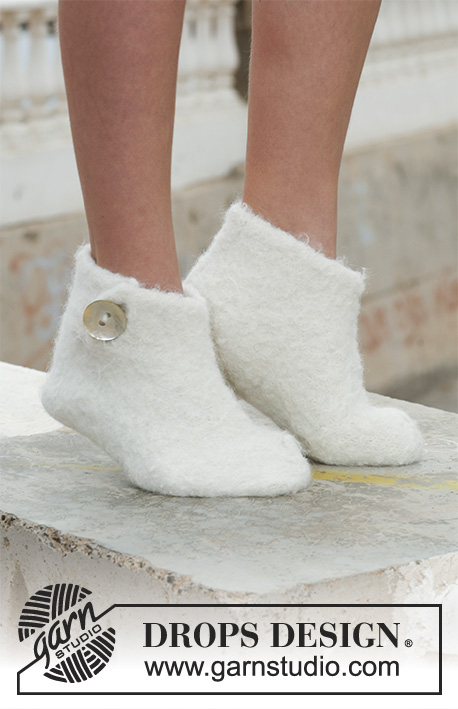
Snow Slippers |
|||||||||||||
|
|
|||||||||||||
Knitted and felted slippers in 2 threads DROPS Alpaca. Size 35 - 44. Theme: Christmas
DROPS Extra 0-517 |
|||||||||||||
|
SLIPPERS: Worked in 1 piece with seams mid back and mid upper foot. Beg mid back – see measuring chart. LOOSELY cast on 76-80-86 sts on needle size 5.5 mm with 2 threads Alpaca and work stocking st back and forth on needle. REMEMBER THE KNITTING TENSION! When piece measures 6-7-7 cm continue on 16 sts on the left of piece only – slip the remaining sts on a stitch holder. Work 7 cm stocking st on the 16 and cast off. Slip sts from stitch holder back on needle and cast on 16 new sts on the left side of piece. Now continue on all sts. When piece measures 8-9-9 cm (from cast on row) work next row as follows from WS: work 4 sts, cast off 9 sts, work remaining sts on row. Cast on 9 new sts over the cast off sts on return row (= buttonhole). When piece measures 18-19.5-21.5 cm cast off 4-4-5 sts each side = 68-72-76 sts. Now dec at the beg of every row each side: 4 sts 2 times, and then at the beg of every other row each side: 1 st 8-9-10 times = 36-38-40 sts. Continue until piece measures 34-38-42 cm, cast off loosely. Make 1 more slipper, but mirror it, i.e. when piece measures 6-7-7 cm only work the first 16 sts on the right side of piece. ASSEMBLY: Fold slipper and sew tog mid back in outer loops of sts. Sew tog mid upper foot at the front in the same way. After felting sew on buttons to fit buttonholes. FELTING: The piece can be felted either in the washing machine or the tumble dryer – read description below. Remember: Subsequent washes are as for a normal wool garment. IN WASHING MACHINE: Washing machines will vary when felting. If the piece is not felted enough, it can be felted again. If it is felted too much, it can be stretched to the correct size while still wet. DO THE FOLLOWING: Lay the piece in the washing machine, using a programme of approx. 40 minutes (not a wool programme). Wash at 40 degrees without pre-wash, detergent is optional. After washing, shape the piece while it is still wet. IN TUMBLE DRYER: Felting in a tumble dryer gives good control over the degree of felting. The tumble dryer can be opened during drying to check the size of the piece. If it is not felted enough it can be thoroughly wetted and felted again. If it is felted too much it can be stretched to the correct size while still wet. DO THE FOLLOWING: Lay the piece in water so it becomes completely wet, then place it in the tumble dryer and begin the drying process. Dry to the desired size, checking regularly. |
|||||||||||||
Diagram explanations |
|||||||||||||
|
|||||||||||||
 |
|||||||||||||
Have you finished this pattern?Tag your pictures with #dropspattern or submit them to the #dropsfan gallery. Do you need help with this pattern?You'll find 14 tutorial videos, a Comments/Questions area and more by visiting the pattern on garnstudio.com. © 1982-2026 DROPS Design A/S. We reserve all rights. This document, including all its sub-sections, has copyrights. Read more about what you can do with our patterns at the bottom of each pattern on our site. |
|||||||||||||


With over 40 years in knitting and crochet design, DROPS Design offers one of the most extensive collections of free patterns on the internet - translated to 17 languages. As of today we count 324 catalogues and 12245 patterns translated into English (UK/cm). 12245
We work hard to bring you the best knitting and crochet have to offer, inspiration and advice as well as great quality yarns at incredible prices! Would you like to use our patterns for other than personal use? You can read what you are allowed to do in the Copyright text at the bottom of all our patterns. Happy crafting!
Post a comment to pattern DROPS Extra 0-517
We would love to hear what you have to say about this pattern!
If you want to leave a question, please make sure you select the correct category in the form below, to speed up the answering process. Required fields are marked *.