
Popular categories
Looking for a yarn?


Comments / Questions (33)
![]() Joke Bakker wrote:
Joke Bakker wrote:
Kun je dit vest ook het linker voorpand, achter pand en rechter voorpand in één keer aan elkaar breien? En warom moet je twee soorten garen kopen? Ik zie dit niet echt in het patroon terug en snap het daarom helaas niet Groet, Joke
17.01.2020 - 17:47DROPS Design answered:
Dag Joke,
In dit ontwerp worden 2 verschillende soorten garens gebruikt om een bepaald effect te krijgen. Je breit dus met 2 draden (1 draad van elke kwaliteit), dit staat bovenaan bij de materialen aangegeven.
Je kan inderdaad de voor en achterpanden aan elkaar breien. Je telt dan alle steken bij elkaar op die je voor de panden op moet zetten en je haalt de kantsteken er af.
18.01.2020 - 12:15
![]() Ulla Pettersson wrote:
Ulla Pettersson wrote:
Hej ! Jag vill sticka en kofta som heter 106-6. Eftersom Cotton Viscose har utgått så vill jag ersätta det med Alpaca . Hur många nystan av Alpaca behöver jag för att ersätta Cotton Viscose och sticka med dubbelt garn . Alltså , hur många nystan av Alpaca behöver jag sammanlagt i storlek L . Med Vänlig Hälsning Ulla Pettersson
20.11.2018 - 23:25DROPS Design answered:
Hei Ulla. Du trenger ca 350 gram Alpaca for å erstatte Cotton Viscose = 7 nøster. Det vil si at du trenger totalt 14 nøster. Du kan enkelt regne ut dette selv ved å fylle inn garnet du vil bytte i vår Garnkalkulator, her Du vil få oppgitt alle alternativer, og mengde. God fornøyelse.
23.11.2018 - 09:28
![]() Nancy wrote:
Nancy wrote:
Heeft u hier ook een patroon van om te breien met gewone breinaalden aub ? Heb deze vraag al eens gesteld, maar nooit een antwoord gekregen. Groetjes, Nancy
01.08.2018 - 08:44
![]() Nancy Uyter Hoeven wrote:
Nancy Uyter Hoeven wrote:
Beste, Kan u me ook het patroon bezorgen om het gewoon met 2 breinaalden te breien aub ? Mvg, Nancy
17.07.2018 - 18:24
![]() DROPS Design wrote:
DROPS Design wrote:
Videoen er ikke laget til akkurat denne oppskriften men er en allmenn forklaring på bølgemønster. Du må følge diagrammet i oppskriften.
24.01.2012 - 08:32
![]() Gunilla Hermansson wrote:
Gunilla Hermansson wrote:
Ang mönster 106-6: Instruktionsteckningen till M1 är inte samma som i instruktionsvideon. Känns som om instruktinen i mönstret är fel. Den orsakade mig stora problem i alla fall.
24.01.2012 - 07:58
![]() DROPS Design wrote:
DROPS Design wrote:
Du strikker 1 maske, lager et kast og strikker 1 maske.
28.05.2008 - 21:53
![]() Mevza Zvonic wrote:
Mevza Zvonic wrote:
Kan noen forklare for meg : 1kast mellom 2 maske hvor skal jeg ta de mas....
28.05.2008 - 12:37
![]() Marianne wrote:
Marianne wrote:
This is my next project. I am leaving off the rows of garter at the breastline and replacing with some ribbing lower by the waistline.
08.03.2008 - 00:02
![]() Mieke wrote:
Mieke wrote:
Ik wil graag patroon z-325 als dat kan
18.02.2008 - 15:44
|
|||||||||||||
DROPS 106-6 |
|||||||||||||
|
|
|||||||||||||
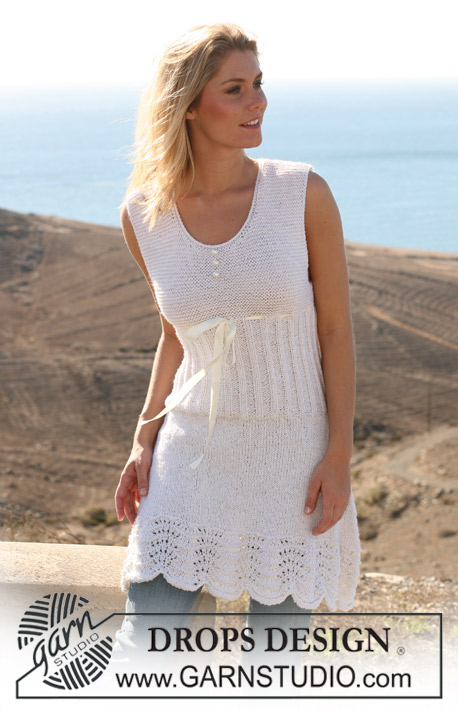
DROPS jacket in stocking st and garter st in “Cotton Viscose” and “Alpaca”. Size S – XXXL
DROPS 106-6 |
|||||||||||||
|
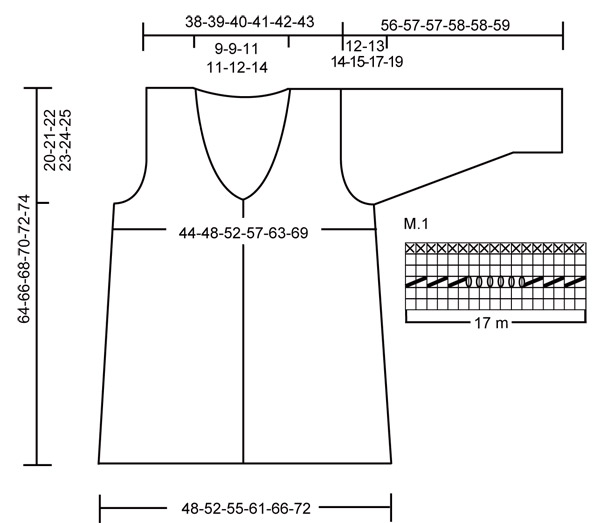
Pattern: See M.1. The diagram is seen from the RS. Garter st, back and forth on needle: K all rows. Decreasing tip (applies to front piece): Make all dec from RS! Dec as follows before 6 sts: slip 1 st as if to knit, K1, psso Dec as follows after 6 sts: K2 tog. Buttonholes: Make buttonholes on right front piece. 1 buttonhole = cast off 3rd st from mid front, cast on 1 new st on return row. Make buttonholes when piece measures: Size S: 16, 21, 26, 31, 36 and 41cm. Size M: 16, 22, 27, 32, 37 and 42 cm. Size L: 16, 22, 28, 33, 38 and 43 cm. Size XL: 16, 22, 28, 34, 39 and 44 cm. Size XXL: 16, 22, 28, 34, 40 and 45 cm. Size XXXL: 16, 22, 28, 34, 40 and 46 cm. Back and front piece: Worked back and forth on circular needle from mid front. Cast on 199-216-233-250-284-301 sts on 2 circular needle (4 + 5 mm, to make the edge elastic) with 1 thread of each quality. Remove needle size 4 and continue back and forth on needle size 5 mm as follows: 6 garter sts (front band), M.1 on the next 187-204-221-238-272-289 sts, and finish with 6 garter sts (front band). Work 3 vertical repeats of M.1 and continue in stocking st with front bands in garter st, at the same time dec 24-28-33-29-45-42 sts on first row in stocking st (do not dec on front band sts) = 175-188-200-221-239-259 sts. Remember buttonholes on right front piece – see above. Insert 2 Marking Threads (MT), 47-50-53-59-63-68 sts in from each side (back piece = 81-88-94-103-113-123 sts. Remember the knitting tension! When piece measures10 cm dec 1 st on each side of both MT (4 dec per row) on every 10-10-10-12-12-12 cm a total of 3 times = 163-176-188-209-227-247 sts. When piece measures 36-37-38-39-40-41 cm change to needle size 4 mm and work 16 rows garter st – see above. Change back to needle size 5 mm and continue in stocking st with front bands in garter st. When piece measures 44-45-46-47-48-49 cm cast off 3 sts on each side of both MT for armhole and now complete back and front pieces separately. Back piece: = 69-76-82-91-101-111 sts. Dec to shape the armhole each side on every other row: 3 sts 0-0-0-1-1-1 time, 2 sts 1-2-2-2-3-5 times and 1 st 0-1-3-4-6-6 times = 65-66-68-69-71-73 sts. When piece measures 60-62-64-66-68-70 cm work garter st on the middle 27-28-30-31-33-35 sts, work remaining sts as before. When piece measures 62-64-66-68-70-72 cm cast off the middle 13-14-16-17-19-21 sts for neck and dec 1 st on neckline on next row = 25 sts left on each shoulder. Continue with 6 garter sts towards neckline and cast off when piece measures 64-66-68-70-72-74 cm. Left front piece: = 41-44-47-53-57-62 sts. Dec for armhole at side as described for back piece. At the same time dec to shape the neckline – see Decreasing tip: 1 st on every 4th row a total of 7-7-7-8-8-8 times, and then 1 st on every other row a total of 7-7-8-9-9-10 times. After all dec are complete there are 25 sts left on shoulder. Cast off when piece measures 64-66-68-70-72-74 cm. Right front piece: Like left front piece, but mirrored. Sleeve: Worked back and forth on needle. Cast on 50-52-54-56-58-60 sts (includes 1 edge st each side) on needle size 4 mm with 1 thread of each quality. Work 16 rows garter st, change to needle size 5 mm and continue in stocking st. At the same time when piece measures 8-8-8-8-8-10 cm inc 1 st each side on every 8-6-5.5-4-3-2.5 cm a total of 5-6-7-9-10-11 times = 60-64-68-74-78-82 sts. When piece measures 44-44-43-43-41-40 cm (less on the larger sizes because of longer sleeve cap and wider shoulder) dec to shape the sleeve cap each side on every other row: 3 sts 1 time, then 1 st each side until piece measures 55-56-56-57-57-58 cm. On next row work all sts tog 2 by 2. Cast off remaining sts, piece measures approx 56-57-57-58-58-59 cm. Assembly: Sew shoulder seams. Set in sleeves and sew side seams inside 1 edge st. Sew on buttons. |
|||||||||||||
Diagram explanations |
|||||||||||||
|
|||||||||||||
 |
|||||||||||||
Have you finished this pattern?Tag your pictures with #dropspattern or submit them to the #dropsfan gallery. Do you need help with this pattern?You'll find 21 tutorial videos, a Comments/Questions area and more by visiting the pattern on garnstudio.com. © 1982-2026 DROPS Design A/S. We reserve all rights. This document, including all its sub-sections, has copyrights. Read more about what you can do with our patterns at the bottom of each pattern on our site. |
|||||||||||||


With over 40 years in knitting and crochet design, DROPS Design offers one of the most extensive collections of free patterns on the internet - translated to 17 languages. As of today we count 324 catalogues and 12290 patterns translated into English (UK/cm). 12290
We work hard to bring you the best knitting and crochet have to offer, inspiration and advice as well as great quality yarns at incredible prices! Would you like to use our patterns for other than personal use? You can read what you are allowed to do in the Copyright text at the bottom of all our patterns. Happy crafting!
Post a comment to pattern DROPS 106-6
We would love to hear what you have to say about this pattern!
If you want to leave a question, please make sure you select the correct category in the form below, to speed up the answering process. Required fields are marked *.