
Popular categories
Looking for a yarn?


Comments / Questions (35)
![]() Nico wrote:
Nico wrote:
Bonjour, Question de débutant intermédiaire. Je n'ai jamais tricoté en double fils. La quantité de laine en grammes est prévue pour les deux fils ou un seul et alors faut il doubler le nombre de pelote. Bien cordialement Nicolas
28.05.2026 - 07:04DROPS Design answered:
Bonjour Nicolas, la quantité indiquée correspond à la quantité nécessaire en tricotant le fil en double, vous n'avez pas besoin de multiplier la quantité indiquée par 2. Bon tricot!
28.05.2026 - 09:42
![]() Lisbeth wrote:
Lisbeth wrote:
Tak for svar, men rettelsen er forkert. Udtagningstips-2 beskriver rigtig nok, hvordan der skal strikkes udt-hø-vr og udt-ve-vr, så maskerne vender rigtigt, men det er en fejl, at der på pind 3 står, at man først skal tage ud mod højre og til slut mod venstre - det er lige omvendt.
27.05.2026 - 14:39
![]() Lisbeth wrote:
Lisbeth wrote:
Hej, jeg vil spørge, om det ikke er en fejl, når der i opskriften under BAGSYKKE står: 3.pind vrangen: Strik A2, tag 1 maske ud mod HØJRE - skal det ikke være mod venstre? og igen (inden der strikkes A1) står tag ud mod højre og ikke mod venstre?
27.05.2026 - 10:38DROPS Design answered:
Hej Lisbeth, UDTAGNINGSTIPS-2 er opdateret, så det stemmer det som står under 3. pind fra vrangen :)
27.05.2026 - 12:11
![]() Vera Santucci wrote:
Vera Santucci wrote:
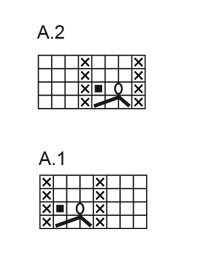
Teria algum vídeo como executar o Gráfico A1 , no avesso? Obrigada
21.05.2026 - 20:52DROPS Design answered:
Bom dia, O gráfico A,1 mostra as carreiras do avesso. Tricota a carreira 1 e 3 pelo direito, lendo o gráfico da direita para a esquerda, tricota a carreira 2 e 4pelo avesso, lendo o gráfico da esquerda para a direita, Quando unir a peça para tricotar em redondo, tricota todas as carreiras pelo direito, lendo sempre o gráfico da direita para a esquerda, Bons tricôs!
22.05.2026 - 10:13
![]() Ophélie wrote:
Ophélie wrote:
Bonjour, je ne suis pas sûre de bien comprendre le symbole - glisser 1 maille, tricoter 2 mailles endroit, passer la maille glissée par-dessus la maille tricotée - dans le diagramme (rang 1). Selon moi, ici nous faisons une diminution de deux mailles mais ce ne doit pas être ça car après nous n'en récupérons qu'une avec le jeté. Devons nous tricoter deux mailles ensemble et ensuite glisser la maille précédente au dessus ? Si non, que devons nous faire ? Merci
14.05.2026 - 22:18DROPS Design answered:
Bonjour Ophélie, cela devrait etre: glisser 1 maille, tricoter 2 mailles endroit, passer la maille glissée par-dessus les (2) mailles tricotées. Vous obtenez 2 mailles a partir de 3. Ensuite vous ajoutez un jete pour le compenser. Bon tricot!
15.05.2026 - 08:19
![]() Lore Gesemann wrote:
Lore Gesemann wrote:
Hallo ich weiß nicht wie ich in dem Diagramm eine Masche überspringen soll
05.05.2026 - 11:38DROPS Design answered:
Liebe Frau Gesemann, bei der 1. Reihe A.1 und A.2 hatten Sie 3 Maschen und diese Maschen wurden zu 2 Maschen abgenommen (1 M abheben, 2 M stricken und die abgehobene Masche über die 2 Maschen ziehen), so bei der 2. Reihe A.1 und A.2 sind es immer nur noch 2 Maschen, und man wird einfach diese 2 Maschen stricken mit 1 Umschlag inzwischen, so sind es wieder 3 Maschen. Viel Spaß beim Stricken!
05.05.2026 - 16:22
![]() Coco wrote:
Coco wrote:
Suite à ma question 28, je reprécise que je ne tricote pas serré puisque je n'ai besoin que de 17 mailles pour l'échantillon au lieu de 19 dans le modèle, et je n'ai que 12 cm de largeur de col en taille M, au lieu de 14 cm Et bien évidemment j'ai mis le nombre de mailles indiquées, Avez vous un conseil pour que j'obtienne largeur de col 14 cm ? Merci beaucoup
28.04.2026 - 19:31DROPS Design answered:
Bonjour Coco, votre tension est différente: vous avez besoin de moins de mailles pour 10 cm, donc avec le même nombre de mailles vous ne pouvez pas avoir la même largeur, vous allez devoir recalculer le nombre de mailles requis avec votre tension et les largeurs souhaitées. Vous trouverez des pulls avec ces épaules et cette tension, l'un d'eux pourra peut-être vous inspirer? Bon tricot!
29.04.2026 - 08:13
![]() Coco wrote:
Coco wrote:
Bjr\\r\\nJ\\\'ai commencé la taille M, le dos \\r\\nMon échantillon fait 17 mailles au lieu de 19, pourquoi mon encolure ne fait que 14 cm au lieu de 16 cm ? \\r\\nJ\\\'ai gardé la même tension et je ne tricote pas la torsade mais tout en jersey\\r\\nMerci
27.04.2026 - 14:39DROPS Design answered:
Bonjour Coco, vous tricotez probablement un peu plus serré, car les 32 mailles en taille XS, S et M - 1 m de chaque côté (on va relever ensuite les mailles à 1 m du bord) doivent donner 16 cm (32-2)=30/1.9=16 cm environ. Bon tricot!
27.04.2026 - 16:13
![]() Coco wrote:
Coco wrote:
Bjr\\r\\nJ\\\'ai commencé la taille M, le dos \\r\\nMon échantillon fait 17 mailles au lieu de 19, pourquoi mon encolure ne fait que 14 cm au lieu de 16 cm ? \\r\\nJ\\\'ai gardé la même tension et je ne tricote pas la torsade mais tout en jersey\\r\\nMerci
27.04.2026 - 14:39
![]() Anne wrote:
Anne wrote:
In knitting pattern A1/A2,what does it mean when the pattern says ‘no stitch, skip this square’? What does you do with that stitch?
15.04.2026 - 03:57DROPS Design answered:
Dear Anne, when working first row in A.1 and A.2 you decreased 1 stitch, reason why there is no stitch on 2nd row in diagrams, so as you get only 2 sts, work 1 stitch, make 1 yarn over and work 1 stitch = there are 3 sts again. Happy knitting!
15.04.2026 - 08:10
|
||||||||||||||||
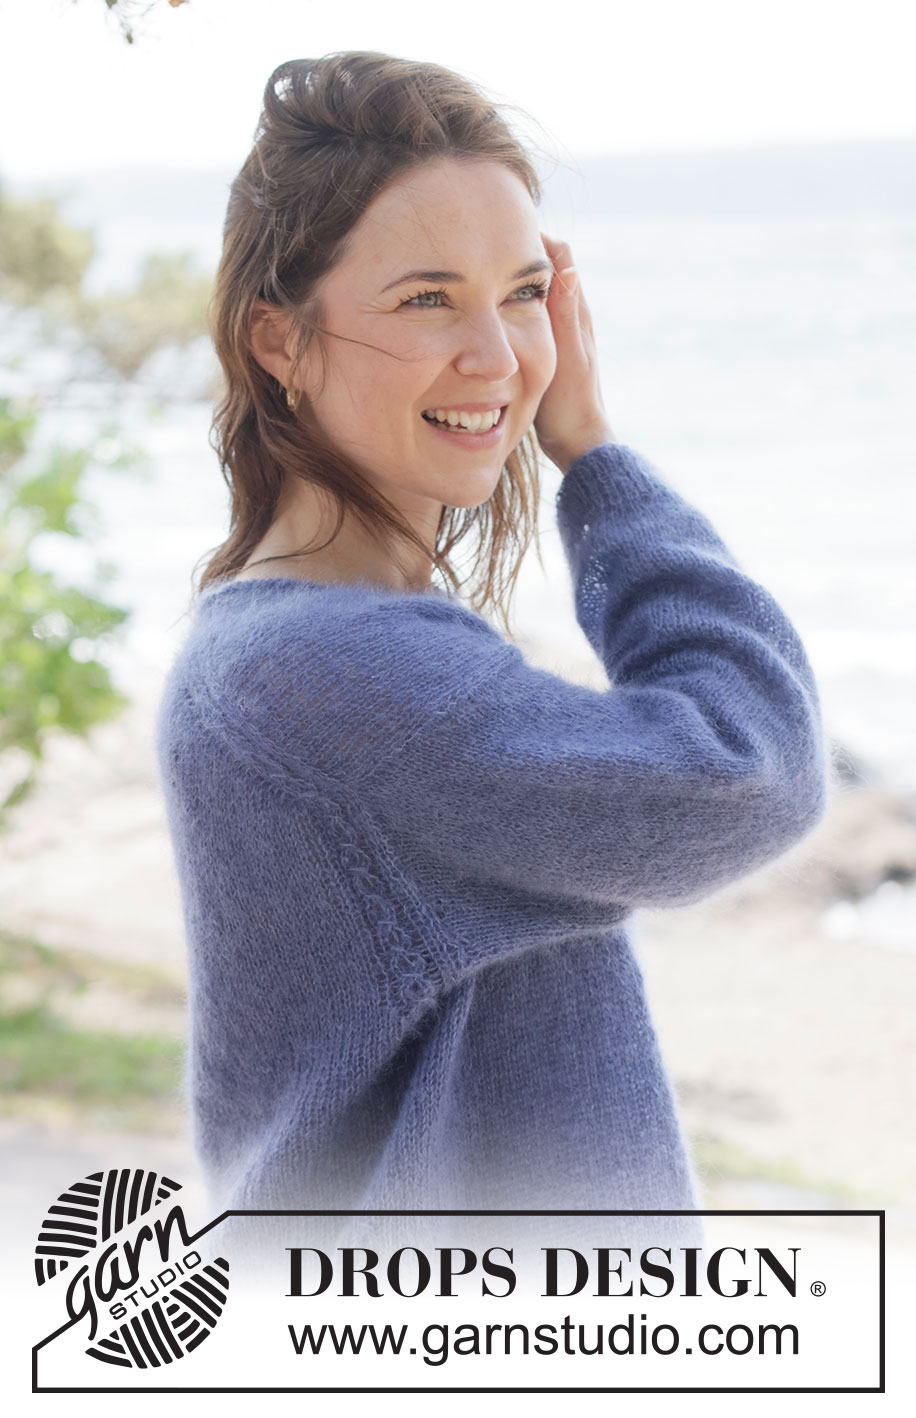
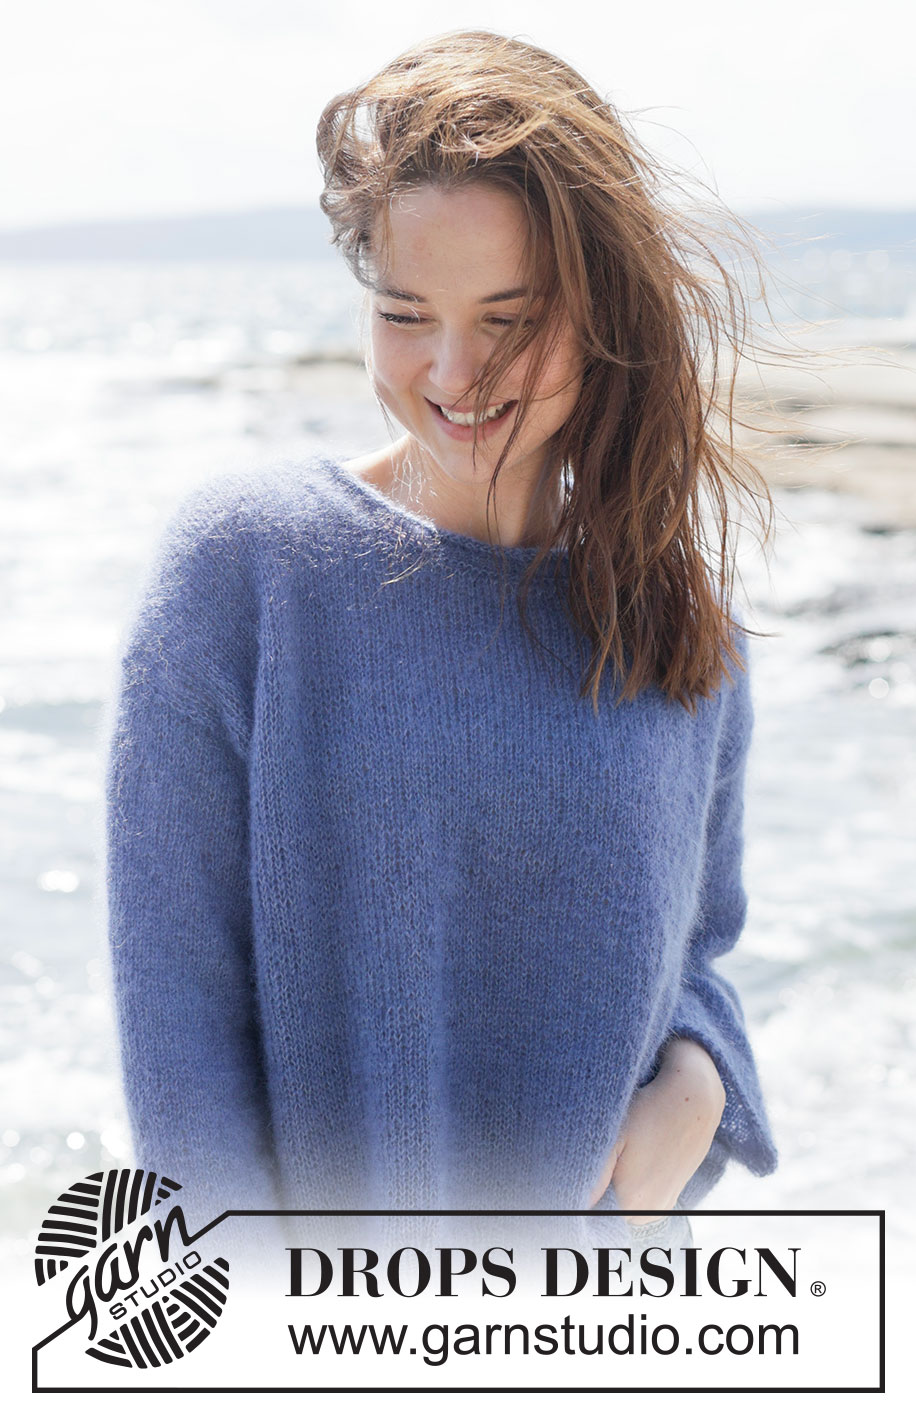
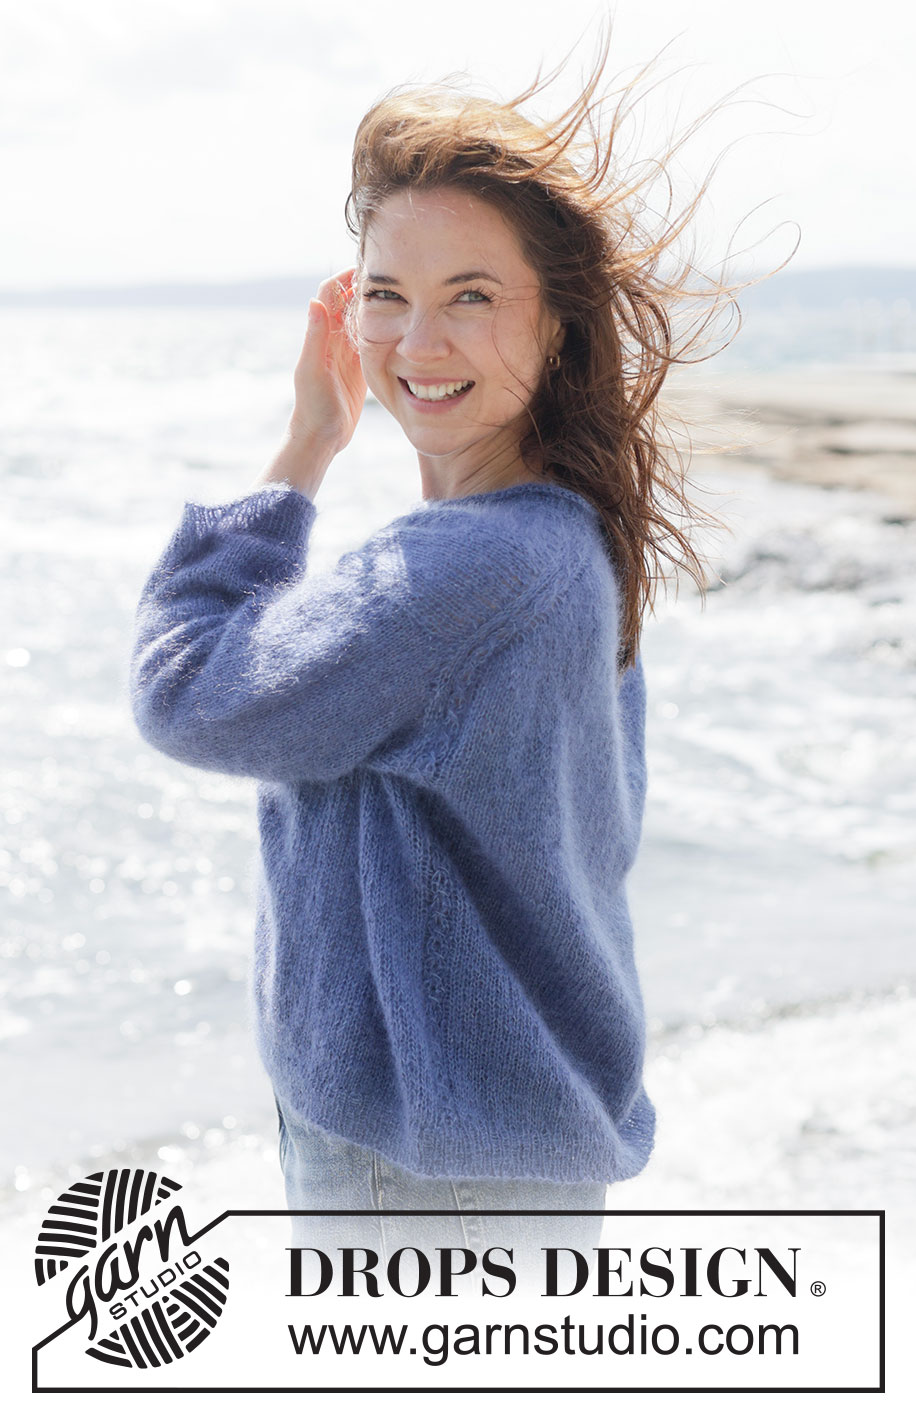
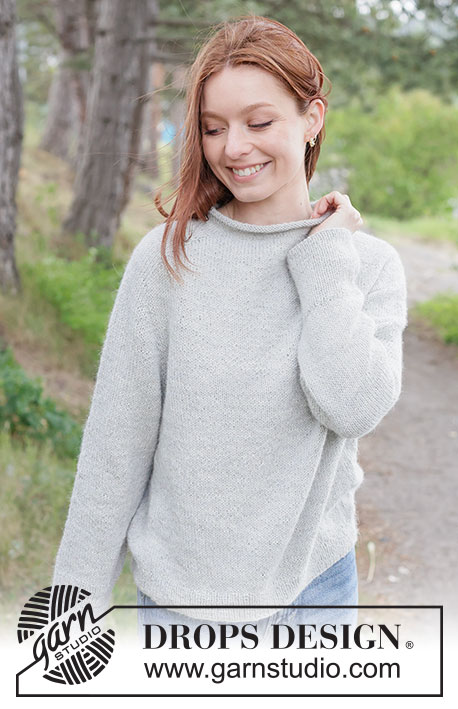
Calm Spirit Sweater#calmspiritsweater |
||||||||||||||||
 |
 |
|||||||||||||||
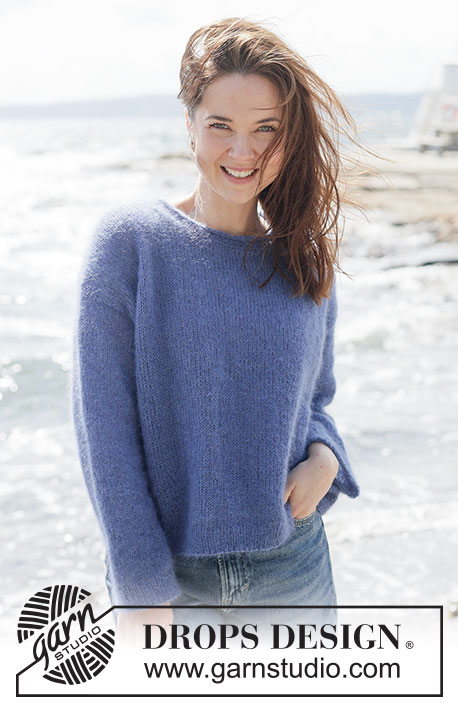
Knitted jumper in 2 strands DROPS Kid-Silk. The piece is worked top down with European/diagonal shoulders, small cables on the back piece and rolled neck. Sizes XS - XXXL.
DROPS 263-4 |
||||||||||||||||
|
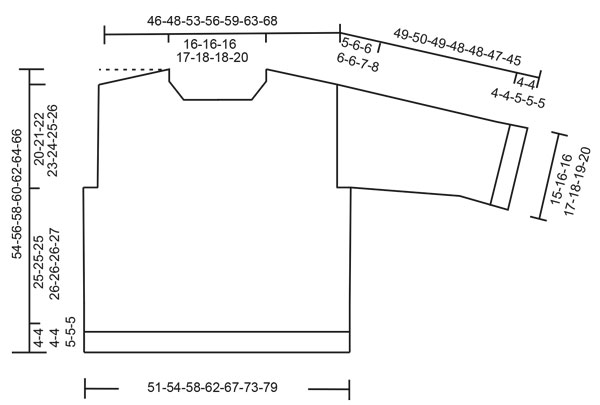
------------------------------------------------------- EXPLANATIONS FOR THE PATTERN: ------------------------------------------------------- PATTERN: See diagrams A.1 and A.2 INCREASE TIP-1: INCREASE 1 STITCH TOWARDS THE LEFT - from RIGHT SIDE: Use left needle to pick up yarn between 2 stitches from row below, pick up yarn from the front and knit in the stitch loop that is on the back of the needle. INCREASE 1 STITCH TOWARDS THE RIGHT - from RIGHT SIDE: Use left needle to pick up yarn between 2 stitches from row below, pick up yarn from the back and knit in the stitch loop that is on the front side of the needle. . INCREASE TIP-2: INCREASE 1 STITCH TOWARDS THE RIGHT - from WRONG SIDE: Use left needle to pick up yarn between 2 stitches from row below, pick up yarn from the back and purl in the stitch loop that is on the front side of the needle. INCREASE 1 STITCH TOWARDS THE LEFT - from WRONG SIDE: Use left needle to pick up yarn between 2 stitches from row below, pick up yarn from the front and purl in the stitch loop that is on the back side of the needle. KNITTING TIP: When working short rows, there will be a small hole after each turn. This hole can be closed by tightening the strand or using the technique German Short Rows as follows: Slip the first stitch purl-wise, take the strand over the right needle and tighten well from the back (2 loops on the needle). These loops are worked together on the next row. DECREASE TIP: Decrease 1 stitch on each side of the marker thread as follows: Work until there are 3 stitches left before the marker thread, knit 2 together, knit 2 (marker thread sits between these 2 stitches) slip 1 stitch knit-wise, knit 1 and pass the slipped stitch over the knitted stitch (= 2 stitches decreased). ------------------------------------------------------- START THE PIECE HERE: ------------------------------------------------------- JUMPER – SHORT OVERVIEW OF THE PIECE: The pattern uses both long and short needles; start with the length which fits the number of stitches and change when necessary. The piece is started back and forth, casting on stitches at the back of the neck and working the back piece top down, while increasing stitches on each side for the shoulders, which become slightly diagonal. The back piece is worked as far as the armholes. The front piece is then worked in 2 sections, knitting up stitches along 1 back shoulder, working pattern and increasing for the neckline. This is repeated on the other shoulder, the 2 front sections are joined when the neckline is finished and worked until the armholes are finished. The front and back pieces are joined on the same circular needle and the body worked in the round Stitches are knitted up around the armholes for the sleeves which are first worked back and forth for the sleeve cap, then finished in the round. Stitches are knitted up around the neckline and the neck worked in the round to finish. BACK PIECE: The piece is worked back and forth. Cast on slightly loosely 32-32-32-34-36-36-42 stitches with circular needle size 4 mm and 2 strands DROPS Kid-Silk. ROW 1 (wrong side): Purl. Now work PATTERN – read explanation above, and stocking stitch while increasing as follows: ROW 2 (right side): Work A.1, read INCREASE TIP-1 and increase 1 stitch towards the left, knit until there are 8 stitches left on the row, increase 1 stitch towards the right, work A.2. ROW 3 (wrong side): Read INCREASE TIP-2. Work A.2, increase 1 stitch towards the right, purl until there are 8 stitches left, increase 1 stitch towards the left, work A.1. Work ROWS 2 and 3 a total of 14-15-17-18-19-21-22 times (28-30-34-36-38-42-44 rows worked) = 88-92-100-106-112-120-130 stitches. Insert 1 marker outermost on one side. The piece is now measured from here! Continue with stocking stitch and A.1/A.2 (remember to maintain the knitting tension) until the piece measures 12-12-13-13-14-15-16 cm from the marker, measured down the armhole. Now increase for the armholes. INCREASE FOR ARMHOLES: ROW 1 (right side): Remember INCREASE TIP-1. Work A.1, increase 1 stitch towards the left, knit until there are 7 stitches left, increase 1 stitch towards the right, work A.2. ROW 2 (wrong side): Purl. Work ROWS 1 and 2 a total of 2-2-2-2-3-3-3 times = 92-96-104-110-118-126-136 stitches. Continue working until the piece measures 14-14-15-15-16-17-18 cm, from the marker and down the armhole, finishing with a row from the wrong side. Cut the strand and place the stitches on a stitch holder/thread and work the left front piece along the left back piece as follows: LEFT FRONT PIECE: Find the left back shoulder as follows: Lay the back piece flat, right side up, with the stitch holder towards you; left side of piece = left shoulder. Starting from the right side by the neck on the left back shoulder, knit up 1 stitch inside the outermost stitch in each worked row along the shoulder as far as the armhole = 28-30-34-36-38-42-44 stitches. All length-measurements on the front piece are taken from the knitted-up row. Work stocking stitch back and forth with the first row from the wrong side until the piece measures 7 cm. Now increase for the neckline as follows: ROW 1 (right side): Remember INCREASE TIP-1. Knit 3, increase 1 stitch towards the left, work to end of row. ROW 2 (wrong side): Purl. Work ROWS 1 and 2 a total of 5 times (10 rows worked) = 33-35-39-41-43-47-49 stitches (with the next row from the right side). Cut the strand and place the stitches on a stitch holder/thread and work the right front piece along the right back piece as follows: RIGHT FRONT PIECE: Starting from the right side by the armhole on right left back shoulder, knit up 1 stitch inside the outermost stitch in each worked row as far as the neck = 28-30-34-36-38-42-44 stitches. All length-measurements on the front piece are taken from the knitted-up row. Work stocking stitch back and forth, with the first row from the wrong side until the piece measures 7 cm. Now increase for the neckline as follows: ROW 1 (right side): Knit until there are 3 stitches left, increase 1 stitch towards the right, knit 3 - remember INCREASE TIP-1. ROW 2 (wrong side): Purl. Work ROWS 1 and 2 a total of 5 times (10 rows worked) = 33-35-39-41-43-47-49 stitches (with the next row from the right side). Now join the 2 front pieces. FRONT PIECE: From the right side, knit the 33-35-39-41-43-47-49 stitches from the right front piece, cast on 22-22-22-24-26-26-32 stitches for the neckline (make sure the cast-on stitches are not tight), knit the 33-35-39-41-43-47-49 stitches from the left front piece = 88-92-100-106-112-120-130 stitches. Continue stocking stitch back and forth until the piece measures 24-26-27-29-30-31-32 cm. Now increase for the armholes. INCREASE FOR ARMHOLES: ROW 1 (right side): Knit 3, increase 1 stitch towards the left, knit until there are 3 stitches left, increase 1 stitch towards the right, knit 3. ROW 2 (wrong side): Purl. Work ROWS 1 and 2 a total of 2-2-2-2-3-3-3 times = 92-96-104-110-118-126-136 stitches. Continue working until the piece measures 26-28-29-31-32-33-34 cm, finishing after a row from the wrong side. Now join the front and back pieces for the body. The piece is measured from here! BODY: Knit the 92-96-104-110-118-126-136 stitches from the front piece, cast on 4-6-6-8-10-12-14 stitches (mid-under the sleeve), work the 92-96-104-110-118-126-136 stitches from the back piece as before, cast on 4-6-6-8-10-12-14 stitches (mid-under the sleeve) = 192-204-220-236-256-276-300 stitches. Continue A.1, A.2 and stocking stitch in the round for a further 25-25-25-26-26-26-27 cm. Change to circular needle size 2.5 mm. Work rib (knit 1, purl 1), AT THE SAME TIME increase 32-34-36-36-38-46-48 stitches evenly on the first round = 224-238-256-272-294-322-348 stitches. When the rib measures 4-4-4-4-5-5-5 cm, cast off slightly loosely with rib. The jumper measures approx. 54-56-58-60-62-64-66 cm. SLEEVES: The sleeve is worked top down. Lay the piece flat and insert 1 marker at the top of the armhole. (NOTE! This is not the same place as the knitted-up row on the front piece but approx. 6-7 cm down the front piece). Use 2 strands and circular needle 2.5 mm. Start in the middle of the cast-on stitches under the sleeve and knit up 76-80-82-90-98-106-110 stitches around the armhole, with equal numbers of stitches on both sides of the marker. Change to circular needle size 4 mm. Work stocking stitch back and forth with short rows for the sleeve cap (to give the sleeve a better fit), starting from mid-under the sleeve as follows: ROW 1 (right side): Knit to 10-10-10-11-12-13-14 stitches past the marker on top of the sleeve, turn – read KNITTING TIP. ROW 2 (wrong side): Purl to 10-10-10-11-12-13-14 stitches past the marker, turn. ROW 3 (right side): Knit to 4-4-4-4-4-4-4 stitches past the previous turn, turn. ROW 4 (wrong side): Purl to 4-4-4-4-4-4-4 stitches past the previous turn, turn. Repeat row 3 and 4. Work until you have turned a total of 12-14-14-14-14-18-18 times (6-7-7-7-7-8-8 times each side with the last row from the wrong side). After the final turn, knit back to the beginning of the round (mid-under the sleeve). Insert 1 marker-thread here; it is used when decreasing under the sleeve. Allow it to follow your work onwards. Work stocking stitch in the round. AT THE SAME TIME, when the sleeve measures 1 cm from the division, decrease mid-under the sleeve – read DECREASE TIP as follows: Decrease 2 stitches every 2nd round 2-2-3-3-3-4-4 times, then decrease 2 stitches every 5-5-5-3½-3-2½-2½ cm a total of 7-8-7-10-12-13-13 times = 58-60-62-64-68-72-76 stitches. Continue working until the sleeve measures 45-46-45-44-43-42-40 cm from the shoulder. Change to double pointed needles size 2.5 mm. Work rib (knit 1, purl 1), AT THE SAME TIME increase 8-10-10-10-12-12-12 stitches evenly on the first round = 66-70-72-74-80-84-88 stitches. When the rib measures 4-4-4-4-5-5-5 cm, cast off slightly loosely with rib. The sleeve measures approx. 49-50-49-48-48-47-45 cm from the shoulder. NECK: Use circular needle size 2.5 mm and 2 strands. Start from the right side on one shoulder-line and knit up 94 to 112 stitches inside 1 stitch around the neckline: the stitch count should be divisible by 2. Purl 1 round, knit 2 rounds, work 4 rounds of rib (knit 1, purl 1), knit 4 rounds (= rolled-edge). Change to circular needle size 4 mm and cast off a little loosely. |
||||||||||||||||
Diagram explanations |
||||||||||||||||
|
||||||||||||||||
 |
||||||||||||||||
 |
||||||||||||||||
Have you finished this pattern?Tag your pictures with #dropspattern #calmspiritsweater or submit them to the #dropsfan gallery. Do you need help with this pattern?You'll find 37 tutorial videos, a Comments/Questions area and more by visiting the pattern on garnstudio.com. © 1982-2026 DROPS Design A/S. We reserve all rights. This document, including all its sub-sections, has copyrights. Read more about what you can do with our patterns at the bottom of each pattern on our site. |
||||||||||||||||


With over 40 years in knitting and crochet design, DROPS Design offers one of the most extensive collections of free patterns on the internet - translated to 17 languages. As of today we count 325 catalogues and 12298 patterns translated into English (UK/cm). 12298
We work hard to bring you the best knitting and crochet have to offer, inspiration and advice as well as great quality yarns at incredible prices! Would you like to use our patterns for other than personal use? You can read what you are allowed to do in the Copyright text at the bottom of all our patterns. Happy crafting!
Post a comment to pattern DROPS 263-4
We would love to hear what you have to say about this pattern!
If you want to leave a question, please make sure you select the correct category in the form below, to speed up the answering process. Required fields are marked *.