
Popular categories
Looking for a yarn?


Comments / Questions (33)
![]() Christine Cunin wrote:
Christine Cunin wrote:
J'ai tricoté cette veste en Flora (dont j'étais très fière!) et dont j'ai fait cadeau, mais il y a eu un problème: après un lavage en machine programme délicat, 30°, essorage 1300t/mn elle est sortie complètement feutrée et rétrécie... Pouvez-vous me dire ce qui a provoqué ce feutrage non désiré ... afin qu'on ne recommence pas, car je suis très déçue bien sûr!
04.11.2025 - 15:21DROPS Design answered:
Bonjour Mme Cunin, il est possible que les 1300 tours étaient beaucoup trop forts, référez-vous à l'onglet "Entretien" du nuancier pour plus d'infos. Bon tricot!
04.11.2025 - 17:22
![]() Mirja Kouvola wrote:
Mirja Kouvola wrote:
Miksi piirrokset eivät näy?
31.10.2025 - 09:28DROPS Design answered:
Hei, nyt piirrokset löytyvät.
31.10.2025 - 12:28
![]() Henny wrote:
Henny wrote:
Maat L. Opzetten 151 st. Beide zijden 7 st erbij na 4 cm. Er staat = 161st. Dit moet zijn 165. Krijg ik hier later problemen mee in het telpatroon?
25.10.2025 - 20:41DROPS Design answered:
Dag Henny,
Inderdaad, dit is denk ik een fout en het zou volgens mij ook 165 moeten zijn. Ik heb het doorgegeven aan de ontwerpafdeling om na te kijken zodat er een correctie op kan komen. Hopelijk kun je nu eerst verder.
26.10.2025 - 11:39
![]() Gurli wrote:
Gurli wrote:
Hvor er mønsteret jeg kan ikke få det frem
24.10.2025 - 12:59DROPS Design answered:
Hej Gurli. Nu ska du kunna se diagrammet. Mvh DROPS Design
24.10.2025 - 13:43
![]() Maru wrote:
Maru wrote:
In rows 23-33 on A2 there seem to be missing stiches: there are 2 instead of 3 stiches. I don’t understand why. Can you explain this?
22.10.2025 - 13:55
![]() Concetta La Scala wrote:
Concetta La Scala wrote:
Buongiorno, io ho 151 punti ma le14 maglie le devo aumentare solo alla fine del ferro o dividerle 7 all'inizio e 7 alla fine. Grazie
15.04.2025 - 18:15DROPS Design answered:
Buongiorno Concetta, se sta facendo riferimento al primo aumento deve procedere come indicato: aumenta 7 maglie all'inizio e 7 maglie alla fine del ferro. Buon lavoro!
19.04.2025 - 14:53
![]() Eva wrote:
Eva wrote:
Hej! Jag behöver förklaring ang ökningen på ok. Ni skriver : ” Pil-4: Öka 23-23-29-35-35-35 maskor jämnt fördelat = 300-324-342-366-384-408 maskor. När A.1 och A.2 har stickats färdigt, är det 348-376-397-425-446-474 maskor på stickan. ” Det finns ingen mer ökning efter pil-4 så hur kan det vara sådan skillnad på antal maskar efter avslutat A1 och A2? Tack på förhand! MVH Eva
17.01.2025 - 14:40DROPS Design answered:
Hei Eva. Husk økningene som er tegnet inn i selve diagrammene (rad 33) - sort prikk. mvh DROPS Design
20.01.2025 - 09:17
![]() Jeltje wrote:
Jeltje wrote:
Bij de dikke schuine streep in het diagram brei je 3 steken en haalt de eerste steek over, dan hou je 2 steken over. In de volgende toer staan weer 3, hoe kom ik aan die derde steek.
07.12.2024 - 22:31DROPS Design answered:
Dag Jeltje,
Twee naalden ervoor heb je 1 steek erbij gemaakt door een omslag te maken. Deze wordt nu weer geminderd waardoor je weer op hetzelfde aantal steken komt.
11.12.2024 - 09:27
![]() Carmen wrote:
Carmen wrote:
En A1, tras hacer el segundo aumento, veo que hay un cuadrado negro que indica que se ha disminuido un punto anteriormente. Sin embargo, no se ha disminuido ningún punto anteriormente sino después, en los 3 puntos derechos cuando se pasa el primero sobre los otros dos. ¿Es así? Gracias por adelantado
22.11.2024 - 22:59DROPS Design answered:
Hola Carmen, en la fila 9 del diagrama A.1 se comienza una nueva parte del dibujo. Para ello, pasamos del dibujo anterior, trabajado sobre 6 puntos, a uno trabajado sobre 5 puntos. Después del aumento en la flecha 2, trabajas una fila entera de revés. En la fila 9 trabajas: 8 puntos de la cenefa, 48 repeticiones de los 5 puntos de A.1 en esta fila + 3 puntos de A.2 y 8 puntos de la cenefa. Como hay un aumento en esta fila, en la siguiente fila volvemos a tener un patrón de 6 puntos.
24.11.2024 - 22:58
![]() Carmen wrote:
Carmen wrote:
Hola, Cuando empieza el canesú, en la talla L, llevábamos 161 puntos, al aumentar 36, me quedan 197, no 207 como pone ahí... El cálculo no me sale y me da miedo no poder seguir las indicaciones de ahí en adelante. ¿Lo podéis verificar? Gracias
17.11.2024 - 15:58DROPS Design answered:
Hola Carmen, hay un fallo en el cuello. De 151 puntos, montas 14 puntos al final de la fila y obtienes 165 puntos. Después aumentas 36 puntos y te quedan 201, como pone ahí. Lo corregiremos lo antes posible.
17.11.2024 - 23:56
|
|||||||||||||||||||||||||||||||
Quilting Bee Cardigan#quiltingbeecardigan |
|||||||||||||||||||||||||||||||
 |
 |
||||||||||||||||||||||||||||||
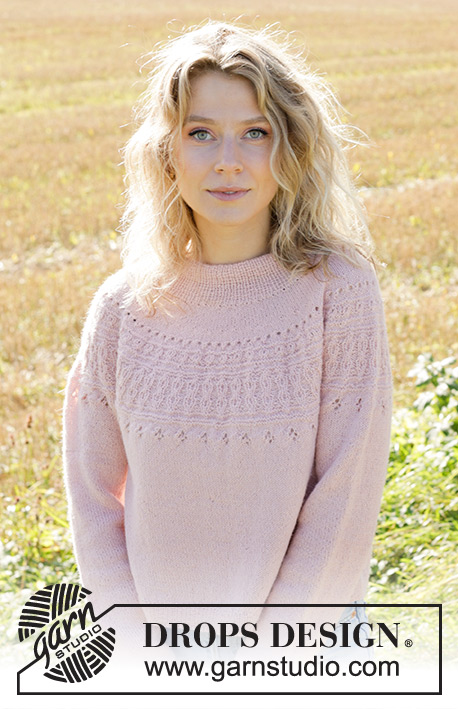
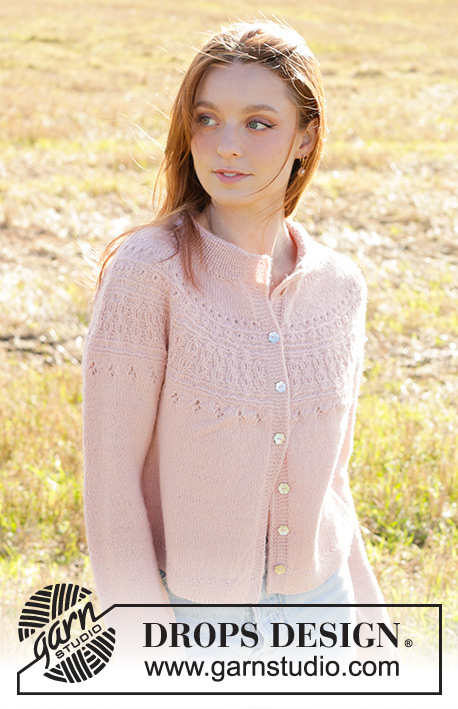
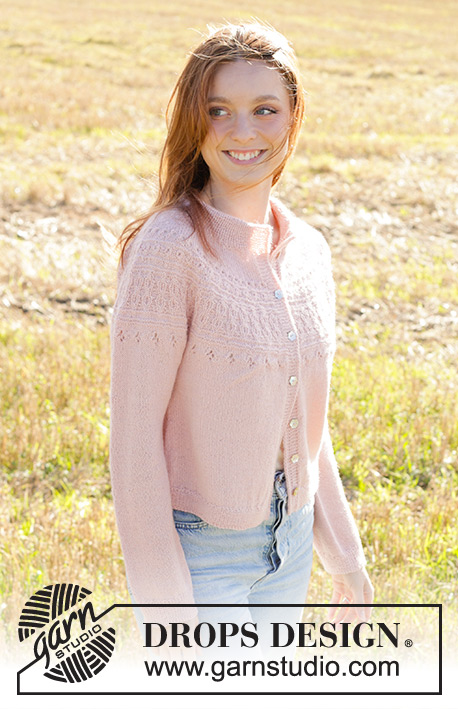
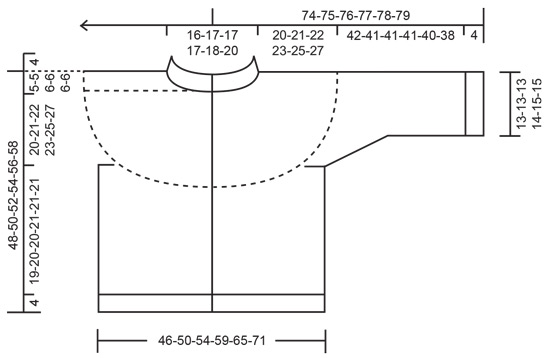
Knitted jacket in DROPS Alpaca or DROPS Flora. The piece is worked top down with double neck, round yoke, relief-pattern and I-cord. Sizes S - XXXL.
DROPS 248-25 |
|||||||||||||||||||||||||||||||
|
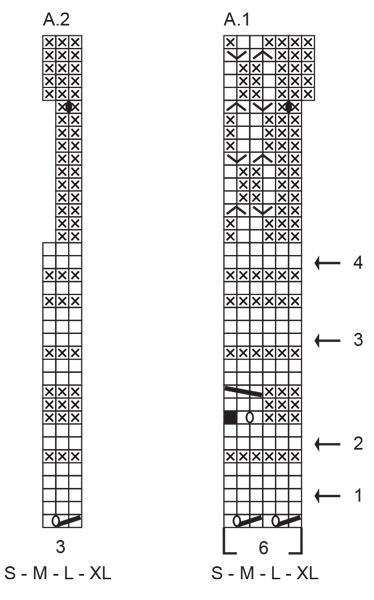
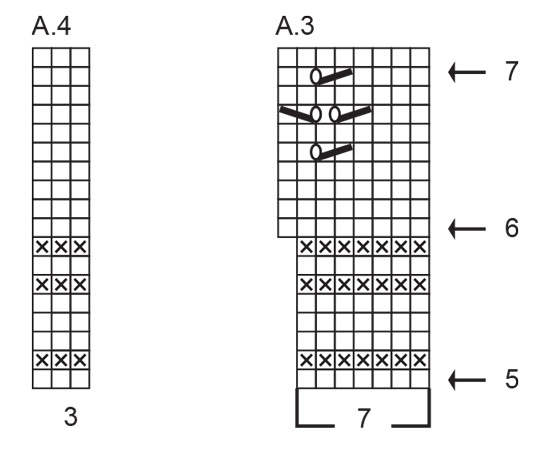
------------------------------------------------------- EXPLANATIONS FOR THE PATTERN: ------------------------------------------------------- GARTER STITCH (worked back and forth): Knit all rows. BANDS WITH I-CORD: START OF ROW: Work the band as follows: Slip 1 stitch purl-wise, with yarn in front, knit 1, work 6 garter stitches. END OF ROW: Work the band as follows: Work until there are 8 stitches left on the row, work 6 garter stitches, slip 1 stitch purl-wise with yarn in front, knit 1. PATTERN: See diagrams A.1 to A.4. Choose diagram for your size (applies to A.1 and A.2). The diagrams show all rows in the pattern from the right side. INCREASE TIP (for round yoke): Do not increase over the outermost 12 stitches on each side. To work out how to increase evenly, count the total number of stitches on the needle (e.g., 151 stitches), minus the stitches you don’t increase over (i.e., 24 stitches), then divide the remaining stitches by the number of increases to be made (e.g., 34) = 3.7. In this example, increase by making 1 yarn over after approx. each 4th stitch. On the next row work the yarn overs twisted to avoid holes. DECREASE TIP (for sleeves): Work until there are 3 stitches left before the marker-thread, knit 2 together, knit 2 (marker-thread sits between these 2 stitches), slip 1 stitch knit-wise, knit 1 and pass the slipped stitch over the knitted stitch (2 stitches decreased). BUTTONHOLES: Work buttonholes on the right band (when the garment is worn). Work from the right side, when there are 5 stitches left on the row as follows: Make 1 yarn over, knit 2 together, knit 1, slip 1 stitch purl-wise with yarn in front, knit 1. On the next row (wrong side), knit the yarn over to leave a hole. The first buttonhole is worked on the first row from the right side after the neck. The other 6 buttonholes are then worked with approx. 6½-7-7-7½-8-8 cm between each one. The bottom buttonhole is worked in the transition between stocking stitch and rib. ------------------------------------------------------- START THE PIECE HERE: ------------------------------------------------------- JACKET – SHORT OVERVIEW OF THE PIECE. The pattern uses both short and long circular needles; start with the length which fits the number of stitches and change when necessary. The neck and yoke are worked back and forth with circular needle, from mid front and top down. When the yoke is finished, it is divided for body and sleeves and the body continued back and forth with circular needle, while the sleeves wait. The sleeves are then worked in the round, top down. The neck is folded double to the wrong side and sewn down. NECK: Cast on 137-143-151-155-159-167 stitches with circular needle size 3 mm. Change to circular needle size 2.5 mm (casting on with a larger needle makes the cast-on edge elastic). Purl 1 row from the wrong side. Work as follows from the right side: 1 GARTER STITCH – read description above, * knit 1, purl 1 *, work from *-* until there are 2 stitches left, finish with knit 1 and 1 garter stitch. Continue this rib back and forth for 4 cm. Now cast on 7 stitches at the end of the next 2 rows = 151-157-165-169-173-181 stitches. Continue the rib but with the outermost 8 stitches on each side worked according to BANDS WITH I-CORD – read description above. Work until the neck measures 9 cm – finishing after a row from the wrong side The neck is later folded double to approx. 4 cm. Insert 1 marker inside the band; the yoke is measured from this marker. YOKE: Change to circular needle size 3 mm. Knit 1 row from the right side (bands worked as before) and increase 34-36-36-38-40-42 stitches evenly spaced – read INCREASE TIP. Remember the BUTTONHOLES on the right band – read description above = 185-193-201-207-213-223 stitches. Continue with stocking stitch and 8 band stitches on each side. REMEMBER THE KNITTING TENSION! When the yoke measures 3-4-5-5-5-6 cm from the marker, increase 38-42-46-46-52-54 stitches evenly spaced – remember INCREASE TIP = 223-235-247-253-265-277 stitches. Continue with stocking stitch and 8 band stitches on each side, until the yoke measures 4-5-6-7-7-8 cm from the marker. Now work PATTERN – read description above, i.e., work the first row from the right side as follows: 8 band stitches as before, work A.1 until there are 11 stitches left, work A.2 and 8 band stitches as before. Continue this pattern. AT THE SAME TIME on each row marked with an arrow in A.1, increase evenly as follows (do not increase over the bands): Arrow-1: Increase 18-18-18-24-24-30 stitches evenly spaced = 241-253-265-277-289-307 stitches. Arrow-2: Increase 18-26-24-22-25-32 stitches evenly spaced = 259-279-289-299-314-339 stitches. Arrow-3: Increase 18-22-24-32-35-34 stitches evenly spaced = 277-301-313-331-349-373 stitches. Arrow-4: Increase 23-23-29-35-35-35 stitches evenly spaced = 300-324-342-366-384-408 stitches. When A.1 and A.2 are finished there are 348-376-397-425-446-474 stitches. Now work as follows: 8 band stitches as before, work A.3 until there are 11 stitches left and increase 14-14-21-28-35-35 stitches evenly spaced (arrow-5), work A.4 and finish with 8 band stitches as before = 362-390-418-453-481-509 stitches. Continue the pattern and increase evenly on each row marked with an arrow in A.3 – remember INCREASE TIP (do not increase over the 12 outermost stitches on each side). Arrow-6: Increase 9-13-17-22-26-30 stitches evenly spaced = 371-403-435-475-507-539 stitches. Arrow-7: Increase 6-10-10-14-18-18 stitches evenly spaced – make sure to space the increases so the lace pattern is not disrupted = 377-413-445-489-525-557 stitches. When A.3 and A.4 are finished, the yoke measures approx. 19-20-21-22-24-25 cm from the marker. Continue with stocking stitch and 8 band stitches on each side until the yoke measures 20-21-22-23-25-27 cm from the marker. Now divide for the body and sleeves: Work the first 62-68-72-78-85-92 stitches (front piece), place the next 72-78-86-96-100-102 stitches on a thread for the sleeve, cast on 10-10-12-12-14-16 (in side under sleeve), work 109-121-129-141-155-169 stocking stitches (back piece), place the next 72-78-86-96-100-102 stitches on a thread for the sleeve, cast on 10-10-12-12-14-16 (in side under sleeve), work the last 62-68-72-78-85-92 stitches as before (front piece). The body and sleeves are finished separately. The piece is now measured from here! BODY: = 253-277-297-321-353-385 stitches. Continue back and forth, with stocking stitch and 8 band stitches on each side, until the body measures 19-20-20-21-21-21 cm from the division. Knit 1 row from the right side and increase 60-62-66-74-82-88 stitches evenly spaced (do not increase over the bands) = 313-339-363-395-435-473 stitches. Change to circular needle size 2.5 mm. Work rib as follows from the wrong side: 8 band stitches, * purl 1, knit 1 *, work from *-* until there are 9 stitches left, purl 1 and 8 band stitches. Continue this rib for 4 cm. Cast off. The jacket measures approx. 48-50-52-54-56-58 cm from the shoulder. SLEEVES: Place the 72-78-86-96-100-102 stitches from the thread on the one side of the piece on short circular needle/double pointed needles size 3 mm and knit up 1 stitch in each of the 10-10-12-12-14-16 stitches cast on under the sleeve = 82-88-98-108-114-118 stitches. Insert a marker-thread in the middle of the 10-10-12-12-14-16 stitches under the sleeve. Start at the marker-thread and work stocking stitch in the round. When the sleeve measures 2 cm from the division, decrease 2 stitches under the sleeve – read DECREASE TIP. Decrease like this every 4th-4th-3rd-3rd-2nd-2nd round a total of 8-10-14-18-19-20 times = 66-68-70-72-76-78 stitches. Continue working until the sleeve measures 42-41-41-41-40-38 cm from the division (There is 4 cm left; try the jacket on and work to desired length before the rib). Knit 1 round and increase 14-16-16-18-18-18 stitches evenly spaced = 80-84-86-90-94-96 stitches. Change to double pointed needles size 2.5 mm. Work rib (knit 1, purl 1) for 4 cm. Cast off. The sleeve measures approx. 46-45-45-45-44-42 cm from the division. ASSEMBLY: Fold the rib at the top of the neck to the inside and sew down to give a double neck. To avoid the neck being tight, and rolling outwards, it is important that the seam is elastic. Sew together the openings mid-front of neck with small stitches. Sew the buttons onto the left band. |
|||||||||||||||||||||||||||||||
Diagram explanations |
|||||||||||||||||||||||||||||||
|
|||||||||||||||||||||||||||||||
 |
|||||||||||||||||||||||||||||||
 |
|||||||||||||||||||||||||||||||
 |
|||||||||||||||||||||||||||||||
 |
|||||||||||||||||||||||||||||||
Have you finished this pattern?Tag your pictures with #dropspattern #quiltingbeecardigan or submit them to the #dropsfan gallery. Do you need help with this pattern?You'll find 33 tutorial videos, a Comments/Questions area and more by visiting the pattern on garnstudio.com. © 1982-2026 DROPS Design A/S. We reserve all rights. This document, including all its sub-sections, has copyrights. Read more about what you can do with our patterns at the bottom of each pattern on our site. |
|||||||||||||||||||||||||||||||


With over 40 years in knitting and crochet design, DROPS Design offers one of the most extensive collections of free patterns on the internet - translated to 17 languages. As of today we count 324 catalogues and 12290 patterns translated into English (UK/cm). 12290
We work hard to bring you the best knitting and crochet have to offer, inspiration and advice as well as great quality yarns at incredible prices! Would you like to use our patterns for other than personal use? You can read what you are allowed to do in the Copyright text at the bottom of all our patterns. Happy crafting!
Post a comment to pattern DROPS 248-25
We would love to hear what you have to say about this pattern!
If you want to leave a question, please make sure you select the correct category in the form below, to speed up the answering process. Required fields are marked *.