
Popular categories
Looking for a yarn?


Comments / Questions (9)
![]() Giusy wrote:
Giusy wrote:
Buonasera come posso sostituire il filato drops camelia/jasmine? Grazie per la risposta
29.12.2025 - 20:15DROPS Design answered:
Buonasera Giusy, può utilizzare un filato che appartiene al gruppo A. Buon lavoro!
30.12.2025 - 22:10
![]() Giusy wrote:
Giusy wrote:
Buonasera come posso sostituire il filato drops camelia/jasmine? Grazie per la risposta
29.12.2025 - 20:14DROPS Design answered:
Buonasera Giusy, può utilizzare un filato che appartiene al gruppo A. Buon lavoro!
30.12.2025 - 22:11
![]() Malou wrote:
Malou wrote:
Comment faire une boutonnière lorsque la bordure est double ?
11.06.2024 - 07:19DROPS Design answered:
Bonjour Malou, vous allez ouvrir les boutonnières 2 fois au même endroit, la 1ère fois sur la 1ère partie de la bordure, puis la 2ème fois sur la 2ème partie de la bordure, veillez bien à avoir le même nombre de rangs après la 1ère boutonnière jusqu'au rang de cassure et après le rang de cassure jusqu'à la 2ème boutonnière. Bon tricot!
11.06.2024 - 08:22
![]() Leah Frederick wrote:
Leah Frederick wrote:
I am trying to find the alpaca yarn to make this pattern. Are there substitute colors for those that are no longer available? The purple, light green and green are no longer sold. Thank you
05.11.2022 - 03:18DROPS Design answered:
Dear Leah, there are no exact substitutes so you can choose whichever you prefer. For example, you have dark purple (4400) to replace purple, there is a new pistachio ice cream (9030) that you could use to replace light green and you could use green grass (7238) to replace green. This is all a suggestion, since they are not exact replacements for these colors, but may fit the pattern. Happy knitting!
07.11.2022 - 00:24
![]() Marg wrote:
Marg wrote:
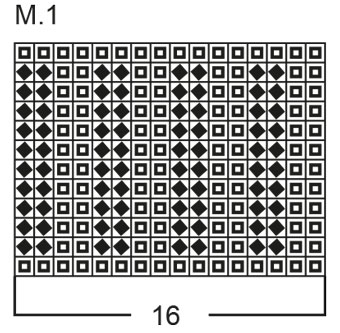
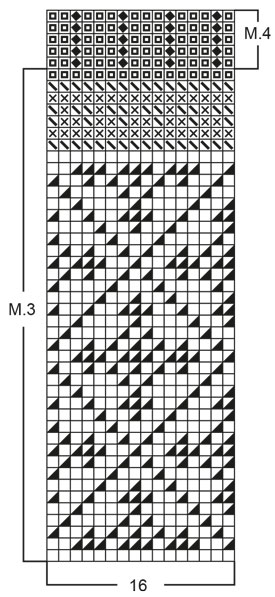
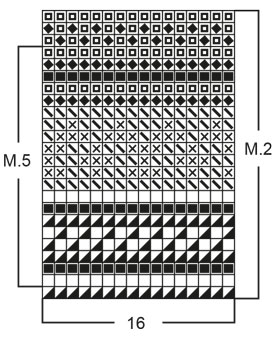
Directions say to knit pattern 2. All pattern diagrams are M1-M5. So which pattern is which please
05.05.2022 - 09:20DROPS Design answered:
Dear Marg, each pattern is called M.1 to M.5; you will find M.2 at the bottom of pattern just above the measurement chart - see last diagram, on the right side M.2 (= all the rows in the diagram) while you get M.5 on the left side (fewer rows). Happy knitting!
05.05.2022 - 15:10
![]() Daniele Trochon wrote:
Daniele Trochon wrote:
Bonjour, Je ne trouve pas de correspondance entre les codes couleurs et le diagramme, par exemple pour le noir et le vert. Merci de votre aide
05.11.2021 - 20:55DROPS Design answered:
Bonjour Mme Trochon, nous venons de publier une meilleure version des diagrammes, plus lisible, ce sera ainsi plus simple. Bon tricot
08.11.2021 - 12:00
![]() Wilma wrote:
Wilma wrote:
Begrijp ik het goed ? Als ik niet doormidden wil knippen dan is het gewoon een trui?
06.11.2019 - 09:01DROPS Design answered:
Dag Wilma,
Dat klopt, maar dan verspringt het patroon wel op het voorpand, omdat daar steeds de naald begint en eindigt. (Als je, zoals bij het vest er later een bies op zet valt niet niet op) Dit verspringen zou je dan bijvoorbeeld beter in de zijnaad kunnen doen.
08.11.2019 - 17:56
![]() Svanhild Karoliussen wrote:
Svanhild Karoliussen wrote:
Er det mulig å skaffe fargediagrammet til denne på nytt. Det er så utydelig at jeg vet ikke om jeg klarer å få det likt? På forhånd takk. Jeg har så lyst å strikke denne som mitt neste prosjekt.
28.09.2016 - 10:22DROPS Design answered:
Hej Svanhild. Jeg har spurgt om det er muligt at forstörre diagrammet. Hvis det kan, saa publicerer vi et nyt saa hurtigt vi kan.
28.09.2016 - 13:42
![]() Twila Sickmann wrote:
Twila Sickmann wrote:
When you come to binding off center front sts do you start working flat and not in the round?
05.04.2015 - 15:23DROPS Design answered:
Dear Mrs Sickmann, that's correct, when you have bound off the mid 14-16 sts (see size) for front neck, you continue back and forth ( = flat) on needle binding off sts each side for neck. Happy knitting!
07.04.2015 - 09:20
|
||||||||||||||||||||||
DROPS 49-1 |
||||||||||||||||||||||
|
|
||||||||||||||||||||||
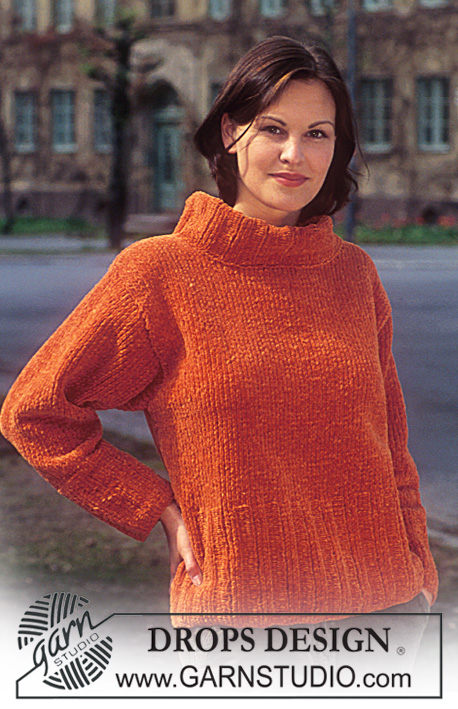
DROPS Cardigan with vertical stripes.
DROPS 49-1 |
||||||||||||||||||||||
|
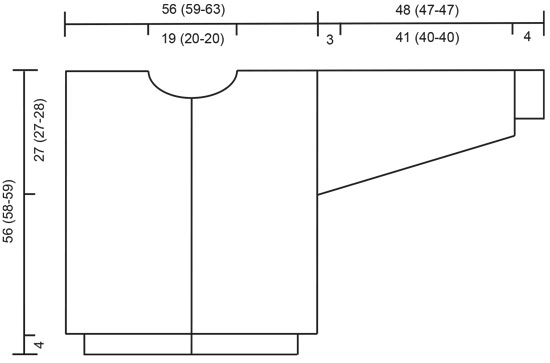
Gauge: 23 sts x 30 rows on larger needles in pattern = 10 x 10 cm . Long model: If a longer sweater is desired, knit as follows: Increase the measurements at armhole, neck and binding off by 14 (16-18) cm . Finished dimensions = 70 (74-77) cm . Increase the length of Pattern 4 to 63 (67-70) cm , then knit Pattern 5. Pick up approx. 35-45 more sts on the buttonband and knit 1-2 extra buttonholes. Increase the yarn amount 50 g black and 50 g beige. Pattern: See chart. (1 chart = 1 repeat). The pattern is seen from the right side and is knit entirely in stockinette stitch. Border: Knit flat. Knit 12 rows stockinette stitch, purl 1 row (on the right side, for the folding edge) and then Pattern 1. Body: Knit the cardigan in the round after the Border and cut steeks for armholes and at the center front. Cast on 259 (275-291) sts (includes 1 edge st each side)on smaller circular needles with black and knit Border. Change to larger circular needles and increase 3 sts at the center front - these sts + 1 edge st at each side = 5 steek sts and are not knit into the pattern. Join and place a marker at the join. Knit Pattern 2 once, then Pattern 3 once, then repeat Pattern 4. At the same time, when the work measures 29 (31-31) cm , knit the next row as follows: 5 steek sts, 64 (68-72) sts for the front, inc 4 sts (for the steek - do not knit into the pattern), 129 (137-145) sts for the back, inc 4 sts (for the steek - do not knit into the pattern), 64 (68-72) sts for the front. When the work measures 49 (51-52) cm , knit 2 rows black and then Pattern 5 and at the same time bind off for the neck at the center front: 14 (16-16) sts + the 5 steek sts. Then bind off at each neck edge every other row: 3 sts 2 times, 2 sts 2 times, 1 st 4 times. At the same time, when the work measures 54 (56-57) cm , bind off the center back 39 (41-41) sts for the neck. Then bind off 2 sts at each back neck edge on the next row. Bind off after Pattern 5. The work measures approx. 56 (58-59) cm . Sleeves: Cast on 60 (60-62) sts on smaller double pointed needles with black and knit Border. Change to larger double pointed needles; join and place a marker at the join. Knit Pattern 2 and then knit the rest with black. After the border, inc 1 st each side of marker 32 (32-33) times: Sizes S+M: alternately every 3rd and every 4th row Size L: every 3rd row = 124 (124-128) sts. When the work measures 45 (44-44) cm , put 2 sts each side of marker on a stitch holder. Continue to knit back and forth on the needles and put sts on the stitch holder each side on every other row: 13 (13-14) sts 3 times. Now the work measures approx. 48 (47-47) cm . Put all sts back on same needles again; join and knit in the round over all sts 2 cm reverse stockinette stitch for a seam allowance over the cut edge on the body, bind off. Assembly: Sew a marker thread down into the center of the steek sts at each side and the center front. Sew two machine seams around the marker threads, 1st seam = 1/2 st from the thread, 2nd seam = 1/2 st from the 1st seam. Cut up for armholes and at the center front. Sew shoulder seams. Pick up approx. 120-130 sts along the left front on smaller needles with black and knit 3 cm stockinette stitch, purl 1 row (from the right side - for the folding edge), 3 cm stockinette stitch, bind off. Fold the edge over against the wrong side and sew. Repeat along the right front, but after 1 cm make 6 buttonholes evenly distributed on the row (1 buttonhole = bind off 2 sts and cast on 2 new sts over the bound-off sts on the next row). Pick up approx. 120 sts around the neck on smaller needles with black and knit 2.5 cm stockinette stitch, change to beige and knit 1 row from RS, and knit 1 row from WS (for the folding edge). Change back to black and knit 2.5 cm stockinette stitch, bind off. Sew the sleeves to the body from the right side as follows: sew alternately a stitch in the last row of knitting on the sleeve before the seam allowance and a stitch on the body after the machine seam. Turn the sweater inside out and sew the seam allowance from the sleeve over the cut edge on the body by hand. Fold all edges over against the wrong side and sew. Sew on the buttons. |
||||||||||||||||||||||
Diagram explanations |
||||||||||||||||||||||
|
||||||||||||||||||||||
 |
||||||||||||||||||||||
 |
||||||||||||||||||||||
 |
||||||||||||||||||||||
 |
||||||||||||||||||||||
Have you finished this pattern?Tag your pictures with #dropspattern or submit them to the #dropsfan gallery. Do you need help with this pattern?You'll find 29 tutorial videos, a Comments/Questions area and more by visiting the pattern on garnstudio.com. © 1982-2026 DROPS Design A/S. We reserve all rights. This document, including all its sub-sections, has copyrights. Read more about what you can do with our patterns at the bottom of each pattern on our site. |
||||||||||||||||||||||


With over 40 years in knitting and crochet design, DROPS Design offers one of the most extensive collections of free patterns on the internet - translated to 17 languages. As of today we count 325 catalogues and 12298 patterns translated into English (UK/cm). 12298
We work hard to bring you the best knitting and crochet have to offer, inspiration and advice as well as great quality yarns at incredible prices! Would you like to use our patterns for other than personal use? You can read what you are allowed to do in the Copyright text at the bottom of all our patterns. Happy crafting!
Post a comment to pattern DROPS 49-1
We would love to hear what you have to say about this pattern!
If you want to leave a question, please make sure you select the correct category in the form below, to speed up the answering process. Required fields are marked *.