
Popular categories
Looking for a yarn?


Comments / Questions (21)
![]() Letizia wrote:
Letizia wrote:
Ciao. Vorrei sapere se la traduzione italiana è corretta....perché a me sembra che "3 treble crochets together" non coincide con "3 maglie altissime insieme"? Invece ora in Italiano c'è scritto "3 maglie ALTE insieme"
05.01.2026 - 10:45DROPS Design answered:
Buonasera Letizia, la traduzione è corretta, sono 3 maglie alte insieme. Buon lavoro!
06.01.2026 - 22:20
![]() Lucie wrote:
Lucie wrote:
Es heißt in der Anleitung, dass man zum Beispiel beim Vorderteil in der Hin-Reihe A.1A, A.1B und dann A.1C häkelt. In der nächsten Runde dann A.2A, A2.B und dann A.2C. Müsste es nicht aber genau andersrum sein? Also C, B und dann A? Ich bin ja dann am Ende der Hin-Reihe sozusagen links im Diagramm und muss wieder zurück häkeln. Also muss ich doch dann mit C beginnen. Der Fehler zieht sich dann in der gesamten Anleitung durch.
18.09.2025 - 12:46DROPS Design answered:
Liebe Lucie, danke für den Hinweis, da stimmt tatsächlich etwas nicht, C und A sind in der 2. Reihe vertauscht. Die Anleitung wird nochmal überprüft und dann korrigiert.
23.10.2025 - 23:24
![]() Pernot wrote:
Pernot wrote:
Il me manque une pelote colori ecru pour finir mon pull en taille L.
17.09.2025 - 15:48DROPS Design answered:
Bonjour Mme Pernot, aviez-vous bien la bonne tension en largeur mais aussi en hauteur tout du long? Autrement dit 6 groupes de brides x 6 rangs = 10 x 10 cm (en DROPS Melody)? Merci pour votre retour.
17.09.2025 - 16:28
![]() Sidar wrote:
Sidar wrote:
Das Muster ist leider falsch ins englische übersetzt. Feste Maschen sind als double crochet übersetzt, obwohl double crochet Stäbchen sind. Rbeite lieber mit den englischen Termini, da die deutsche Verwendung der Begriffe irreführend sind, was wohl ich zu dem Übersetzungsfehler geführt hat :D Trotzdem kann man die englische Anleitung nicht gebrauchen.
17.09.2025 - 12:52
![]() Catherine wrote:
Catherine wrote:
Bonjour J’ai bien monté 71mailles , taille M , puis j’ai fait les mailles serrées et ensuite le motif Et mon pull est tout en bas et beaucoup plus large après le rang de mailles serrées et ça gondole , ça fait des vagues , c’est pas normal , il n’est pas droit
07.03.2025 - 06:51DROPS Design answered:
Bonjour Catherine, vos mailles en l'air et vos mailles serrées du 1er rang doivent toutes être de la même largeur, pensez à bien conserver la bonne tension, ainsi vos 71 mailles doivent mesurer environ 59 cm de large. Pensez à bien vérifier votre tension aussi, vous devez avoir 6 groupes de brides (soit 12 mailles = 10 cm de large). Bon crochet!
07.03.2025 - 10:06
![]() Deisy Design wrote:
Deisy Design wrote:
På framstycket står det: "Nästa varv virkas som diagram A.2, dvs virka A.2A i första stolpen, virka A.2B tills det återstår 1 stolpe, virka A.2C i sista stolpen." Detta är fel. Det ska stå: "Nästa varv virkas som diagram A.2, dvs virka A.2C i första stolpen, virka A.2B tills det återstår 1 stolpe, virka A.2A i sista stolpen. " Dvs A.2C, A.2B och A.2A.
14.01.2025 - 14:17
![]() Rita wrote:
Rita wrote:
Non riesco a capire le maglie per fare il campione: possibile che siamo solo 6 maglie alte in larghezza?
29.10.2024 - 15:30DROPS Design answered:
Buongiorno Rita, le istruzioni per il campione sono corrette. Buon lavoro!
02.11.2024 - 12:04
![]() Suzette wrote:
Suzette wrote:
I am struggling to meet gauge on this one, is it really 6 double crochet (US terminology) in 4 inches, that’s about one stitch is 3/4”, which seems huge to me.
07.08.2024 - 12:42DROPS Design answered:
Dear Suzette, that's correct, that's the right tension. Remember to adjust crochet hook size if needed. Happy crocheting!
07.08.2024 - 13:31
![]() Abby wrote:
Abby wrote:
Thank you sm for the FREE pattern! I love it smmmm
03.08.2024 - 01:11
![]() Elke Decorte wrote:
Elke Decorte wrote:
Beste Drops A1 Ik begrijp niet goed hoe ik 3 losse moet haken in de eerste vaste. A.2.A begin ik met een stokje zonder losse te haken. Klopt dit? Alvast bedankt voor jullie antwoord, Elke
26.04.2024 - 20:22DROPS Design answered:
Dag Elke,
Aan het begin van de toer haak je 3 lossen welke a.h.w. staan voor 1 stokje, dus het eerste stokje wordt vervangen door 3 lossen. Je haakt het werk heen en weer, dus op de tweede toer lees je de teltekening terug van links naar rechts en haak je op het einde 1 stokje in de 3e losse van de 3 lossen. (Op het begin dus steeds 3 lossen en op het einde steeds een stokje in de derde losse van de 3 lossen.)
27.04.2024 - 09:08
|
|||||||||||||||||||||||||
Nautical Melody#heavysnowfallsweater |
|||||||||||||||||||||||||
 |
 |
||||||||||||||||||||||||
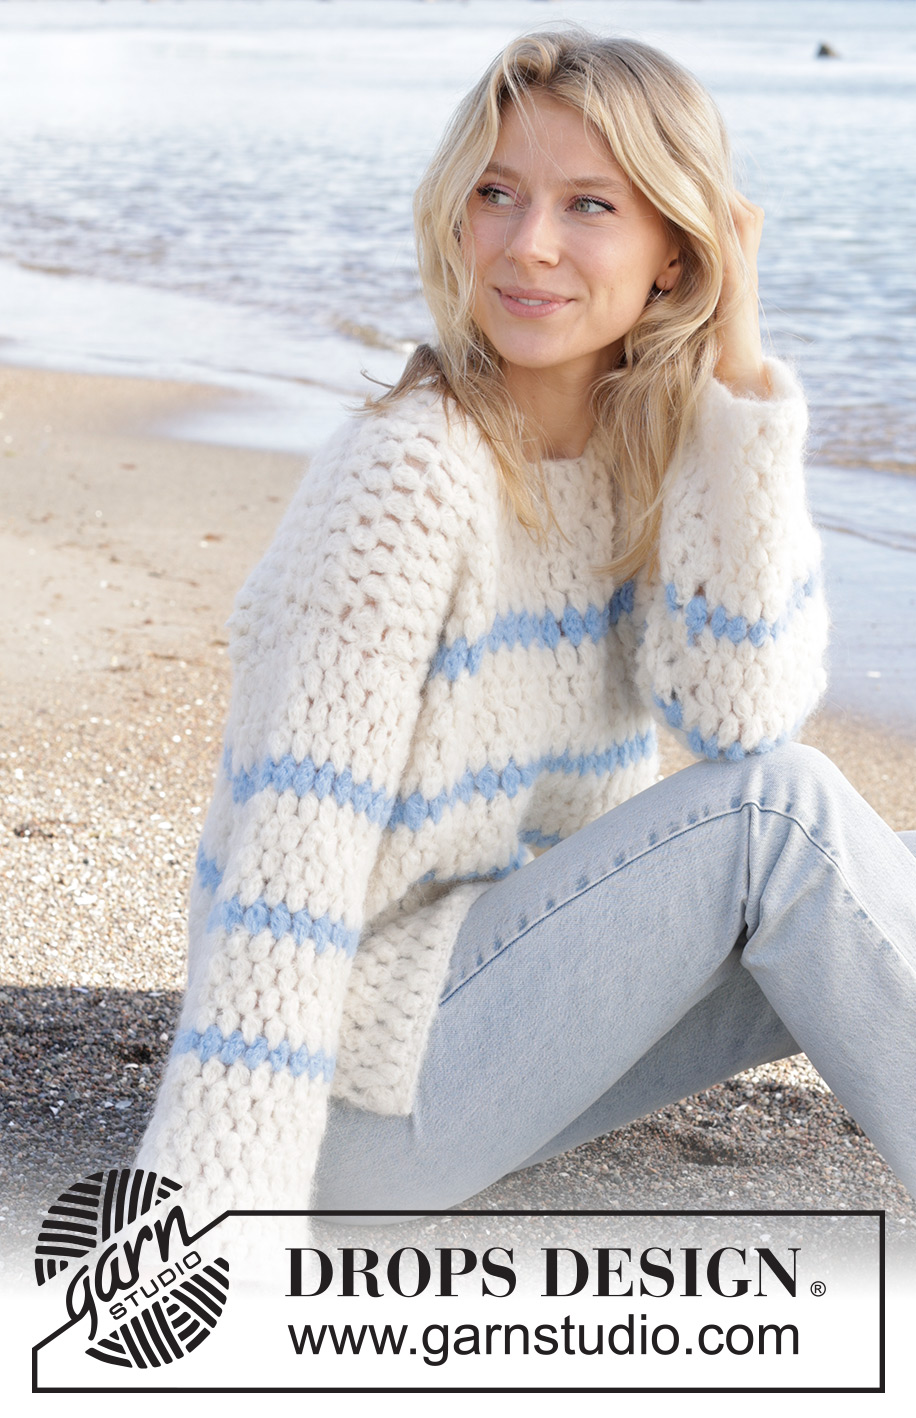
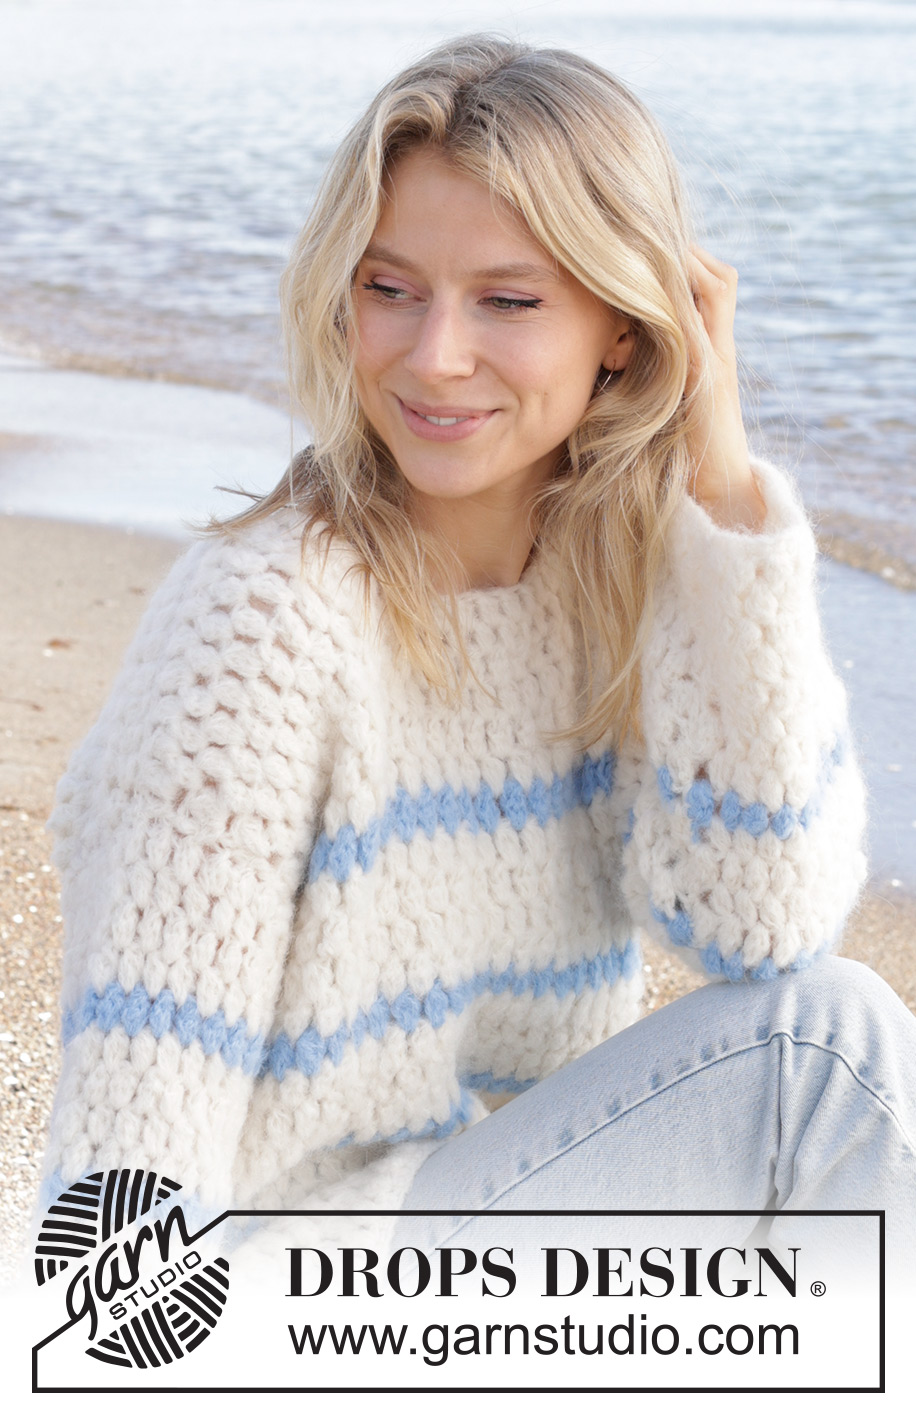
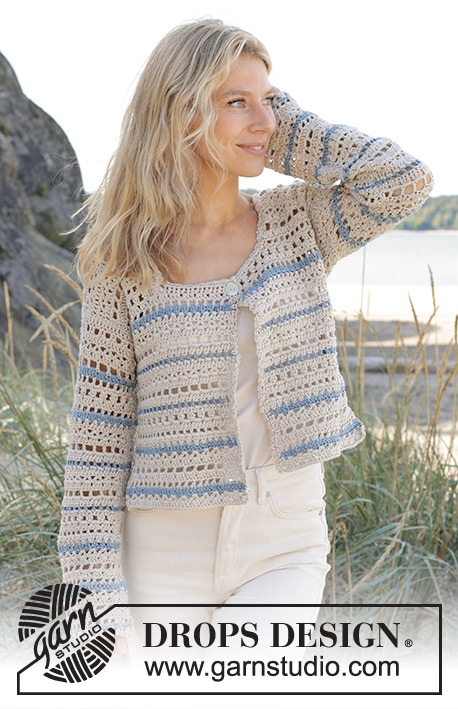
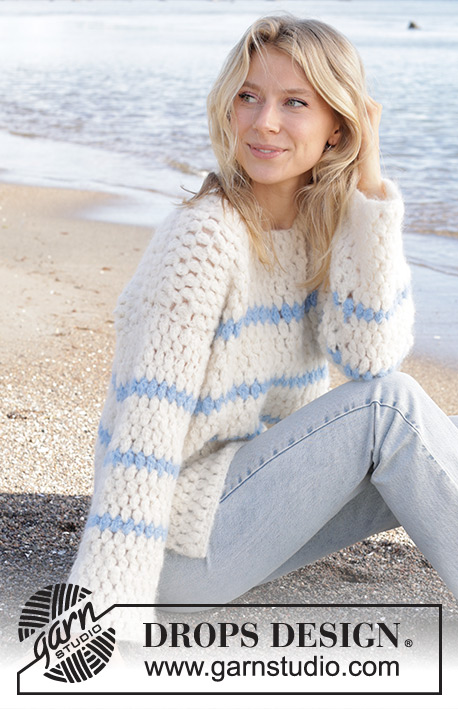
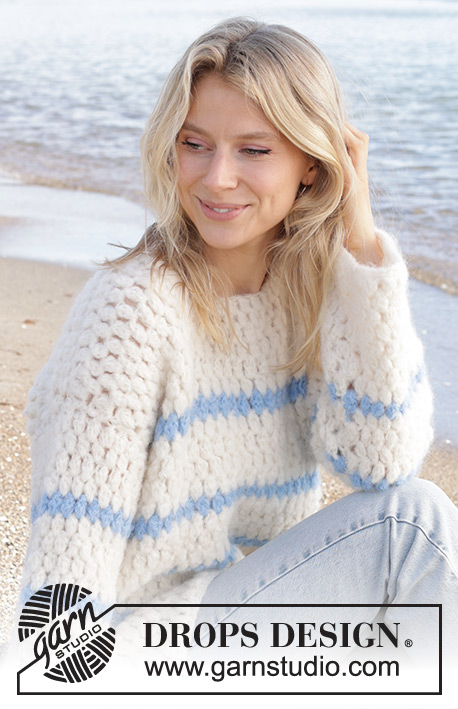
Crocheted jumper in DROPS Melody. Piece is crocheted from bottom up with stripes and vents in the sides. Size XS – XXL.
DROPS 239-9 |
|||||||||||||||||||||||||
|
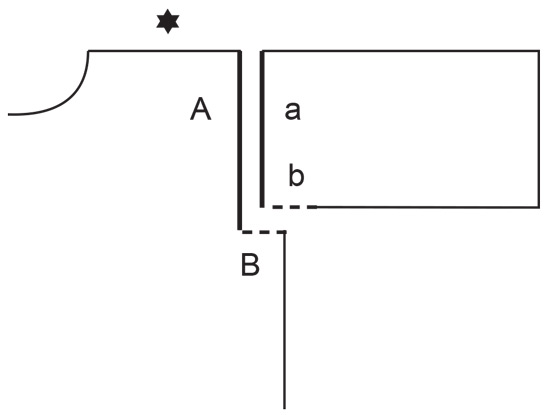
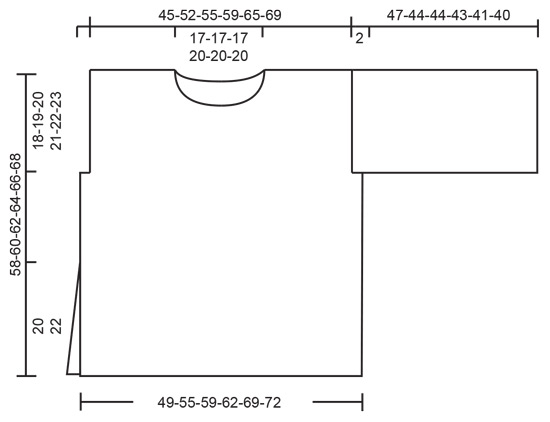
---------------------------------------------------------- EXPLANATION FOR THE PATTERN: ---------------------------------------------------------- CHAIN STITCH: If you work at the end of crochet hook the chain stitch will often be too tight. 1 chain stitch should be just as long as 1 double crochet/treble crochet is wide. PATTERN: See diagrams A.1 to A.3. STRIPES BODY: * 1 row with colour light blue, 4-4-4-5-5-5 rows with colour off white *, work from *-* 3 times in total vertically, finish with 1 row with the colour light blue. Then work with colour off white until finished measurements. STRIPES SLEEVE: * 1 row with colour light blue, 4-4-4-5-5-5 rows with colour off white *, work from *-* 2 times in total vertically, finish with 1 row with the colour light blue. Then work with colour off white until finished measurements. ---------------------------------------------------------- START THE PIECE HERE: ---------------------------------------------------------- JUMPER - SHORT OVERVIEW OF THE PIECE: Piece is worked back and forth in parts, bottom up. Sew parts together. Then work a neck edge in the round. FRONT PIECE: Work 59-67-71-75-83-87 CHAIN STITCHES - read explanation above, on hook size 7 mm with colour off white in DROPS Melody. Work 1 double crochet in 2nd chain stitch from hook, then work 1 double crochet in every chain stitch = 58-66-70-74-82-86 double crochets and 1 chain stitch. Work next row from right side as diagram A.1, i.e. work A.1A in first double crochet, work A.1B until 1 double crochet remains, work A.1C in last double crochet = 28-32-34-36-40-42 treble crochet groups + 1 treble crochet in each side. Work next row as diagram A.2, i.e. work A.2C in first treble crochet, work A.2B until 1 treble crochet remains, work A.2A in last treble crochet. Continue the pattern like this - repeat A.2 vertically. REMEMBER THE CROCHET TENSION! When piece measures 14-14-15-15-16-16 cm, work STRIPES BODY - read explanation above. When stripes have been worked, continue in colour off white until finished measurements. At the same time cast off for armholes and neck as explained below. ARMHOLES: When piece measures 40-41-42-43-44-45 cm, cast off for armholes in each side as follows: Work 1 slip stitch in first treble crochet on row, work 1 slip stitch at the top of first treble crochet group, 3 chain stitches (= A.2A when decreasing from right side / A.2C when decreasing from wrong side), work A.2B until 1 treble crochet group remain and 1 treble crochet at the end of row, work A.2C (from right side) / A.2A (from wrong side) in treble crochet group, turn. Then work back and forth as before with 26-30-32-34-38-40 treble crochet groups and 1 treble crochet in each side. NECK: When piece measures approx. 50-52-54-54-56-58 cm, work A.3 over the first shoulder stitches from right side as follows: Work A.3A in first treble crochet, work A.3B 7-9-10-10-12-13 times in total, work A.3C = 9-11-12-12-14-15 treble crochet groups with 1 treble crochet in each side. Continue A.3 back and forth like this. When A.3 has been worked vertically, work 7-9-10-10-12-13 treble crochet groups back and forth as before with 1 treble crochet in each side until front piece measures 58-60-62-64-66-68 cm from cast-on edge. Cut and fasten the yarn. Turn piece, begin in the side from wrong side and work the other shoulder the same way. BACK PIECE: Work back piece as front piece until piece measures 55-57-59-61-63-65 cm. Begin from right side and work shoulder as follows: Work A.2A in first treble crochet, work A.3B 7-9-10-10-12-13 times in total, work A.2C at the top of next treble crochet group. Work 7-9-10-10-12-13 treble crochet groups with 1 treble crochet in each side. Cut and fasten the yarn. Back piece measures approx. 58-60-62-64-66-68 cm from cast-on edge. Turn piece, begin in the side from wrong side and work the other shoulder the same way. SLEEVES: Work 43-45-49-51-53-55 CHAIN STITCHES - read explanation above, on hook size 7 mm with colour off white. Work 1 double crochet in 2nd chain stitch from hook, then work 1 double crochet in every chain stitch = 42-44-48-50-52-54 double crochets and 1 chain stitch. Work next row as diagram A.1, i.e. work A.1A in first double crochet, work A.1B until 1 double crochet remains, work A.1C in last double crochet = 20-21-23-24-25-26 treble crochet groups + 1 treble crochet in each side. Work next row as diagram A.2, i.e. work A.2C in first treble crochet, work A.2B until 1 treble crochet remains, work A.2A in last treble crochet. Continue the pattern like this - repeat A.2 vertically. When piece measures 22-19-19-15-13-12 cm, work STRIPES SLEEVE - read explanation above. When stripes have been work, continue in colour off white until sleeve measures 47-44-44-43-41-40 cm from cast-on edge. Cut and fasten the yarn. Work another sleeve the same way. ASSEMBLY: Sew shoulder seams edge to edge to avoid a chunky seam. Sew side seams - begin at the top of armhole and sew edge to edge until a vent remains at the bottom of approx. 20 to 22 cm in each side. Sew sleeve seam together but leave a vent of approx. 2 cm at the top of sleeve. Sew sleeve cap to armhole. Sew vent at the top of sleeve to bottom of armhole – see chart. NECK EDGE: Begin at one shoulder seam, work 1 slip stitch on hook size 7 mm with colour off white, work 3 chain stitches (= 1 treble crochet), then work approx. 36-36-36-42-42-42 treble crochet groups evenly around the neck – adjust number of treble crochet groups to get a nice neck edge, finish round with 1 slip stitch in 3rd chain stitch at the beginning of round. Work 1 round more with 1 treble crochet group between each treble crochet group from previous round (round begins with 3 chain stitches and finishes with 1 slip stitch in 3rd chain stitch). Cut and fasten the yarn. |
|||||||||||||||||||||||||
Diagram explanations |
|||||||||||||||||||||||||
|
|||||||||||||||||||||||||
 |
|||||||||||||||||||||||||
 |
|||||||||||||||||||||||||
 |
|||||||||||||||||||||||||
 |
|||||||||||||||||||||||||
Have you finished this pattern?Tag your pictures with #dropspattern #heavysnowfallsweater or submit them to the #dropsfan gallery. Do you need help with this pattern?You'll find 13 tutorial videos, a Comments/Questions area and more by visiting the pattern on garnstudio.com. © 1982-2026 DROPS Design A/S. We reserve all rights. This document, including all its sub-sections, has copyrights. Read more about what you can do with our patterns at the bottom of each pattern on our site. |
|||||||||||||||||||||||||


With over 40 years in knitting and crochet design, DROPS Design offers one of the most extensive collections of free patterns on the internet - translated to 17 languages. As of today we count 324 catalogues and 12290 patterns translated into English (UK/cm). 12290
We work hard to bring you the best knitting and crochet have to offer, inspiration and advice as well as great quality yarns at incredible prices! Would you like to use our patterns for other than personal use? You can read what you are allowed to do in the Copyright text at the bottom of all our patterns. Happy crafting!
Post a comment to pattern DROPS 239-9
We would love to hear what you have to say about this pattern!
If you want to leave a question, please make sure you select the correct category in the form below, to speed up the answering process. Required fields are marked *.