
Popular categories
Looking for a yarn?


|
|||||||||||||||||||||||||
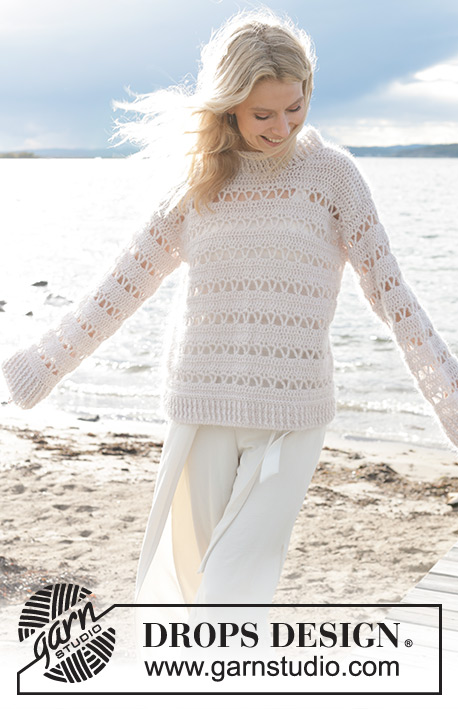
Nautical Melody |
|||||||||||||||||||||||||
 |
 |
||||||||||||||||||||||||
Crocheted jumper in DROPS Melody. Piece is crocheted from bottom up with stripes and vents in the sides. Size XS – XXL.
DROPS 239-9 |
|||||||||||||||||||||||||
|
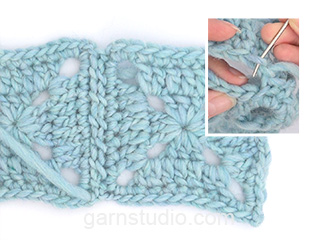
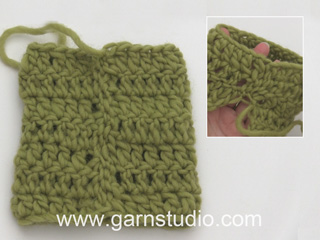
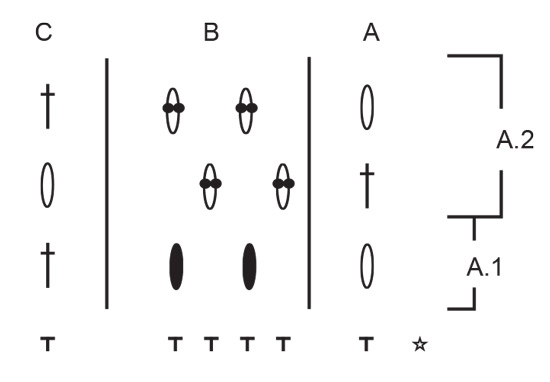
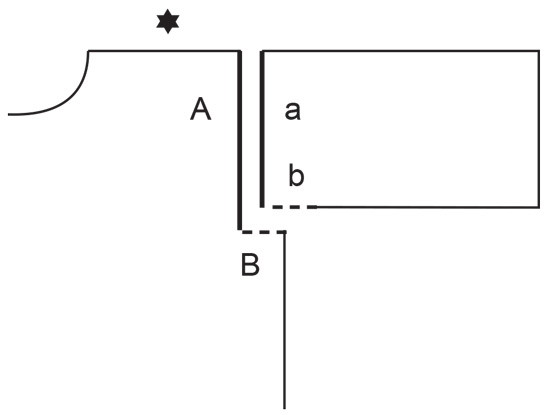
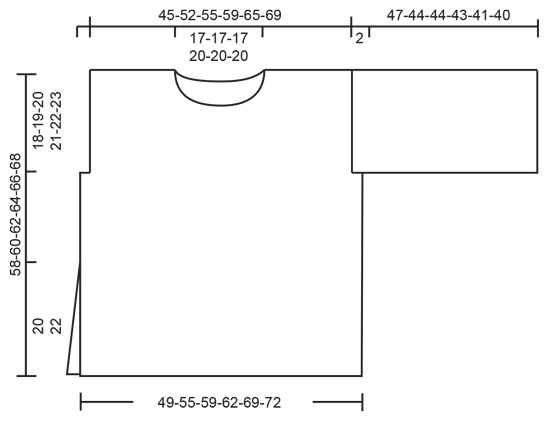
---------------------------------------------------------- EXPLANATION FOR THE PATTERN: ---------------------------------------------------------- CHAIN STITCH: If you work at the end of crochet hook the chain stitch will often be too tight. 1 chain stitch should be just as long as 1 double crochet/treble crochet is wide. PATTERN: See diagrams A.1 to A.3. STRIPES BODY: * 1 row with colour light blue, 4-4-4-5-5-5 rows with colour off white *, work from *-* 3 times in total vertically, finish with 1 row with the colour light blue. Then work with colour off white until finished measurements. STRIPES SLEEVE: * 1 row with colour light blue, 4-4-4-5-5-5 rows with colour off white *, work from *-* 2 times in total vertically, finish with 1 row with the colour light blue. Then work with colour off white until finished measurements. ---------------------------------------------------------- START THE PIECE HERE: ---------------------------------------------------------- JUMPER - SHORT OVERVIEW OF THE PIECE: Piece is worked back and forth in parts, bottom up. Sew parts together. Then work a neck edge in the round. FRONT PIECE: Work 59-67-71-75-83-87 CHAIN STITCHES - read explanation above, on hook size 7 mm with colour off white in DROPS Melody. Work 1 double crochet in 2nd chain stitch from hook, then work 1 double crochet in every chain stitch = 58-66-70-74-82-86 double crochets and 1 chain stitch. Work next row from right side as diagram A.1, i.e. work A.1A in first double crochet, work A.1B until 1 double crochet remains, work A.1C in last double crochet = 28-32-34-36-40-42 treble crochet groups + 1 treble crochet in each side. Work next row as diagram A.2, i.e. work A.2A in first treble crochet, work A.2B until 1 treble crochet remains, work A.2C in last treble crochet. Continue the pattern like this - repeat A.2 vertically. REMEMBER THE CROCHET TENSION! When piece measures 14-14-15-15-16-16 cm, work STRIPES BODY - read explanation above. When stripes have been worked, continue in colour off white until finished measurements. At the same time cast off for armholes and neck as explained below. ARMHOLES: When piece measures 40-41-42-43-44-45 cm, cast off for armholes in each side as follows: Work 1 slip stitch in first treble crochet on row, work 1 slip stitch at the top of first treble crochet group, 3 chain stitches (= A.2A), work A.2B until 1 treble crochet group remain and 1 treble crochet at the end of row, work A.2C in treble crochet group, turn. Then work back and forth as before with 26-30-32-34-38-40 treble crochet groups and 1 treble crochet in each side. NECK: When piece measures approx. 50-52-54-54-56-58 cm, work A.3 over the first shoulder stitches from right side as follows: Work A.3A in first treble crochet, work A.3B 7-9-10-10-12-13 times in total, work A.3C = 9-11-12-12-14-15 treble crochet groups with 1 treble crochet in each side. Continue A.3 back and forth like this. When A.3 has been worked vertically, work 7-9-10-10-12-13 treble crochet groups back and forth as before with 1 treble crochet in each side until front piece measures 58-60-62-64-66-68 cm from cast-on edge. Cut and fasten the yarn. Turn piece, begin in the side from wrong side and work the other shoulder the same way. BACK PIECE: Work back piece as front piece until piece measures 55-57-59-61-63-65 cm. Begin from right side and work shoulder as follows: Work A.2A in first treble crochet, work A.3B 7-9-10-10-12-13 times in total, work A.2C at the top of next treble crochet group. Work 7-9-10-10-12-13 treble crochet groups with 1 treble crochet in each side. Cut and fasten the yarn. Back piece measures approx. 58-60-62-64-66-68 cm from cast-on edge. Turn piece, begin in the side from wrong side and work the other shoulder the same way. SLEEVES: Work 43-45-49-51-53-55 CHAIN STITCHES - read explanation above, on hook size 7 mm with colour off white. Work 1 double crochet in 2nd chain stitch from hook, then work 1 double crochet in every chain stitch = 42-44-48-50-52-54 double crochets and 1 chain stitch. Work next row as diagram A.1, i.e. work A.1A in first double crochet, work A.1B until 1 double crochet remains, work A.1C in last double crochet = 20-21-23-24-25-26 treble crochet groups + 1 treble crochet in each side. Work next row as diagram A.2, i.e. work A.2A in first treble crochet, work A.2B until 1 treble crochet remains, work A.2C in last treble crochet. Continue the pattern like this - repeat A.2 vertically. When piece measures 22-19-19-15-13-12 cm, work STRIPES SLEEVE - read explanation above. When stripes have been work, continue in colour off white until sleeve measures 47-44-44-43-41-40 cm from cast-on edge. Cut and fasten the yarn. Work another sleeve the same way. ASSEMBLY: Sew shoulder seams edge to edge to avoid a chunky seam. Sew side seams - begin at the top of armhole and sew edge to edge until a vent remains at the bottom of approx. 20 to 22 cm in each side. Sew sleeve seam together but leave a vent of approx. 2 cm at the top of sleeve. Sew sleeve cap to armhole. Sew vent at the top of sleeve to bottom of armhole – see chart. NECK EDGE: Begin at one shoulder seam, work 1 slip stitch on hook size 7 mm with colour off white, work 3 chain stitches (= 1 treble crochet), then work approx. 36-36-36-42-42-42 treble crochet groups evenly around the neck – adjust number of treble crochet groups to get a nice neck edge, finish round with 1 slip stitch in 3rd chain stitch at the beginning of round. Work 1 round more with 1 treble crochet group between each treble crochet group from previous round (round begins with 3 chain stitches and finishes with 1 slip stitch in 3rd chain stitch). Cut and fasten the yarn. |
|||||||||||||||||||||||||
Diagram explanations |
|||||||||||||||||||||||||
|
|||||||||||||||||||||||||
|
|||||||||||||||||||||||||

|
|||||||||||||||||||||||||
|
|||||||||||||||||||||||||
|
|||||||||||||||||||||||||
|
Have you made this or any other of our designs? Tag your pictures in social media with #dropsdesign so we can see them! Do you need help with this pattern?You'll find tutorial videos, a Comments/Questions area and more by visiting the pattern on garnstudio.com. © 1982-2024 DROPS Design A/S. We reserve all rights. This document, including all its sub-sections, has copyrights. Read more about what you can do with our patterns at the bottom of each pattern on our site. |
|||||||||||||||||||||||||


With over 40 years in knitting and crochet design, DROPS Design offers one of the most extensive collections of free patterns on the internet - translated to 17 languages. As of today we count 304 catalogues and 11422 patterns - 11422 of which are translated into English (UK/cm).
We work hard to bring you the best knitting and crochet have to offer, inspiration and advice as well as great quality yarns at incredible prices! Would you like to use our patterns for other than personal use? You can read what you are allowed to do in the Copyright text at the bottom of all our patterns. Happy crafting!
Comments / Questions (11)
Hej ! Har svårt att förstå halskants diagrammet behöver hjälp . kan ni hjälpa mig ?
06.03.2024 - 17:39I ci chodzi w momencie A3 przy przerabianiu dekoltu? Czy robiąc A3C mam po każdej grupie słupków robić dodatkowy słupek? I ile grup słupków powinnam mieć dla rozmiaru S po skończeniu przerabiania deliktu? Jest opcja dodania zdjęcia przodu sweterka żeby można było zobaczyć jak to powinno wyglądać? 😅
19.07.2023 - 14:51DROPS Design answered:
Witaj Kingo, niestety nie posiadam innego zdjęcia, ale przy przerabianiu dekoltu ten skos, który powstaje, jest to podkrój dekoltu (wykonujesz każde ramię osobno). Przerabiając schemat A.3 po ostatniej grupie słupków przerabiasz 1 słupek w górę pęczka słupków poprzedniego rzędu. Obracasz robótkę i przerabiasz 3 oczka łańcuszka i pęczek słupków w otwór za pęczkiem słupków poprzedniego rzędu (w każdym kolejnym rzędzie będzie coraz mniej pęczków słupków). Po przerobieniu schematu A.3 będziesz mieć 9 pęczków słupków z 1 słupkiem z każdej strony. Pozdrawiamy!
20.07.2023 - 09:25Dag,\r\n\r\nIk kom toch echt op haaknaald 10 uit en dat vond ik een beetje vreemd omdat ik altijd een haaknaald kleiner moet hebben. Nu heb ik naar het patroon in het Noors gekeken en zij hebben het over stavgrupper. Ik vermoed nu dat bij het proeflapje geen 6 stokjes in de breedte moet doen maar 6 x een stokjesgroep van 3. Is dit mogelijk een foutje in de vertaling?\r\nMet vriendelijke groet, J. Leeuwerink
27.05.2023 - 12:51Dag, Met de naalddikte 7 bereik ik wel de hoogte maar bij lange na niet de breedte. Als ik dan een naalddikte 8 gebruik wordt de hoogte 12cm maar de breedte wordt dan nog maar 7 cm. Hoe los ik dit op? Normaal gesproken haak ik bij jullie patronen met een naalddikte die 1 punt minder is. Hoor graag van u. Met vriendelijke groet, J. Leeuwerink
21.05.2023 - 12:09DROPS Design answered:
Dag Leeuwerink,
Bij dit patroon is de breedte maatgevend, dus de stekenverhouding moet in de breedte kloppen. De hoogte kun je aanpassen door meer of minder toeren te haken.
23.05.2023 - 09:51Quelle longueur doit faire la manche pour la taille S ? L’ordre des longueurs semble inversé dans l’explication : « Quand l'ouvrage mesure 22-19-19-15-13-12 cm, crocheter les RAYURES MANCHES - voir ci-dessus. Quand les rayures sont faites, continuer en coloris naturel jusqu'à ce que la manche mesure 47-44-44-43-41-40 cm depuis la chaînette de base« . Faut-il bien lire qu’en taille S on commence les rayures à 13 cm et on arrête l’ouvrage à 41 cm ? Merci
13.05.2023 - 21:57DROPS Design answered:
Bonjour Cath, en taille S, on commence les rayures quand la manche mesure 22 cm, on continue ensuite en naturel jusqu'à ce que la manche mesure 47 cm de hauteur totale (cf schéma); les 2 derniers cm forment la tête de la manche. Bon crochet!
15.05.2023 - 09:18Czy jak robię przód na 67 łańcuszków, to znaczy, że powinien on mieć 67cm? Kiedy robię według naprężenia z próbki wychodzi, że dół przodu (tam gdzie są oczka ścisłe) miałby ponad 100cm, kiedy robię słupki łączone mam już normalny rozmiar. :/
23.03.2023 - 22:30DROPS Design answered:
Witaj Kingo, łańcuszek początkowy jest zwykle szerszy niż pozostała część robótki, ale nie jest to później widoczne. Jeżeli wykonując podstawowy ścieg (słupki) rozmiar wychodzi jak trzeba, to wszystko jest ok. Nic tylko działać dalej :) Pozdrawiamy!
24.03.2023 - 08:33Deze maat gaat tot xxl maar ik wil het in maat xxxl haken hoeveel lossen moet ik dan hebben
07.03.2023 - 08:27DROPS Design answered:
Dag Marja,
Op basis van de stekenverhouding (aantal steken per 10 cm) zou je uit kunnen rekenen hoeveel steken je extra moet opzetten. A.1 herhaalt zich over 4 steken, dus het aantal extra steken dat je opzet moet deelbaar zijn door 4.
08.03.2023 - 12:39Partly cloudy sky
21.01.2023 - 04:03Cloudy Day or just Beautiful Day
20.01.2023 - 12:32Mooie trui
18.01.2023 - 08:55