
Popular categories
Looking for a yarn?


Comments / Questions (25)
![]() Irini Karistinos wrote:
Irini Karistinos wrote:
Ik ga nu beginnen met Verkorte toeren en een spie . Klopt het dat ik die aan de verkeerde kant moet breien?
01.04.2026 - 09:39DROPS Design answered:
Dag Irini,
De spie brei je aan de rechter kant (aan de goede kant gezien) en de verkorte toeren zitten ook aan de rechter kant, dus je breit steeds tot je een aantal steken over hebt aan de linker kant, dan keer je het werk en brei je terug aan de verkeerde kant.
04.04.2026 - 20:46
![]() Else Dahlin wrote:
Else Dahlin wrote:
Vanskelig å forstå oppskriften. Hvordan strikker man inn en kile? Forstår ikke forklaringen i oppskriften. Håper på raskt svar. På forhånd takk. Mvh. Else Dahlin.
06.11.2024 - 00:28DROPS Design answered:
Hej Else, Hvor langt er du kommet i opskriften? Vi forklarer hver pind, så hvilken pind er det du ikke forstår, så skal vi forsøge at forklare den anderledes :)
07.11.2024 - 08:41
![]() Katharina wrote:
Katharina wrote:
Ich möchte diese Form des Tuches in einem einfarbigen Garn stricken. Würde sich da die Anleitung verändern (wegen der verkürzten Reihen) oder können Sie eine andere gute Anleitung für diese Tuchform empfehlen?
21.11.2023 - 11:02DROPS Design answered:
Liebe Katharina, leider können wir nicht jede Anleitung nach jeder Anfrage anpassen, aber hier finden Sie alle unsere Tücher, gerne schmökern Sie alle Modellen, Filtern können auch helfen. Viel Spaß beim stricken!
21.11.2023 - 16:00
![]() Catia Nicoli wrote:
Catia Nicoli wrote:
Ho dimenticato di inserire l'indirizzo per la notifica. Catia Nicoli
09.11.2023 - 08:48
![]() Catia Nicoli wrote:
Catia Nicoli wrote:
Buongiorno, nella parte 1 delle spiegazioni si legge: Lavorare 4 m in meno ad ogni ferro .... finché non rimangono da 5 a 7 m, devono restare 4 o più m dopo aver girato il lavoro l’ultima volta." In tal modo non mi restano maglie per eseguire il tassello, arrivando a 10 m dal segno rosso. Quindi, le 5-7 maglie, si intendono dal ferro blu o è necessario prima lavorare su tutti i ferri accorciati, riprendendoli? Grazie per la risposta, Catia
09.11.2023 - 08:46DROPS Design answered:
Buonasera Catia, c'è la possibilità che non si riesca a lavorare il tassello. Buon lavoro!
19.11.2023 - 19:45
![]() Gerda Wittrup wrote:
Gerda Wittrup wrote:
Tak for hurtigt svar på mit spørgsmål, om der både skulle strikkes forkortede pinde og kiler i del 3-6 eller kun forkortede pinde. K Desværre kunne jeg ikke bruge svaret. På ingen af billederne ligger sjalet strakt ud, så jeg han se teknikkerne. Men jeg kan jo spørge igen. Venlig hilsen Gerda
13.08.2022 - 22:25DROPS Design answered:
Hei Gerda. Du skal strikke del 3-6 slik som del 1 og 2, og i del 1 og 2 er det beskrevet at man skal strikke både forkortede pinner og kile. Så svar på ditt spørsmål fra 08/08 og 13/08 er ja, det strikkes både forkortede pinner og kile. mvh DROPS Design
15.08.2022 - 11:12
![]() Gerda wrote:
Gerda wrote:
Skal der strikkes kile i alle dele.? Eller er det kun forkortede pinde efter de første to. Et foto af sjalet udstrakt eller en tegning ville have været en hjælp. Venlig hilsen
08.08.2022 - 23:28DROPS Design answered:
Hej Gerda, du ser det udstrakte sjal på billede nummer 2 :)
09.08.2022 - 11:00
![]() Doris Schmid wrote:
Doris Schmid wrote:
Wo ist der Strickanfang (Mitte Rücken oder auf der Seite)? Wäre hilfreich zu wissen. Habe meine Arbeit schon viermal aufgetrennt, da asymetrisch. Muss das so sein, oder habe ich was falsch gemacht? Ein Foto wäre hilfreich. Stricke zum ersten Mal diagonal, ansonsten grössere Erfahrung im Stricken. Danke für Ihre Hilfe.
17.06.2022 - 16:20DROPS Design answered:
Liebe Doris, die Arbeit wird ja zuerst asymetrisch aussehen, weill Sie verkürzten Reihen stricken, dh schauen Sie mal das 2. Bild oben, ganz oben (ca die Mitte) = Anfang in Schwarz, dann stricken Sie die verkürzten Reihen an einer Seite mit Delight, dann verkürzten Reihen an der anderen Seite mit Alpaca usw Bilder von anderen Strickerinnen können Sie mal aufs Ravelry sehen. Viel Spaß beim stricken!
20.06.2022 - 07:29
![]() Elena wrote:
Elena wrote:
Non capisco cosa devo fare nella parte 1, sotto TASSELLO. Non capisco come devo fare i ferri da 1 a 4 e ferro 5. Non ci sono riferimenti. Grazie
30.10.2021 - 12:10DROPS Design answered:
Buongiorno Elena, deve ripetere i 4 ferri descritti sopra. Buon lavoro!
30.10.2021 - 14:19
![]() Charlotte Dalum Nielsen wrote:
Charlotte Dalum Nielsen wrote:
Jeg har strikket forkortede pinde til der nu er 10 masker tilbage, før den røde mærketråd. Men forstår ikke, for der står først, at der skal være mellem 5 og 7 masker tilbage. Når man så skal lave kilen, har man så samme maske antal resten af pinden? Hele det afsnit giver desværre ikke mening. Kan man evt lave en video med hele den del af arbejdsgangen med de forkortede pinde samt kile?
27.10.2021 - 16:42DROPS Design answered:
Hej, Vi skriver kilen og de forkortede pinde på ønskelisten over videoer. Har du set tidligere spørgsmål og svar?
28.10.2021 - 15:31
|
|
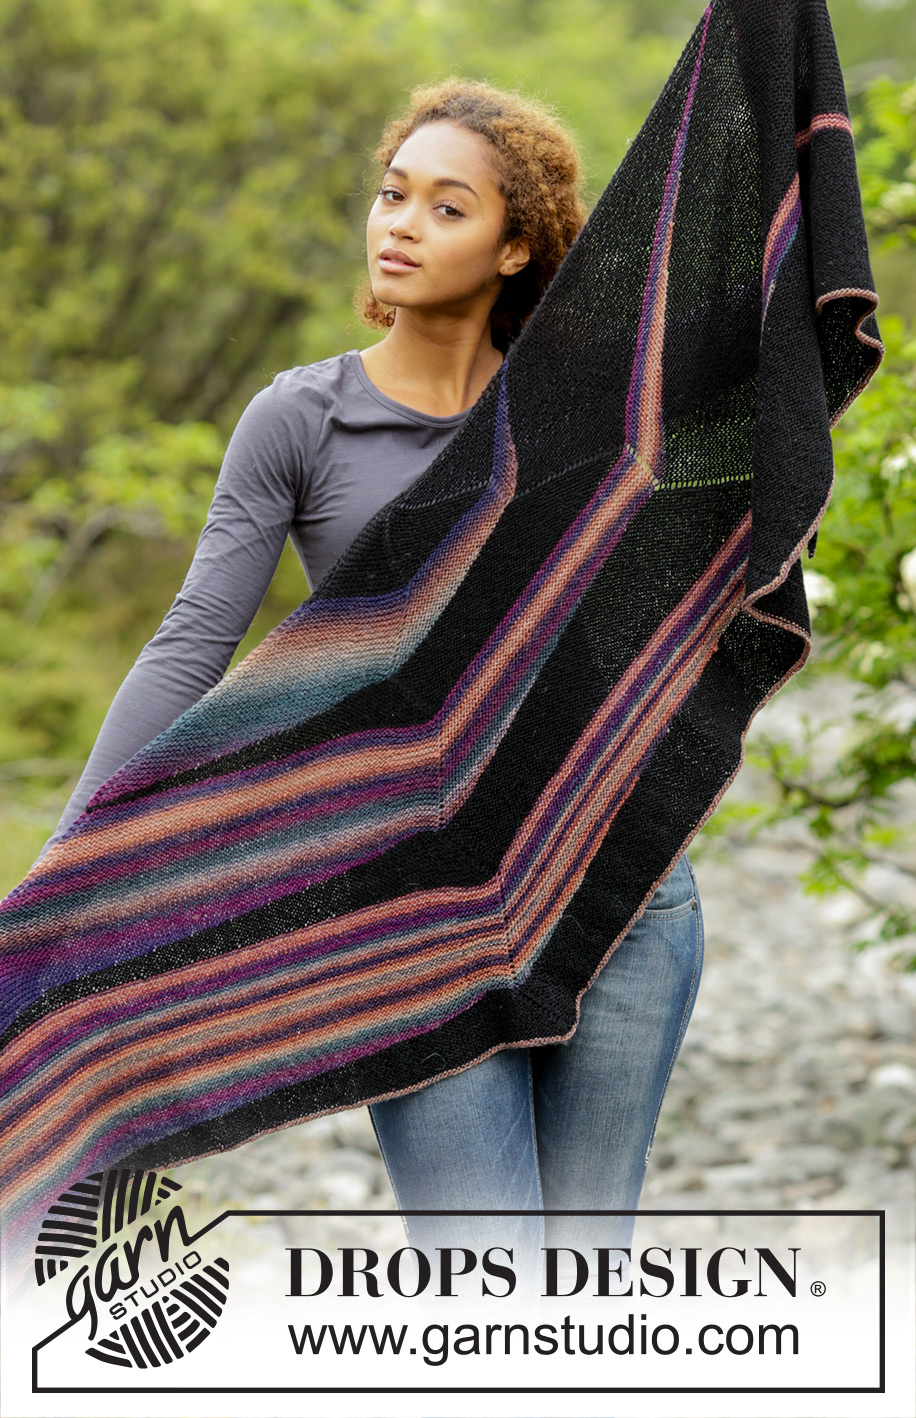
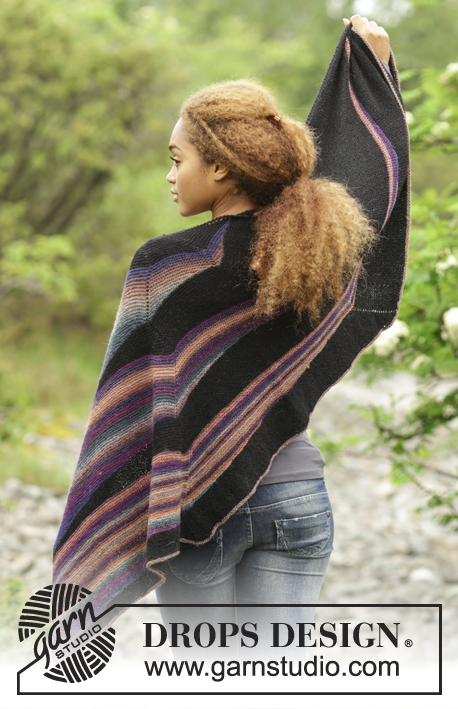
Colours in the Dark#coloursinthedarkscarf |
|
 |
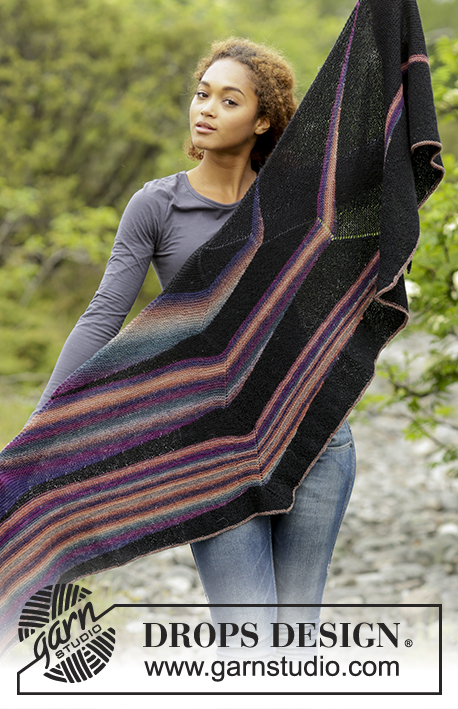 |
Knitted DROPS shawl with stripes and short rows in ”Delight” and ”Alpaca”.
DROPS 171-34 |
|
|
GARTER ST (back and forth): K all rows. 1 ridge = 2 rows K. KNITTING TIP: Every time piece is turned in the middle of piece, slip first st as if to K, tighten yarn and return, this is done to avoid holes in the transitions. ---------------------------------------------------------- SHAWL: Worked top down in GARTER ST - see explanation above, back and forth on circular needle to make room for all the sts. Cast on 7 sts on circular needle size 4 mm with Alpaca. ROW 1 (= RS): Work 2 sts in garter st, * 1 YO, 1 st in garter st *, repeat from *-* 4 times in total, finish with 1 st in garter st = 11 sts. ROW 2 (= WS): K all sts, do not work YOs twisted; they should make holes. ROW 3 (= RS): Work 1 st in garter st, K 2 tog, 1 YO (this is done so that the piece is the same in both sides), 2 sts in garter st, 1 YO, insert 1 red marker, 2 sts in garter st, 1 YO, insert 1 blue marker, 2 sts in garter st, 1 YO, finish with 2 sts in garter st = 14 sts (= 2 markers). ROW 4 (= WS): K all sts, do not work YOs twisted; they should make holes. ROW 5 (= RS): Work 1 st in garter st, K 2 tog, 1 YO, * work in garter st until marker, 1 YO (= 1 st inc, i.e. inc before marker) *, repeat from *-* 2 times in total, work in garter st until 2 sts remain, 1 YO (= 3 sts inc in total), finish with 2 sts in garter st. Repeat 4th and 5th row, i.e. inc 3 sts on every row from RS until piece measures 8 cm measured along the middle, adjust so that next row is from RS. Then work as follows: ROW 1 (= RS): Work 1 st in garter st, K 2 tog, 1 YO, work 2 sts in each of the next 2 sts (= 2 sts inc), * work in garter st until marker, 1 YO *, repeat from *-* 2 times in total, work in garter st until 2 sts remain, 1 YO (= 5 sts inc in total), finish with 2 sts in garter st. ROW 2 (= WS): K all sts, do not work YOs twisted; they should make holes. REMEMBER THE KNITTING TENSION PART 1: Switch to Delight. K 1 row over all sts from RS and inc as follows: K 2, 1 YO (= 1 st inc), K until red marker, 1 YO (= 1 st inc, i.e. inc after marker), K until blue marker 1 YO (= 1 st inc, i.e. inc after marker), K until 3 sts remain, 1 YO, K 2 tog, 1 st in garter st. K 1 row (= from WS). Continue inc like this AT THE SAME TIME work short rows and gusset as follows: NOTE: When working short rows, inc only at the markers worked over, i.e. you have to work over 1 st after marker to be able to inc with 1 YO. The inc after 2 edge sts continue as before on every row from RS. READ ALL OF THE FOLLOWING SECTION BEFORE CONTINUING! Work short rows while AT THE SAME TIME working gusset: SHORT ROWS: ROW 1 (= RS): K until 4 sts remain, turn piece (these sts are no longer worked). ROW 2 (= WS): K all sts - READ KNITTING TIP. ROW 3: K until 8 sts remain (incl the first 4 sts), turn piece (these sts are no longer worked). ROW 4: K back. Work over 4 sts less on every row from RS (= every other row) until 5 to 7 sts remain, there should be 4 or more sts left on last turn. Work last row from WS. GUSSET: Work 1 gusset in right side of piece (seen from RS) beg from RS as follows: ROW 1-4: Work short rows and inc as before. ROW 5 (= RS): Work and inc as before until 10 sts remain before red marker, turn piece. ROW 6 (= WS): K back. Because of the short rows it is not always possible to work gusset. Work gusset only when working short rows over the 10 sts before red marker. Repeat inc, the short rows and gusset. When the short rows have been worked, work next part as follows: PART 2: Switch to Alpaca. K 1 row over all sts from RS and inc as follows: K 1, K 2 tog, 1 YO, K until red marker, 1 YO (= 1 st inc, i.e. inc before marker), K until blue marker, 1 YO (= 1 st inc, i.e. inc before marker), K until 2 sts remain, 1 YO (= 1 st inc), K 2. Continue inc like this AT THE SAME TIME work short rows and gusset as follows: Inc will be diagonal according to part 1. NOTE: When working short rows, inc only at markers worked, i.e. work over 1 st after marker to inc with 1 YO. Inc before 2 edge sts at the end of every row from RS is continued as before on every row from RS. READ ALL OF THE FOLLOWING SECTION BEFORE CONTINUING! Work short rows while AT THE SAME TIME working gusset: SHORT ROWS: ROW 1 (= WS): K until 6 sts remain, turn piece (these sts are no longer worked). ROW 2 (= RS): K back and inc as before. ROW 3: K until 12 sts remain (incl the first 6 sts), turn piece (these sts are no longer worked). ROW 4: K back and inc as before. Work over 6 sts less on every row from WS (= every other row) until 7 to 11 sts remain, there should be 6 or more sts left on last turn. Work last row from RS. K 1 row from WS over all sts. GUSSET: Work 1 gusset in left side of piece (seen from RS) beg from WS as follows: ROW 1-4: Work short rows and inc as before. ROW 5 (= WS): Work and inc as before until 10 sts remain before blue marker, turn piece. ROW 6 (= RS): K back. Repeat inc, the short rows and gusset. When the short rows have been worked, work next part as follows: PART 3: Switch to Delight. Work as PART 1 but when working short rows work over 8 sts less on every other row until 9 to 15 sts remain, there should be 8 or more sts left on last turn. PART 4: Switch to Alpaca. Work as PART 2 but when working short rows work over 10 sts less on every other row until 11 to 19 sts remain, there should be 10 or more sts left on last turn. PART 5: Switch to Delight. Work as PART 1 but when working short rows work over 12 sts less on every other row until 13 to 23 sts remain, there should be 12 or more sts left on last turn. PART 6: Switch to Alpaca. Work as PART 2 but when working short rows work over 14 sts less on every other row until 15 to 27 sts remain, there should be 14 or more sts left on last turn. Piece now measures approx. 46 cm (measured mid back). Work 1 ridge with Delight and inc as before on row from RS. Loosely cast off. |
|
Have you finished this pattern?Tag your pictures with #dropspattern #coloursinthedarkscarf or submit them to the #dropsfan gallery. Do you need help with this pattern?You'll find 15 tutorial videos, a Comments/Questions area and more by visiting the pattern on garnstudio.com. © 1982-2026 DROPS Design A/S. We reserve all rights. This document, including all its sub-sections, has copyrights. Read more about what you can do with our patterns at the bottom of each pattern on our site. |
|


With over 40 years in knitting and crochet design, DROPS Design offers one of the most extensive collections of free patterns on the internet - translated to 17 languages. As of today we count 324 catalogues and 12290 patterns translated into English (UK/cm). 12290
We work hard to bring you the best knitting and crochet have to offer, inspiration and advice as well as great quality yarns at incredible prices! Would you like to use our patterns for other than personal use? You can read what you are allowed to do in the Copyright text at the bottom of all our patterns. Happy crafting!
Post a comment to pattern DROPS 171-34
We would love to hear what you have to say about this pattern!
If you want to leave a question, please make sure you select the correct category in the form below, to speed up the answering process. Required fields are marked *.