
Popular categories
Looking for a yarn?


Comments / Questions (21)
![]() Jannette Van Schoonhoven wrote:
Jannette Van Schoonhoven wrote:
Er moeten vlgs de foto 5 knopen op maar bij de cm. om af te kanten voor het knoopsgat staan 4 opties. Volgens mij moet het zijn bij mt. L: 1-9-16-23-30. Dit geldt voor alle maten.
11.01.2026 - 21:41
![]() Anke wrote:
Anke wrote:
Ik lees het volgende: Zet 256-276-296-316 st (inclusief 4 voorbiesst aan weerszijden van middenvoor) op met rondbreinld 3 mm en sering. Brei als volgt (gezien aan de goede kant): 4 ribbelst, 1 av, 246-266-286-306 st M.1 – zie de beschrijving hierboven, 1 av, 4 ribbelst. Brei zo 8 cm Ik wil maat M breien: dus 276 steken en daarna dus 4 ribbelst, 1 av en 266 steken als M1 en weer 1 av en 4 ribbelst. M1 gaat over 8 steken, maar 266 is niet deelbaar door 8. Wat klopt hier niet?
09.06.2025 - 16:03DROPS Design answered:
Dag Anke,
Dat klopt, je breit op het einde van die 266 alleen de eerste 2 steken van M.1, dus je maakt niet een volledige herhaling in de breedte van M.1 af.
10.06.2025 - 20:03
![]() Wenche Søgaard wrote:
Wenche Søgaard wrote:
Etter å ha sett en video som viser hvordan stolpen skal sys fast til halskanten trekker jeg tilbake min kommentar 🙂
22.04.2025 - 14:31
![]() Wenche Søgaard wrote:
Wenche Søgaard wrote:
Jeg synes det blir penere å strikke 1 ekstra vrangmaske på stolpene når disse skal strikkes videre etter fellingen av de øvrige maskene siden en maske forsvinner når stolpene sys på halskanten.
21.04.2025 - 13:39
![]() Wenche Søgaard wrote:
Wenche Søgaard wrote:
Ved å vrenge ermene tror jeg at det ble riktig :)
14.04.2025 - 16:32
![]() Wenche Søgaard wrote:
Wenche Søgaard wrote:
Jeg er nå ferdig med bolen og ermene og skal strikke disse inn på samme rundpinne. Siden fellingen under ermet på bolen er gjort fra retten skal det jo nå strikkes vrang tilbake for at ribbestrikken og mønsteret på stolpen skal stemme. I videoen strikkes det sammen fra retten, men det blir jo feil i dette tilfellet.
14.04.2025 - 15:32DROPS Design answered:
Hei Wenche, Hvis du har avsluttet bolen med en pinne fra retten, skal du nå strikke første pinnen på bærestykke fra vrangen som du sier. God påske!
14.04.2025 - 17:28
![]() Lena wrote:
Lena wrote:
Fantastiskt fin kofta! Är sugen på att sticka denna i Fabel nr 924, men jag drar mig för detta då mönstret är nerifrån och upp. Jag lämnar ett önskemål till designavdelningen att omarbeta mönstret så det blir uppifrån och ner istället. 🙏🏻😃 Det är så mycket lättare att få till ett plagg man blir nöjd med i slutändan när man börjar uppifrån.
22.06.2024 - 17:58DROPS Design answered:
Hej Lena, det er noteret :)
25.06.2024 - 13:56
![]() Pauline Kern wrote:
Pauline Kern wrote:
Hello again...can you clarify the way thre decreases go...do you do the body decreases the same time as the sleeves and if so how ....my understanding is thr neck edge and sleeve decreases are worked together ....one decrease at the edge then one before the marker of sleeve and one after on each side for a total of 10 each 4th row .....then the body decreases after that ??
16.06.2024 - 20:36DROPS Design answered:
Dear Pauline, the neck edge decreases are worked as before, in the body, and are in addition to the yoke decreases. So you continue with the neck edge decreases every 4th row as before, in the same markers (for the neck). The yoke decreases, both for the body and sleeves, are worked both in the same row, and are also repeated every 4th row. These may match the neck edge decreases or not, depending on in which row of the neck decreases you set aside the piece. These decreases are worked on each side of the yoke markers but depending on which side is the body or the sleeves you will decrease 2 or 3 sts, depending on the written instructions. Happy knitting!
16.06.2024 - 22:34
![]() Pauline Kern wrote:
Pauline Kern wrote:
I have added the number of decreases in the pattern and subtracted from the total stitch on the yoke and something isn't adding up....I get more than 66 stitches in the end ....what am I missing ?
16.06.2024 - 18:22DROPS Design answered:
Dear Pauline, in the yoke you have now placed 4 markers for each transition. For the raglan, on the sleeves you decrease 2 sts at each side of the sleeve markers. So, on each side of a marker that corresponds to the sleeve you will decrease 2 sts. There are 4 decrease places in the sleeves, so you decrease 8 stitches per round and (2x4x14=)112 in total. The body is worked similarly; 3 sts in 4 places 3 times (=36) and 2 sts in 4 places 11 times (=88). That's a total of 236 decreases. So you have 88 sts left and you need to include the neck decreases (which you started on the body and continue in the yoke), which will allow you to reach 66 sts. Happy knitting!
16.06.2024 - 18:49
![]() Gigi wrote:
Gigi wrote:
Bonjour, pour le raglan il y est mentionné 2 sortes de diminutions (les diminutions des 2m et de 3m avant et après le marqueur) cela ne correspond pas au 8 diminutions par rang. Je ne comprends pas pourquoi ces 2 sortes de diminutions ? De plus si je diminue que 2m avant le marqueur et la maille jersey je me retrouve à tricoter la maille jersey puisque glisser 1m et 2m ensemble puis passer la maille glissée, est-ce normal ? Merci
08.03.2023 - 22:39DROPS Design answered:
Bonjour Gigi, effectivement, on diminue plus que 8 m à chaque fois, je transmets aux stylistes. Vous devez diminuer de part et d'autre des 2 m jersey à chaque raglan: tricotez jusqu'à ce qu'il reste 4 m (pour diminuer 2 m) ou 5 m (pour diminuer 3 m) avant le marqueur, diminuez 2/3 m, tricotez 2 m jersey (le marqueur est entre ces 2 mailles) et diminuez 2/3 m. Bon tricot!
09.03.2023 - 09:11
|
||||||||||
DROPS 69-17 |
||||||||||
 |
 |
|||||||||
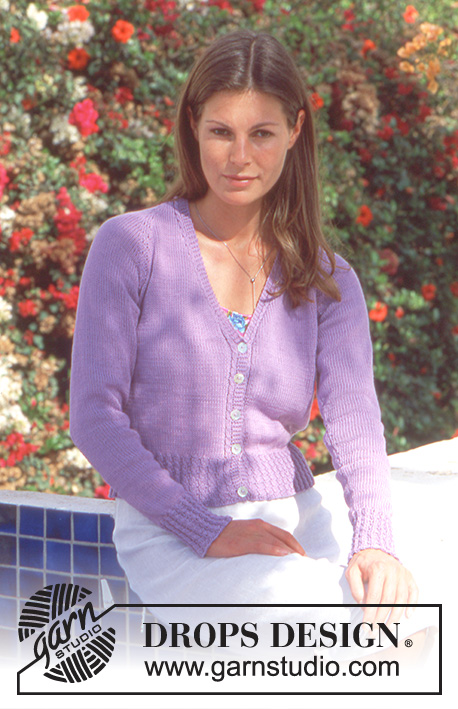
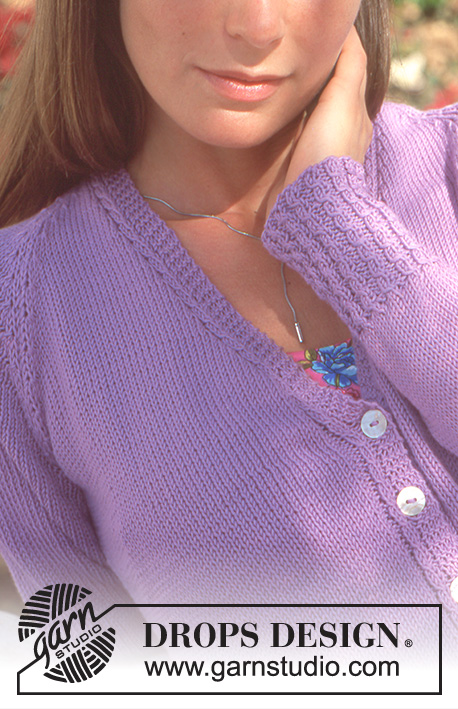
DROPS Cardigan in Safran
DROPS 69-17 |
||||||||||
|
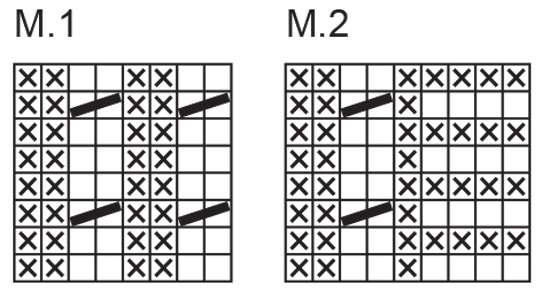
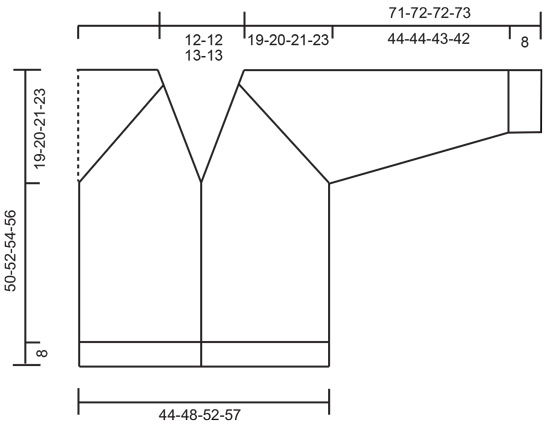
Gauge: 23 sts x 30 rows on larger needles in stockinette st = 10 x 10 cm. Garter st, when knitting flat: Knit all sts, all rows. Pattern: See charts. The pattern is seen from the right side. Buttonhole: 1 buttonhole = bind off the 3rd st from edge, on the next row, yo over bound off st. Make buttonholes when the piece measures: 1-1-1-1 cm 8-8-9-9 cm 14-15-16-17 cm 21-22-23-25 cm and 28-29-30-31 cm. Decreasing tips (for neck): All decs are made from right side. Dec inside 9 button band sts which are knit as follows from edge: 4 sts in garter st, P 1, 2 sts cable, P 2. After 9 edge sts: K 2 tog. Before 9 edge sts: sl 1, K 1, psso. Body: Cast on 256-276-296-316 sts on smaller circular needles. Establish pattern as follows (right side row): 4 sts in garter st, 1 st reverse stockinette st, 246-266-286-306 sts of Pattern 1 - see instructions above, 1 st reverse stockinette st, 4 sts in garter st. Continue pattern as established for 8 cm. After 1 cm make first buttonhole on right button band - see instructions above. When the piece measures 8 cm change to larger circular needles. Continue in stockinette st, keeping the 9 button band sts at each side in Pattern 2 (reverse Pattern 2 so that each front edge will be a mirror image – from edge: 4 sts in garter st, P 1, 2 sts cable, P 2) - decreasing 38 sts evenly distributed on the first row (do not dec over the 9 edge sts at each side) = 218-238-258-278 sts. Read the entire next section before knitting. When the piece measures 28-29-30-31 cm put a marker at each side of work, 59-64-69-74 sts in from each front edge - at the same time dec 1 st at each side for the neck - see knitting tips: 2-2-2-2 times every other row, then 12-12-13-13 times every 4th row. At the same time, when the piece measures 31-32-33-33 cm bind off 5-5-5-6 sts each side of each marker (10-10-10-12 sts bound off each side) for armhole = 90-100-110-118 sts on back and 51-56-61-66 sts each front. Set aside and knit the sleeves. Sleeve: Cast on 60-64-68-72 sts on smaller double-pointed needles; join and place a marker at the join. Knit Pattern 1 for 8 cm. Change to larger double pointed needles and stockinette st, decreasing 12-12-14-14 sts evenly distributed on the first row = 48-52-54-58 sts. When the piece measures 9 cm inc 1 st each side of marker 14-14-15-16 times every 9-9-8-7 rows = 76-80-84-90 sts. When the piece measures 52-52-51-50 cm bind off 5-5-5-6 sts each side of marker = 66-70-74-78 sts. Yoke: Put the sleeves in on the same circular needles as the Body over bound off sts for armhole = 324-352-380-406 sts. Put a marker in each transition between the sleeve and Body = 4 markers. Continue with stockinette st, button band sts in Pattern 2 and neck decs and at the same time shape raglan. Raglan shaping: Read entire next section before knitting. There are 8 decs made per dec row and 1 st each side of markers knit in stockinette st = 2 sts between decs. Dec on sleeves: 2 sts 14-15-16-17 times every 4 rows. Dec on body: 3 sts 3-6-8-10 times every 4 rows and then 2 sts 11-9-8-7 times every 4 rows. All decs are made on right side rows as follows. Dec 2 sts as follows: Before marker at stockinette st: Sl 1, K 2 tog, psso. After marker and stockinette st: K 3 tog. Dec 3 sts as follows: Before marker and stockinette st: sl 1, K 3 tog, psso. After marker and stockinette st: K 4 tog After all decs there are 66-66-68-68 sts. Bind off all sts except the 9 button band sts at each side. Continue on these sts for approx. 4 cm for the back neckband – adjust length to fit. Weave the 2 bands together at center back and sew to back neckline. Assembly: Sew opening under the sleeve and sew on buttons. |
||||||||||
Diagram explanations |
||||||||||
|
||||||||||
 |
||||||||||
 |
||||||||||
Have you finished this pattern?Tag your pictures with #dropspattern or submit them to the #dropsfan gallery. Do you need help with this pattern?You'll find 26 tutorial videos, a Comments/Questions area and more by visiting the pattern on garnstudio.com. © 1982-2026 DROPS Design A/S. We reserve all rights. This document, including all its sub-sections, has copyrights. Read more about what you can do with our patterns at the bottom of each pattern on our site. |
||||||||||


With over 40 years in knitting and crochet design, DROPS Design offers one of the most extensive collections of free patterns on the internet - translated to 17 languages. As of today we count 324 catalogues and 12290 patterns translated into English (UK/cm). 12290
We work hard to bring you the best knitting and crochet have to offer, inspiration and advice as well as great quality yarns at incredible prices! Would you like to use our patterns for other than personal use? You can read what you are allowed to do in the Copyright text at the bottom of all our patterns. Happy crafting!
Post a comment to pattern DROPS 69-17
We would love to hear what you have to say about this pattern!
If you want to leave a question, please make sure you select the correct category in the form below, to speed up the answering process. Required fields are marked *.