
Popular categories
Looking for a yarn?


Comments / Questions (86)
![]() Maria wrote:
Maria wrote:
Buonasera. Chiedo scusa . Non capisco perché per il dietro e il davanti sinistro avviare lo stesso numero di maglie es. 102 , mentre per il davanti destro sono 166.Potete per favore darmi un chiarimento? Grazie mille
27.12.2024 - 19:17DROPS Design answered:
Buonasera Maria, il davanti sinistro è lavorato dal lato (verso il dietro) verso il centro davanti (collo/apertura del cardigan) e si finisce con 166 maglie per la taglia S. Il davanti destro si lavora a specchio, cioè si inizia dal centro davanti (collo/apertura del cardigan) e si finisce a lato (verso il dietro) con 166 maglie. Buon lavoro!
30.12.2024 - 00:23
![]() Kathrin Deckert wrote:
Kathrin Deckert wrote:
Wie geht das mit dem schalkragen bei dem Model ? Ich finde keine Anleitung in der Beschreibung . Der kragenausschnitt von 8cm kommt mir auch sehr klein vor .
29.11.2024 - 18:19DROPS Design answered:
Liebe Frau Deckert, beim linken Vorderteil wird der Schlakragen am Ende gestrickt: wenn man 6 bis 8 cm über die 166-194Maschen strickt, die neuen 23 bis 28 Maschen sind für den Schalkragen (1. Teil bis zum hinteren Mitte); beim rechten Vorderteil strickt man den Schalkragen am Anfang: die ersten 23 bis 28 Maschen, die nach 6 bis 8 cm abgekettet sind. Viel Spaß beim Stricken!
02.12.2024 - 08:13
![]() Maria wrote:
Maria wrote:
Buon pomeriggio. Vorrei realizzare questo cardigan usando i ferri n 4, invece del 3,5. Tenendo presente anche che il punto legaccio è molto elastico e il capo quindi risulta un po’ più lungo e largo, chiedo: io che porto la L , potrei realizzarlo seguendo le indicazioni per la taglia M.? Grazie
21.11.2024 - 14:47DROPS Design answered:
Buonasera Maria, le nostre spiegazioni si adattano al campione indicato: se il suo campione è diverso deve riadattare le spiegazioni alle sue misure. Buon lavoro!
23.11.2024 - 20:17
![]() MTL wrote:
MTL wrote:
Bonjour Je n ai pas suffisamment de laine Réf. Drop you 8 Lilas 16 pour finir ce modèle Elle est en rupture de stock dans tous vos magasins Par quelle référence est elle remplacée ? Cordialement
23.02.2024 - 15:33DROPS Design answered:
Bonjour MTL, vous pouvez utiliser un autre fil du groupe de fils C, comme Paris par ex; ou bien 2 fils du groupe de fils A (2 x Safran par ex). Votre magasin saura vous conseiller la couleur idéale. Notez toutefois que ce modèle se tricote en Delight, une laine qui appartenait au groupe de fils A, la DROPS Loves You 8 ne serait ici pas une alternative. Bon tricot!
23.02.2024 - 15:55
![]() Ann Drissel wrote:
Ann Drissel wrote:
When measuring across the back, pattern Magic Autumn, are all the measurements taken from the cast on edge? Ie in xl sizes, the first measurement is 5 1/2 inches. The next is 10 1/4 inches. Does that mean 10 1/4 inches from the cast on edge?
01.01.2022 - 19:37DROPS Design answered:
Hi Ann, Yes, unless otherwise stated, you measure from the cast-on edge. Happy knitting!
03.01.2022 - 07:51
![]() Agneta wrote:
Agneta wrote:
Der Halsausschnitt am Rückenteil beträgt je nach Größe 8-10 cm. So, wie ich es verstehe, wird an beide Vorderteile ein Band für den Schalkragen in 10 cm Länge gestrickt. Wie wird dieses denn in den Halsausschnitt eingenäht? Mir kommt der Halsausschnit sehr klein vor. Kann man ihn vergrößern? Wie lang muss man dann das Band an den Vorderteilen stricken?
20.12.2021 - 09:56DROPS Design answered:
Liebe Agneta, die Seite vom Kragen beim rechten Vorderteil zusammen mit der Seite vom Kragen beim linken Vorderteil und dann die Länge entlang Halsausschnitt am Rückenteil annähen. Viel Spaß beim stricken!
20.12.2021 - 14:33
![]() Rose wrote:
Rose wrote:
Is it possible to shorten the garment with casting on less stitches? Thank you
23.06.2021 - 16:58DROPS Design answered:
Dear Rosa, Please understand we cannot modify our patterns for each individual request. To shorten the garment, you would have to take off stitches from above the shortrows, and from the shortrows as well as recalculate them, to have a nicely balanced piece. Happy Stitching!
23.06.2021 - 20:38
![]() Katarina wrote:
Katarina wrote:
I made left front side and now I'm working on the right side, but I got confused. The left side said after the 2nd pleat the piece measures 17 cm, then I castted on 23 sts and worked another 6 cm... The right side says when the piece measures 17 cm, work the 2nd pleat. Then work another 4 cm and cast off 38... Is the right side the same width as the left one?
11.03.2021 - 20:42DROPS Design answered:
Dear Katarina, the right front piece is the same but is started from the mid front while the left front piece started from the side towards mid front, that's the reason why measurements look a bit different since they are not take from the same first row. Right front piece is the mirrored image as the left front piec; Happy knitting!
12.03.2021 - 08:29
![]() Teji wrote:
Teji wrote:
I have knitted this pattern and love it. Thanks. Could I do this in a cotton or other yarn for use in spring for a similar drape? If so , which yarn would you recommend? Many thanks.
28.01.2021 - 15:02DROPS Design answered:
Dear Teiji, you can use any other yarn from yarn group A - try out our yarn converter to find other alternatives. Happy knitting!
28.01.2021 - 16:31
![]() Karen Cantor wrote:
Karen Cantor wrote:
Thank you for such a quick response, after I read your response-I hit myself in the head (kempie), makes sense, but one more sillyquestion. It says to make the button holes after an inch of knitting and then I continue on making the right side, isn\'t that a big overlap, shouldn\'t the button holes be closer to the edge when I finish the side? Sorry for these ridiculous questions. Karen
01.12.2020 - 13:52DROPS Design answered:
Dear Mrs Cantor, pattern has been written like this, ie with 3 cm = approx. 1 inch front edge before buttons - you can adjust placement for the buttons afterwards. Happy knitting!
02.12.2020 - 08:08
|
|
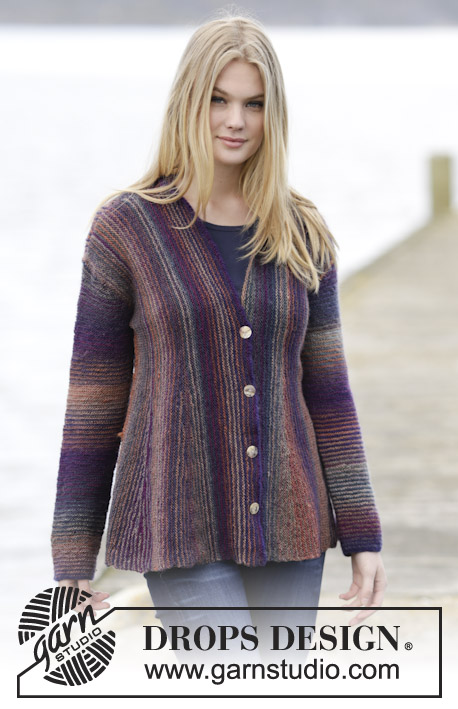
Magic Autumn#magicautumncardigan |
|
 |
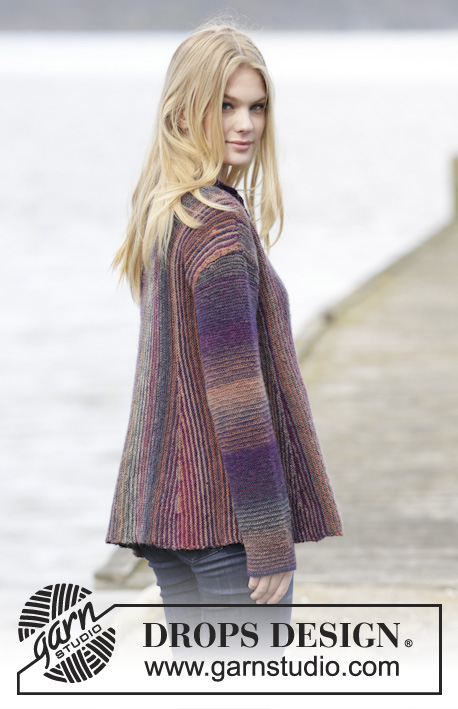 |
Knitted DROPS jacket in garter st with pleats and shawl collar, worked sideways in ”Delight”. Size: S - XXXL.
DROPS 164-15 |
|
|
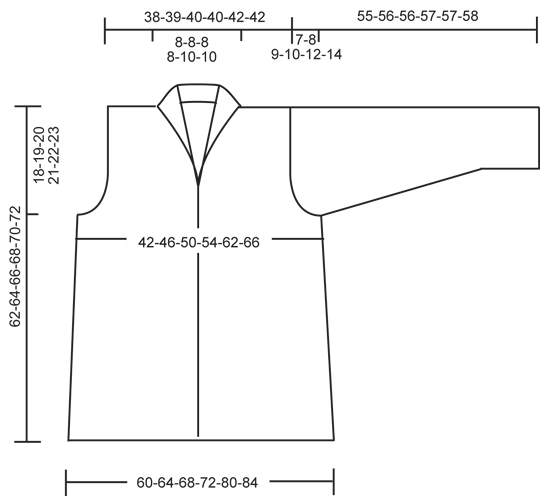
KNITTING TIP: Garter st is very elastic. The garment will therefore be somewhat longer and wider according to the measurements in chart. STRIPES: To get more stripes on garment work alternately with 2 balls. * Work 2 rows with the first ball, work 2 rows with the other ball *, repeat from *-*. Switch yarn at beg of a row from WS. Pull yarn upwards in bottom edge of garment/side of sleeve. PLEAT: Work 1 pleat with short rows as follows (1st row = WS): work 75 sts, turn and work back, work 68 sts, turn and work back, work 62 sts, turn and work back, work 55 sts, turn and work back, work 49 sts, turn and work back, work 42 sts, turn and work back, work 36 sts, turn and work back, work 29 sts, turn and work back, work 23 sts, turn and work back, work 16 sts, turn and work back, work over all sts on needle, turn and work back, work over all sts on needle, turn and work back, work 16 sts, turn and work back, work 23 sts, turn and work back, work 29 sts, turn and work back, work 36 sts, turn and work back, work 42 sts, turn and work back, work 49 sts, turn and work back, work 55 sts, turn and work back, work 62 sts, turn and work back, work 68 sts, turn and work back, work 75 sts, turn and work back. MEASURING TIP: Measure from cast-on edge. Measure where pleat is most narrow. ---------------------------------------------------------- BACK PIECE: Worked back and forth on circular needle. The whole piece is worked in garter st, i.e. K all rows. Beg working in the side. Read KNITTING TIP! Loosely cast on 102-104-106-109-111-113 sts on circular needle size 3.5 mm with Delight. Work STRIPES - see explanation above. Work 5-11-13-15-19-21 rows (1st row = RS). REMEMBER THE KNITTING TENSION At the end of next row (from WS), cast on 3 new sts for armhole. Then cast on new sts at the end of every 6th row (= from WS): 3 sts 0-0-1-2-4-5 times = 105-107-112-118-126-131 sts. On the end of next row from WS, cast on 38-41-40-39-35-35 sts = 143-148-152-157-161-166 sts. Continue to work in garter st over all sts until piece measures 9-10-11-12-14-16 cm (adjust so that next row is from RS). K 1 row from RS. Then work PLEAT - see explanation above. When pleat has been worked, work 1 row over all sts (from WS). Continue back and forth over all sts until piece measures 17-19-21-23-26-28 cm - READ MEASURING TIP. Now cast off 5 sts at beg of next row (from RS) for neck = 138-143-147-152-156-161 sts. Continue to work until piece measures 25-27-29-31-36-38 cm. Now cast on 5 sts at the end of row (from WS) = 143-148-152-157-161-166 sts. Continue back and forth over all sts until piece measures 32-35-38-41-47-49 cm (adjust so that next row is from RS). K 1 row from RS. Then work Pleat. When pleat is done, work 1 row over all sts. Work until piece measures approx. 40-43-45-47-52-54 cm. Now cast off 38-41-40-39-35-35 sts at beg of next row (from RS) for armhole = 105-107-112-118-126-131 sts. On next row (from RS) cast off 3 sts at beg of row. Then cast off at beg of every 6th row: 3 sts 0-0-1-2-4-5 times = 102-104-106-109-111-113 sts. Work back and forth until piece measures 42-46-50-54-62-66 cm. Loosely cast off. LEFT FRONT PIECE: Cast on and work from the side to mid front. Loosely cast on 102-104-106-109-111-113 sts on circular needle size 3.5 mm with Delight. Work stripes and cast on new sts for armhole as on back piece = 143-148-152-157-161-166 sts. When piece measures 6-7-8-9-12-14 cm, work pleat. When pleat has been worked, work 1 row over all sts (from WS). Continue back and forth over all sts. When piece measures 13-15-17-17-19-21 cm - READ MEASURING TIP, work pleat. When pleat has been worked, work 1 row over all sts (from WS). Work until piece measures 3-3-3-5-6-6 cm after last pleat (piece now measures approx. 17-19-21-23-26-28 cm in total). Now cast on 23-23-23-23-28-28 new sts at the end of a row from WS = 166-171-175-180-189-194 sts. Work back and forth over all sts for 6-6-6-6-8-8 cm. Loosely cast off. RIGHT FRONT PIECE: Cast on and work from mid front to the side. Loosely cast on 166-171-175-180-189-194 sts on circular needle size 3.5 mm with Delight. Work stripes back and forth over all sts for 3 cm. Now dec for buttonhole on a row from WS as follows: Work 24 sts, * K 2 tog, 1 YO, work 20-20-20-22-22-22 sts *, repeat from *-* 4 times, work the rest of row. ( = 4 buttonholes). Continue in garter st and stripes over all sts until piece measures 6-6-6-6-8-8 cm. On next row from RS, cast off the first 23-23-23-23-28-28 sts = 143-148-152-157-161-166 sts. Continue back and forth over all sts until piece measures approx. 9-9-9-11-12-13 cm. Then work pleat. When pleat has been worked, work 1 row over all sts (from WS). Continue back and forth over all sts until piece measures approx. 17-18-19-20-20-21 cm (adjust so that next row is from WS). Then work pleat. When pleat has been worked, work 1 row over all sts (from WS). AT THE SAME TIME when piece measures 4-4-3-2-2-2 cm after last pleat, cast off the first 38-41-40-39-35-35 sts (from RS) for armhole. On next row (from RS) cast off 3 sts at beg of row. Then cast off at beg of every 6th row: 3 sts 0-0-1-2-4-5 times = 102-104-106-109-111-113 sts. Continue back and forth over all sts until piece measures 6-7-8-9-12-14 cm after last pleat. Loosely cast off. SLEEVE: Worked back and forth in garter st. Loosely cast on 55-57-60-62-62-66 sts (incl 1 edge st in each side) on circular needle size 3.5 mm with Delight. Work stripes. When piece measures 5-5-5-7-9-7 cm, inc 1 st in each side every 5-4-3½-2½-2-2 cm 9-11-12-15-17-18 times in total = 73-79-84-92-96-102 sts. When piece measures 48-48-47-47-45-44 cm, cast off 3 sts in each side for sleeve cap. NOTE: Shorter measurements in the larger sizes because of longer sleeve cap and wider shoulders. Then cast off for sleeve cap in each side on every other row: 2 sts 2-2-2-2-1-0 times and 1 st 10-12-14-15-24-28 times. Then cast off 2 sts in each side until piece measures 54-55-55-56-56-57 cm. Now cast off 3 sts in each side 1 time. Cast off the remaining sts, piece measures approx. 55-56-56-57-57-58 cm. ASSEMBLY: Sew the shoulder seams. Sew in sleeves. Sew sleeve and side seams in one inside 1 edge st. Sew shawl collar tog mid back and sew it to the neckline. Sew the buttons on to the left band. |
|
 |
|
Have you finished this pattern?Tag your pictures with #dropspattern #magicautumncardigan or submit them to the #dropsfan gallery. Do you need help with this pattern?You'll find 18 tutorial videos, a Comments/Questions area and more by visiting the pattern on garnstudio.com. © 1982-2026 DROPS Design A/S. We reserve all rights. This document, including all its sub-sections, has copyrights. Read more about what you can do with our patterns at the bottom of each pattern on our site. |
|


With over 40 years in knitting and crochet design, DROPS Design offers one of the most extensive collections of free patterns on the internet - translated to 17 languages. As of today we count 324 catalogues and 12290 patterns translated into English (UK/cm). 12290
We work hard to bring you the best knitting and crochet have to offer, inspiration and advice as well as great quality yarns at incredible prices! Would you like to use our patterns for other than personal use? You can read what you are allowed to do in the Copyright text at the bottom of all our patterns. Happy crafting!
Post a comment to pattern DROPS 164-15
We would love to hear what you have to say about this pattern!
If you want to leave a question, please make sure you select the correct category in the form below, to speed up the answering process. Required fields are marked *.