
Popular categories
Looking for a yarn?


Comments / Questions (151)
![]() Jennifer wrote:
Jennifer wrote:
Hi, ik heb fase 1 en 2 afgerond en ga nu beginnen aan de mouwen. Daar lees ik dat ik eerst een rand om het hele werk mag haken. In de l-lus moet ik 6 stokjes haken om een hoek te vormen. Betekent dit dat ik in iedere lus bij een hoek 6 stokjes moet haken. Dat ziet er namelijk vreemd uit. Ik kijk uit naar jullie reactie.
09.08.2017 - 15:35
![]() Suzie wrote:
Suzie wrote:
Bonjour, je ne sais pas ce que veut dire (pour l'échantillon) au modèle 162-5 , groupe de B. J'imagine que ce sont des brides mais groupe? Merci à l'avance
20.06.2017 - 23:47DROPS Design answered:
Bonjour Suzie, les groupes de brides sont comptés d'après le motif du diagramme. 1 groupe = quand plusieurs brides sont crochetées dans /autour de la même maille. Bon crochet!
21.06.2017 - 10:11
![]() Kobus wrote:
Kobus wrote:
Ek het met ry 9geeindig nou verstaan ek nie. Now work armholes
14.02.2017 - 14:51Marilia wrote:
Não entendi como fazer a cava deste casaco. A explicação não ficou clara para mim. Completei todo o gráfico com sucesso mas a explicação da CAVA não compreendi. Por favor me ajudem.
13.02.2017 - 04:24DROPS Design answered:
Pode pedir ajuda no grupo Drops wORKSHOP no Facebook. Bom croché!
19.06.2017 - 10:55
![]() Simonis Michèle wrote:
Simonis Michèle wrote:
Bonjour j'ai réalisé la veste ajourée au crochet drops design modèle n° w-543 en taille M J'ai commandé le coton pour la taille XL et ne trouve pas les explications correspondant à cette taille Pourriez-vous m'aider svp ? Merci d'avance cordialement
26.12.2016 - 17:22DROPS Design answered:
Bonjour Mme Simonis, la taille XL correspond aux 4èmes indications dans les explications, c'est-à-dire que le carré se crochète comme en taille M mais répétez les tours 6 à 8 jusqu'à ce qu'il mesure 42 x 32 cm. Bon crochet!
02.01.2017 - 09:23Bernadetteoconnor wrote:
I am trying to start the front the sleeves are each side the other 2 side are full from the increasing I don't no if that is correct because the patterns of said if on the side with the less decreasehelp
11.08.2016 - 10:56DROPS Design answered:
Dear Mrs Oconnor, when working front piece, you will now work as before but only along one side, ie back and forth and without the inc in the corner. Starting in the corner work A.2 and finish row in next corner as explained under written pattern. Happy crocheting!
15.08.2016 - 09:37Bernadette O Connor wrote:
I have finished the square with armhole I can't make out how the side with no Inc for the front it seems to be full all around the square I would have liked to see video it would be nice
10.08.2016 - 19:19DROPS Design answered:
Dear Mrs O Connor, when square is done, continue working only along 1 of the 4 sides, and crochet now back and forth (= in rows), working now A.2 - see diagram and written pattern from one corner to the other (front pieces = 2 opposite sides of the square). Happy crocheting!
15.08.2016 - 09:12Bernadette O Connor wrote:
I have finished the square with armhole I can't make out how the side with no Inc for the front it seems to be full all around the square I would have liked to see video it would be nice
10.08.2016 - 19:18Nicole Lefevre wrote:
Ik ben geraakt tot aan de armsgaten, maar nu ben ik al even aant zoeken hoe ik verder moet!?! Help? Voorpand en mouwen snap ik dan wel! Prachtig vest!
31.07.2016 - 21:48DROPS Design answered:
Hoi Nicole. Je hebt het vierkant gehaakt (achterpand) en je begint nu met het haken van l tot aan het midden van de eerste zijkant (tussen hoek 1 en 2). Je haakt 1 l voor elke overgeslagen l/stk. Bevestig de l hier in het midden tussen de hoeken en haak door in patroon tot je in het midden staat tussen hoek 3 en 4 en haak nu l en sla net zo veel l/stk over als aan de eerste zijkant. Ga door in patroon zoals eerst. Je haakt hierna het patroon verder zoals eerst en haak nu het patroon om de lossen zoals eerst. Je krijgt dan 2 armsgaten en het patroon loopt door.
30.08.2016 - 12:28Pisani wrote:
Eu quero comprar.por favor como faço para adquirir estes casacos. Obrigada Pisani
18.07.2016 - 08:48DROPS Design answered:
Pode consultar a página de lojas e contactar qualquer loja.
20.07.2016 - 13:05
|
||||||||||||||||||||||
Spring Bliss#springblisscardigan |
||||||||||||||||||||||
 |
 |
|||||||||||||||||||||
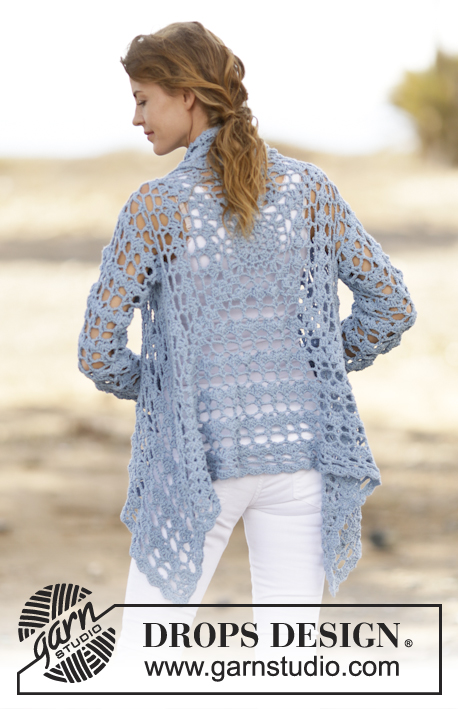
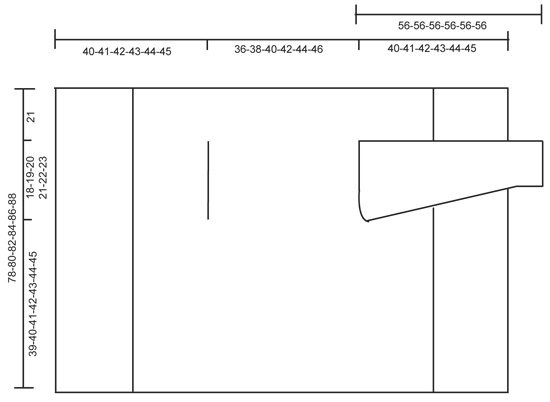
Crochet DROPS jacket with lace pattern in ”Paris”. Size: S - XXXL.
DROPS 162-5 |
||||||||||||||||||||||
|
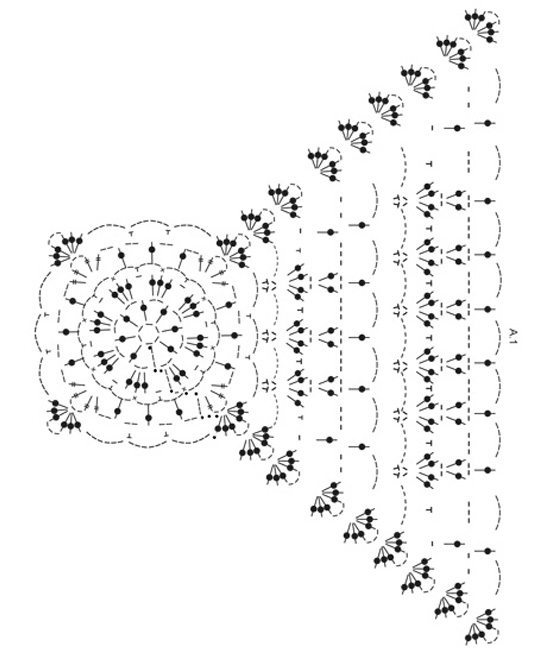
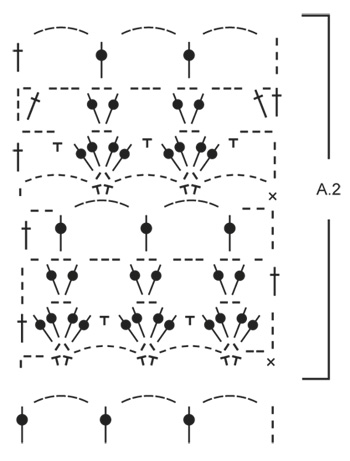
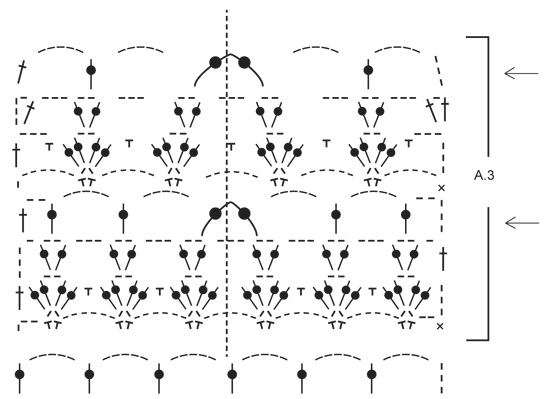
PATTERN: See diagrams A.1 and A.2. DECREASE TIP: Dec 1 tr by working 2 tr tog as follows: Work 1 tr in first ch-space but wait with last pull through, skip 3 ch, work 1 tr in next ch-space but on last pull through, pull yarn through all 3 loops on hook. ---------------------------------------------------------- BODY: Worked in the round from mid back on the back. Work 6 ch with Paris on hook size 5 mm and form a ring with 1 sl st in first ch. Work according to diagram A.1, i.e. work as follows: ROUND 1: 5 ch (= 1 tr + 2 ch), * 1 tr in ring, 2 ch *, repeat from *-* a total of 7 times, finish with 1 sl st in 3rd ch from beg of round = 8 tr with 2 ch between each. ROUND 2: 1 sl st in first ch-space, 3 ch (= 1 tr), 2 tr in same ch-space, * 1 ch, 3 tr in next ch-space *, repeat from *-* 7 times in total, and finish with 1 ch and 1 sl st in 3rd ch from beg of round = 8 tr-groups with 1 ch between each. ROUND 3: 1 ch, 1 dc in the middle tr in tr-group, * 3 ch, 1 dc in ch before next tr-group, 3 ch, 1 dc in the middle tr in next tr-group *, repeat from *-* 7 times in total, 3 ch, 1 dc in last ch, 3 ch and 1 sl st in first dc at beg of round = 16 ch-spaces. ROUND 4: Now work the circle into a square, i.e. work as follows: 1 sl st in first ch-space, 4 ch (= 1 dtr), 1 dtr + 3 ch + 2 dtr in same ch-space (= corner), * (2 ch, 1 tr in next ch-space) repeat from (-) 3 times in total, 2 ch, 2 dtr + 3 ch + 2 dtr in next ch-space (= corner) *, repeat from *-* 3 times in total, repeat from (-) 3 times in total and finish with 2 ch and 1 sl st in 4th ch from beg of round. ROUND 5: Work sl sts until ch-space in the corner, 3 ch (= 1 tr), 2 tr + 3 ch + 3 tr in same ch-space (= corner), * 5 ch, skip 1 ch-space, 1 dc in next ch-space, 5 ch, 1 dc in next ch-space, 5 ch, skip 1 ch-space, in next ch-space (= corner) work 3 tr + 3 ch + 3 tr *, repeat from *-* 3 times in total, 5 ch, skip 1 ch-space, 1 dc in next ch-space, 5 ch, 1 dc in next ch-space, 5 ch, skip last ch-space and finish with 1 sl st in 3rd ch at beg of round. ROUND 6: Work sl sts until ch-space in the corner, 3 ch (= 1 tr), 2 tr + 3 ch + 3 tr in same ch-space (= corner), * (6 ch, 1 dc + 2 ch + dc in next ch-space), repeat from (-) until corner, 6 ch, work 3 tr + 3 ch + 3 tr in ch-space in the corner *, repeat from *-* 3 times in total, repeat from (-) until the corner and finish with 6 ch and 1 sl st in 3rd ch at beg of round. ROUND 7: Work sl sts until ch-space in the corner, 3 ch (= 1 tr), 2 tr + 3 ch + 3 tr in same ch-space (= corner), * 1 ch, (1 dc in 6-ch-space, 2 tr + 2 ch + 2 tr in 2-ch-space), repeat from (-) until one 6-ch-space remains before the corner, 1 dc in 6-ch-space, 1 ch, 3 tr + 3 ch + 3 tr in ch-space in the corner *, repeat from *-* 3 times in total, 1 ch, repeat from (-) until one 6-ch-space remains before the corner and finish with 1 ch and 1 sl st in 3rd ch at beg of round. ROUND 8: Work sl sts until ch-space in the corner, 3 ch (= 1 tr), 2 tr + 3 ch + 3 tr in same ch-space (= corner), * 2 ch, 1 tr in first ch, (3 ch, 1 tr + 2 ch + 1 tr in ch-space in tr-group), repeat from (-) until corner, 3 ch, 1 tr in ch before corner, 2 ch, 3 tr + 3 ch + 3 tr in ch-space in the corner *, repeat from *-* 3 times in total, 2 ch, 1 tr in first ch, repeat from (-) until corner, 3 ch, 1 tr in last ch, 2 ch and 1 sl st in 3rd ch at beg of round. ROUND 9: Work sl sts until ch-space in the corner, 3 ch (= 1 tr), 2 tr + 3 ch + 3 tr in same ch-space (= corner), * 5 ch, 1 tr in first ch-space, (5 ch, 1 tr in ch-space in tr-group), repeat from (-) until 1 ch-space remains before tr-group in the corner, 5 ch, 1 tr in last ch-space before the corner, 5 ch and 3 tr + 3 ch + 3 tr in ch-space in the corner *, repeat from *-* 3 times in total, 5 ch, 1 tr in first ch-space, repeat from (-) until 1 ch-space remains before the corner, 5 ch, 1 tr in last ch-space, 5 ch and 1 sl st in 3rd ch at beg of round. REMEMBER THE CROCHET TENSION! Repeat 6th to 9th round (4 rounds) outwards as shown in diagram. Continue like this until square measures approx. 36-38-40-42-44-46 cm x 36-38-40-42-44-46 cm. Now work arm holes as follows: Work as before until first corner, work 3 tr + 3 ch + 3 tr in ch-space in the corner. Now work ch until the middle of next side (i.e. in the middle between 1st and 2nd corner) as follows: Work 1 ch for every ch/tr skipped. Then work pattern as before until the middle between 3rd and 4th corner. Now work ch until beg of round as follows: Work 1 ch for every ch/tr skipped. On next round work pattern and inc as before over all sts, also in ch for armholes. Continue like this until square measures approx. 78-80-82-84-86-88 cm x 78-80-82-84-86-88 cm (i.e. approx. 21 cm in all sizes from armhole) - adjust to finish after 9th round (round with ch-spaces and trebles). Cut the yarn. FRONT PIECE: Beg from WS and work back and forth between first and second corner. NOTE: Work front piece without inc. Work according to diagram A.2 from first corner, i.e. work as follows: ROW 1: 3 ch (= 1 dc + 2 ch), 1 dc + 2 ch + 1 dc in first ch-space, * 6 ch, 1 dc + 2 ch + 1 dc in next ch-space*, repeat from *-* the entire row and finish with 2 ch and 1 dc in first ch-space in the corner, turn piece. ROW 2 (= RS): 3 ch (= 1 tr), * 2 tr + 2 ch + 2 tr in ch-space between 2 dc, 1 dc in 6-ch-space *, repeat from *-* the entire row and finish with 1 tr in 1st ch from beg of previous row, turn piece. ROW 3: 4 ch (= 1 tr + 1 ch), * 1 tr + 2 ch + 1 tr in ch-space in the middle of tr-group, 3 ch *, repeat from *-* until 1 tr-group remains before the corner, 1 tr + 2 ch + 1 tr in ch-space in last tr-group, finish with 1 ch and 1 tr in 3rd ch from beg of previous row, turn piece. ROW 4 (= RS): 5 ch (= 1 tr + 2 ch), * 1 tr in ch-space in tr-group, 5 ch *, repeat from *-* until 1 tr-group remains, 1 tr in ch-space in last tr-group, 2 ch and 1 tr in 3rd ch from beg of previous row, turn piece. ROW 5: 7 ch (= 1 dc + 6 ch), * 1 dc + 2 ch + 1 dc in 5-ch-space, 6 ch *, repeat from *-* the entire row and finish with 1 dc in 3rd ch from beg of previous row, turn piece. ROW 6 (= RS): 6 ch (= 1 tr + 3 ch), * 1 dc in 6-ch-space, 2 tr + 2 ch + 2 tr in 2-ch-space *, repeat from *-* the entire row and finish with 1 dc in last 6-ch-space, 3 ch and 1 tr in first ch from beg of previous row, turn piece. ROW 7: 4 ch (= 1 tr + 1 ch), 1 tr in same st, * 3 ch, 1 tr + 2 ch + 1 tr in ch-space in the middle of next tr-group *, repeat from *-* the entire row and finish with 3 ch and 1 tr + 1 ch + 1 tr in 3rd ch from beg of previous row, turn piece. ROW 8 (= RS): 8 ch (= 1 tr + 5 ch), * 1 tr in ch-space in the middle of tr-group, 5 ch *, repeat from *-* the entire row and finish with 5 ch and 1 tr in 3rd ch from beg of previous row, turn piece. Repeat rows 1 to 8 outwards. Continue like this until approx. 19-20-21-22-23-24 cm have been worked back and forth, fasten off (adjust after 1st or 5th row in pattern). Repeat on the other side, now work back and forth from third to fourth corner. EDGE: Finally work a round around the entire piece with 2nd or 6th row in pattern but in ch-space in each corner work 6 tr. Fasten off. SLEEVE: Work back and forward and sew togheter at the end. Sleeve is worked straight out of armhole of the body, top down. Beg mid under armhole, from RS. 1 dc in first st, then work ch-space as on 4th or 8th row in A.2. Work so that there are 12-13-14-15-15-16 ch-spaces around armhole. Then continue with pattern according to diagram A.2. Work pattern like this until sleeve measures 26 cm. Now work according to A.3. On every row with arrow work 2 tr tog into 1 tr mid front of sleeve (i.e. dec 1 ch-space on every row with arrow) - READ DECREASE TIP. The dotted line shows mid front of sleeve. Otherwise continue the pattern as before. Dec on every 4th row a total of 4 times. Then work according to diagram A.2 until sleeve measures 56 cm in all sizes. Fasten off. Repeat in the other side. |
||||||||||||||||||||||
Diagram explanations |
||||||||||||||||||||||
|
||||||||||||||||||||||
 |
||||||||||||||||||||||
 |
||||||||||||||||||||||
 |
||||||||||||||||||||||
 |
||||||||||||||||||||||
Have you finished this pattern?Tag your pictures with #dropspattern #springblisscardigan or submit them to the #dropsfan gallery. Do you need help with this pattern?You'll find 12 tutorial videos, a Comments/Questions area and more by visiting the pattern on garnstudio.com. © 1982-2026 DROPS Design A/S. We reserve all rights. This document, including all its sub-sections, has copyrights. Read more about what you can do with our patterns at the bottom of each pattern on our site. |
||||||||||||||||||||||


With over 40 years in knitting and crochet design, DROPS Design offers one of the most extensive collections of free patterns on the internet - translated to 17 languages. As of today we count 324 catalogues and 12290 patterns translated into English (UK/cm). 12290
We work hard to bring you the best knitting and crochet have to offer, inspiration and advice as well as great quality yarns at incredible prices! Would you like to use our patterns for other than personal use? You can read what you are allowed to do in the Copyright text at the bottom of all our patterns. Happy crafting!
Post a comment to pattern DROPS 162-5
We would love to hear what you have to say about this pattern!
If you want to leave a question, please make sure you select the correct category in the form below, to speed up the answering process. Required fields are marked *.