
Popular categories
Looking for a yarn?


Comments / Questions (28)
![]() Christina wrote:
Christina wrote:
Jeg har hatt samme problemer som beskrevet under. Det er helt klart at denne oppskriften ikke er korrekt! Jeg fulgte oppskriften og fikk alt for mange masker på første runde i kanten slik at den ble helt flat.. Dersom en starter å hekle kanten som beskrevet i rad 3, og deretter rad 2 og 3 annenhver gang får man en fin kurv som er lik den på bildet :)
06.07.2016 - 18:32
![]() Sonali wrote:
Sonali wrote:
Thanks for your reply
19.12.2015 - 23:01
![]() Sonali wrote:
Sonali wrote:
As the yarn is used for a bread basket in the picture, presumably the dyes used are safe for food? If so, is this true for all Drops yarns? Thanks
18.12.2015 - 00:32
![]() Helle Virenfeldt Smith wrote:
Helle Virenfeldt Smith wrote:
Jeg har samme spørgsmål, som de andre, men synes ikke, at I svarer på det. Hvis man følger opskriften for første række af kanten, får man nogle meget sammenpressede stjerner, fordi man skal samle op i bagerste og forreste fm på rækken i stedet for at samle op i de næste to fm på rækken, som I i øvrigt også viser i videoen. Video og opskrift passer ikke sammen. Eller er en mening med de mange stjerner i første række? Mvh Helle
21.09.2015 - 14:02DROPS Design answered:
Hej Helle, Jo men følge videoen vi henviser til, så ser du nøjagtig hvordan du skal hækle stjernerne! God fornøjelse!
24.09.2015 - 11:03
![]() Petra wrote:
Petra wrote:
Hallo, ich habe das Sternenmuster so verstanden: 1. Rd: 1 Stern in jede Fm, 2. Rd: 2 Hstb in jedes Sternenloch. Schon nach diesen beiden Runden sieht man, dass sich der Rand sehr stark wellt. Soll das so sein oder mache ich etwas falsch?
25.02.2015 - 08:27DROPS Design answered:
Sie häkeln 1 Stern in mehr als 1 fM, schauen Sie sich das in der Anleitung genau an, wann Sie wo einstechen müssen, ich vermute, es liegt hierin begründet, dass sich das Muster wellt. Es ist richtig, dass Sie in der 2. Rd in jedes Sternenloch 2 H-Stb häkeln (d.h. pro Stern 2 H-Stb).
04.03.2015 - 15:33
![]() Patouche wrote:
Patouche wrote:
Bonjour Je suis en train de faire ces corbeilles mais la j ai fini de crocheter j ai un grand rond et je me demande comment faire tenir les bords en l air Merci de votre aide Pat
13.09.2014 - 12:26
![]() Patouche wrote:
Patouche wrote:
Bonjour Je suis en train de faire ces corbeilles mais la j ai fini de crocheter j ai un grand rond et je me demande comment faire tenir les bords en l air Merci de votre aide Pat
13.09.2014 - 11:00DROPS Design answered:
Bonjour Patouche, le grand rond = le fond de la corbeille. On continue ensuite au point d'étoiles (on augmente plus pour que les bords soient droits), puis on double la bordure sur l'endroit pour qu'elle tienne bien. Bon crochet!
15.09.2014 - 10:20
![]() Mirta wrote:
Mirta wrote:
Alles klar, jetzt klappt es wunderbar. Vielen dank fuer eure erlaeuterung!
04.08.2014 - 21:05
![]() Anneke Maaskant wrote:
Anneke Maaskant wrote:
Na de bodem moet toer 1 vervallen, in plaats daarvan toer 3 eerst haken. Dan afwisselen d 2 en 3. De zijkant wordt anders veel te wijd!
22.07.2014 - 12:24DROPS Design answered:
Hoi Anneke. Ja, dat staat ook vermeld in het patroon.
22.07.2014 - 19:57
![]() Mirta wrote:
Mirta wrote:
Hallo, was heisst bitte "Weiter jeweils 1 fM mehr zwischen den Aufnahmen häkeln"? Ich habe bis zur 5. Runde gehaekelt, komme aber nun nicht weiter. Vielen Dank im voraus fuer eure Rueckmeldung!
13.07.2014 - 01:24DROPS Design answered:
Liebe Mirta, Sie arbeiten die Zunahmen einfach wie begonnen weiter, es wird ja in jeder Rd 1 fM mehr, bevor Sie 2 fM in 1 fM häkeln (das sind ja die Zunahmen, in jeder Rd nehmen Sie weiter 6 fM zu). In der 6. Rd häkeln Sie also immer 4 fM und in die 5. fM 2 fM, in der 7. Rd häkeln Sie 5 fM und in die 6. fM 2 fM usw.
14.07.2014 - 21:31
|
|
Summer Baskets#summerbaskets |
|
|
|
|
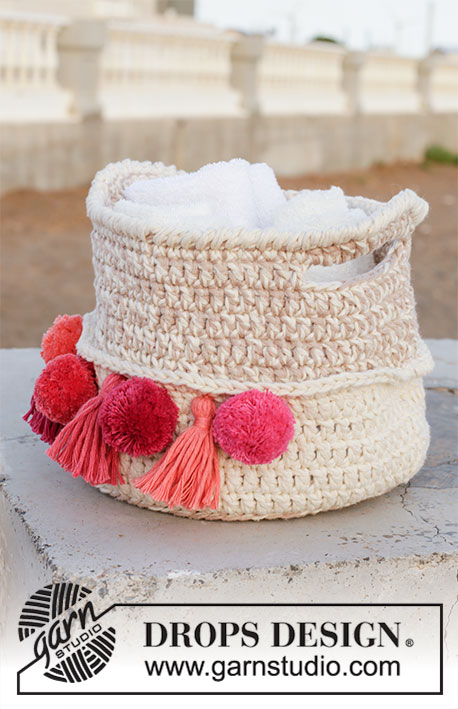
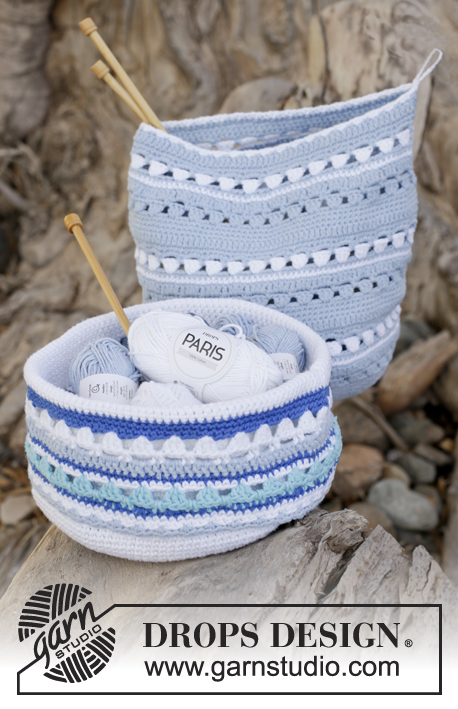
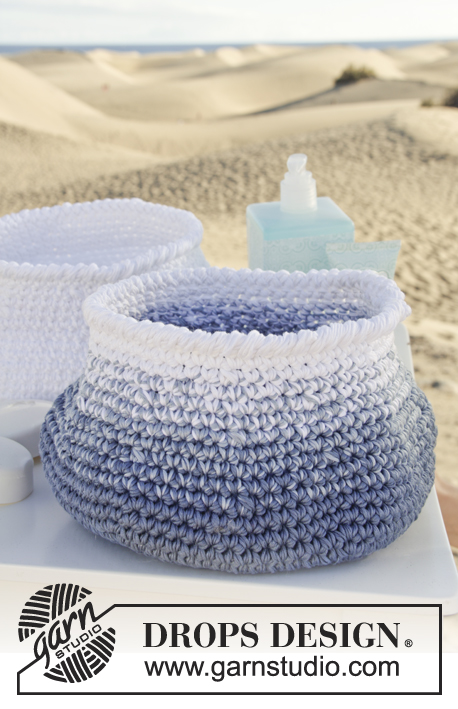
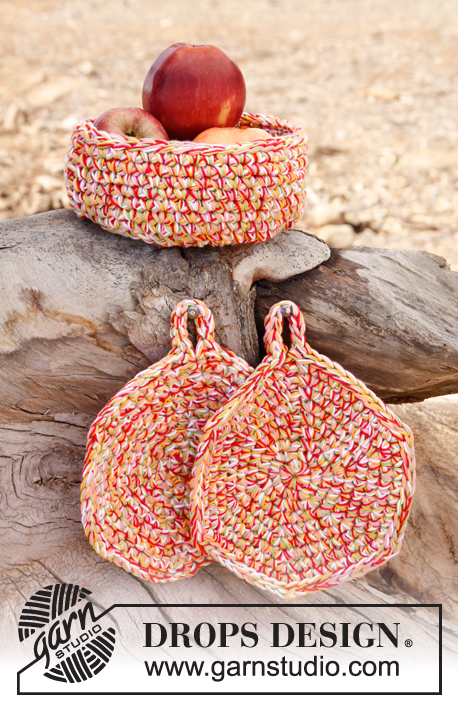
Crochet DROPS basket with star pattern in ”Paris”.
DROPS 152-34 |
|
|
CROCHET TIP: Beg every round with dc with 1 ch and finish with 1 sl st in 1st dc from beg of round. ---------------------------------------------------------- SMALL BASKET: Worked from bottom up. Crochet 4 ch on hook size 4 mm with light yellow and form a ring with 1 sl st in first ch. ROUND 1: Work 6 dc in ch-ring – see CROCHET TIP! ROUND 2: Work 2 dc in every dc = 12 dc. ROUND 3: Work 1 and 2 dc alternately in every dc the entire round = 18 dc. ROUND 4: Work 1 dc in every dc but work 2 dc in every 3rd dc = 24 dc. ROUND 5: Work 1 dc in every dc but work 2 dc in every 4th dc = 30 dc. Then work 1 dc more between inc until basket measures approx. 20 cm in diameter. NOW MEASURE PIECE FROM HERE! Now work star pattern back and forth, beg from RS as follows: ROW 1: Work 3 ch, pick up 1 st in 2nd and 3rd ch from hook, pick up 1 st in back loop of next dc, pick up 1 st in front loop of same dc, pick up 1 st in the next dc on row = 6 sts on hook, make a YO and pull through all 6 sts, work 1 ch, * pick up 1 st in the hole, pick up 1 st in the side on the last of the 6 sts, pick up 1 st in same st as the last of the 6 sts was picked up in, pick up 1 st in back loop of next dc, pick up 1 st in front loop of same st = 6 sts on hook, make a YO and pull through all 6 sts, 1 ch *, repeat from *-* until 1 dc remains on row, work 1 htr in last dc. Turn. ROW 2: 2 ch (replace 1 htr), work 2 htr in every "star hole", finish row with 1 htr in last st. Turn. ROW 3: Work 3 ch, pick up 1 st in 2nd and 3rd ch from hook, pick up 1 st in the first 3 htr on row = 6 sts on hook, make a YO and pull through all 6 sts, work 1 ch, * pick up 1 st in the hole, pick up 1 st in the side on the last of the 6 sts, pick up 1 st in same st as the last of the 6 sts was picked up in, pick up 1 st in each of the next 2 sts = 6 sts on hook, make a YO and pull through all 6 sts, 1 ch *, repeat from *-* until 1 dc remains on row, work 1 htr in last htr. Turn. Repeat row 2 and 3 until piece measures approx. 11 cm vertically (adjust after row 2). Finish and cut the yarn, leave approx. 25 cm for assembly. ASSEMBLY: Sew tog in the side and fasten off. Fold the edge double inwards. ---------------------------------------------------------- LARGE BASKET: Work the same way as SMALL BASKET with vanilla, but inc until bottom measures approx. 23 cm in diameter. Repeat star pattern until piece measures 17 cm vertically. |
|
Have you finished this pattern?Tag your pictures with #dropspattern #summerbaskets or submit them to the #dropsfan gallery. Do you need help with this pattern?You'll find 9 tutorial videos, a Comments/Questions area and more by visiting the pattern on garnstudio.com. © 1982-2026 DROPS Design A/S. We reserve all rights. This document, including all its sub-sections, has copyrights. Read more about what you can do with our patterns at the bottom of each pattern on our site. |


With over 40 years in knitting and crochet design, DROPS Design offers one of the most extensive collections of free patterns on the internet - translated to 17 languages. As of today we count 324 catalogues and 12290 patterns translated into English (UK/cm). 12290
We work hard to bring you the best knitting and crochet have to offer, inspiration and advice as well as great quality yarns at incredible prices! Would you like to use our patterns for other than personal use? You can read what you are allowed to do in the Copyright text at the bottom of all our patterns. Happy crafting!
Post a comment to pattern DROPS 152-34
We would love to hear what you have to say about this pattern!
If you want to leave a question, please make sure you select the correct category in the form below, to speed up the answering process. Required fields are marked *.