
Popular categories
Looking for a yarn?


Comments / Questions (46)
![]() Ly wrote:
Ly wrote:
, j’ai besoin d’aide pour les explications des augmentations2 je ne comprend pas vraiment cette explication 1 jeté avant et après les 4 mailles sur chaque tour 8 mailles à tous les 2 rangs ou tous le débout du patron A1 les augmentations ce font pendant 12 fois selon la grandeur et après vous mentionnez 2 fois tous les 5 cm pour avoir 112 m toujours en fonction de la grandeur choisi Comment les augmentations se font sur 5 cm x2 =10cm pour arriver à 25 cm j’ai un problème
18.04.2021 - 18:16DROPS Design answered:
Bonjour Ly, vous augmentez de chaque côté de chaque A.1 = 8 augmentations à chaque fois, et, dans la 2ème taille: 12 fois tous les 2 tours puis 2 fois tous les 5 cm; tricotez ensuite comme avant jusqu'à ce que l'ouvrage mesure 25 cm (sans augmenter davantage). Bon tricot!
19.04.2021 - 08:55
![]() Melanei wrote:
Melanei wrote:
Bei der Frage von Viola vom 28.3.2014 haben Sie die Umschläge vor und nach A1 als verschränkte Maschen angegeben. Was ist jetzt richtig?
26.03.2019 - 10:00DROPS Design answered:
Liebe Melanie, in der Antwort liest man: nur die Löcher des Lochmusters A.1 zu sehen sind dh die Umschläge in A.1 sollen Löcher bilden. Wenn Sie aber auf beiden Seiten von A.1 mit einem Umschlag zunehmen, stricken Sie diese Umschläge verschränkt - siehe TIPP ZUR AUFNAHME 2. Viel Spaß beim stricken!
26.03.2019 - 12:12
![]() Melanie wrote:
Melanie wrote:
Sind auch alle Umschläge bei A1 in der 2. und 4. Reihe rechts zu stricken?
26.03.2019 - 09:24DROPS Design answered:
Liebe Melanie, wenn A.1 in der Runde gestrickt wird, werden alle Maschen in A.1 rechts gestrickt, dh auch Umschläge, damit Löcher entstehen. Viel Spaß beim stricken!
26.03.2019 - 09:25
![]() Melani wrote:
Melani wrote:
Sind bei den Reihen 2 und 4 bei A1 alle Maschen in rechts zu stricken?
25.03.2019 - 20:35DROPS Design answered:
Liebe Melani, A.1 wird in der Runde gestrickt, dh bei der 2. und 4. Reihe in A.1 stricken Sie alle Maschen rechts. Viel Spaß beim stricken!
26.03.2019 - 09:03
![]() Bizi wrote:
Bizi wrote:
Hallo, mir ist nicht klar, warum der untere teil in Hin- und Rückreihen gestrickt werden soll. So wie ich das Muster A2, A3 und A4 lese, geht das doch in Runden!? Birgit
05.11.2018 - 20:37DROPS Design answered:
Liebe Bizi, A.2 wird am Anfang der Reihe nach der Randmasche gestrickt, und A.4 endet das Muster (vor der Randmasche). Ich würde wie die Designerin stricken, damit das Muster schön klappt. Viel Spaß beim stricken!
06.11.2018 - 08:25
![]() Trine wrote:
Trine wrote:
Jeg kan ikke forstå A 2 og A 3. A 2: 2 ret, 2 ret sammen, slå om, 2 ret sammen giver 5 masker og ikke 6 masker. Hvad skal jeg gøre?
08.10.2017 - 17:14DROPS Design answered:
Hej Trine, Jo hvis du tæller omslaget med så får du 6 masker. God fornøjelse!
11.10.2017 - 15:27
![]() Stefania wrote:
Stefania wrote:
Buonasera, sono sempre Stefania, scusi la domanda forse non ho capito esattamente..ma allora cosa significa la frase CONFEZIONE: Cucire il poncho insieme al centro, sul dietro
21.09.2017 - 19:28DROPS Design answered:
Buonasera Stefania. La prima parte del poncho viene lavorata in tondo. Quando il lavoro misura 22-25-27-30 cm, si prosegue avanti e indietro sui ferri con i diagrammi A2, A3, A4 e infine con il diagramma A5. Questa parte finale viene poi cucita. Buon lavoro!
21.09.2017 - 20:37
![]() Stefania wrote:
Stefania wrote:
Buonasera, per eseguire questo modello è indispensabile l'utilizzo dei ferri circolari? si possono usare anche i ferri diritti lunghi? grazie
21.09.2017 - 17:15DROPS Design answered:
Buonasera Stefania, il modello è lavorato in tondo senza cuciture, quindi prevede l'uso dei ferri circolari. Se preferisce può lavorarlo in piano e cucirlo aggiungendo una maglia di vivagno per lato, ma sicuramente esteticamente è meglio lavorarlo in tondo. Buon lavoro!
21.09.2017 - 18:37
![]() Heidi wrote:
Heidi wrote:
Vil bare opplyse om at mønsterborden med fordel kan strikkes rundt uten å strikkes frem og tilbake, for så å syes sammen. Har strikket en av hver, og den som ble strikket rundt er uten tvil den fineste.
16.06.2016 - 14:28
![]() Heidi Myhre Leirvik wrote:
Heidi Myhre Leirvik wrote:
Hva er grunnen til at mønsterborden må strikkes fram og tilbake? Skjønner ikke hvorfor den ikke kan strikkes rundt?
27.05.2016 - 00:20DROPS Design answered:
Hei Heidi. Jeg vil tro man har gjort det for at sörge for at mönstret er lige höjt - strikker man rundt kan der vaere en lille forskel (i overgangen til man starter en ny p), men du kan sikkert ogsaa strikke den rundt om du hellere vil det.
27.05.2016 - 12:36
|
|||||||||||||||||||||||||
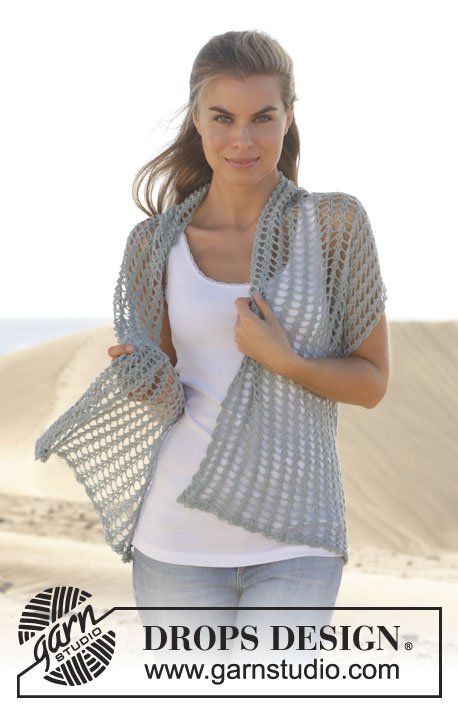
Sweet Love of Mine#sweetloveofmineponcho |
|||||||||||||||||||||||||
|
|
|||||||||||||||||||||||||
Knitted DROPS poncho with lace pattern in ”Alpaca”. Size: S - XXXL.
DROPS 152-5 |
|||||||||||||||||||||||||
|
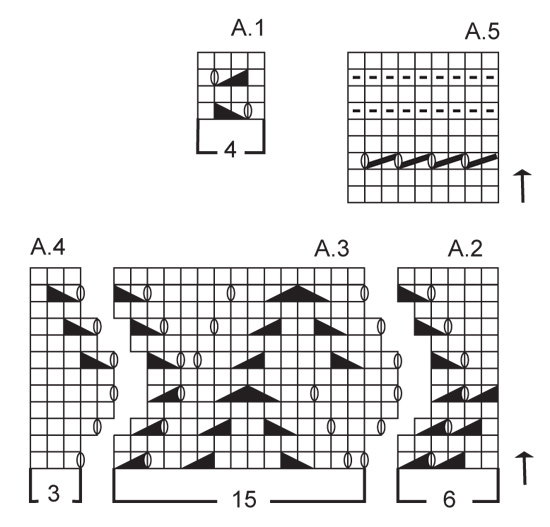
GARTER ST (in the round on circular needle): 1 ridge = 2 rounds. * K 1 round and P 1 round *, repeat from *-*. PATTERN: See diagrams A-1 to A-5. The diagrams show all rows in pattern seen from RS. INCREASE TIP 1: Inc 1 st by getting yarn between 2 sts from previous row - K this st twisted, i.e. work in back loop of st instead of front to avoid holes. INCREASE TIP 2: Inc on each side of A.1 as follows from RS: * 1 YO, A.1 (= 4 sts), 1 YO *, repeat the same inc every time working according to A.1 on round = 4 times in total on row and 8 sts inc. Repeat the same inc every 3rd-2nd-2nd-2nd row 7-12-15-16 times in total, then inc every 5-5-4-3½ cm 2-2-3-4 times in total (= 72-112-144-160 sts inc) = 266-326-371-401 sts. ---------------------------------------------------------- PONCHO: Poncho is worked top down, in the round on circular needle, and then back and forth when working pattern. Cast on 170-184-193-202 sts on circular needle size 3.5 mm with Alpaca. Work 3 ridges in GARTER ST – see explanation above, AT THE SAME TIME on last round in last ridge inc 24-30-34-39 sts evenly - READ INCREASE TIP 1. There are now 194-214-227-241 sts on needle. Then work as follows: 26-36-47-45 sts in stocking st, A.1 (= 4 sts), 38-28-20-31 sts in stocking st, A.1, 53-73-80-76 sts in stocking st, A.1, 38-28-20-31 sts in stocking st, A.1, 23-33-44-42 sts in stocking st. Continue the same way, AT THE SAME TIME inc on each side of the 4 repetitions of A.1 - read INCREASE TIP 2! Continue like this until piece measures 22-25-27-30 cm. Then work PATTERN back and forth as follows from RS mid back: 1 edge st in garter st, A.2 (= 6 sts), A.3 (= 15 sts) 17-21-24-26 times in width, A.4 (= 3 sts), 1 edge st in garter st. NOTE! Make sure that eyelet row A.1 meets eyelet rows in pattern A.3. Continue like this back and forth until 12-13-14-15 cm of pattern A.2, A.3 and A.4 have been worked vertically and piece measures approx. 34-38-41-45 cm. Then work as follows: 1 edge st in garter st, pattern according to A.5 until 1 st remains, 1 edge st in garter st. Continue back and forth until A.5 has been worked 1 time vertically. Loosely cast off. ASSEMBLY: Sew poncho tog mid back. Sew in outer loops of edge sts to avoid a chunky seam. Fasten off. |
|||||||||||||||||||||||||
Diagram explanations |
|||||||||||||||||||||||||
|
|||||||||||||||||||||||||
 |
|||||||||||||||||||||||||
 |
|||||||||||||||||||||||||
Have you finished this pattern?Tag your pictures with #dropspattern #sweetloveofmineponcho or submit them to the #dropsfan gallery. Do you need help with this pattern?You'll find 18 tutorial videos, a Comments/Questions area and more by visiting the pattern on garnstudio.com. © 1982-2026 DROPS Design A/S. We reserve all rights. This document, including all its sub-sections, has copyrights. Read more about what you can do with our patterns at the bottom of each pattern on our site. |
|||||||||||||||||||||||||


With over 40 years in knitting and crochet design, DROPS Design offers one of the most extensive collections of free patterns on the internet - translated to 17 languages. As of today we count 324 catalogues and 12290 patterns translated into English (UK/cm). 12290
We work hard to bring you the best knitting and crochet have to offer, inspiration and advice as well as great quality yarns at incredible prices! Would you like to use our patterns for other than personal use? You can read what you are allowed to do in the Copyright text at the bottom of all our patterns. Happy crafting!
Post a comment to pattern DROPS 152-5
We would love to hear what you have to say about this pattern!
If you want to leave a question, please make sure you select the correct category in the form below, to speed up the answering process. Required fields are marked *.