
Popular categories
Looking for a yarn?


Comments / Questions (36)
![]() ELENA wrote:
ELENA wrote:
Lo que no entiendo es no trabajar las hebras en el patrón cuando empiezas a disminuir las mangas. Disculpas estoy empezando a tejer y me gusta mucho
21.08.2024 - 21:19
![]() ELENA wrote:
ELENA wrote:
Perdona, tengo problema con las mangas. Ya las he deshecho 2 veces. ¿Podrías ayudarme?
21.08.2024 - 20:20
![]() Ana wrote:
Ana wrote:
Elena: No falta ningún símbolo, son dos disminuciones seguidas.
11.08.2024 - 11:37
![]() ELENA wrote:
ELENA wrote:
Hola, falta en explicaciones del diagrama un símbolo. Por favor pueden explicarlo? Gracias
01.08.2024 - 19:31
![]() Ina wrote:
Ina wrote:
Ved halsrigning foran bør det vel puttes inn en setning at hvert forstykke strikkes hver for seg opp til skulder?
04.07.2024 - 23:02
![]() Evi wrote:
Evi wrote:
Hallo,ich verstehe bei der Beschreibungg des Ärmels den Satz nicht:Weiter 2 Ma abketten bis die Arbeit 55cm misst,heisst das in jeder 2. Reihe auf jeder Seite 2Ma abnehmen?
22.06.2024 - 22:50DROPS Design answered:
Liebe Evi, jetzt werden Sie 2 Maschen beidseitig in jeder 2. Reihe, dh am Anfang jeder Reihe (Hin- sowie Rückreihe) abketten, bis die Ärmel 55 cm misst, beachten Sie nur, daß Sie genauso viele Maschen beidseitig abgekettet haben, damit die Armkugel symmetrisch wird. Viel Spaß beim Stricken!
24.06.2024 - 08:22
![]() Siss wrote:
Siss wrote:
Holder på med 1. erme. Er det meningen at de økte maskene skal strikkes i rettmasker hele veien opp eller strikkes de i mønster på neste pinne. Blir det et glatt felt midt under ermet ?
21.03.2024 - 15:29DROPS Design answered:
Hei Siss. Ja, de økte maskene strikkes i glattstrikk. Blir et glattstrikket felt under ermet. mvh DROPS Design
02.04.2024 - 13:36
![]() Sophie wrote:
Sophie wrote:
Hej, jag kanske tänker helt fel, men...varför börjar mönstret på M6B (storlek S/M) på avigsidan?
07.10.2023 - 21:16DROPS Design answered:
Hei Sophie. Her har det nok dessverre blitt en feil når diagrammet har blitt oppdatert (nå nylig). Dette skal vi få fikset asap. Mønstret skal begynne på 2. pinne i diagram M.6B str. S/M. Tusen takk for at du gjorde oss oppmerksom på dette. mvh DROPS Design
16.10.2023 - 13:55
![]() Lynn Hanrahan wrote:
Lynn Hanrahan wrote:
Im at the end of the sleeve where i have 92 stitches on my needles. Wondering how to finish this next part.
04.05.2023 - 15:48DROPS Design answered:
Hi Lynn, After the increases are finished, continue working until the sleeve measures 46 cm. Then begin casting off for the sleeve cap on each side, every 2nd row: 4 stitches once on each side, then 2 stitches 5 times on each side, 1 stitch once on each side. Then continue by casting off 2 stitches on each side every 2nd row until the sleeve measures 55 cm, cast off 4 stitches on each side. Cast off all stitches when the sleeve measures 56 cm. Hope this helps and happy knitting!
05.05.2023 - 06:51
![]() Lynn Hanrahan wrote:
Lynn Hanrahan wrote:
So do you still do the yos in pattern on sleeves
12.12.2022 - 18:19DROPS Design answered:
Hi Lynn, Yes, The pattern on the sleeves is the same as on the body. Happy knitting!
13.12.2022 - 07:47
|
|||||||||||||
Wisteria Weaving |
|||||||||||||
|
|
|||||||||||||
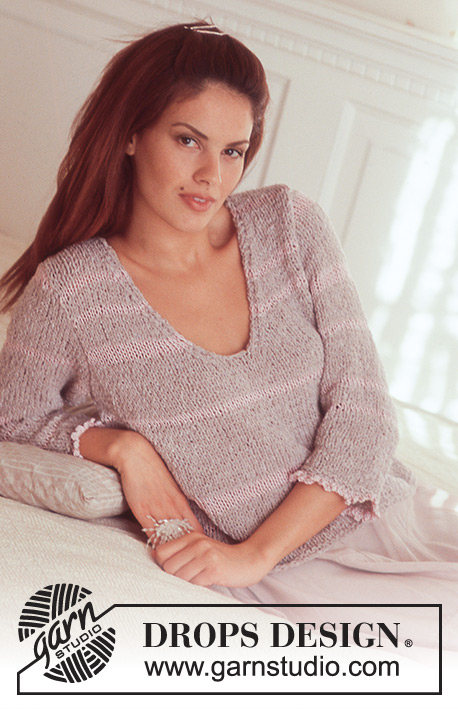
DROPS Pullover in Muskat
DROPS 73-5 |
|||||||||||||
|
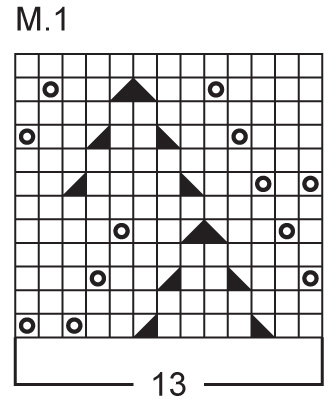
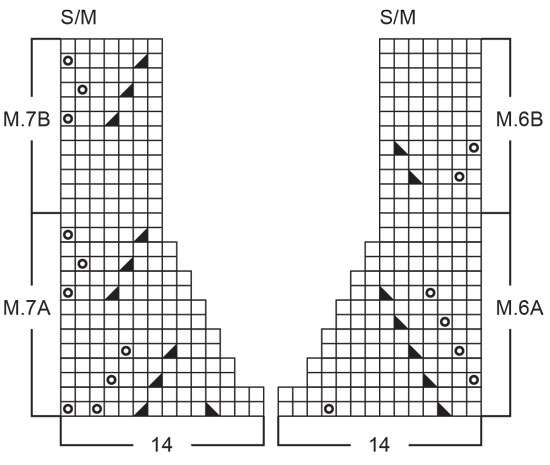
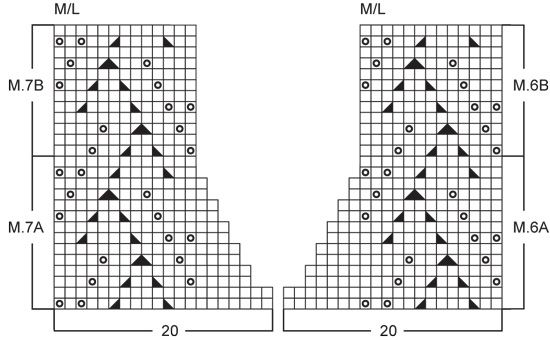
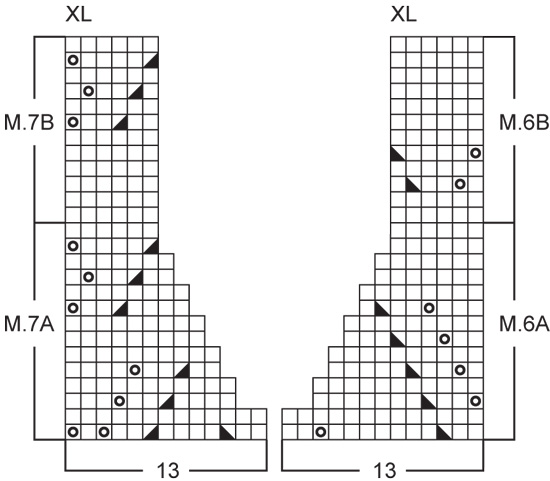
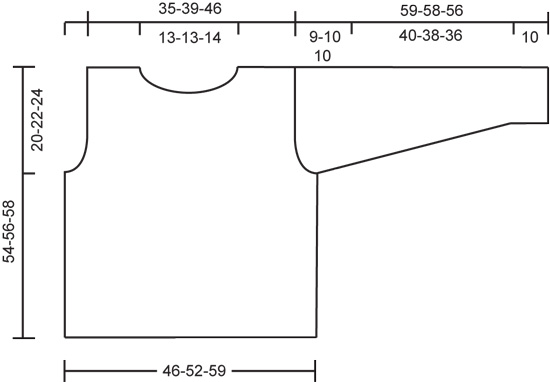
Gauge: 20 sts x 26 rows = 10 x 10 cm on larger needles in pattern. 1 repeat of Pattern 1 = 7 cm wide Rib: * K 2, P 4 *, repeat from * - *. Garter st, when knitting flat: Knit all sts, all rows. Pattern: See charts. The pattern is seen from the right side. Note: Patterns 6 and 7 (neck shaping) are different for each size - use the appropriate chart for your size. ------------------------------------------------------------------ Front: Cast on 92-104-116 sts on smaller needles. Knit 6 rows rib, but keep 1 edge st at each side knit in garter st throughout. Change to larger needles and Pattern 1, increasing 1-2-3 sts evenly distributed on the first row = 93-106-119 sts (the edge st at each side should not be knit in Pattern 1). When the piece measures approx. 34 cm - adjust to end after a complete repeat of Pattern 1 - knit the next row as follows (right side row): 14 sts stockinette st, Pattern 1 over 65-78-91 sts, 14 sts stockinette st. Continue Pattern 1 with stockinette st at each side and bind off for armhole at each side every other row: 4 sts 1 time, 2 sts 2 times and 1 st 3-5-5 times = 71-80-93 sts. Continue Pattern 1 with 3-1-1 sts stockinette st each side. When the piece measures approx. 43 cm (adjust to end after a complete repeat of Pattern 1) knit the next row as follows: 3-1-1 sts stockinette st, 13-13-26 sts of Pattern 1, Pattern 6A (use chart for your size) for 14-20-13 sts, bind off 11-12-13 sts for the neck, Pattern 7A (use chart for your size) for 14-20-13 sts, 13-13-26 sts of Pattern 1 and 3-1-1 sts stockinette st. Shape neck following Patterns 6A and 7A. When neck shaping is complete 23-27-33 sts remain on each shoulder. Continue with Patterns 6B and 7B over 7-13-6 sts to finished measurements, knit the remaining sts as before. Bind off when the piece measures 54-56-58 cm. Back: Cast on and knit the same as the front. Bind off for armhole as on front and continue until the piece measures 52-54-56 cm. Now bind off the center 23-24-25 sts for the neck. On the next row dec 1 st at each neck edge = 23-27-33 sts remain on each shoulder. Bind off when the piece measures 54-56-58 cm. Sleeve: Cast on 56-56-56 sts on smaller needles and knit rib for 10 cm, keeping 1 edge st at each side in garter st. Change to larger needles and continue as follows: 2 sts stockinette st, Pattern 1 over 52 sts, 2 sts stockinette st. When the piece measures 12 cm inc 1 st at each side a total of 10-14-18 times: Size S/M: every 10 rows. Size M/L: alternately every 6th and 7th row. Size XL: alternately every 4th and 5th row = 76-84-92 sts - knit the increased sts in stockinette st. When sleeve measures 50-48-46 cm bind off for sleeve cap at each side every other row (do not make any yo in the pattern even if sts are knit together): 4 sts 1 time, 2 sts 4-5-5 times, 1 st 2-2-1 times, then bind off 2 sts at each side until the piece measures 58-57-55 cm and then bind off 4 sts 1 time. Bind off, sleeve measures approx. 59-58-56 cm. Assembly: Sew right shoulder. Neckband: Pick up approx. 80-90 sts around the neck on smaller needles. Knit 4 rows garter st, bind off. Sew left shoulder and up along neckband. Sew in sleeves and sew sleeve and side seams using edge sts as a seam allowance. Belt: Cast on 7 sts on double-pointed needle. Knit 1 row, * push sts to right side of needle without turning the work, pull yarn tight on back side and knit 1 row from same side as previous row *. Repeat from * - *. For best results, pull yarn tight on previously knit rows as you go along. Bind off when belt measures approx. 120-150 cm. |
|||||||||||||
Diagram explanations |
|||||||||||||
|
|||||||||||||
 |
|||||||||||||
 |
|||||||||||||
 |
|||||||||||||
 |
|||||||||||||
 |
|||||||||||||
Have you finished this pattern?Tag your pictures with #dropspattern or submit them to the #dropsfan gallery. Do you need help with this pattern?You'll find 19 tutorial videos, a Comments/Questions area and more by visiting the pattern on garnstudio.com. © 1982-2026 DROPS Design A/S. We reserve all rights. This document, including all its sub-sections, has copyrights. Read more about what you can do with our patterns at the bottom of each pattern on our site. |
|||||||||||||


With over 40 years in knitting and crochet design, DROPS Design offers one of the most extensive collections of free patterns on the internet - translated to 17 languages. As of today we count 324 catalogues and 12290 patterns translated into English (UK/cm). 12290
We work hard to bring you the best knitting and crochet have to offer, inspiration and advice as well as great quality yarns at incredible prices! Would you like to use our patterns for other than personal use? You can read what you are allowed to do in the Copyright text at the bottom of all our patterns. Happy crafting!
Post a comment to pattern DROPS 73-5
We would love to hear what you have to say about this pattern!
If you want to leave a question, please make sure you select the correct category in the form below, to speed up the answering process. Required fields are marked *.