
Popular categories
Looking for a yarn?


Comments / Questions (12)
![]() Rannveig wrote:
Rannveig wrote:
Hei, hva er et dbl-kast?
10.04.2026 - 14:54DROPS Design answered:
Hei Rannveig, Hvis du klikker på "Videoer" på toppen av sida, finner du en video som viser deg hvordan du strikker en dobbel-kast. Der er det også andre videoer som kan hjelpe deg med denne oppskriften. Hilsen Drops Team.
11.04.2026 - 07:52
![]() Rissa wrote:
Rissa wrote:
Weil es ein hübsches Muster ist, aber in den Ausmassen zu gross, habe ich die Anleitung etwas abgewandelt. Das kleine Band mit dünnem Baumwollgarn und Nadeln Nr. 2 ergibt eine Höhe von 10 cm. Passt um ein leeres Marmeladeglas. Für ein etwas kleineres Glas lasse ich die linke Bordüre weg und stricke dafür 2 Maschen kraus rechts = 8 cm Höhe.
31.10.2020 - 04:11Aurelie Quade wrote:
After reading all the posts from above, I just wanted to write to say thank you for the lovely free pattern, for the support and for your Christmas wishing. Thank you to all the lovely ladies working for the website for sharing their passion for knitting. Joyeux Noel et Bonne Année 2019. Aurélie
17.12.2018 - 23:43
![]() DANA wrote:
DANA wrote:
Bonjour, Je pense que vous vous êtes trompée dans la mensuration de la circonférence : 44 et même 57 cm c'est énorme pour un photophore. Est-ce une mesure autre?
22.12.2017 - 11:50DROPS Design answered:
Bonjour Dana, ce sont bien les bonnes mesures, on parle ici de circonférence, les photophores mesurent 40-52 cm pour s'ajuster à un support plus large. Vous pouvez naturellement les tricoter à la longueur souhaitée. Bon tricot!
22.12.2017 - 16:22
![]() Kim wrote:
Kim wrote:
This Is a very pretty and delicate look. However, its not for an inexperienced knitter. The combination of these two yarns create knots very easily, and you have to be careful not to split them or they stick out and spoil the design. If you are meticulous and patient, then this is the pattern for you.
23.01.2017 - 03:29
![]() Giulia wrote:
Giulia wrote:
Buonasera quanto termino un'intera ripetizione di A1 devo ricominciare dal 1 ferro come spiegato dopo la costa a legaccio quindi terminando il ferro con 7 maglie a diritto? Non sono riuscita a trovare dei vasi con questa circonferenza quindi m chiedevo se fosse possibile avere la misura in cm di un' intera ripetizione di A1 in modo che io possa regolarmi con vasi di diversa misura. Grazie e complimenti per questo carinissimo modello
29.11.2015 - 00:45DROPS Design answered:
Buongiorno Giulia, dopo la "costa" a m legaccio deve lavorare il motivo A.1 con 7 m per parte con il bordo a pizzo, e continuare a ripeterlo fino alla lunghezza desiderata, ripartendo dal 1° ferro di A.1 con il bordo a pizzo ai lati. Se il suo campione corrisponde a quello indicato A.1 dovrebbe misurare poco più di 3 cm, in ogni caso lavori A.1 fino alla circonferenza desiderata. Buon lavoro!
29.11.2015 - 14:34
![]() Sharron Blackburn wrote:
Sharron Blackburn wrote:
Why are the measurements given for the size and circumference so large, when the candle holders shown seem clearly not to be as large as the measurements for the finished article? The smaller one in particular. From the photo it looks like a candle holder 10cm in height maximum, which is what a friend purchased for me to make these for her. Do you have a pattern for anything smaller?? Many thanks
12.03.2015 - 15:43DROPS Design answered:
Dear Mrs Blackburn, the covers on the pictures are approx. 15-20 cm height (= width when working). If you like something smaller, you can adapt pattern, make another edge, use smaller needle .. Remember you can get help and advice from your DROPS store. Happy knitting!
12.03.2015 - 17:41
![]() Trude wrote:
Trude wrote:
Denne oppskriften var det ikke enkelt å forstå. Midtpartiet var greit men ikke i rysje (ytterkanten).
01.12.2014 - 19:48
![]() Sabine wrote:
Sabine wrote:
Hi, ich hätte auch Angst wegen der Feuergefährlichkeit.... Aber die Anleitung etwas 'vergrößert' gibt das bestimmt eine schöne Bauchbinde für eine Vase. Werd' ich bestimmt ausprobieren...
21.12.2013 - 11:13
![]() Andrea wrote:
Andrea wrote:
Wunderschön! Und ich glaube nicht, dass es zu heiß wird, zumindest nicht bei diesen breiten Gläsern. Sonst musst du es mit einem reinen Baumwollfaden stricken. Schön wären die auch um gläserne Teetassen. Aber leider zu groß.
19.12.2013 - 07:52
|
||||||||||||||||
Christmas Lights#dropschristmaslights |
||||||||||||||||
|
|
||||||||||||||||
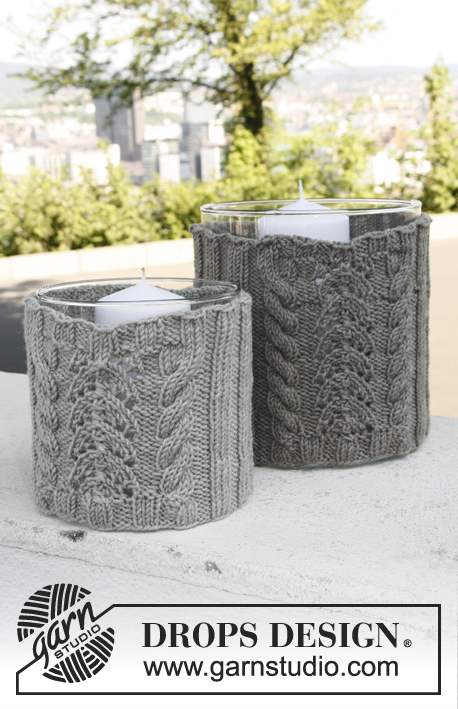
DROPS Christmas: Knitted candle holder cover in DROPS Cotton Viscose and Glitter
DROPS Extra 0-1003 |
||||||||||||||||
|
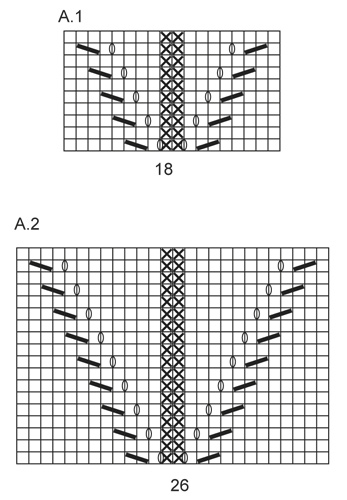
GARTER ST (back and forth on needle): K all rows. 1 ridge = 2 rows K. RIGHT LACE EDGE: Row 1 (from RS): K 3, 1 double YO, P 1, K 3. Row 2 (from WS): K 5 (= K4 and K1 in first yo), K 1 twisted (i.e. work in back loop of second yo instead of front), K 3. Row 3: Cast off 2 sts (= 1 st remains on right needle), K 2, P 1, 1 double YO, K 2 twisted tog, K 1 twisted. Row 4: K 2, K 1 in double YO, slip the other YO off, K 4. LEFT LACE EDGE: Row 1 (from WS) = K 3, 1 double YO, K 4. Row 2 (from RS): K 3, P 1, K 1 (in first yo), K 1 twisted (in second yo), K 3. Row 3: Cast off 2 sts (= 1 st remains on needle), K 3, 1 double YO, K 2 twisted tog, K 1 twisted. Row 4: K 2, K1 in first yo (slip the second YO off the needle), P 1, K 3. PATTERN: See diagrams A.1 or A.2. Diagrams show all rows in pattern. ---------------------------------------------------------- SMALL BAND: Cast on 32 sts on needle size 3 mm with 1 strand Cotton Viscose and 1 strand Glitter. Work 1 ridge in GARTER ST - see explanation above. Then work as follows from RS: Right lace edge over the first 7 sts, A.1 (= 18 sts), K the last 7 sts. Work next row as follows – from WS: Left lace edge, A.1, right lace edge (2nd row). Continue like this. NOTE! No of sts will vary because of dec and inc in lace edges. Continue pattern until piece measures approx. 40 cm, or desired measurements – adjust according to one whole repetition of A.1. Cast off. Sew tog the cast-on and cast-off edge. LARGE BAND: Cast on 40 sts on needle size 3 mm with 1 strand Cotton Viscose and 1 strand Glitter. Work 1 ridge in GARTER ST - see explanation above. Then work as follows from RS: Right lace edge over the first 7 sts, A.2 (= 26 sts), K the last 7 sts. Work next row as follows – from WS: Left lace edge, A.2, right lace edge (2nd row). Continue like this. NOTE! No of sts will vary because of dec and inc in lace edges. Continue pattern until piece measures approx. 52 cm, or desired measurements – adjust according to one whole repetition of A.2. Cast off. Sew tog the cast-on and cast-off edge. |
||||||||||||||||
Diagram explanations |
||||||||||||||||
|
||||||||||||||||
 |
||||||||||||||||
Have you finished this pattern?Tag your pictures with #dropspattern #dropschristmaslights or submit them to the #dropsfan gallery. Do you need help with this pattern?You'll find 17 tutorial videos, a Comments/Questions area and more by visiting the pattern on garnstudio.com. © 1982-2026 DROPS Design A/S. We reserve all rights. This document, including all its sub-sections, has copyrights. Read more about what you can do with our patterns at the bottom of each pattern on our site. |
||||||||||||||||


With over 40 years in knitting and crochet design, DROPS Design offers one of the most extensive collections of free patterns on the internet - translated to 17 languages. As of today we count 324 catalogues and 12290 patterns translated into English (UK/cm). 12290
We work hard to bring you the best knitting and crochet have to offer, inspiration and advice as well as great quality yarns at incredible prices! Would you like to use our patterns for other than personal use? You can read what you are allowed to do in the Copyright text at the bottom of all our patterns. Happy crafting!
Post a comment to pattern DROPS Extra 0-1003
We would love to hear what you have to say about this pattern!
If you want to leave a question, please make sure you select the correct category in the form below, to speed up the answering process. Required fields are marked *.