
Popular categories
Looking for a yarn?


Comments / Questions (51)
![]() Sølvi wrote:
Sølvi wrote:
I oppskriften begynner vrangbord på midt foran/midt bak feltene før felling for ermer og deling til for og bakstykker På bildet er denne vrangborden kun øverst på toppen. Når skal man begynne vrangborden for å få det likt som på bildet av modellen?
25.05.2016 - 10:43DROPS Design answered:
Hei Sølvi. Du skal begynne som der staar i mönstret. Jeg tror den ogsaa er begyndt för paa modellen paa billedet, men pga barmen traekker den lidt op.
25.05.2016 - 13:32
![]() Grethe Augustesen wrote:
Grethe Augustesen wrote:
Ups :-) Jeg er så gået i gang med at trevle op. Har glemt indtagningerne. Tak for svaret. Med venlig hilsen Grethe
04.05.2015 - 19:15
![]() Grethe Augustesen wrote:
Grethe Augustesen wrote:
Ang drops 147-5. Forstykke halsudskæring. Der er 102m og når der lukkes af til hals er det de midterste 14, så er der 88 m tilbage altså 44 m til hver skulder. Så står der at der skal lukkes 2m 4 gange og 1m 4 gange. Det giver rest på 32m og ikke 22. Jeg har så valgt at lukke 2m 9 gange og 1m 4 gange. Det er en rigtig fin halsudskæring, men mon ikke det skal rettes? Iøvrigt er jeg meget glad for jeres opskrifter. Med venlig hilsen Grethe
04.05.2015 - 10:48DROPS Design answered:
Hej Grethe. Mönstret passer. Du skal strikke og tage ind til ærmegab som paa bagstykket. Dvs, du har 102 m og tager ind som paa bagstyk (82 m til overs), saa lukker du 14 af til hals = 68 eller 34 paa hver skulder. Du lukker saa af til hals som beskrevet (2 m 4 gange og 1 m 4 gange) og du har 22 m tilbage paa hver skulder.
04.05.2015 - 15:58
![]() Elena wrote:
Elena wrote:
Buongiorno, questo modello mi piace molto e vorrei realizzarlo. Noto che le spiegazioni si riferiscono ai ferri circolari, ma io possiedo solo ferri dritti. Posso procedere ugualmente. Ha dei suggerimenti da darmi? grazie molte saluti Elena
18.04.2015 - 09:04DROPS Design answered:
Buonasera Elena, se vuole lavorare con i ferri dritti può avviare la metà delle m e aggiungere una m di vivagno per lato per le cuciture. Faccia attenzione anche alla lavorazione del diagramma. Buon lavoro!
18.04.2015 - 21:53
![]() Bodil Engen Lund wrote:
Bodil Engen Lund wrote:
Har begynt å strikke toppen. Har redusert de vrange maskene til 192. Skal strikke neste omgang, stemmer ikke med maske-antallet når jeg har strikket ferdig omgangen. Har da "brukt" 180 masken, det gjenstår 12 masker. Må være noe feit i oppskriften?
11.08.2014 - 18:04DROPS Design answered:
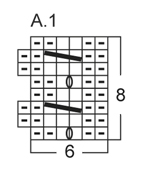
Når du har 192 m strikker du næste omgang således: diag A.1, 2 r, 2 vr, 2 r, diag A.1 66 m, diag A.1, 2 r, 2 vr, 2 r, diag A.1, 2 r, 2 vr, 2 r, diag A.1, 66 m, diag A.1, 2 r, 2 vr, 2 r. = 192 m God fornøjelse! Markere i opskriften hvilke tal som gælder for din størrelse!
04.09.2014 - 11:14
![]() Jill wrote:
Jill wrote:
Thank you for the correction! I greatly appreciate it. The directions for the pattern are not correct. Is their any other corrections in the pattern that I need to be aware of?
04.06.2013 - 20:35DROPS Design answered:
Dear Jill, no correction there, I just wrote for you all indications for size S. Any correction added would be listed under the tab at the right side of the picture. Happy knitting!
05.06.2013 - 10:34
![]() Jill wrote:
Jill wrote:
I am making a size small, & when I switch to the larger size needle, 3.5mm, I get to the 2nd part, where you work 58 stockinette stitches & that is already 176 for the small, but I need 10 more stitches to finish the row. Am I reading the directions incorrectly?
04.06.2013 - 05:56DROPS Design answered:
Dear Jill, in size S you should have : (starting 3 sts before beg of round) : A1 (6 sts) + K2, P2 + K2 + 6 sts in A1 + 58 st st + 6 sts in A1 + K2, P2 + K2 + 6 sts in A1 + K2, P2 + K2 + 6 sts in A1 + 58 st st + 6 sts in A1 + K2, P2 + K2 = 176 sts. Happy knitting!
04.06.2013 - 09:01
![]() Karin wrote:
Karin wrote:
Nu är den klar! Stickade klart den på en vecka exakt...Enkel och väldigt bra passform, jag minskade den lite så att den skulle bli en tajt xs och den sitter precis så som jag ville! Tack för det snabba svaret på min fråga...
18.03.2013 - 13:28
![]() Anna wrote:
Anna wrote:
Resåren ska stickas 4cm!
12.03.2013 - 19:18
![]() Karin wrote:
Karin wrote:
Hej, i mönstret står det att man ska upprepa resåren i strl small skall det upprepas 1 ggr allstå ska jag sticka resåren 2 grr eller bara en gång? Det stämmer inte med mönstret...Tacksam för svar
12.03.2013 - 17:57
|
|||||||||||||
Pretty pink#prettypinktop |
|||||||||||||
 |
 |
||||||||||||
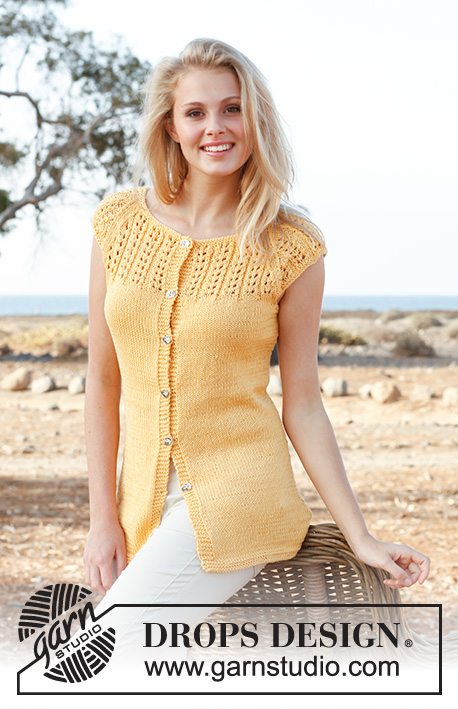
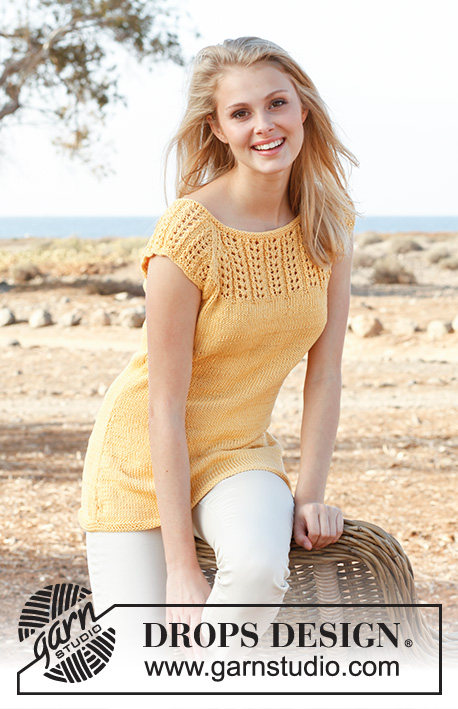
Knitted DROPS tight-fitting top with rib and lace pattern in ”Cotton Light”. Size: S - XXXL.
DROPS 147-5 |
|||||||||||||
|
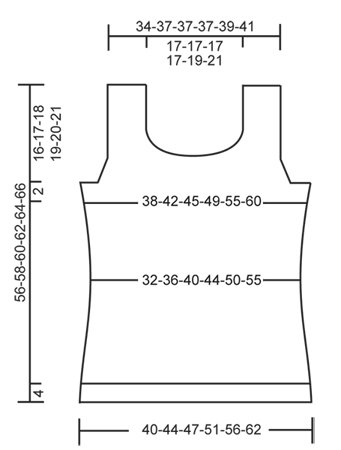
PATTERN: See diagram A.1. Diagram shows all rows in pattern seen from RS. GARTER ST (in the round on circular needle): 1 ridge = 2 rounds. * K 1 round and P 1 round *, repeat from *-*. GARTER ST (back and forth on needle): K all rows. 1 ridge = 2 rows K. DECREASE TIP 1 (applies to waist): Dec after 1st and 3rd marker and before 2nd and 4th marker. Dec as follows after marker: Slip 1 st as if to K, K 1, psso. Dec as follows before marker: K 2 tog. DECREASE TIP 2 (applies to armhole): Dec inside 3 edge sts in garter st. All dec are done from RS! Dec after 3 edge sts as follows: Slip 1 st as if to K, K 1, psso. Dec before 3 edge sts as follows: K 2 tog. INCREASE TIP (applies to waist): Inc after 1st and 3rd marker and before 2nd and 4th marker. Inc as follows after marker: K 1, then pick up same st from previous round and K this st. Inc as follows before marker: Beg 1 st before marker and pick up this st from previous round, K this st and K last st before marker. ---------------------------------------------------------- BODY: Worked in the round on circular needle. Cast on 220-240-260-280-310-340 sts on circular needle size 3 mm with Cotton Light. K 1 round. Work next round as follows: Insert 1 marker at beg of round (= side), K 1, * P 3, K 2 *, repeat from *-* 21-23-25-27-30-33 times in total, P 3, K 2 (insert 1 marker in the middle of these 2 K sts = side), * P 3, K 2 *, repeat from *-* 21-23-25-27-30-33 times in total and finish with P 3 and K 1. Continue rib like this. When piece measures 4 cm, dec all 3 P sts to 2 P sts by P tog the first 2 sts in every P-section = 176-192-208-224-248-272 sts. Switch to circular needle size 3.5 mm. Beg next round 3 sts before marker at beg of round: Diagram A.1 (= 6 sts – marker in the side is in the middle of A.1), * K 2, P 2 *, repeat from *-* 1-1-2-3-4-5 times in total, K 2, diagram A.1 (= 6 sts), insert 1 marker (= 1st marker), work in stocking st over the next 58-66-66-66-70-74 sts, insert 1 marker (= 2nd marker), diagram A.1 (= 6 sts), * K 2, P 2 *, repeat from *-* 1-1-2-3-4-5 times in total, K 2, diagram A.1 (= 6 sts – marker in the side is in the middle of A.1), * K 2, P 2 *, repeat from *-* 1-1-2-3-4-5 times in total, K 2, diagram A.1 (= 6 sts), insert 1 marker (= 3rd marker), work in stocking st over the next 58-66-66-66-70-74 sts, insert 1 marker (= 4th marker), diagram A.1 (= 6 sts), * K 2, P 2 *, repeat from *-* 1-1-2-3-4-5 times in total and finish with K 2. Continue pattern like this. REMEMBER THE KNITTING TENSION! When piece measures 6-7-7-7-8-8 cm, dec 1 st after 1st and 3rd marker and before 2nd and 4th marker - READ DECREASE TIP 1 (= 4 sts dec). Repeat dec every 4th round 8-7-7-7-6-6 more times = 140-160-176-192-220-244 sts. When piece measures 22 cm, inc 1 st after 1st and 3rd marker and before 2nd and 4th marker - READ INCREASE TIP (= 4 sts inc). Repeat inc every 7th-8th-9th-10th-13th-14th round 6-5-5-5-4-4 more times = 168-184-200-216-240-264 sts. READ ALL OF THE FOLLOWING SECTION BEFORE CONTINUING! When piece measures 38-39-40-41-42-43 cm, work rib (= K 2/P 2) over the middle 54-62-62-62-66-70 sts in stocking st front and back (i.e. between 1st and 2nd marker and between 3rd and 4th marker, work the other sts as before – NOTE: Beg and end rib with K 2 in each side). AT THE SAME TIME when piece measures 39-40-41-42-43-44 cm, work 2 ridges in GARTER ST over the middle 12 sts in each side (= 6 sts in garter st on each side of markers in the sides - work the other sts as before). On next round after the 2 ridges, cast off the middle 6 sts in each side for armholes (i.e. cast off 3 sts on each side of both markers). Work front and back piece separately, back and forth on circular needle. BACK PIECE: = 78-86-94-102-114-126 sts. Continue pattern as before but work the outermost 3 sts in each side in GARTER ST - read explanation above. AT THE SAME TIME on next row from RS, dec 1 st on each side for armhole - Read DECREASE TIP 2 (= 2 sts dec). Repeat dec every other row (i.e. on every row from RS), 1-1-3-6-10-14 more times and then every 4th row (i.e. on every other row from RS) a total of 0-0-2-3-3-3 times = 74-82-82-82-86-90 sts. When piece measures 54-56-58-60-62-64 cm, cast off the middle 34-34-34-34-38-42 rib sts for neck and finish each shoulder separately. Continue to cast off 2 sts on next row from neck = 18-22-22-22-22-22 sts remain on the shoulder. Continue pattern as before with 3 sts in garter st towards the armhole and 2 sts in garter st towards the neck. Cast off when piece measures 56-58-60-62-64-66 cm. Repeat on the other shoulder. FRONT PIECE: = 78-86-94-102-114-126 sts. Work as on back piece but when piece measures 44-46-48-48-50-52 cm, cast off the middle 14-14-14-14-18-22 sts for neck and finish each shoulder separately. Then cast off at beg of every row from neck: 2 sts 4 times and 1 st 4 times = 18-22-22-22-22-22 sts remain on shoulder. Continue with pattern with 3 sts in garter st towards armhole and 2 sts in garter st towards neck until piece measures 56-58-60-62-64-66 cm and cast off. Repeat on the other shoulder. ASSEMBLY: Sew the shoulder seams. NECK EDGE: Beg mid back and work a finishing edge around the neck on hook size 3 mm as follows: 1 dc in first st, * 2 ch, skip approx. 1-1½ cm, 1 dc in next st *, repeat from *-* the entire round and finish with 2 ch and 1 sl st in first dc from beg of round. Cut and fasten the thread. |
|||||||||||||
Diagram explanations |
|||||||||||||
|
|||||||||||||
 |
|||||||||||||
 |
|||||||||||||
Have you finished this pattern?Tag your pictures with #dropspattern #prettypinktop or submit them to the #dropsfan gallery. Do you need help with this pattern?You'll find 22 tutorial videos, a Comments/Questions area and more by visiting the pattern on garnstudio.com. © 1982-2026 DROPS Design A/S. We reserve all rights. This document, including all its sub-sections, has copyrights. Read more about what you can do with our patterns at the bottom of each pattern on our site. |
|||||||||||||


With over 40 years in knitting and crochet design, DROPS Design offers one of the most extensive collections of free patterns on the internet - translated to 17 languages. As of today we count 324 catalogues and 12290 patterns translated into English (UK/cm). 12290
We work hard to bring you the best knitting and crochet have to offer, inspiration and advice as well as great quality yarns at incredible prices! Would you like to use our patterns for other than personal use? You can read what you are allowed to do in the Copyright text at the bottom of all our patterns. Happy crafting!
Post a comment to pattern DROPS 147-5
We would love to hear what you have to say about this pattern!
If you want to leave a question, please make sure you select the correct category in the form below, to speed up the answering process. Required fields are marked *.