
Popular categories
Looking for a yarn?


Comments / Questions (51)
![]() Mireille P wrote:
Mireille P wrote:
Tricoter 2 côtes POINT MOUSSE au-dessus des 12 m au milieu sur les côtés (= 6 m au point mousse de chaque côté des marqueurs des côtés - tricoter les autres mailles comme avant). Au tour suivant, après les 2 côtes mousse, rabattre les 6 m au milieu de chaque côté pour les emmanchures (c'est-à-dire rabattre 3 m de chaque côté des 2 marqueurs). merci de m'expliqueren bon Français je suis complètement perdu
17.05.2024 - 23:42
![]() Mireille P wrote:
Mireille P wrote:
Je vois que même dans vos réponses vous êtes de mauvaise foi , il faut corriger l'énoncé de votre patron qui est faux !!! le point fantaisie correspond bien à 208 mailles pour une taille L !!!!! moi j'ai commencé pour une taille M . J'ai fini par m'en sortir mais une chose est sûre je n'achèterai pas de patron sur DROPS . Cordialement
07.05.2024 - 14:19DROPS Design answered:
Bonjour Mireille, je suis désolée si j'ai mal compris votre propos précédemment, en taille M, il faut lire les explications ainsi pour que les motifs tombent juste: A.1 (= 6 m), 2 m end, 2 m env (= 4 m), 2 m end, A.1 (= 6 m), (= 1er marqueur), tricoter les 66 m suiv en jersey, (= 2ème marqueur), A.1 (= 6 m), 2 m end, 2 m env, 2 m end, A.1 (= 6 m – le marqueur du côté se trouve au milieu de A.1), 2 m end, 2 m env, 2 m end, diagramme A.1 (= 6 m), (= 3ème marqueur), tricoter les 66 m suiv en jersey, (= 4ème marqueur), A.1 (= 6 m), 2 m end, 2 m env et terminer par 2 m end = 6+2+2+2+6+66+6+2+2+2+6+2+2+2+6+66+6+2+2+2 =192 m. Bon tricot!
07.05.2024 - 16:09
![]() Paquit Mireille wrote:
Paquit Mireille wrote:
Bonjour vous vous êtes trompé dans ce modèle les explications sont données pour la taille L(208 m) je l'ai commencé en M ce qui fait que le point fantaisie n'est pas juste cela donne 3 motifs d'un côté et 2 motifs de l'autre comment faire pour que les points tombent juste
26.04.2024 - 13:46DROPS Design answered:
Bonjour Mme Paquit, en taille, tricotez ainsi: A.1 (= 6 m), * 2 m end, 2 m env* x 2 (=8 m), 2 m end, A.1 (= 6 m), (= 1er marqueur), 66 m jersey, (= 2ème marqueur), A.1 (= 6 m), * 2 m end, 2 m env* x 2 (= 8 m), 2 m end, A.1 (= 6 m), * 2 m end, 2 m env* x 2 (= 8 m), 2 m end, A.1 (= 6 m), (3ème marqueur), 66 m jersey, (4ème marqueur), A.1 (= 6 m), * 2 m end, 2 m env* x 2 (= 8 m), 2 m end soit: 6+8+2+6+66+6+8+2+6+8+2+6+66+6+8+2=208 m et 6 fois le diagramme A.1 au total tout le tour; Bon tricot!
26.04.2024 - 15:41
![]() Manon wrote:
Manon wrote:
. Continuer avec l'aiguille circulaire 3.5 et commencer le tour suivant 3 m avant le marqueur du début du tour: Diagramme A.1 (= 6 m – le marqueur sur le côté est au milieu de A.1), *mais j'ai déjà tricoter mes 3 mailles pour finir mon tour alors commencer le tour 3 mailles avant le marqueur?????
20.02.2022 - 21:13DROPS Design answered:
Bonjour Manon, détricotez ces 3 mailles à la fin de votre dernier tour avec les aiguilles 3, vous allez désormais commencer ici par le diagramme A.1 (= les 3 dernières mailles du tour + les 3 premières mailles du tour suivant). Bon tricot!
21.02.2022 - 10:05
![]() Manon wrote:
Manon wrote:
Merci pour vos explications maintenant je suis rendu a faire le A1 mais je n,y comprends explications simple svp merci beaucoup ...
19.02.2022 - 17:11DROPS Design answered:
Bonjour Manon, cette leçon explique comment lire un diagramme; et cette vidéo montre comment tricoter ce type de petites torsades. Bon tricot!
21.02.2022 - 09:35
![]() Manon wrote:
Manon wrote:
Bonjour merci pour l'info..maintenant ces le entre parenthèse ( (2+ (5x27)+3+1)+(1+(5*27)+3) que je ne comprends pas Merci !
09.02.2022 - 15:55DROPS Design answered:
Bonjour Manon, les chiffres dans les parenthèses correspondent aux mailles décrites juste au-dessus, autrement dit: *1 m end (et non pas 2 désolée), (3 m env, 2 m end) x 27 (soit 5 x 27 =135 mailles en côtes 3 m env, 2 m end) , 3 m env, 1 m end*, (vous avez maintenant tricoté: 1 + 135+3+1=140 mailles, placez le 2ème marqueur, et répétez de * à* encore 1 fois = 140 mailles après le 2ème marqueur = 280 mailles au total. Bon tricot!
09.02.2022 - 16:05
![]() Manon wrote:
Manon wrote:
Bonjour moi je me demande quand on commence au début 1 m end 3 m env 2 m end c'esi écris 2 fois répéter 21 a 33 fois moi je fais ex donc 27 fois et mettre un marqueur je ne sais pas ou je doit mettre les marqueurs Merci !
08.02.2022 - 01:16DROPS Design answered:
Bonjour Manon, tricotez ainsi en XL: placez votre 1er marqueur au début du tour, puis tricotez: 2 m end, (3 m env, 2 m end) x 27, 3 m env, 1 m end, placez le 2ème marqueur, 1 m end, (3 m env, 2 m end) x 27, terminez par 3 m end, soit: (2+ (5x27)+3+1)+(1+(5*27)+3)=280 mailles (140 de chaque côté de chaque marqueur). Bon tricot!
08.02.2022 - 09:24
![]() Rose wrote:
Rose wrote:
I am doing a project with pattern 147-5. But having problem after the rib for body. The calculation of stiches does not match with my rib sticthes. My size is L
12.08.2021 - 15:07DROPS Design answered:
Dear Rose, In size L work as follows: Insert 1 marker at beg of round (= side), K 1, * P 3, K 2 *, repeat from *-* 25 times in total (= 5 sts x 25 = 125 sts) , P 3, K 2 (insert 1 marker in the middle of these 2 K sts = side), * P 3, K 2 *, repeat from *-* 25 times in total (= 5 sts x 25 = 125 sts) and finish with P 3 and K 1 = 1+ 125 + 3 +2 + 125 + 3 +1=260 sts. Happy knitting!
12.08.2021 - 16:17
![]() Fanny Andrä wrote:
Fanny Andrä wrote:
Ich stricke dieses Top nach. Ich komme beim Beginn des Musters nur auf 96 Maschen und nicht auf die nötigen 208. wo liegt mein Fehler?
24.04.2020 - 15:23DROPS Design answered:
Liebe Frau Andrä, Sie beginnen mit 260 M und stricken: 1 M re, * 3 M li, 2 M re *, von *-* insgesamt 25 x arbeiten, 3 M li, 2 M re, * 3 M li, 2 M re *, von *-* insgesamt 25 x arbeiten und mit 3 M li und 1 M re enden = 260 M und Sie haben jetzt 3 M li x 52 insgesamt. Bei 4 cm nehmen Sie 1 Masche in jeder dieser 3-M-Li-Partien (2 M li zs) = 52 werden abgenommen, so haben Sie 260-52=208 M übrig. Viel Spaß beim stricken!
24.04.2020 - 15:49
![]() Duperrex wrote:
Duperrex wrote:
Modèle très facile à faire et j'ai eu grand plaisir à le faire !
15.07.2019 - 22:54
|
|||||||||||||
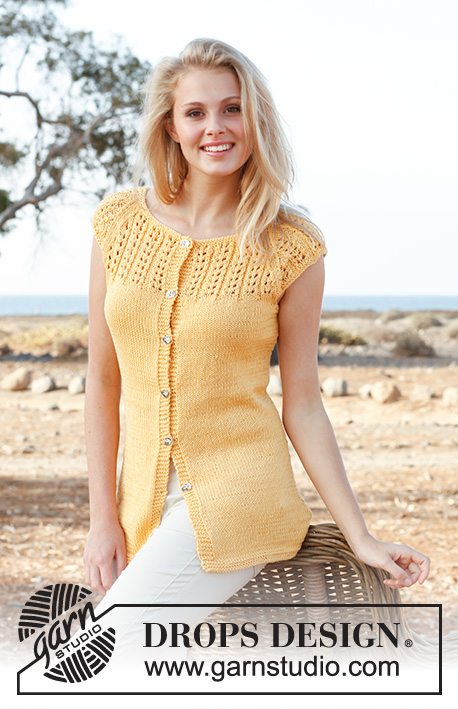
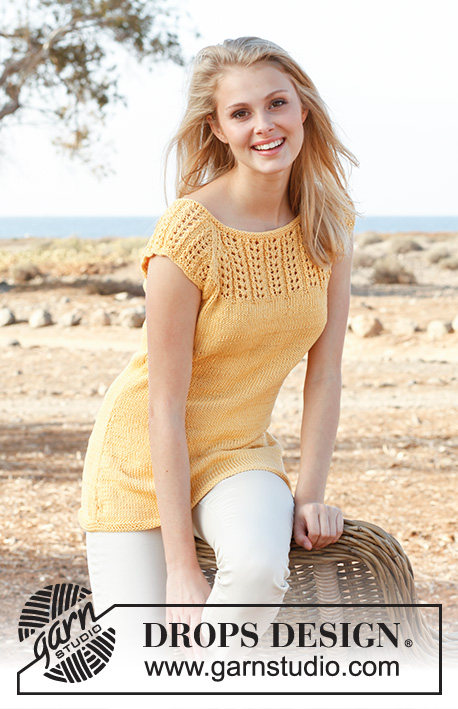
Pretty pink#prettypinktop |
|||||||||||||
 |
 |
||||||||||||
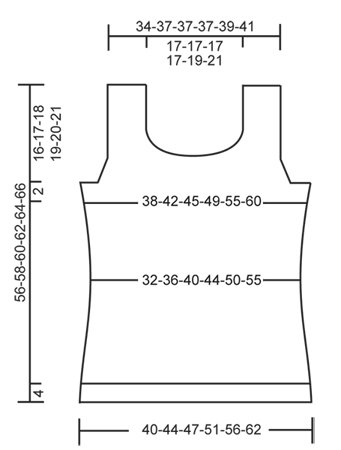
Knitted DROPS tight-fitting top with rib and lace pattern in ”Cotton Light”. Size: S - XXXL.
DROPS 147-5 |
|||||||||||||
|
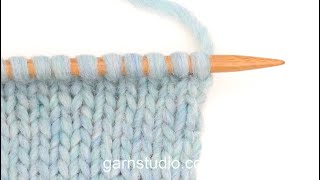
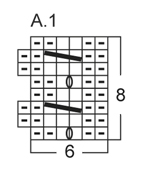
PATTERN: See diagram A.1. Diagram shows all rows in pattern seen from RS. GARTER ST (in the round on circular needle): 1 ridge = 2 rounds. * K 1 round and P 1 round *, repeat from *-*. GARTER ST (back and forth on needle): K all rows. 1 ridge = 2 rows K. DECREASE TIP 1 (applies to waist): Dec after 1st and 3rd marker and before 2nd and 4th marker. Dec as follows after marker: Slip 1 st as if to K, K 1, psso. Dec as follows before marker: K 2 tog. DECREASE TIP 2 (applies to armhole): Dec inside 3 edge sts in garter st. All dec are done from RS! Dec after 3 edge sts as follows: Slip 1 st as if to K, K 1, psso. Dec before 3 edge sts as follows: K 2 tog. INCREASE TIP (applies to waist): Inc after 1st and 3rd marker and before 2nd and 4th marker. Inc as follows after marker: K 1, then pick up same st from previous round and K this st. Inc as follows before marker: Beg 1 st before marker and pick up this st from previous round, K this st and K last st before marker. ---------------------------------------------------------- BODY: Worked in the round on circular needle. Cast on 220-240-260-280-310-340 sts on circular needle size 3 mm with Cotton Light. K 1 round. Work next round as follows: Insert 1 marker at beg of round (= side), K 1, * P 3, K 2 *, repeat from *-* 21-23-25-27-30-33 times in total, P 3, K 2 (insert 1 marker in the middle of these 2 K sts = side), * P 3, K 2 *, repeat from *-* 21-23-25-27-30-33 times in total and finish with P 3 and K 1. Continue rib like this. When piece measures 4 cm, dec all 3 P sts to 2 P sts by P tog the first 2 sts in every P-section = 176-192-208-224-248-272 sts. Switch to circular needle size 3.5 mm. Beg next round 3 sts before marker at beg of round: Diagram A.1 (= 6 sts – marker in the side is in the middle of A.1), * K 2, P 2 *, repeat from *-* 1-1-2-3-4-5 times in total, K 2, diagram A.1 (= 6 sts), insert 1 marker (= 1st marker), work in stocking st over the next 58-66-66-66-70-74 sts, insert 1 marker (= 2nd marker), diagram A.1 (= 6 sts), * K 2, P 2 *, repeat from *-* 1-1-2-3-4-5 times in total, K 2, diagram A.1 (= 6 sts – marker in the side is in the middle of A.1), * K 2, P 2 *, repeat from *-* 1-1-2-3-4-5 times in total, K 2, diagram A.1 (= 6 sts), insert 1 marker (= 3rd marker), work in stocking st over the next 58-66-66-66-70-74 sts, insert 1 marker (= 4th marker), diagram A.1 (= 6 sts), * K 2, P 2 *, repeat from *-* 1-1-2-3-4-5 times in total and finish with K 2. Continue pattern like this. REMEMBER THE KNITTING TENSION! When piece measures 6-7-7-7-8-8 cm, dec 1 st after 1st and 3rd marker and before 2nd and 4th marker - READ DECREASE TIP 1 (= 4 sts dec). Repeat dec every 4th round 8-7-7-7-6-6 more times = 140-160-176-192-220-244 sts. When piece measures 22 cm, inc 1 st after 1st and 3rd marker and before 2nd and 4th marker - READ INCREASE TIP (= 4 sts inc). Repeat inc every 7th-8th-9th-10th-13th-14th round 6-5-5-5-4-4 more times = 168-184-200-216-240-264 sts. READ ALL OF THE FOLLOWING SECTION BEFORE CONTINUING! When piece measures 38-39-40-41-42-43 cm, work rib (= K 2/P 2) over the middle 54-62-62-62-66-70 sts in stocking st front and back (i.e. between 1st and 2nd marker and between 3rd and 4th marker, work the other sts as before – NOTE: Beg and end rib with K 2 in each side). AT THE SAME TIME when piece measures 39-40-41-42-43-44 cm, work 2 ridges in GARTER ST over the middle 12 sts in each side (= 6 sts in garter st on each side of markers in the sides - work the other sts as before). On next round after the 2 ridges, cast off the middle 6 sts in each side for armholes (i.e. cast off 3 sts on each side of both markers). Work front and back piece separately, back and forth on circular needle. BACK PIECE: = 78-86-94-102-114-126 sts. Continue pattern as before but work the outermost 3 sts in each side in GARTER ST - read explanation above. AT THE SAME TIME on next row from RS, dec 1 st on each side for armhole - Read DECREASE TIP 2 (= 2 sts dec). Repeat dec every other row (i.e. on every row from RS), 1-1-3-6-10-14 more times and then every 4th row (i.e. on every other row from RS) a total of 0-0-2-3-3-3 times = 74-82-82-82-86-90 sts. When piece measures 54-56-58-60-62-64 cm, cast off the middle 34-34-34-34-38-42 rib sts for neck and finish each shoulder separately. Continue to cast off 2 sts on next row from neck = 18-22-22-22-22-22 sts remain on the shoulder. Continue pattern as before with 3 sts in garter st towards the armhole and 2 sts in garter st towards the neck. Cast off when piece measures 56-58-60-62-64-66 cm. Repeat on the other shoulder. FRONT PIECE: = 78-86-94-102-114-126 sts. Work as on back piece but when piece measures 44-46-48-48-50-52 cm, cast off the middle 14-14-14-14-18-22 sts for neck and finish each shoulder separately. Then cast off at beg of every row from neck: 2 sts 4 times and 1 st 4 times = 18-22-22-22-22-22 sts remain on shoulder. Continue with pattern with 3 sts in garter st towards armhole and 2 sts in garter st towards neck until piece measures 56-58-60-62-64-66 cm and cast off. Repeat on the other shoulder. ASSEMBLY: Sew the shoulder seams. NECK EDGE: Beg mid back and work a finishing edge around the neck on hook size 3 mm as follows: 1 dc in first st, * 2 ch, skip approx. 1-1½ cm, 1 dc in next st *, repeat from *-* the entire round and finish with 2 ch and 1 sl st in first dc from beg of round. Cut and fasten the thread. |
|||||||||||||
Diagram explanations |
|||||||||||||
|
|||||||||||||
 |
|||||||||||||
 |
|||||||||||||
Have you finished this pattern?Tag your pictures with #dropspattern #prettypinktop or submit them to the #dropsfan gallery. Do you need help with this pattern?You'll find 22 tutorial videos, a Comments/Questions area and more by visiting the pattern on garnstudio.com. © 1982-2026 DROPS Design A/S. We reserve all rights. This document, including all its sub-sections, has copyrights. Read more about what you can do with our patterns at the bottom of each pattern on our site. |
|||||||||||||


With over 40 years in knitting and crochet design, DROPS Design offers one of the most extensive collections of free patterns on the internet - translated to 17 languages. As of today we count 324 catalogues and 12290 patterns translated into English (UK/cm). 12290
We work hard to bring you the best knitting and crochet have to offer, inspiration and advice as well as great quality yarns at incredible prices! Would you like to use our patterns for other than personal use? You can read what you are allowed to do in the Copyright text at the bottom of all our patterns. Happy crafting!
Post a comment to pattern DROPS 147-5
We would love to hear what you have to say about this pattern!
If you want to leave a question, please make sure you select the correct category in the form below, to speed up the answering process. Required fields are marked *.