
Popular categories
Looking for a yarn?


Comments / Questions (6)
![]() Régine wrote:
Régine wrote:
Bonjour Je ne sais si c'est à cause de la traduction ou si en vieillissant je deviens stupide mais je ne comprends absolument pas les explications pour le col sur les devants. Existe t il un croquis ?Doit on rajouter une maille au point mousse à chaque rang ?Merci de votre aide.
15.12.2022 - 22:54DROPS Design answered:
Bonjour Régine, vous allez augmenter pour le col et en même temps, diminuer pour l'encolure ainsi (devant gauche): augmentez 2 m pour le col à 1 m du bord puis augmentez 1 m: 5 x tous les rangs (sur l'envers augmentez après la première m), 5 x tous les 2 rangs puis 6 x tous les 4 rangs =2+5+5+6=18 m pour le col. En même temps, vous diminuez pour l'encoure juste avant les mailles de la bordure devant + les mailles augmentées pour le col: 13, 14 ou 15 fois tous les 2 rangs (on diminue le nombre de mailles jersey). Bon tricot!
16.12.2022 - 08:31
![]() Jeanie wrote:
Jeanie wrote:
Sorry to ask again but I have done all of that. Further down the pattern it says Collar: Continue with garter stitches over the 18 stitches ... until the collar measures approx. 7.5 cm. Put stitches on a holder. The English pattern does not say what to do with these 12 stitches left on the holder.
07.04.2020 - 14:15DROPS Design answered:
Dear Jeanie, when you have 18 sts left for collar, work over these 18 stitches with short rows, ie: 2 rows over all stitches, 2 rows over the 12 sts outermost sts only and repeat these 4 rows, ie you will work more rows over the first 18 sts then over the whole 18 sts and this will shape collar. Repeat these 4 rows until piece measures 7.5 cm (= it will measures approx. 15 cm along the outermost stitches). Happy knitting!
09.04.2020 - 15:49
![]() Jeanie wrote:
Jeanie wrote:
For the front panels they seem to end at the collar where the last 18 stitches are put on a holder. I cannot see what you are supposed to do with these stitches. Can you help?
07.04.2020 - 01:32DROPS Design answered:
Dear Janie, with the 18 stitches left on th eneedles for the collar, you should knit the following: Collar: When the piece measures 27-29-30-32 cm inc 2 sts inside the 1st button band st - knit the increased sts in garter st. Then knit 2 short rows garter st over only the 8 outermost sts at the center front. Then knit all sts again, at the same time inc 1 st inside of the outermost button band st every row 5 times, then every other row 5 times and then every 4 rows 6 times = 18 sts increased for collar - knit the increased sts in garter st. Happy Knitting!
07.04.2020 - 05:26
![]() Louise wrote:
Louise wrote:
Bonjour, je ne comprends pas où l'on doit faire les rangs raccourcis sur le devant gauche. est ce au milieu du travail ou bien sur les mailles de bordure au point mousse? merci
26.09.2019 - 08:44DROPS Design answered:
Bonjour Louise, on tricote des rangs raccourcis sur les 8 mailles côté bordure devant, ainsi, pour le devant gauche, en début de rang sur l'envers, tricotez les 8 premières mailles, tournez, tricotez ces 8 mailles de nouveau, et continuez comme avant sur toutes les mailles. Bon tricot!
26.09.2019 - 10:44
![]() Mercedes wrote:
Mercedes wrote:
Hola otra vez! estoy algo atascada con este preyecto. No consigo entender esta parte del patron: dism 1 pt dentro de todos los pts en pt musgo (los 6 pts del borde para los botones + los pts aum para el cuello) – ver Tips para la elaboración del tejido – en vtas alternas 13-14-14-15 veces. (borde del cuello) ¿a que se refiere con disminuir un punto dentro de todos los puntos?? Gracias por la ayuda! un saludo!
18.09.2014 - 20:40DROPS Design answered:
Hola Mercedes. Cuando se dice aum/dism dentro de los pts de la cenefa significa trabajar los pts de la cenefa y trabajar los aum/dism en el anterior/siguiente pt antes/después de los pts de la cenefa. Las dism/aum siempre se trabajan por el LD (salvo que diga lo contrario el patrón).
19.09.2014 - 10:32
![]() Mercedes wrote:
Mercedes wrote:
Hola! creo que las medidas del patron están equivocadas. El busto para la talla S pone que son 130 cm (que me parece muy grande) y luego pone que son 51" que serían 103 cm, asique supongo que los inches son los que están bien. Luego en la cintura tengo el mismo problema porque si me fio de los inches,44, es muy estrecha, mientras si me fio de los cm, 112, lo veo bien. ¿alquien me puede ayudar? gracias!
25.01.2014 - 12:30DROPS Design answered:
Hola Mercedes. Las conversiones inches/cm son correctas: 51 inches por 2.54 = 129.5 cm. La chaqueta tiene un corte muy amplio.
28.01.2014 - 09:32
|
|
DROPS 76-19 |
|
|
|
|
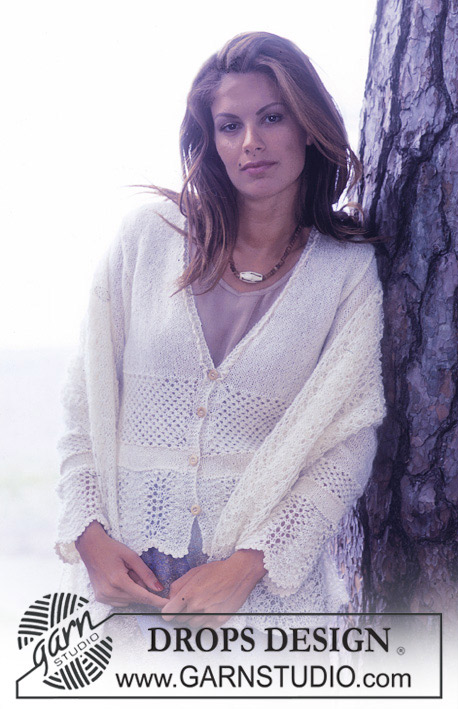
DROPS Cardigan in Alaska
DROPS 76-19 |
|
|
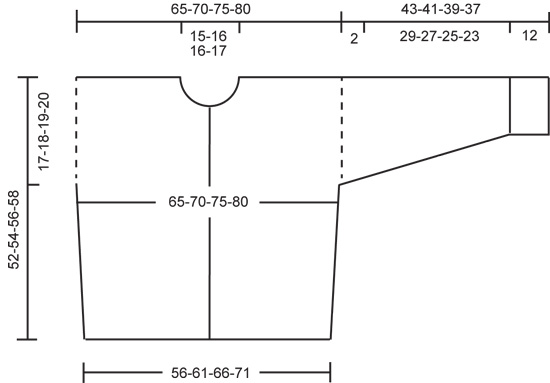
Gauge: 14 sts x 17 rows = 10 x 10 cm in stockinette Knitting tips (for neckband): All decs are made from right side. Dec 1 st as follows: After the garter st sts: Sl 1 st as if to knit, K 1, psso. Before the garter st sts: K 2 tog. Back: Loosely cast on 81-88-95-102 sts. Knit 10 rows garter st. Change to stockinette st, increasing 12 sts evenly distributed on the 1st row = 93-100-107-114 sts. When the piece measures 35-36-37-38 cm bind off 1 st at each side for armholes = 91-98-105-112 sts. When the piece measures 50-52-54-56 cm bind off the center 19-20-21-22 sts for the neck. On the next row dec 1 st at each neck edge = 35-38-41-44 sts remain on each shoulder. Bind off when the piece measures 52-54-56-58 cm. Left front: Cast on 43-47-50-54 sts. Knit 10 rows garter st. Change to stockinette st, keeping 6 sts in garter st at center front edge for button band and increasing 6 sts evenly distributed on the 1st row = 49-53-56-60 sts. Read the entire next section before knitting: Collar: When the piece measures 27-29-30-32 cm inc 2 sts inside the 1st button band st - knit the increased sts in garter st. Then knit 2 short rows garter st over only the 8 outermost sts at the center front. Then knit all sts again, at the same time inc 1 st inside of the outermost button band st every row 5 times, then every other row 5 times and then every 4 rows 6 times = 18 sts increased for collar - knit the increased sts in garter st. Neckband: At the same time when the piece measures 30-32-33-35 cm dec for the neckband (but continue to inc for collar) as follows: dec 1 st inside of all garter st sts (the 6 button band sts + the sts increased for collar) - see knitting tips - every other row 13-14-14-15 times. Armhole: At the same time when the piece measures 35-36-37-38 cm bind off 1 edge st at the side for armhole. After all shaping for neck and armhole is complete you have 53-56-59-62 sts. When the piece measures 52-54-56-58 cm bind off shoulder sts + 6 button band sts (= 35-38-41-44 sts). Only the garter st collar sts remain on needles = 18 sts. Collar: Continue with garter st over the 18 sts as follows: * 2 rows garter st over all sts, 2 rows garter st over only the outermost 12 sts *, repeat from * - * until the collar measures approx. 7.5-8-8-8.5 cm or to center back of the neck. Put sts on a st holder. Right front: Cast on and knit the same as the left but reversing all shaping. Make buttonholes along button band. 1 buttonhole = bind off the 4th st from edge and on the next row yo over the bound off st. Make buttonholes when the piece measures: Size S/M: 7, 14, 21 and 28 cm. Size M/L: 9, 16, 23 and 30 cm. Size XL: 10, 17, 24 and 31 cm. Size XXL: 12, 19, 26 and 33 cm. Sleeve: Loosely cast on 40-42-44-46 sts. Knit garter st for 12 cm. Change to stockinette st and inc 1 st at each side every 6.5-6-4.5-4 cm a total of 5-5-6-6 times = 50-52-56-58 sts. When sleeve measures 41-39-37-35 cm bind off 4 sts at each side every other row 2 times. Then bind off the remaining sts. The piece measures approx. 43-41-39-37 cm. Assembly: Sew shoulder seams. Join the collar at center back. Sew the collar to neck band with the seam on the right side so it will not show when the collar folds down. Sew in sleeves. Sew sleeve and side seams using edge sts as a seam allowance. Sew on buttons. |
|
 |
|
Have you finished this pattern?Tag your pictures with #dropspattern or submit them to the #dropsfan gallery. Do you need help with this pattern?You'll find 20 tutorial videos, a Comments/Questions area and more by visiting the pattern on garnstudio.com. © 1982-2026 DROPS Design A/S. We reserve all rights. This document, including all its sub-sections, has copyrights. Read more about what you can do with our patterns at the bottom of each pattern on our site. |


With over 40 years in knitting and crochet design, DROPS Design offers one of the most extensive collections of free patterns on the internet - translated to 17 languages. As of today we count 325 catalogues and 12298 patterns translated into English (UK/cm). 12298
We work hard to bring you the best knitting and crochet have to offer, inspiration and advice as well as great quality yarns at incredible prices! Would you like to use our patterns for other than personal use? You can read what you are allowed to do in the Copyright text at the bottom of all our patterns. Happy crafting!
Post a comment to pattern DROPS 76-19
We would love to hear what you have to say about this pattern!
If you want to leave a question, please make sure you select the correct category in the form below, to speed up the answering process. Required fields are marked *.