
Popular categories
Looking for a yarn?


Comments / Questions (39)
![]() Lana wrote:
Lana wrote:
Hi, ich bin gerade an dem Punkt angekommen, an dem man Vorder- und Rückenteil separat weiter strickt und habe dazu zwei Fragen: Soll man den Teil, den man gerade nicht strickt, auf einen Maschenhalter auslagern, oder kann ich ihn auf der Rundnadel lassen? Wie stricke ich die Randmaschen?
13.09.2025 - 12:12DROPS Design answered:
Liebe Lana, Sie legen die Maschen am besten auf einem Maschenhalter still. Sie brauchen keine besonderen Randmaschen stricken, da die Ärmel später angenäht werden. Für die Naht eignet es sich gut, wenn Sie die Maschen einfach wie die anderen Maschen glatt rechts stricken. Viel Spaß beim Tragen Ihres tollen Pullovers!
25.10.2025 - 00:28
![]() Hannah-Maria wrote:
Hannah-Maria wrote:
Hello! I am really enjoying this pattern, and have just finished the body. I am aam just about to start working on the sleeves and am trying to understand the construction before I start. I’m really confused about what the pattern means when it says to work back and forth on the needle from mid under sleeve. Do I stop knitting in the round? Is this working all the stitches? I can’t seem to picture what it will look like or how that will then work with attaching it to the body…?
27.02.2024 - 01:18DROPS Design answered:
Dear Hannah-Maria, you will now work in rows instead of in the round, starting the rows from mid under sleeve (where rounds previously started); in this video we show how to work and sew such a sleeve, hope it can help. Happy knitting!
27.02.2024 - 09:07
![]() Cornelia Becker wrote:
Cornelia Becker wrote:
Hallo, habe jetzt im Muster M 1 gestrickt und bin der Meinung, daß ist nicht das Muster des abgebildeten Pullovers??
03.02.2024 - 17:21DROPS Design answered:
Liebe Frau Becker, das Diagram M;1 stimmt so, was meinen Sie damit? Haben Sie wie in der schriftlichen Anleitung gestrickt? dh die Masche mit dem Pfeil muss die mittlere Masche beim Vorderteil sowie beim Rückenteil, dh Das Muster passt an beiden Seiten nicht. Viel Spaß beim stricken!
05.02.2024 - 08:40
![]() Cornelia Becker wrote:
Cornelia Becker wrote:
Hallo, wie werden M1, M2 und M3 gelesen? Von rechts nach links rechte Maschen und die Rückreise von links nach rechts linke Maschen?
29.01.2024 - 23:56DROPS Design answered:
Liebe Frau Becker, das ist genauso richtig. Viel Spaß beim stricken!
30.01.2024 - 08:11
![]() Nadine wrote:
Nadine wrote:
Merci beaucoup c'est exactement ce qu'il me fallait
14.11.2023 - 12:20
![]() Nadine wrote:
Nadine wrote:
Bonjour, on termine les derniers cm en allers et retours pour le haut de la manche qui sera ensuite assemblé à l'emmanchure (sur le dos et le devant), entre les mailles rabattues pour le dos et le devant. Auriez-vous une vidéo montrant cet assemblage des cm en allers retours sur l'emmanchure ? Merci pour votre aide
13.11.2023 - 23:07DROPS Design answered:
Bonjour Nadine, peut-être que cette vidéo pourra vous aider, on procède un peu différemment, mais elle montre comment passer du tricot de la manche en rond au tricot en allers et retours pour le haut de la manche puis comment l'assembler. Bon tricot!
14.11.2023 - 10:36
![]() LOL wrote:
LOL wrote:
Bonjour, Je tricoté la taille M. J'en suis à rabattre 4 mailles de chaque côté des 2 marqueurs. Ensuite il faut continuer en aller/retour le devant et le dos séparément. Avez-vous une vidéo qui montre comment procéder car jusqu'à présent je n'ai tricoté que des pulls en top-down. Quand faut-il commencer à rabattre ? Les 4 premières mailles du tour d'abord ou les 4 premières mailles du rang précédent + les 4 premières mailles du tour (4)? Merci
21.10.2023 - 13:38
![]() LOL wrote:
LOL wrote:
Bonjour, Je tricoté la taille M. J'en suis à rabattre 4 mailles de chaque côté des 2 marqueurs. Ensuite il faut continuer en aller/retour le devant et le dos séparément. Avez-vous une vidéo qui montre comment procéder car jusqu'à présent je n'ai tricoté que des pulls en top-down. Quand faut-il commencer à rabattre ? Les 4 premières mailles du tour d'abord ou les 4 premières mailles du rang précédent + les 4 premières mailles du tour (4)? Merci
21.10.2023 - 13:38DROPS Design answered:
Bonjour Lol, rabattez les mailles comme vous le faites d'habitude, tricotez le dernier tour avant de rabattre jusqu'à ce qu'il reste 4 mailles avant le marqueur du début du tour, rabattez les 8 mailles suivantes, tricotez (dos) jusqu'à ce qu'il reste 4 mailles avant le 2ème marqueur, rabattez les 8 mailles suivantes, et tricotez les mailles restantes (devant). Mettez les mailles du dos en attente et tricotez les mailles du devant, en commençant sur l'envers. Bon tricot!
23.10.2023 - 09:34
![]() LOL wrote:
LOL wrote:
Bonjour, Je tricoté la taille M. J'en suis à rabattre 4 mailles de chaque côté des 2 marqueurs. Ensuite il faut continuer en aller/retour le devant et le dos séparément. Avez-vous une vidéo qui montre comment procéder? car jusqu'à présent je n'ai tricoté que des pulls en top-down. Merci
20.10.2023 - 23:27DROPS Design answered:
Bonjour lol, tricotez simplement le tour suivant en rabattant 8 mailles pour les emmanchures (soit 4 mailles de chaque côté de chaque marqueur), puis continuez le jacquard comme avant, mais vous allez maintenant tricoter le devant et le dos l'un après l'autre, en allers et retours (cf vidéo; mettez les mailles du dos en attente sur un fil ou une autre aiguille et tricotez simplement le devant comme expliqué. Bon tricot!
23.10.2023 - 09:28
![]() Anja wrote:
Anja wrote:
Wunderschöne Anleitung!Ich hätte allerdings noch eine Frage zum Vorder- und Rückteil.Ich soll ja beide Teile separat stricken. Heißt das dann,ich beginne die neue Runde,kette meine Maschen nach meiner ersten Markierung,also direkt zu Rundenbeginn für das Armloch ab, wiederhole das Abnehmen vor der zweiten Markierung, stricke dann das Vorderteil in Reihen weiter und wiederhole danach das Ganze noch einmal für das Rückenteil?Und wie stricke ich dann die Randmaschen?
31.05.2021 - 20:58DROPS Design answered:
Liebe Anja, die Runde mit Abketten für die Armlöcher könnnen Sie auch so stricken: stricken Sie die Runde bis 2 bis 20 M (siehe Größe) vor der Markierung am Ende der Runde übrig sind, die nächsten 4 bis 40 M abketten (= 2 bis 20 vor der Markierung + 2 bis 20 nach der Makierung), weiter stricken bis 2 bis 20 M vor der nächsten Markierung übrig sind, , die nächsten 4 bis 40 M abketten (= 2 bis 20 vor der Markierung + 2 bis 20 nach der Makierung) und die Runde noch enden, wenden und Vorderteil mit einer Rückreihe anfangen. Viel Spaß beim stricken!
01.06.2021 - 08:25
|
||||||||||
Victoria#victoriasweater |
||||||||||
|
|
||||||||||
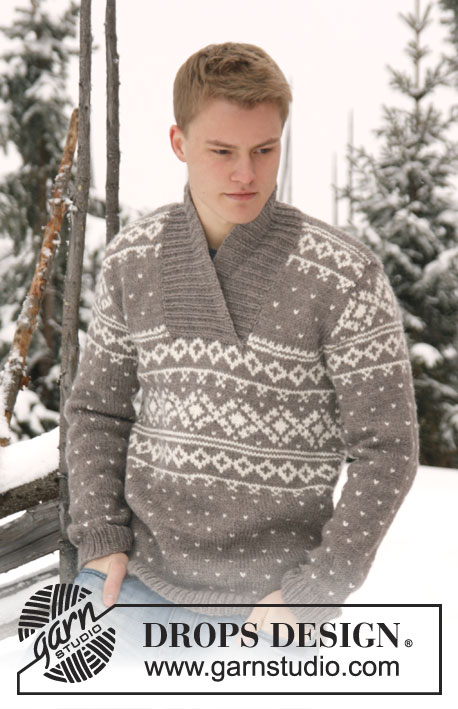
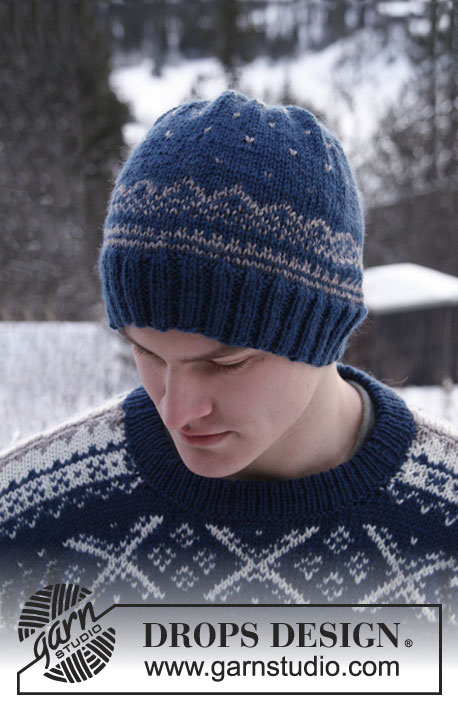
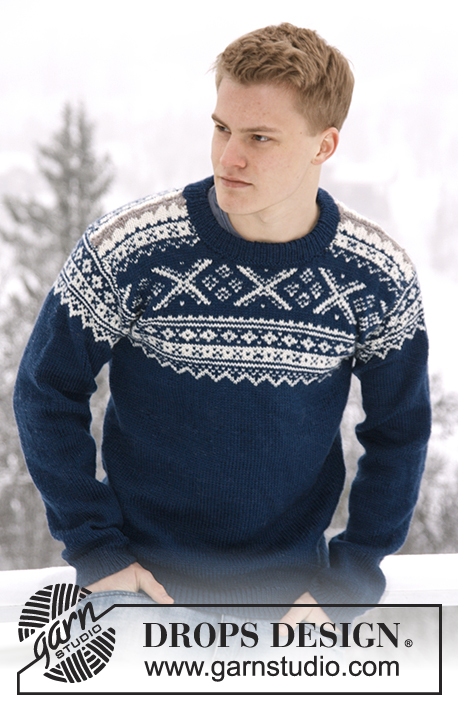
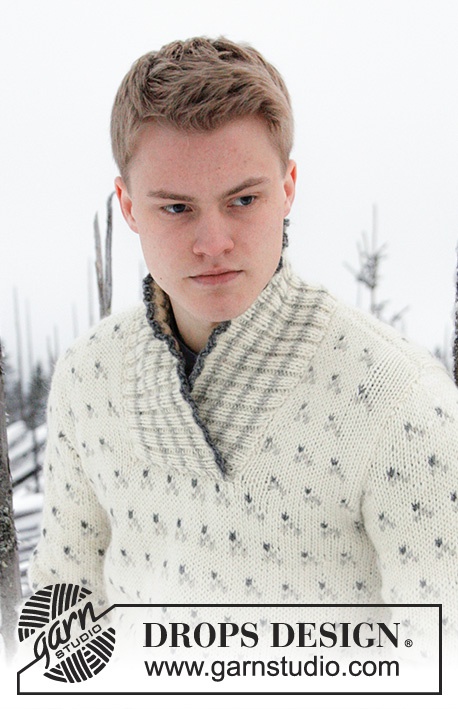
Knitted DROPS jumper with Norwegian pattern in ”Karisma”. Size: S - XXXL.
DROPS Extra 0-816 |
||||||||||
|
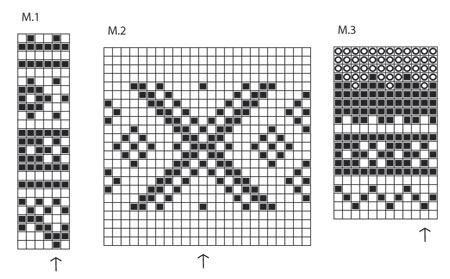
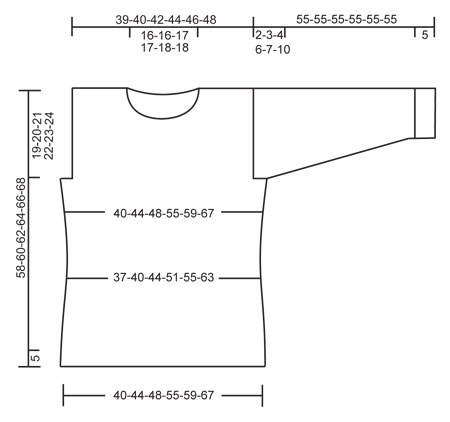
PATTERN: See diagrams M.1 to M.3 – diagrams are worked in stocking st and show 1 repetition of pattern. -------------------------------------------------------- BODY: Worked in the round on circular needle. Cast on 204-224-242-276-296-338 sts on circular needle size 3 mm with dark grey blue Karisma. Work rib = K 1/P 1 for 5 cm. Switch to circular needle size 4 mm and K 1 round while AT THE SAME TIME dec 34-38-40-46-50-56 sts evenly = 170-186-202-230-246-282 sts. Insert a marker at beg of round and a marker after 85-93-101-115-123-141 sts (these marks the sides). Continue in stocking st. REMEMBER THE KNITTING TENSION! When piece measures 10-10-11-11-12-12 cm, dec 1 st on each side of both markers. Repeat dec every 3 cm a total of 4 times = 154-170-186-214-230-266 sts. When piece measures 24-24-25-25-26-26 cm, inc 1 st on each side of both markers. Repeat inc every 3 cm a total of 4 times = 170-186-202-230-246-282 sts. When piece measures 34-36-38-40-42-44 cm, insert 2 markers in the piece; 1 in the middle st at the front and 1 in the middle st at the back. Then work diagram M.1 – st marked with arrow in diagram should be sts with marker mid front/back - count out towards the side. Count out again when at the marker in the side so that pattern is the same on the front and on the back. AT THE SAME TIME when piece measures 39-40-41-42-43-44 cm, cast off 4-8-12-22-26-40 sts for armholes in each side (i.e. 2-4-6-11-13-20 sts on each side of both markers in the sides). Finish front and back piece separately, back and forth on needle. FRONT PIECE: = 81-85-89-93-97-101 sts. Finish diagram M.1, then work diagram M.2 and finally M.3 before continuing with light beige brown until finished measurements (st with arrow in diagram should be st with marker mid front/back – count out towards the side). When piece measures 52-54-55-57-58-60 cm, slip the middle 15-15-17-17-19-19 sts on a stitch holder for neck and finish each shoulder separately. Then cast off at beg of every row from neck: 2 sts 3 times and 1 st 3 times = 24-26-27-29-30-32 sts remain on shoulder. Cast off when piece measures 58-60-62-64-66-68 cm. BACK PIECE: = 81-85-89-93-97-101 sts. Work as on front piece but do not cast off for neck until piece measures 56-58-60-62-64-66 cm. Now cast off the middle 31-31-33-33-35-35 sts for neck and finish each shoulder separately. Continue to cast off 1 st on next row from neck = 24-26-27-29-30-32 sts remain on the shoulder. Cast off when piece measures approx. 58-60-62-64-66-68 cm – cast off on same row in pattern as on front piece. SLEEVE: Worked in the round on double pointed needles, switch to circular needle when needed. Cast on 58-60-62-64-66-68 sts on double pointed needles size 3 mm with dark grey blue. Work rib = K 1/P 1 for 5 cm. Switch to double pointed needles size 4 mm and K 1 round while AT THE SAME TIME dec 9-9-11-11-11-13 sts evenly = 49-51-51-53-55-55 sts. Insert a marker at beg of round (= mid under sleeve) and continue in stocking st. When piece measures 7-8-11-7-6-8 cm, inc 1 st on each side of marker. Repeat inc every 3.-2½.-2.-2.-2.-1½. cm a total of 15-17-19-20-21-23 times = 79-85-89-93-97-101 sts. AT THE SAME TIME when piece measures 46 cm in all sizes, work diagram M.1 (st with arrow in diagram = mid on top of sleeve – count out towards the side. NOTE: Work the inc sts in pattern). After diagram M.1, continue with dark grey blue until finished measurements. AT THE SAME TIME when piece measures 53-52-51-49-48-45 cm (shorter measurements in the larger sizes because of longer sleeve cap and broader shoulder width), finish the piece back and forth on needle from mid under sleeve. Cast on 1 new st in each side (= edge st for assembly) and work until sleeve measures 55 cm in all sizes, cast off. ASSEMBLY: Sew shoulder seams and sew in sleeves (section worked back and forth at the top of sleeve should fit the cast off for armhole). NECK: Knit up from RS approx. 80 to 92 sts around the neck (incl sts on stitch holder at the front) on a short circular needle size 3 mm with dark grey blue. P 1 round, then K 1 round while AT THE SAME TIME inc evenly to 100-104-108-112-116-120 sts. Then work rib = K 1/P 1 for approx. 7 cm, cast off with K over K and P over P. Fold the rib double towards WS and fasten it to the back of neck edge with neat little loose stitches. |
||||||||||
Diagram explanations |
||||||||||
|
||||||||||
 |
||||||||||
 |
||||||||||
Have you finished this pattern?Tag your pictures with #dropspattern #victoriasweater or submit them to the #dropsfan gallery. Do you need help with this pattern?You'll find 24 tutorial videos, a Comments/Questions area and more by visiting the pattern on garnstudio.com. © 1982-2026 DROPS Design A/S. We reserve all rights. This document, including all its sub-sections, has copyrights. Read more about what you can do with our patterns at the bottom of each pattern on our site. |
||||||||||


With over 40 years in knitting and crochet design, DROPS Design offers one of the most extensive collections of free patterns on the internet - translated to 17 languages. As of today we count 324 catalogues and 12290 patterns translated into English (UK/cm). 12290
We work hard to bring you the best knitting and crochet have to offer, inspiration and advice as well as great quality yarns at incredible prices! Would you like to use our patterns for other than personal use? You can read what you are allowed to do in the Copyright text at the bottom of all our patterns. Happy crafting!
Post a comment to pattern DROPS Extra 0-816
We would love to hear what you have to say about this pattern!
If you want to leave a question, please make sure you select the correct category in the form below, to speed up the answering process. Required fields are marked *.