
Popular categories
Looking for a yarn?


Comments / Questions (93)
![]() Elisabeth Haslinger wrote:
Elisabeth Haslinger wrote:
Ich weiß leider ab dieser Position nicht mehr weiter: M1 total 20 Mal in der Höhen stricken – die neuen M. werden ins Muster eingestrickt. - Werden hier keine X1, X2,X3, X4 mehr gestrickt? Das kann sich aber nicht ausgehen, da ja die Mittelmasche sonst nicht zur Geltung kommt und sich das Ganze irgendwie nicht ausgehen kann.
04.01.2015 - 18:59DROPS Design answered:
Doch, Sie stricken auch die anderen Diagramme wie begonnen weiter - die Zunahmen stricken Sie jedoch in M1 ein, sobald dafür genügend M vorhanden sind. Der Abschluss des Musters orientiert sich dann an M.1, wenn Sie dieses Muster 20x gestrickt haben, stricken Sie wie beschrieben glatt re weiter.
06.01.2015 - 22:34
![]() Marie-annick wrote:
Marie-annick wrote:
Bonjour,dans le diagramme M2 je n'arrive pas à aligner mes jetées les unes au dessus des autres merci de votre réponse
21.05.2014 - 18:15DROPS Design answered:
Bonjour Marie-Annick, pour être sûre que vos jetés soient bien placés, placez un marqueur avant et après chaque motif de M2 tricoté et suivez bien les indications du diagramme. Bon tricot!
22.05.2014 - 08:49
![]() Ethel Eriksson wrote:
Ethel Eriksson wrote:
Stickar just nu schalen på bilden 131-2 min fråga är, då man stickar kanten tar man ihop avigt från rätsidan.
22.01.2014 - 15:54
![]() Judith wrote:
Judith wrote:
Ik begrijp M2 niet. Bij de 7e naald brei ik 4 steken,omslag en dan hoeveel steken voor ik weer volgens het patroon brei?
09.09.2013 - 15:23DROPS Design answered:
Hoi Judith. Je breit zoals beschreven in het patroon: 4 kant st in RIBBELST - 1 omsl, 2 st r, 10 keer telpatroon M.2, 2 st r voor de middelste st, 1 omsl, middelste st in tricotst, 1 omsl, 2 st r, 10 keer telpatroon M.2, 2 st r, 1 omsl, 4 kant st in ribbelst. Dus je herhaalt M.2 2 x 10 keer in de breedte (aan weerskanten van de midden st) en 1 keer in de hoogte. Door de omslagen komen er st bij in het patroon (nld 3 en 7)
11.09.2013 - 15:17
![]() Suze wrote:
Suze wrote:
Hallo, ich scheitere schon ganz am Anfang: ist die Reihe in der die Umschläge verschränkt rechts gestrickt werden die Rückreihe? Und stricke ich da die anderen Maschen dann links? Auch die Randmaschen? Oder alles rechts?
29.06.2013 - 12:19DROPS Design answered:
Liebe Suze, ja das ist die Rück-R. Sie stricken alle M re und die Umschläge re verschränkt.
01.07.2013 - 09:07
![]() Judith wrote:
Judith wrote:
Het blok M krijgt wel steedes meer steken. Hoe brei ik die. Brei ik in de X patronen nog steeds de omslagen gedraaid?
21.05.2013 - 13:35
![]() Judith wrote:
Judith wrote:
Ik ben nu bij de 3e alinea aangekomen en heb 61 steken. Nu moet M1 20 keer gebreid worden, maar hoe gaat het verder met deX patronen?
17.05.2013 - 16:21DROPS Design answered:
Je gaat ook door met de X patronen zoals eerst (zijkanten en midden) - die patronen moet je helemaal tot het eind blijven herhalen.
21.05.2013 - 12:27
![]() Judith wrote:
Judith wrote:
Helaas, ik begrijp het patroon niet meer bij de 2e alinea. Is er een workshop?
15.05.2013 - 21:58DROPS Design answered:
Wij hebben hier geen workshop van. We hebben wel meerdere video's die verschillende technieken en steken uitleggen. Als je hier schrijft wat precies fout gaat bij jou, kan ik ook proberen je verder te helpen.
16.05.2013 - 12:35
![]() Emmy wrote:
Emmy wrote:
Et meget smukt sjal, det vil jeg til at strikke:-)
03.04.2013 - 14:12
![]() Annette wrote:
Annette wrote:
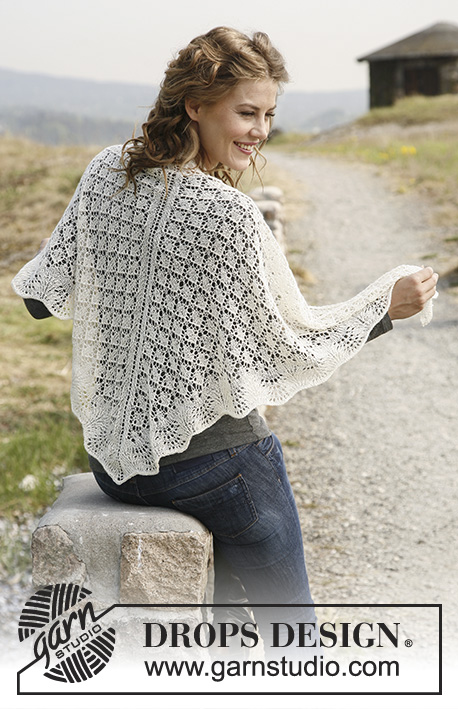
Ik ben net begonnen met deze omslagdoek. Ik brei de teruggaande toeren recht. Ik krijg zo ribbels. Maar als ik de foto bekijk lijkt het een tricot breisel. En hoe moet ik de even naalden van de telpatronen breien?
08.03.2013 - 20:50DROPS Design answered:
U breit in het begin recht elke nld tot u 29 st hebt - dit gedeelte is inderdaad in ribbelst. Daarna volgt u de telpatronen en de lege vakjes breit u heengaand recht en teruggaande averecht zoals staat aangegeven, dus in tricotsteek. Alleen de 3 st aan elke zijkant zijn in ribbelsteek (in de telpatronen X.1 en X.4
15.03.2013 - 08:34
|
||||||||||||||||||||||
Garden of Diamonds#gardenofdiamondsshawl |
||||||||||||||||||||||
 |
 |
|||||||||||||||||||||
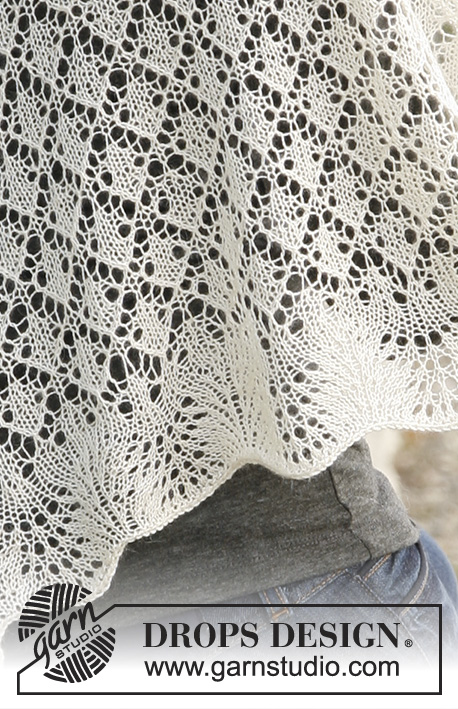
Knitted DROPS shawl with wave pattern in "Lace".
DROPS 131-2 |
||||||||||||||||||||||
|
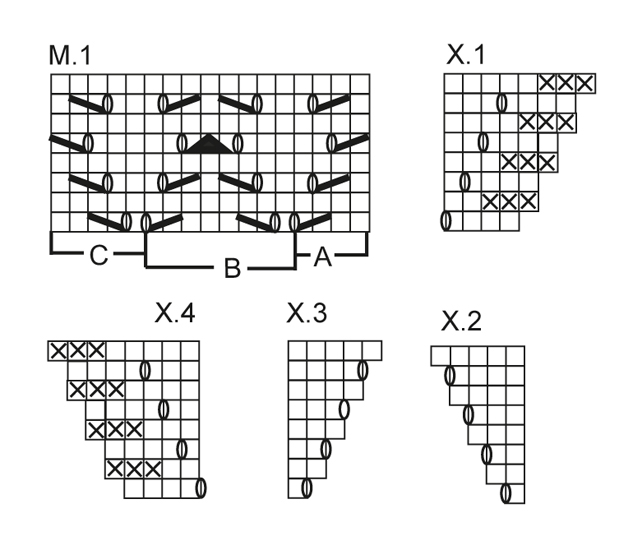
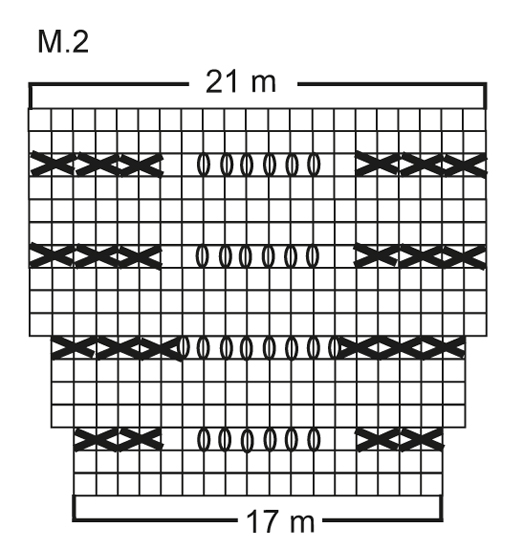
PATTERN: See diagrams X.1, X.2, X.3, X.4, M.1 and M.2. GARTER ST (back and forth on needle): K all rows. --------------------------------------------------------- SHAWL: Worked back and forth on circular needle to make room for all the sts. Cast on 3 sts on circular needle size 3.5 mm with Lace. Insert a marker in the 2nd st (mid st - marks mid back of shawl). Work 1 row as follows (= RS): K 1, 1 YO, K 1, 1 YO, K 1 = 5 sts. NOTE! On next row K YOs twisted, i.e. work in back loop of YOs instead of front, to avoid holes. Then K every row while at the same time inc 4 sts on every row from RS as follows: Work 2 sts in the second st and in the next to last st in each side and make 1 YO on each side of st with marker (still work YOs twisted). Continue like this until there are 29 sts on the needle. Then work as follows from RS: Diagram X.1, diagram M.1A (= 4 sts), diagram M.1C (= 5 sts) and diagram X.2, 1 st in stocking st (= mid st), diagram X.3, diagram M.1A (= 4 sts), diagram M.1C (= 5 sts) and diagram X.4. When the repetition has been worked 1 time vertically, there are 45 sts on needle. Continue to work as follows: Diagrams X.1, M.1A, then repeat M.1B (= 8 sts) until 6 sts remain before mid st(no of sts varies depending on which row in diagrams X.1-X.4 is being worked), over these last 6 sts work diagram M.1C and X.2, 1 st in stocking st (= mid st), work diagrams X.3, M.1A, repeat M.1B until 9 sts remain on row (no of sts varies depending on which row in diagrams X.1-X.4 is being worked), and work these in diagram M.1C and X.4. Continue like this until M.1 has been worked a total of 20 times vertically - the inc sts are worked gradually into diagram M.1. There are now 349 sts on needle, 174 sts on each side of mid st. Work 4 rows in stocking st while AT THE SAME TIME continuing with edge sts each side in garter st and inc on every row from RS as before = 357 sts, 178 sts on each side of mid st. Now work as follows from RS: 4 edge sts in GARTER ST - see explanation above - 1 YO, K 2, 10 times diagram M.2, K 2 before mid st, 1 YO, 1 st in stocking st (= mid st), 1 YO, K 2, 10 times diagram M.2, K 2, 1 YO, 4 edge sts in garter st. NOTE! The inc sts in the sides and mid back are worked in stocking st until diagram M.2 has been worked. When diagram M.2 has been worked 1 time vertically, K 1 row from WS. Loosely cast off with K sts with 2 threads. BLOCKING: Place the shawl in lukewarm water until it is soaking wet. Carefully squeeze the water out of the shawl - do not twist the shawl - then roll the shawl in a towel and squeeze to remove more water - the shawl will now only be moist. Place the shawl on a carpet or mattress - carefully stretch it out to size and fasten it with pins. Leave to dry. Repeat the process when the garment has been washed. |
||||||||||||||||||||||
Diagram explanations |
||||||||||||||||||||||
|
||||||||||||||||||||||
 |
||||||||||||||||||||||
 |
||||||||||||||||||||||
Have you finished this pattern?Tag your pictures with #dropspattern #gardenofdiamondsshawl or submit them to the #dropsfan gallery. Do you need help with this pattern?You'll find 11 tutorial videos, a Comments/Questions area and more by visiting the pattern on garnstudio.com. © 1982-2026 DROPS Design A/S. We reserve all rights. This document, including all its sub-sections, has copyrights. Read more about what you can do with our patterns at the bottom of each pattern on our site. |
||||||||||||||||||||||


With over 40 years in knitting and crochet design, DROPS Design offers one of the most extensive collections of free patterns on the internet - translated to 17 languages. As of today we count 324 catalogues and 12290 patterns translated into English (UK/cm). 12290
We work hard to bring you the best knitting and crochet have to offer, inspiration and advice as well as great quality yarns at incredible prices! Would you like to use our patterns for other than personal use? You can read what you are allowed to do in the Copyright text at the bottom of all our patterns. Happy crafting!
Post a comment to pattern DROPS 131-2
We would love to hear what you have to say about this pattern!
If you want to leave a question, please make sure you select the correct category in the form below, to speed up the answering process. Required fields are marked *.