
Popular categories
Looking for a yarn?


Comments / Questions (93)
![]() Carina wrote:
Carina wrote:
Hallo, Wird das Tuch vom der Spitze oder von der Halsmitte gestrickt? Wie strickt sich ein Farbverlauf ein? Danke!
16.05.2025 - 13:35DROPS Design answered:
Liebe Carina, das Tuch wird von oben nach unten gestrickt, man wird beidseitig (= am Anfang + am Ende der Reihen) sowie beidseitig der mittleren Masche zunehmen damit ein 3-Eck entsteht. Hier finden Sie unterschiedliche Tücher mit DROPS Fabel/Farbverlauf als Beispiel. Viel Spaß beim Stricken!
16.05.2025 - 17:35
![]() RL wrote:
RL wrote:
Os gráficos mostram todas as carreiras? Ou só as carreiras do direito do trabalho? O avesso será tricotado em liga? Obrigada.
12.09.2024 - 13:49
![]() Emilia wrote:
Emilia wrote:
Witam! Mam problem w końcowym etapie a mianowicie ze schematem M.2. Czy każdy z prawych rzędów w tym wzorze rozpoczyna się od 4 o. brzeg, narzutu i 2 oczek prawych , schematem M.2 oraz 2 o.p i narzut przed oczkiem środkowym ? Nie rozumiem dlaczego nie zgadza mi się liczba oczek i ciagle wychodzi mi za dużo oczek. Czy napewno w tej części opisu nie ma jakiegoś błędu? Będę bardzo wdzięczna za odpowiedz ! Pozdrawiam! Emilia
26.07.2021 - 14:25DROPS Design answered:
Witaj Emilio, jest tak jak piszesz i nie ma tu błędu. Nawet jak wykonujesz brzeg (wzór fal) to aby szal uzyskał swój trójkątny kształt liczba oczek musi się zwiększać. W pierwszej połowie schematu M.2 zwiększa się również liczba oczek w schemacie (poza 4 narzutami poza schematami w rzędzie). Na końcowym etapie schematu M.2 dodajesz tylko 4 o. w każdym rzędzie na prawej stronie robótki. Powodzenia!
27.07.2021 - 15:55
![]() Emilia wrote:
Emilia wrote:
Witam! Dziękuję za odpowiedz na poprzednie pytanie! Zastanawiam się jednak czy te dodawane oczka - narzuty wokół oczka środkowego są przerabiane na lewej stronie robótki jako oczka przekręcone lewe czy prawe ? Dziękuję z góry ! Pozdrawiam !
03.05.2021 - 17:44DROPS Design answered:
Witaj Emilio, na lewej stronie robótki narzuty wokół oczka środkowego będą przerabiane na lewo. Pozdrawiamy!
04.05.2021 - 12:48
![]() Emilia wrote:
Emilia wrote:
Witam! Zastanawiam się czy narzuty przed oczkiem środkowym są w tym wzorze zawsze przerabiane z tyłu robótki tzw jako oczka przekręcone czy tylko na początku ? Czy w schematach X2 i X3 te narzuty przy oczku środkowym należy tez przerabiać jak oczka przekręcone czy zwyczajnie na prawo ? Z góry dziękuję za odpowiedz !
29.04.2021 - 12:08DROPS Design answered:
Witaj Emilio, te dodawane oczka z obu stron oczka środkowego są przerabiane jako przekręcone w kolejnym rzędzie, na całej długości szala. W tych miejscach po zblokowaniu i tak będą widoczne małe dziurki. Pozdrawiamy!
29.04.2021 - 13:41
![]() Lilla My wrote:
Lilla My wrote:
Bonjour, Je ne suis pas sûre d'avoir bien compris la bordure : au rang 3 de M2, il me reste 4 mailles avant (et après) la maille centrale, est-ce normal ? Il me semble que oui puisque j'ai augmenté de 4 jetés au rang 1. Mais du coup est-ce que toutes les mailles rajoutées (celles des bords et du milieu) se tricotent en jersey au milieu ? Ou faut-il tricoter 3 mailles end. en début de rang et 3 mailles au milieu et ajouter tous les rangs endroit une maille à ces endroits ? Merci !
28.04.2020 - 14:35DROPS Design answered:
Bonjour Madame My, essayez de bien mettre un marqueur entre chaque diagramme, il vous sera ainsi plus facile de vérifier votre nombre de mailles à chaque rang, comme dans les diagrammes. Bon tricot!
28.04.2020 - 15:55
![]() DE OLIVEIRA wrote:
DE OLIVEIRA wrote:
Bonjour J ai un soucis quant à la réalisation du dessin M1. Pas de pb jusqu'à l'obtention des 66 mailles soit M1 tricoté 2 fois en hauteur. Par contre pour commencer la 3ème hauteur M1, du fait que nous avons commencé par M1A nous devrions reprendre avec M1C et pour cela il nous faut 5 m or il n'y en a que 4 de disponible du fait des augmentations précédentes. Dans ce cas, nous laissons les 4 m en attente pour cette 3ème série et attendons la 4ème pour tricoter un nouveau motif?
22.04.2020 - 09:57DROPS Design answered:
Bonjour Mme De Oliveira, j'ai peur de ne pas comprendre votre propos. Vous répétez M.1 en hauteur de la même façon à chaque fois: X.1 en début de rang, puis M.1A, vous répétez M.1B jusqu'à ce qu'il reste le nombre de mailles de M.1C + X.2 avant la maille centrale, puis vous tricotez M.1C, X2, la m centrale, X.3, M.1A, vous répétez M.2B le même nombre de fois qu'avant la m centrale et vous terminez par X.4. Techniquement, vous aurez 1 motif de M.1B en plus à chaque fois que vous répétez les motifs en largeur (= on augmente 8 mailles: 4 m dans X.1 + 4 m dans X.2). En espérant que ces informations vous aident. Bon tricot!
22.04.2020 - 11:18
![]() Rigmor Pedersen wrote:
Rigmor Pedersen wrote:
Når jeg skal til at strikke mønster x1 og M1 plus x2, har jeg 14 M til midten, når jeg så har strikke første pind i mønstret skulle der være 16 M efter pind to, men jeg har altså 18 M, til midten, hvad gør jeg forkert
31.05.2019 - 13:46DROPS Design answered:
Hei Rigmor. Du har 29 masker på pinnen, 14 masker på hver side av masken med merket i. Det økes 1 maske i hver av X-diagrammene, mens i M.1 forblir maskeantallet det samme. Det økes altså 2 masker på hver side av midten: 1 maske innenfor kantmaskene i rille, og 1 maske på hver side av masken med merket = 16 masker på hver side av midten etter 1. pinne. På 2. pinne økes ingen masker og maskeantallet forblir det samme (33 masker, 16 asker på hver side av midten). På pinne 3 øker du igjen 2 masker på hver side av midten = 18 masker på hver side og 37 masker totalt på pinnen. God fornøyelse
31.05.2019 - 14:23
![]() Francine wrote:
Francine wrote:
Je ne comprends pas comment un losange peut toujours être complet de part et d'autre du milieu du fait des augmentations en X2 et X3. Comment faut-il faire pour celà ? Merci de votre réponse. Cordialement
09.05.2019 - 11:32DROPS Design answered:
Bonjour Francine, quand les diagrammes X.1 à X.4 sont tricotés 1 fois en hauteur, reprenez tous les diagrammes dès le 1er rang: X.1 sur les 4 premières m, M.1A sur les 4 m suivantes, répétez M.1B jusqu'à ce qu'il reste 6 m avant la m centrale, tricotez M.1C, X.2, la maille centrale, puis tricotez l'autre côté du châle de la même façon en commençant par X.3 et en terminant par X.4 - les augmentations de chaque côté et au milieu se tricotent d'abord en jersey (= 8 premiers rangs de X.1 à X.4) puis en point fantaisie M.1 (= on a suffisamment de mailles pour 1 motif de M.1B entre M.1A et M.1C de chaque côté du châle. Bon tricot!
09.05.2019 - 13:58
![]() Christina wrote:
Christina wrote:
Danke vielmals!!!!
23.04.2019 - 13:05
|
||||||||||||||||||||||
Garden of Diamonds#gardenofdiamondsshawl |
||||||||||||||||||||||
 |
 |
|||||||||||||||||||||
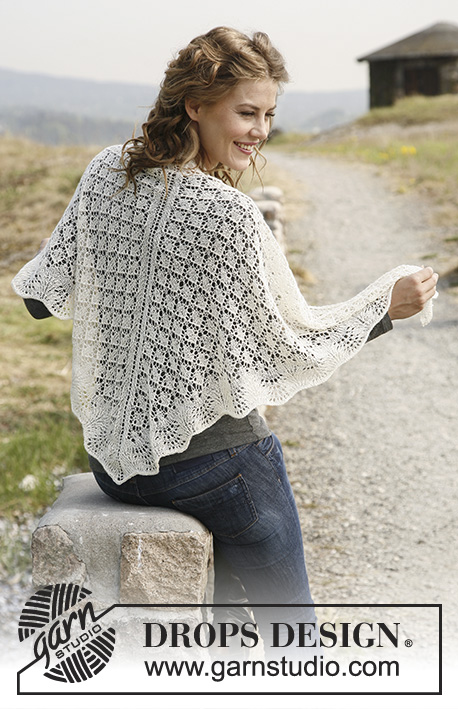
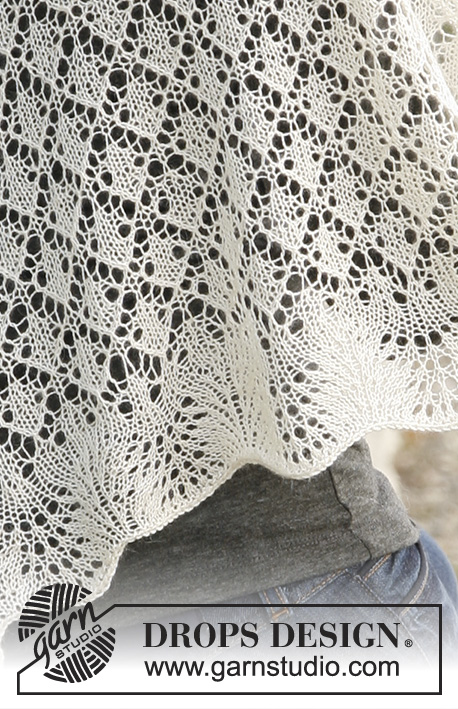
Knitted DROPS shawl with wave pattern in "Lace".
DROPS 131-2 |
||||||||||||||||||||||
|
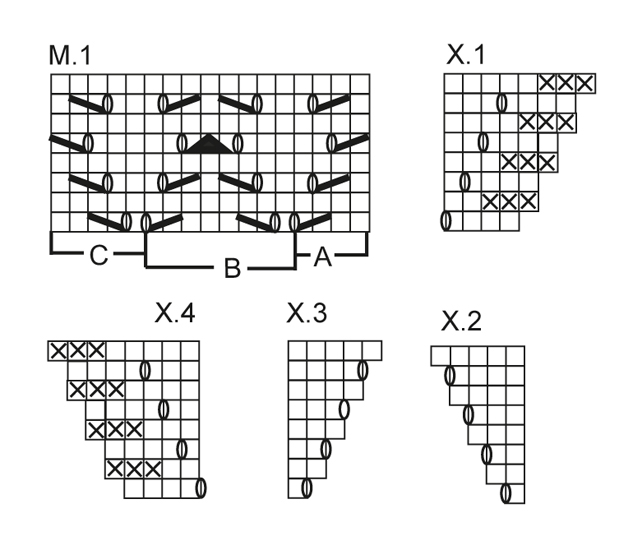
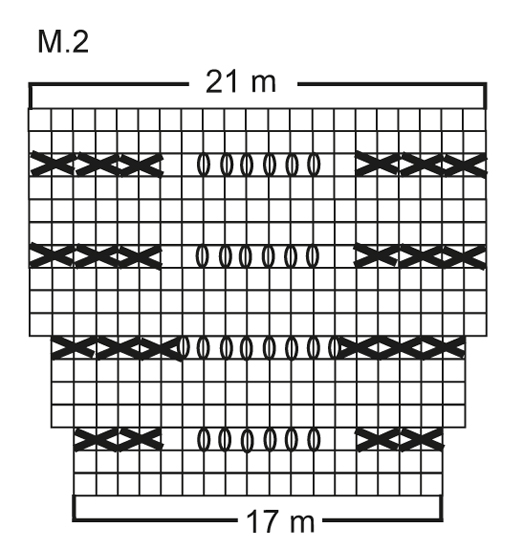
PATTERN: See diagrams X.1, X.2, X.3, X.4, M.1 and M.2. GARTER ST (back and forth on needle): K all rows. --------------------------------------------------------- SHAWL: Worked back and forth on circular needle to make room for all the sts. Cast on 3 sts on circular needle size 3.5 mm with Lace. Insert a marker in the 2nd st (mid st - marks mid back of shawl). Work 1 row as follows (= RS): K 1, 1 YO, K 1, 1 YO, K 1 = 5 sts. NOTE! On next row K YOs twisted, i.e. work in back loop of YOs instead of front, to avoid holes. Then K every row while at the same time inc 4 sts on every row from RS as follows: Work 2 sts in the second st and in the next to last st in each side and make 1 YO on each side of st with marker (still work YOs twisted). Continue like this until there are 29 sts on the needle. Then work as follows from RS: Diagram X.1, diagram M.1A (= 4 sts), diagram M.1C (= 5 sts) and diagram X.2, 1 st in stocking st (= mid st), diagram X.3, diagram M.1A (= 4 sts), diagram M.1C (= 5 sts) and diagram X.4. When the repetition has been worked 1 time vertically, there are 45 sts on needle. Continue to work as follows: Diagrams X.1, M.1A, then repeat M.1B (= 8 sts) until 6 sts remain before mid st(no of sts varies depending on which row in diagrams X.1-X.4 is being worked), over these last 6 sts work diagram M.1C and X.2, 1 st in stocking st (= mid st), work diagrams X.3, M.1A, repeat M.1B until 9 sts remain on row (no of sts varies depending on which row in diagrams X.1-X.4 is being worked), and work these in diagram M.1C and X.4. Continue like this until M.1 has been worked a total of 20 times vertically - the inc sts are worked gradually into diagram M.1. There are now 349 sts on needle, 174 sts on each side of mid st. Work 4 rows in stocking st while AT THE SAME TIME continuing with edge sts each side in garter st and inc on every row from RS as before = 357 sts, 178 sts on each side of mid st. Now work as follows from RS: 4 edge sts in GARTER ST - see explanation above - 1 YO, K 2, 10 times diagram M.2, K 2 before mid st, 1 YO, 1 st in stocking st (= mid st), 1 YO, K 2, 10 times diagram M.2, K 2, 1 YO, 4 edge sts in garter st. NOTE! The inc sts in the sides and mid back are worked in stocking st until diagram M.2 has been worked. When diagram M.2 has been worked 1 time vertically, K 1 row from WS. Loosely cast off with K sts with 2 threads. BLOCKING: Place the shawl in lukewarm water until it is soaking wet. Carefully squeeze the water out of the shawl - do not twist the shawl - then roll the shawl in a towel and squeeze to remove more water - the shawl will now only be moist. Place the shawl on a carpet or mattress - carefully stretch it out to size and fasten it with pins. Leave to dry. Repeat the process when the garment has been washed. |
||||||||||||||||||||||
Diagram explanations |
||||||||||||||||||||||
|
||||||||||||||||||||||
 |
||||||||||||||||||||||
 |
||||||||||||||||||||||
Have you finished this pattern?Tag your pictures with #dropspattern #gardenofdiamondsshawl or submit them to the #dropsfan gallery. Do you need help with this pattern?You'll find 11 tutorial videos, a Comments/Questions area and more by visiting the pattern on garnstudio.com. © 1982-2026 DROPS Design A/S. We reserve all rights. This document, including all its sub-sections, has copyrights. Read more about what you can do with our patterns at the bottom of each pattern on our site. |
||||||||||||||||||||||


With over 40 years in knitting and crochet design, DROPS Design offers one of the most extensive collections of free patterns on the internet - translated to 17 languages. As of today we count 324 catalogues and 12290 patterns translated into English (UK/cm). 12290
We work hard to bring you the best knitting and crochet have to offer, inspiration and advice as well as great quality yarns at incredible prices! Would you like to use our patterns for other than personal use? You can read what you are allowed to do in the Copyright text at the bottom of all our patterns. Happy crafting!
Post a comment to pattern DROPS 131-2
We would love to hear what you have to say about this pattern!
If you want to leave a question, please make sure you select the correct category in the form below, to speed up the answering process. Required fields are marked *.