
Popular categories
Looking for a yarn?


Comments / Questions (131)
Maria Jose wrote:
(5 p.a. a cada lado = la cenefa, trabajar 1 p.a. en cada p.a. - no incluidos en el diagrama). ? no entiendo que es la cenefa... en caso de ser el medio del hombro tomo 5 puntos altos a cada lado es asi?
17.07.2017 - 15:56DROPS Design answered:
Hola Maria Jose. La cenefa son los 5 primeros y los 5 últimos puntos de la fila, es decir, 5 puntos a cada lado de la labor hacia el centro del delantero.
27.07.2017 - 12:40CAROL VAN BEEK wrote:
Is it possible to do this pattern in a Yarn Group B? Would doing a larger size make this possible? Thanks.
12.07.2017 - 01:49DROPS Design answered:
Hi Carol, You can use yarn from group B, but then you need to adjust the number of stitches throughout the pattern so you get the right crochet tension. Either that or follow the pattern for a different size when you have worked out the tension you need. A bit of a job but possible if that is what you want to do. Kind regards, Deirdre
12.07.2017 - 06:17
![]() Ella wrote:
Ella wrote:
Laat maar, ik ben er zelf uitgekomen.
01.12.2016 - 20:40
![]() Ella wrote:
Ella wrote:
Ik bedoel het teken in telpatroon M2, twee schuine strepen met streepjes erdoorheen , die elk een andere kant op wijzen en twee dakjes er boven.
01.12.2016 - 16:08
![]() Ella wrote:
Ella wrote:
Er staan bij het patroon 4 tekens, het teken in M 2 is anders dan het onderste teken wat in M1 gebruikt wordt. Kunt u M 2 voor mij uitschrijven misschien, ik snap er echt niets van.
01.12.2016 - 15:20DROPS Design answered:
Hoi Ella. En welk teken is dat precies? Ik zie alle tekens terug bij de symbolen. Er is een stokje in het stokje, een stokje om de l-lus, een lossen (l) of 2 stk in hetzelfde stk
01.12.2016 - 15:54
![]() Ella wrote:
Ella wrote:
Bij de tekenverklaring staat niet aangegeven hoe ik patroon M2 moet haken. Welke steek is dit?
01.12.2016 - 09:58DROPS Design answered:
Hoi Ella. Jawel. Alle symbolen staan vermeld bij de symbolen onderaan het patroon - net boven de telpatronen.
01.12.2016 - 13:41
![]() Emily Hunt wrote:
Emily Hunt wrote:
HELP!!! Where do I find the number of balls for this (and all the other Drops patterns). Somewhere on this website, I found a statement saying "click on each picture of the design to see how many skeins of yarn is required for each of them". However, when I do that, I get a bigger picture and no number of balls!! I know I must be doing something wrong, but I have clicked everywhere on the page and nothing helps me!
19.10.2016 - 15:20DROPS Design answered:
Dear Mrs Hunt, you will find required yarn and needle under tab "Materials" under picture, ie 550-650-700-750-800-900 g Nepal for this jacket depending on the size. 1 ball Nepal = 50 g, so that you will need 11 balls in 1st size, 13 balls in 2nd size, and so on. Happy crocheting!
19.10.2016 - 16:31
![]() Ana wrote:
Ana wrote:
Hola, estoy empezando ha hacer esta chaqueta y tengo un montón de dudas. He comprado la lana Cotton Merino y estoy utilizando una aguja de 3mm, por lo que no se corresponden el numero de puntos y tengo dificultades para encontrar la equivalencia, ¿me podéis aconsejar?. He empezado por el cuerpo, y no sé si el diagrama M1 se corresponde con el dibujo de arriba o el de abajo, de ser el de abajo, me podéis explicar como hacerlo? Y por último, no viene el patrón del canesú. Muchas gracias.
27.09.2016 - 22:18DROPS Design answered:
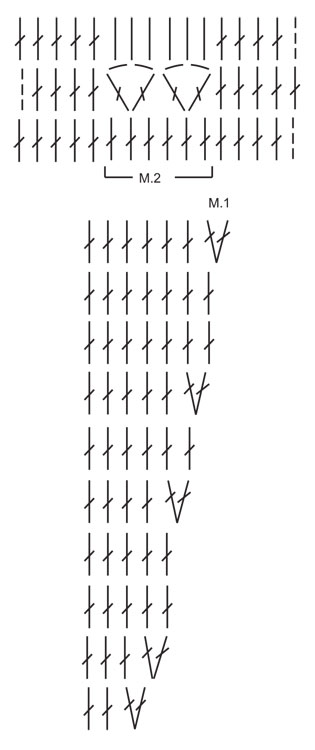
Hola Ana. Esta chaqueta se trabaja de arriba abajo. En el diagrama M.1 ( el dibujo debajo del patrón) se explica como trabajar la parte de canesú (el diagrama se lee de abajo arriba, de derecha a izquierda las filas impar y de izquierda a derecha las filas par; en el diagrama se muestra una repetición completa, que se repíte varias vcs a lo largo de la fila).
07.10.2016 - 20:04Maria wrote:
Hello this is my first ever diagram so I'm really stuck on m2, can you please explain if I start m2 at the bottom right then line two I do left to right and then right to left again? Also could You please explain the exact stitches for each Line on m2 as I make them a lot more than 6 on each line. I use US terms . Thank you so much in advance Maria
10.01.2016 - 01:23DROPS Design answered:
Dear Maria, M.2 is worked over 6 sts and 3 rows: Row1: 1 dc in each dc, Row2: *skip 1 dc, (1dc, 2ch, 1 dc) in next dc, skip 2 dc, (1dc,2ch, 1 dc) in next dc, skip 1 dc* repeat across. Row3: 3 dc in each 2-ch-spaces. Happy crocheting!
11.01.2016 - 10:31
![]() Elma wrote:
Elma wrote:
Ik las eerst het telpatroon M1 van boven naar beneden, maar klopt het dat ik het van onder naar boven moet lezen? Dus dat ik moet beginnen met 2 stokjes in ieder een stokje en dan 2 stokjes in 1 stokje (los van de voorbies)? Persoonlijk vind ik het wel verwarrend wanneer het inderdaad van onder naar boven gelezen moet worden.
15.12.2015 - 22:02DROPS Design answered:
Hoi Elma. Alle onze telpatronen worden van beneden naar boven gelezen. Lees hier meer over hoe je onze telpatronen moet breien/haken.
16.12.2015 - 10:04
|
|||||||||||||
A Kiss For Midwinter#akissformidwintercardigan |
|||||||||||||
 |
 |
||||||||||||
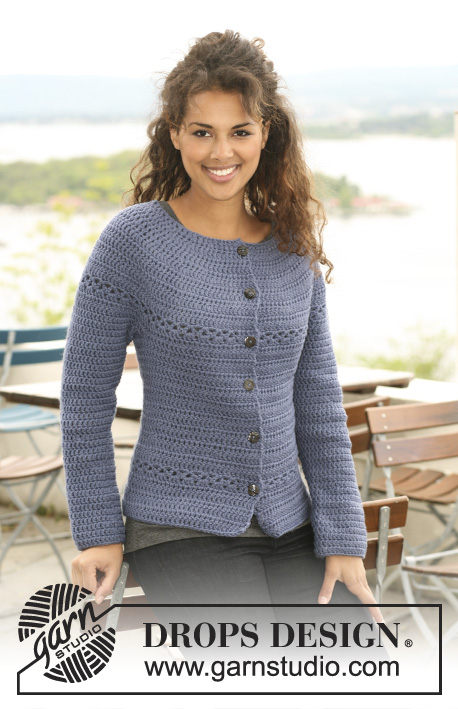
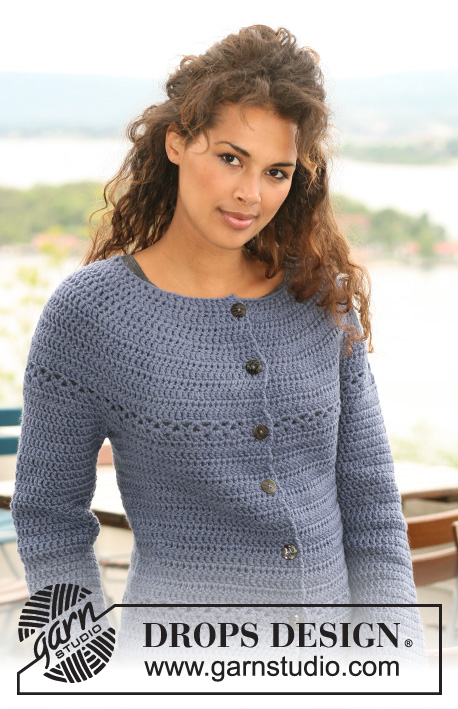
Crochet DROPS jacket in ”Nepal”. Size XS to XXXL.
DROPS 121-33 |
|||||||||||||
|
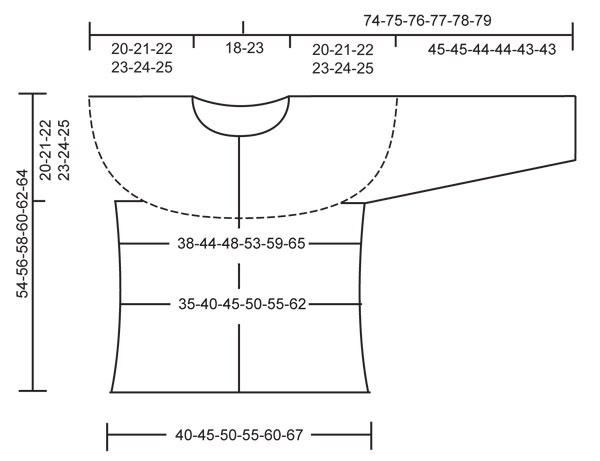
CROCHET INFO: Replace first tr on each round/row with 3 ch. Finish each round with 1 sl st in 3rd ch from beg of round/beg of previous row. PATTERN: See diagram M.1 and M.2. Diagram shows the pattern from RS. DECREASING TIP: Work 1 tr, but wait with last pull-through (= 2 sts on hook), work next tr, but when doing the last pull-through pull thread through all sts on hook – 1 dec tr. ---------------------------------------------------------- BODY PIECE: Worked from top down, back and forth from mid front. Work 91-99-107-115-123-131 ch (includes 3 ch to turn with) with crochet hook size 4.5 mm and Nepal. Work next row as follows: 1 tr in 4th ch, * skip 1 ch, 1 tr in each of the next 3 ch *, repeat from *-*, skip 1 ch and finish with 1 tr in the last 2 ch = 67-73-79-85-91-97 tr – see CROCHET INFO. Now work 10 rows acc to M.1 (5 tr each side = front band, work 1 tr in each tr – not included in diagram). After M.1 there are 162-178-194-210-226-242 tr on row. Continue with 1 tr in each tr. When piece measures 16-17-18-19-20-21 cm continue as follows: 5 tr on front band, 1-0-2-1-0-2 tr, repeat M.2 until 6-5-7-6-5-7 tr remain, finish with 1-0-2-1-0-2 tr and 5 tr on front band. Continue with 1 tr in each tr until piece measures 20-21-22-23-24-25 cm. Work next row as follows: 24-27-30-33-36-40 tr (front piece), 8 ch (under sleeve/armhole), skip 38-40-42-44-46-46 tr from previous round (to be used later for sleeve), 38-44-50-56-62-70 tr (back piece), 8 ch (under sleeve/armhole), skip 38-40-42-44-46-46 tr from previous row (to be used later for sleeve) and 24-27-30-33-36-40 tr (front piece). Continue with 1 tr in each tr/ch = 102-114-126-138-150-166 tr. Insert a marker in the middle of the 8 ch under sleeve each side (back piece = 46-52-58-64-70-78 tr, front piece = 28-31-34-37-40-44 tr). Continue with 1 tr in each tr. When piece measures 34-36-38-40-42-44 cm dec 8 sts evenly (do not dec on front band) - see DECREASING TIP = 94-106-118-130-142-158 tr. When piece measures 40-42-44-46-48-50 cm inc 12-12-12-12-12-14 tr evenly (do not inc on front band) = 106-118-130-142-154-172 tr. When piece measures 43-45-47-49-51-53 cm continue as follows: 5 tr on front band, repeat M.2, finish with 5 tr on front band. Continue with 1 tr in each tr until piece measures 54-56-58-60-62-64 cm, cut and fasten thread. SLEEVE: Worked from top down. Beg mid under sleeve as follows: 1 dc in the 5th of the 8 ch under sleeve/on armhole. Work 3 ch (= 1 tr) and continue with 1 tr in each ch. NOTE: Before continuing over armhole work 1 tr in transition (to avoid a hole). Continue with 1 tr in each tr over armhole, work 1 tr in transition and work 1 tr in each of the remaining ch under sleeve = 48-50-52-54-56-56 tr. Insert a marker mid under sleeve. NOW MEASURE PIECE FROM HERE. Work 1 tr in each tr. When piece measures 4 cm dec 1 tr each side of marker, see DECREASING TIP, and repeat the dec on every 4.5-4.5-4-4-4-4 cm, a total of 8-8-9-9-9-9 times = 32-34-34-36-38-38 tr. Cut and fasten thread when sleeve measures 45-45-44-44-43-43 cm – NOTE – less for the larger sizes because of wider neck and shoulder. ASSEMBLY: Sew buttons on left front piece – place the top one 1 cm from neckline, then the remaining with approx 8 cm between each. Use gap between 2 tr on front band as buttonhole. |
|||||||||||||
Diagram explanations |
|||||||||||||
|
|||||||||||||
 |
|||||||||||||
 |
|||||||||||||
Have you finished this pattern?Tag your pictures with #dropspattern #akissformidwintercardigan or submit them to the #dropsfan gallery. Do you need help with this pattern?You'll find 7 tutorial videos, a Comments/Questions area and more by visiting the pattern on garnstudio.com. © 1982-2026 DROPS Design A/S. We reserve all rights. This document, including all its sub-sections, has copyrights. Read more about what you can do with our patterns at the bottom of each pattern on our site. |
|||||||||||||


With over 40 years in knitting and crochet design, DROPS Design offers one of the most extensive collections of free patterns on the internet - translated to 17 languages. As of today we count 324 catalogues and 12290 patterns translated into English (UK/cm). 12290
We work hard to bring you the best knitting and crochet have to offer, inspiration and advice as well as great quality yarns at incredible prices! Would you like to use our patterns for other than personal use? You can read what you are allowed to do in the Copyright text at the bottom of all our patterns. Happy crafting!
Post a comment to pattern DROPS 121-33
We would love to hear what you have to say about this pattern!
If you want to leave a question, please make sure you select the correct category in the form below, to speed up the answering process. Required fields are marked *.