
Popular categories
Looking for a yarn?


Comments / Questions (131)
![]() DESDOUITS wrote:
DESDOUITS wrote:
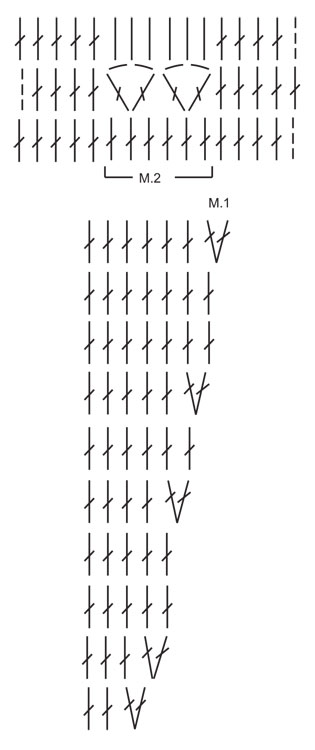
Bonjour, Pouvez vous me préciser si le trait hachuré dans M2 signifie que l'on saute une bride du rang précédent et d'autre part, je ne comprends pas le milieu du deuxième rang : que signifient les deux traits au dessus des deux brides dans la bride du rang d'avant ?) Merci d'avance.
01.01.2025 - 11:11DROPS Design answered:
Bonjour Mme Desdouits, la 1ère maille de M.2 (en bas à droite du diagramme) correspond à 3 mailles en l'air pour remplacer la 1ère maille du diagramme. Les 2 tirets entre les 2 brides de M.2 correspondent à 2 mailles en l'air = on crochète 1 bride, 2 mailles en l'air, 1 bride dans la même maille. Bon crochet!
02.01.2025 - 15:42
![]() ANGELA wrote:
ANGELA wrote:
Cuando se dice "trabajar 10 filas según M.1 (5 puntos altos a cada lado= la cenefa), qué quiere decir?. Otra pregunta es si M.1 se repite a lo largo de toda la labor o sólo se hace en el inicio y el final con 5 puntos altos a cada lado y el resto se rellena con puntos altos.
07.10.2022 - 14:42DROPS Design answered:
Hola ANGELA, tienes que trabajar al principio y final de la fila 5 puntos altos (es decir, 5 puntos altos a cada lado). En el resto de la fila, trabajas repeticiones de M.1. Por ejemplo, para la talla S, trabajas 5 puntos altos para la cenefa, repites M.1 19 veces y trabajas 5 puntos altos para la cenefa.
09.10.2022 - 19:10
![]() Ángela wrote:
Ángela wrote:
No puedo ver los diagramas. Podrían volver a cargarlos?. Gracias
04.09.2022 - 11:16
![]() Caroline wrote:
Caroline wrote:
Can you please clarify the instructions after M1 is completed and the piece sized to that being constructed? The string of 1-0-2-1-0-2... are the zeros skipped stitches? Also, is M2 read from bottom up, then right to left, left to right, right to left? Please clarify. Thank you.
13.02.2021 - 12:25DROPS Design answered:
Dear Caroline, in the string of numbers zero (0) means that in that given size, you do not have to add any stitches after finishing the diagram's pattern. And yes, since this piece is done back-and forth, the diagrams show every row from the RS, thus should be read from right to left, left to right, right to left etc. Happy Crafting!
13.02.2021 - 21:19
![]() Caroline wrote:
Caroline wrote:
Body piece: instructions after M.1 when piece measures “x by y” It states “continue as follows: 5 dc on front band, 1-0-2-0-1-0-2 dc. Does this mean you work these stitches once 1dc, skip 1 dc, 2dc, skip 1dc, 1dc, skip 1dc then 2dc followed by M2 read right to left across the row finishing the row as it was started? I’m lost from this point to next piece measurement instructions. Please help.
12.02.2021 - 12:05DROPS Design answered:
Dear Caroline, you should work as follows: 5 dc on front band, then depending on the size you are working, now crochet either 1 dc in first and 5th size, or 0 dc in 2nd, 4th and 5th size or 2 dc in 3rd and 6th size, then crochet M.2 (read first row from the right towards the left) until 6-5-7-6-5-7 sts remain before the end of row and end with 1 dc in each of the remaining stitches (including the 5 front band sts). Happy crocheting!
12.02.2021 - 13:53
![]() Giraja wrote:
Giraja wrote:
In het telpatroon 121-33 staat aangegeven l = 1 stokje om de l-lus. Ik heb in de instructiefilms geen voorbeeld kunnen vinden. Zou u mij kunnen uitleggen wat hiermee bedoeld wordt en kan de voorbies ook achteraf gehaakt worden? Alvast hartelijk dank voor uw antwoord.
09.02.2021 - 18:27DROPS Design answered:
Dag Giraja,
Met 1 stokje om de l-lus wordt bedoeld jdat je een stokje om de lossenlus haakt, dus je steekt de haaknaald niet in de steek maar om de steek heen, in dit geval om de losse(n) van de vorige toer.
Wat de bies betreft, er is niet een aparte bies in dit patroon, de voorpanden lopen gewoon door tot midden voor en de knopen worden vastgeknoopt in de steken.
21.05.2021 - 14:17
![]() Hillevi Rystedt wrote:
Hillevi Rystedt wrote:
För mig verkar det behövas mycket större virknål. 12st och 7 varv med 4,5 virknål blir ca 7cm brett och 8 cm högt. Räcker det att använda en virknål 5.0 eller behövs ännu större?
27.06.2020 - 09:10DROPS Design answered:
Hei Hillevi. Prøv med heklenål 5,0 og så om du da får den oppgitte heklefastheten. Og husk at nål nr er kun veiledende. Får du for mange masker på 10 cm, bytt til tykkere heklenål. Får du for få masker på 10 cm, bytt til tynnere heklenål. God Fornøyelse!
29.06.2020 - 12:02
![]() Hanaa Zahran wrote:
Hanaa Zahran wrote:
Hi I am Hanaa fm Egypt, I working this beautiful pattern size L, can you help me when Dec 8 sts this part make me confusing where to start decreasing. Thanks for your attention. Hanaa
23.03.2020 - 15:37DROPS Design answered:
Dear Mrs Zahran, you will find how to decrease evenly here. Happy crocheting!
23.03.2020 - 16:45
![]() Bonté wrote:
Bonté wrote:
Comment avoir les explications des modèles de gilets et de pulls tricotés en aiguilles simples ? Je ne sais pas tricoter en aiguilles circulaires et, je trouve les explications de vos modèles difficiles à comprendre. C'est dommage car je trouve ces modèles très jolis et bien travaillés.
06.11.2019 - 11:59DROPS Design answered:
Bonjour Mme Bonté et merci; vous trouverez ici quelques explications pour adapter un modèle sur aiguilles droites; vous trouverez sous chaque modèle une liste de vidéos relatives au modèle, mais également une FAQ pour vous aider. Bon tricot!
06.11.2019 - 12:20
![]() Helle Hansen wrote:
Helle Hansen wrote:
Hej, - er kan I anbefale garnalternativer til denne, vil gerne lave den i blandingsprodukt á la bomuld/uld (50/50), og er I tvivl om hvilken af disse der passer med hæklefastheden. De garn jeg har, kigget ser ud til at have længere løbelængde end denne Nepal, og dermed anden hæklefasthed. Håber I har tid til at hjælpe så jeg kan lave denne lækre sag :-)
06.05.2019 - 14:39DROPS Design answered:
Hej Helle, Denne opskrift kan også hækles i DROPS Paris. Hvis du hellere vi hækle en jakke i DROPS Cotton Light, så finder du opskrifter som passer til her hæklet - jakker - dame - garngruppe B
07.05.2019 - 09:31
|
|||||||||||||
A Kiss For Midwinter#akissformidwintercardigan |
|||||||||||||
 |
 |
||||||||||||
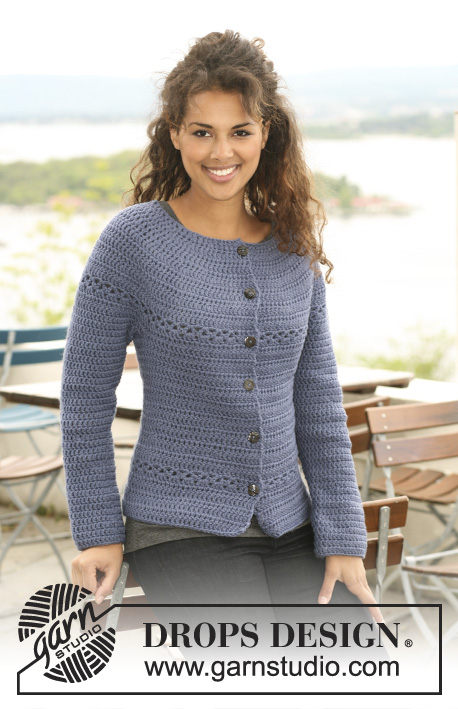
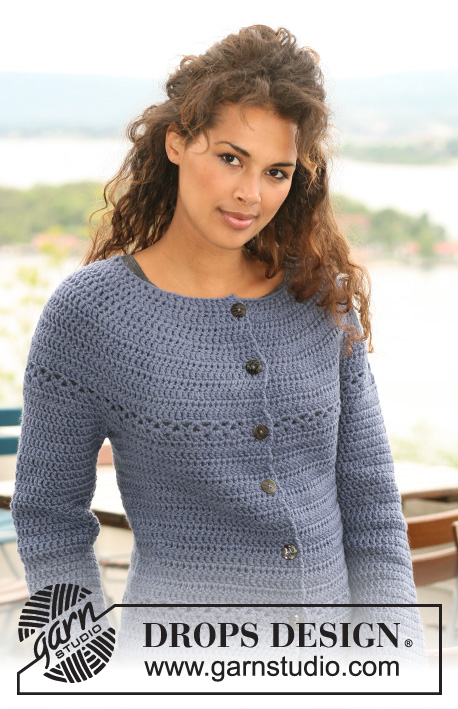
Crochet DROPS jacket in ”Nepal”. Size XS to XXXL.
DROPS 121-33 |
|||||||||||||
|
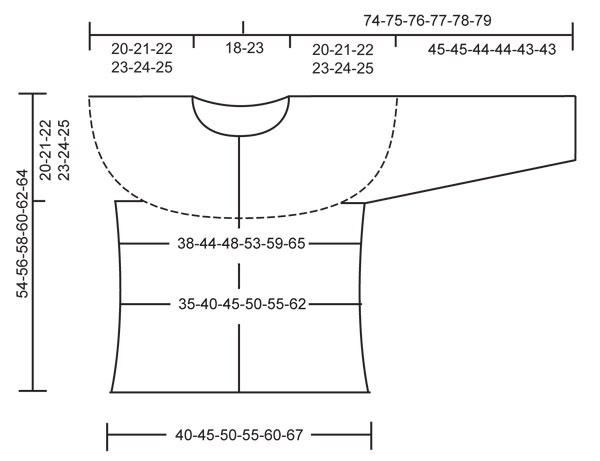
CROCHET INFO: Replace first tr on each round/row with 3 ch. Finish each round with 1 sl st in 3rd ch from beg of round/beg of previous row. PATTERN: See diagram M.1 and M.2. Diagram shows the pattern from RS. DECREASING TIP: Work 1 tr, but wait with last pull-through (= 2 sts on hook), work next tr, but when doing the last pull-through pull thread through all sts on hook – 1 dec tr. ---------------------------------------------------------- BODY PIECE: Worked from top down, back and forth from mid front. Work 91-99-107-115-123-131 ch (includes 3 ch to turn with) with crochet hook size 4.5 mm and Nepal. Work next row as follows: 1 tr in 4th ch, * skip 1 ch, 1 tr in each of the next 3 ch *, repeat from *-*, skip 1 ch and finish with 1 tr in the last 2 ch = 67-73-79-85-91-97 tr – see CROCHET INFO. Now work 10 rows acc to M.1 (5 tr each side = front band, work 1 tr in each tr – not included in diagram). After M.1 there are 162-178-194-210-226-242 tr on row. Continue with 1 tr in each tr. When piece measures 16-17-18-19-20-21 cm continue as follows: 5 tr on front band, 1-0-2-1-0-2 tr, repeat M.2 until 6-5-7-6-5-7 tr remain, finish with 1-0-2-1-0-2 tr and 5 tr on front band. Continue with 1 tr in each tr until piece measures 20-21-22-23-24-25 cm. Work next row as follows: 24-27-30-33-36-40 tr (front piece), 8 ch (under sleeve/armhole), skip 38-40-42-44-46-46 tr from previous round (to be used later for sleeve), 38-44-50-56-62-70 tr (back piece), 8 ch (under sleeve/armhole), skip 38-40-42-44-46-46 tr from previous row (to be used later for sleeve) and 24-27-30-33-36-40 tr (front piece). Continue with 1 tr in each tr/ch = 102-114-126-138-150-166 tr. Insert a marker in the middle of the 8 ch under sleeve each side (back piece = 46-52-58-64-70-78 tr, front piece = 28-31-34-37-40-44 tr). Continue with 1 tr in each tr. When piece measures 34-36-38-40-42-44 cm dec 8 sts evenly (do not dec on front band) - see DECREASING TIP = 94-106-118-130-142-158 tr. When piece measures 40-42-44-46-48-50 cm inc 12-12-12-12-12-14 tr evenly (do not inc on front band) = 106-118-130-142-154-172 tr. When piece measures 43-45-47-49-51-53 cm continue as follows: 5 tr on front band, repeat M.2, finish with 5 tr on front band. Continue with 1 tr in each tr until piece measures 54-56-58-60-62-64 cm, cut and fasten thread. SLEEVE: Worked from top down. Beg mid under sleeve as follows: 1 dc in the 5th of the 8 ch under sleeve/on armhole. Work 3 ch (= 1 tr) and continue with 1 tr in each ch. NOTE: Before continuing over armhole work 1 tr in transition (to avoid a hole). Continue with 1 tr in each tr over armhole, work 1 tr in transition and work 1 tr in each of the remaining ch under sleeve = 48-50-52-54-56-56 tr. Insert a marker mid under sleeve. NOW MEASURE PIECE FROM HERE. Work 1 tr in each tr. When piece measures 4 cm dec 1 tr each side of marker, see DECREASING TIP, and repeat the dec on every 4.5-4.5-4-4-4-4 cm, a total of 8-8-9-9-9-9 times = 32-34-34-36-38-38 tr. Cut and fasten thread when sleeve measures 45-45-44-44-43-43 cm – NOTE – less for the larger sizes because of wider neck and shoulder. ASSEMBLY: Sew buttons on left front piece – place the top one 1 cm from neckline, then the remaining with approx 8 cm between each. Use gap between 2 tr on front band as buttonhole. |
|||||||||||||
Diagram explanations |
|||||||||||||
|
|||||||||||||
|
|||||||||||||
|
|||||||||||||
Have you finished this pattern?Tag your pictures with #dropspattern #akissformidwintercardigan or submit them to the #dropsfan gallery. Do you need help with this pattern?You'll find 7 tutorial videos, a Comments/Questions area and more by visiting the pattern on garnstudio.com. © 1982-2025 DROPS Design A/S. We reserve all rights. This document, including all its sub-sections, has copyrights. Read more about what you can do with our patterns at the bottom of each pattern on our site. |
|||||||||||||


With over 40 years in knitting and crochet design, DROPS Design offers one of the most extensive collections of free patterns on the internet - translated to 17 languages. As of today we count 314 catalogues and 11822 patterns translated into English (UK/cm).
We work hard to bring you the best knitting and crochet have to offer, inspiration and advice as well as great quality yarns at incredible prices! Would you like to use our patterns for other than personal use? You can read what you are allowed to do in the Copyright text at the bottom of all our patterns. Happy crafting!
Post a comment to pattern DROPS 121-33
We would love to hear what you have to say about this pattern!
If you want to leave a question, please make sure you select the correct category in the form below, to speed up the answering process. Required fields are marked *.